|
Looking at that picture again, I agree with Keith that it looks more like Solitude. The Kokomo tank was closer to the side of the valley.
Cliff Mestel (Trout Creek Engineering/Classic Miniatures) has been planning on coming out with an HO kit for the C&S depot, which I've sort of been waiting on. It's several years late at this point, though, so if it doesn't happen by the time I get there (probably in the next year or so) I'll draw up plans of my own. Speaking of which, I should post some progress pictures of Jefferson.... |
|
This post was updated on .
Jim's confusion possibly stems from Mal Ferrell's mis-captioning of a Richard B. Jackson photo of the last train from Leadville at the Solitude Tank, on pg146 of C&Sng, which he described as being the Kokomo Tank.
Jim clearly has it correct here http://c-sng-discussion-forum.41377.n7.nabble.com/Ten-Mile-Stations-of-the-D-RG-tp6164p6278.html EDIT: Mal's error may have been on the part of Richard Jackson mislabeling his photo since the same picture was previously used in CRRA #12 The South Park Line, pg229 also captioned as the Kokomo Tank.
UpSideDownC
in New Zealand |
|
In reply to this post by Chris Walker
Chris--how do you keep all this stuff straight?!? Even among the book references and mis-references?
I spied the photo of the tank Jim posted, but figured it was the D&RGW tank. This looks to be the large tank with a conical roof. I suppose by abandonment it had a flat roof or a board and batten roof? I happen to have two Crystal River tanks, and I guess these will form the basis of my tanks at Kokomo and Solitude. Kokomo is going to get crowded with a section car shed too.
Keith Hayes
Leadville in Sn3 |
|
In reply to this post by Jeff Young
Jeff! You are alive! YES, you are overdue for an update.
I may have to add some 3d parts for a Kokomo build to my to-do list after I finish Mr. Courtney's request for some Platte Canon freight doors and window parts. I need to check, but if I size the muntins right, they will print in HO too. Who needs a stinkin kit when you have some Evergreen novelty siding and Wild West Shingles?
Oh...and a nice set of plans to work from. ![]() ![]()
Keith Hayes
Leadville in Sn3 |
|
We’ll also need some hexagonal shingles for the gable ends, but Builders in Scale’s octagonal ones are probably close enough:
Cheers, Jeff.
|
|
In reply to this post by Jeff Young
Cliff has had some health issues in the recent past
|
|
In reply to this post by Chris Walker
Yes, Chris, the photo that I posted of the "Kokomo" tank, is in retrospect the "Solitude" tank down grade. Per Mac Poor, they were both 50,000 gal tanks, and I suspect both had conical roofs. Can't prove that of course, as your correction means that I know of no photo of the Kokomo tank taken in the 20th century.
This is a perfect example of a rail-fan photographer mis-identifying the location of his own photo, and the error perpetuated for over 75 years, in multiple publications. Keith, Chris Lane published 1/4" scale plans of the Kokomo depot (in color, no less) in an article that he and Rick Steele collaborated on. It was published in the 1st quarter issue of Colorado Narrow Gauge Quarterly, 2008. As the beautiful drawings are copyrighted by Mr. Lane, I don't think it appropriate to scan and post same here. If you can't find a copy of that magazine issue on Amazon, I'd be happy to scan and send you a copy, if you'd like. Once you have a set of drawings, are you going to build a model of the planned model of the Kokomo depot, to test on the "Bauhaus Helix"?
Jim Courtney
Poulsbo, WA |
|
This post was updated on .
This wonderful thread on Kokomo has gotten me inspired to build my first C&S building- the Kokomo depot. I love the design, the building itself a tiny version of typical C&S features, but with the fascinating hipped roof with the gabled center roof shorter than the building. After I failed to find the Chris Lane article and plans, Jim Courtney graciously sent me a copy and I've started on my model. In comparing the plans to the photos of the real thing posted near the beginning of this thread, I noticed some discrepancies in the roof geometry compared with Mr. Lane's plans. Here are a couple of photos illustrating what I found. All the parts are just scotch-taped together to test the configurations, I'm a long way from putting it together for real.
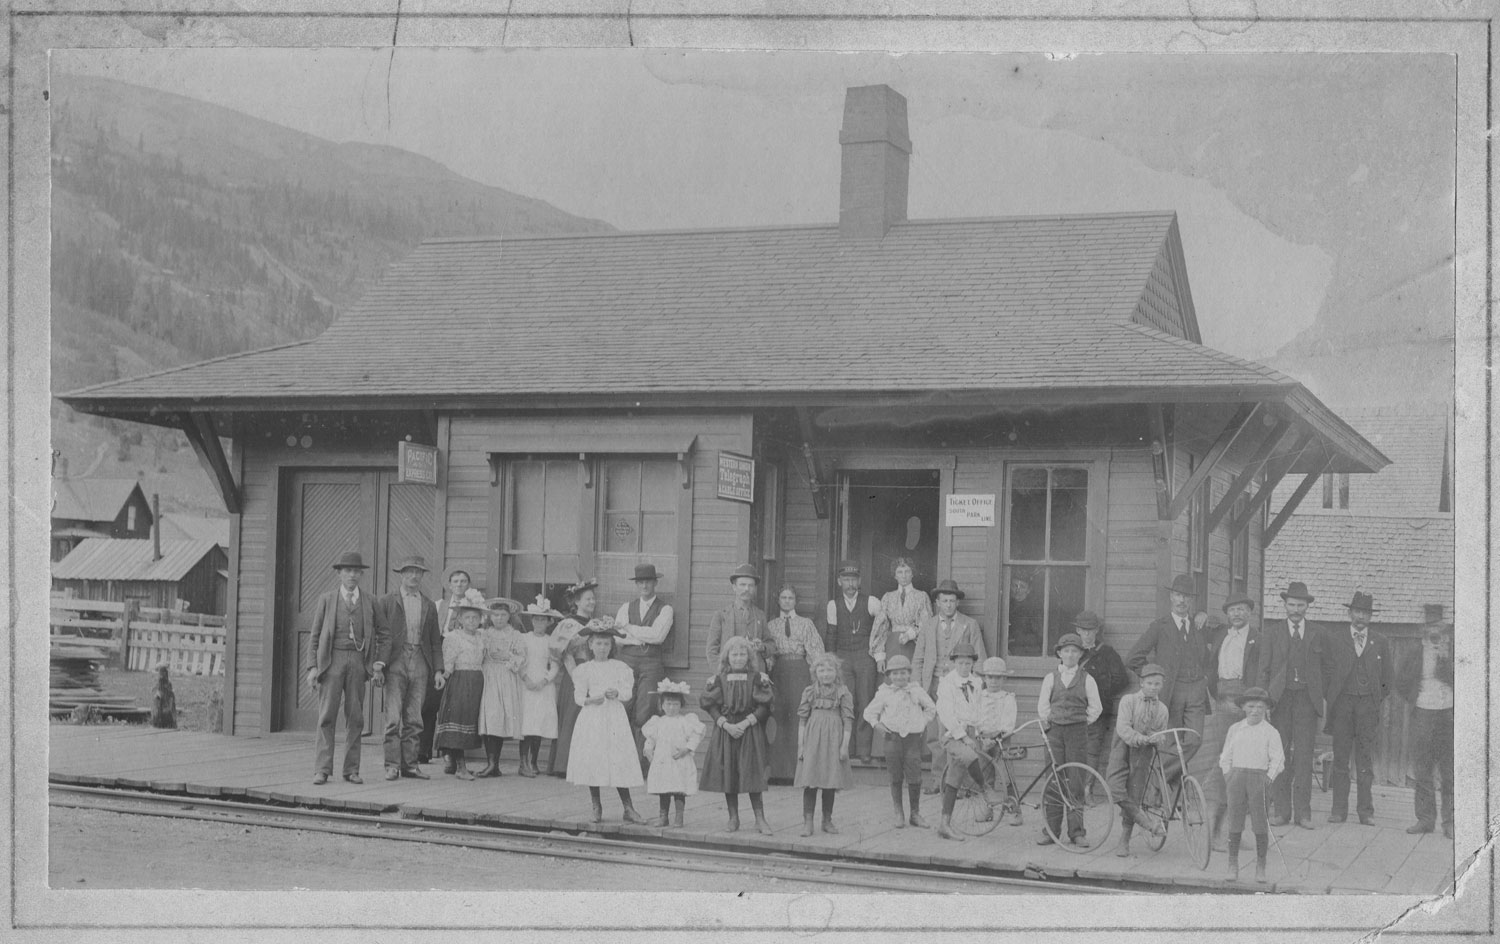
For reference, here's the wonderful photo that Doug Heitcamp posted at the beginning of this thread (thanks!!!): ![]() 
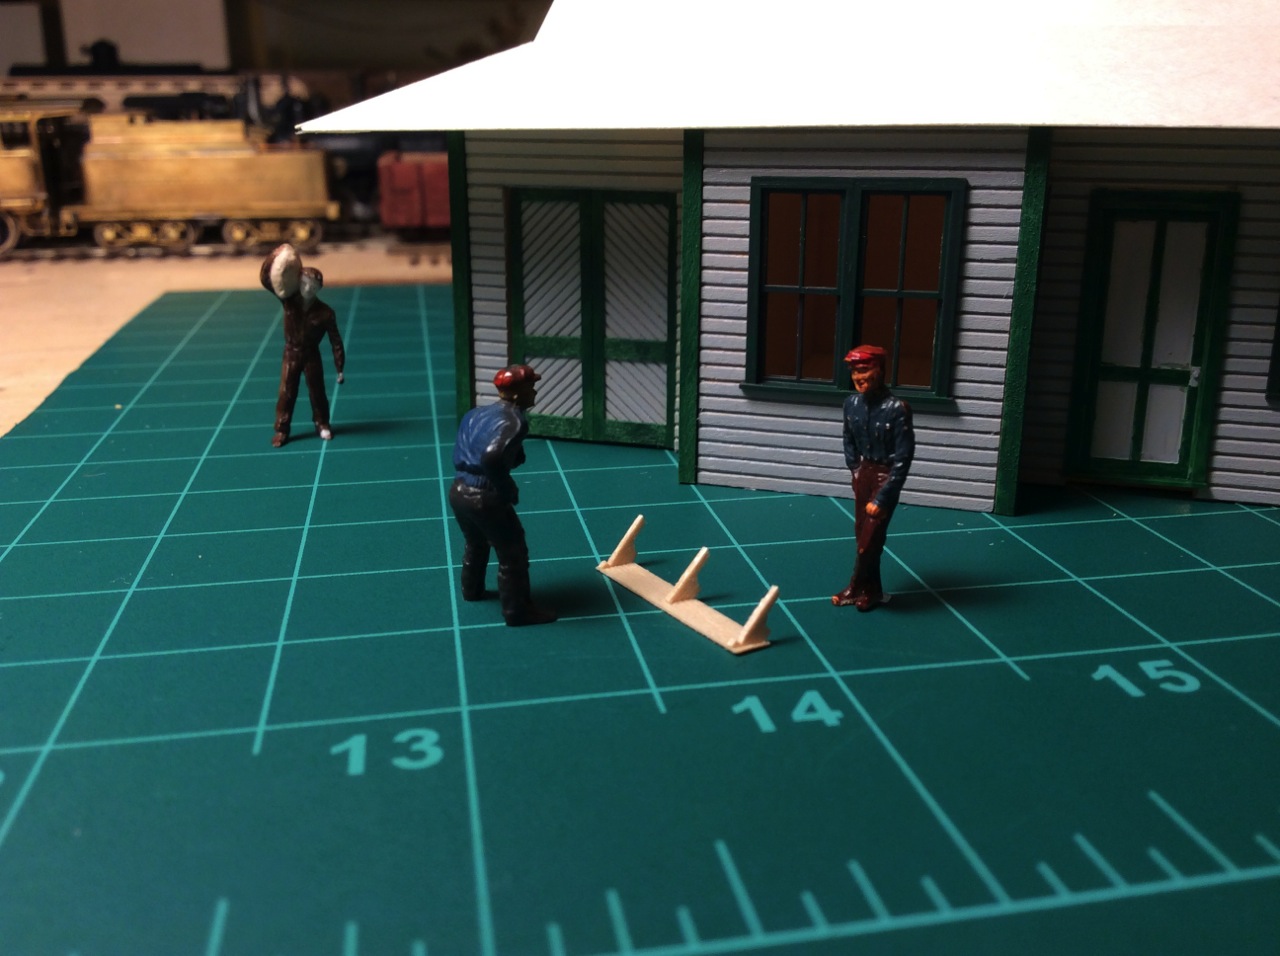
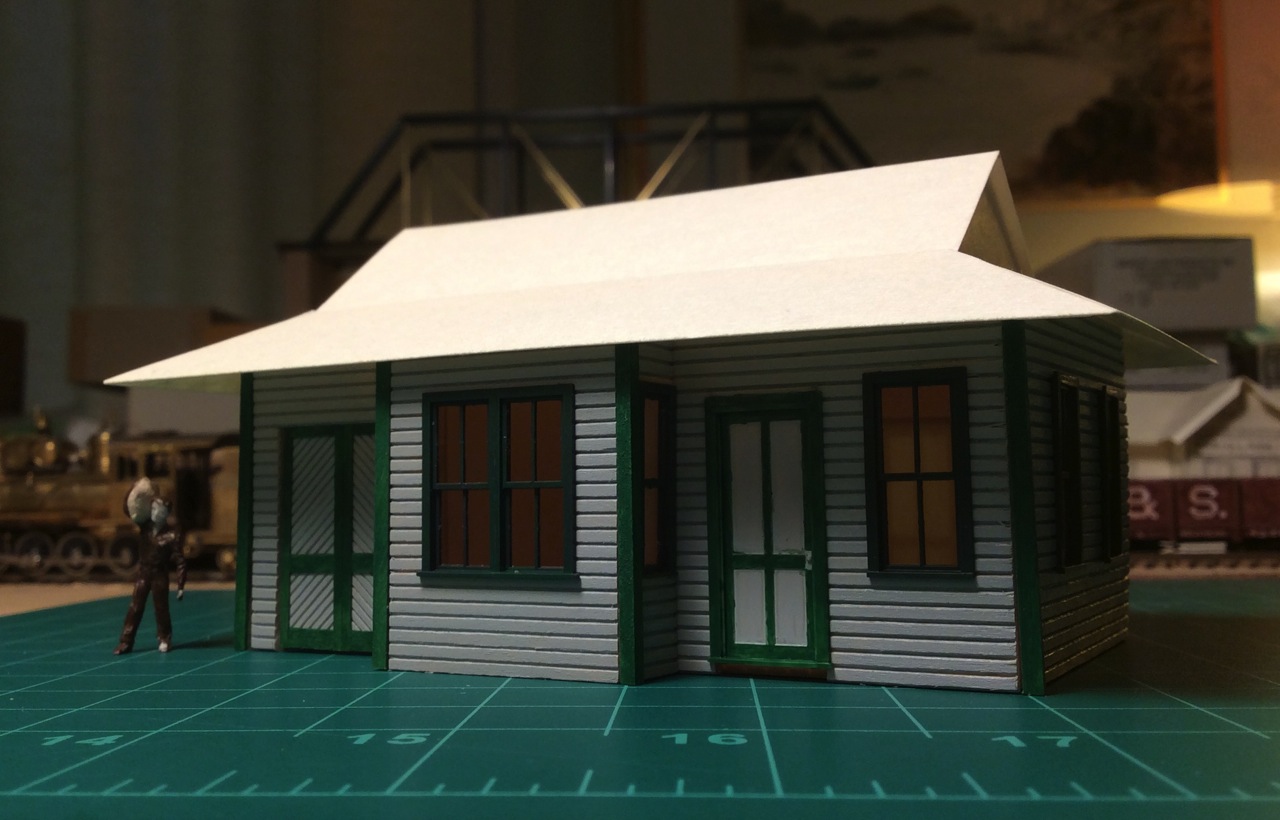
Now here are two photos of the model taken from nearly the same perspective. First, the model with a roof made to the dimensions in the plans (roof is just a cardstock mockup, but accurately cut): ![]() If you compare carefully you see that the gabled main roof ends of the model are inset further from the ends than the real building, in other words the roof ridge is too short, and also the pitch of the model's surrounding roof hip is too flat. 
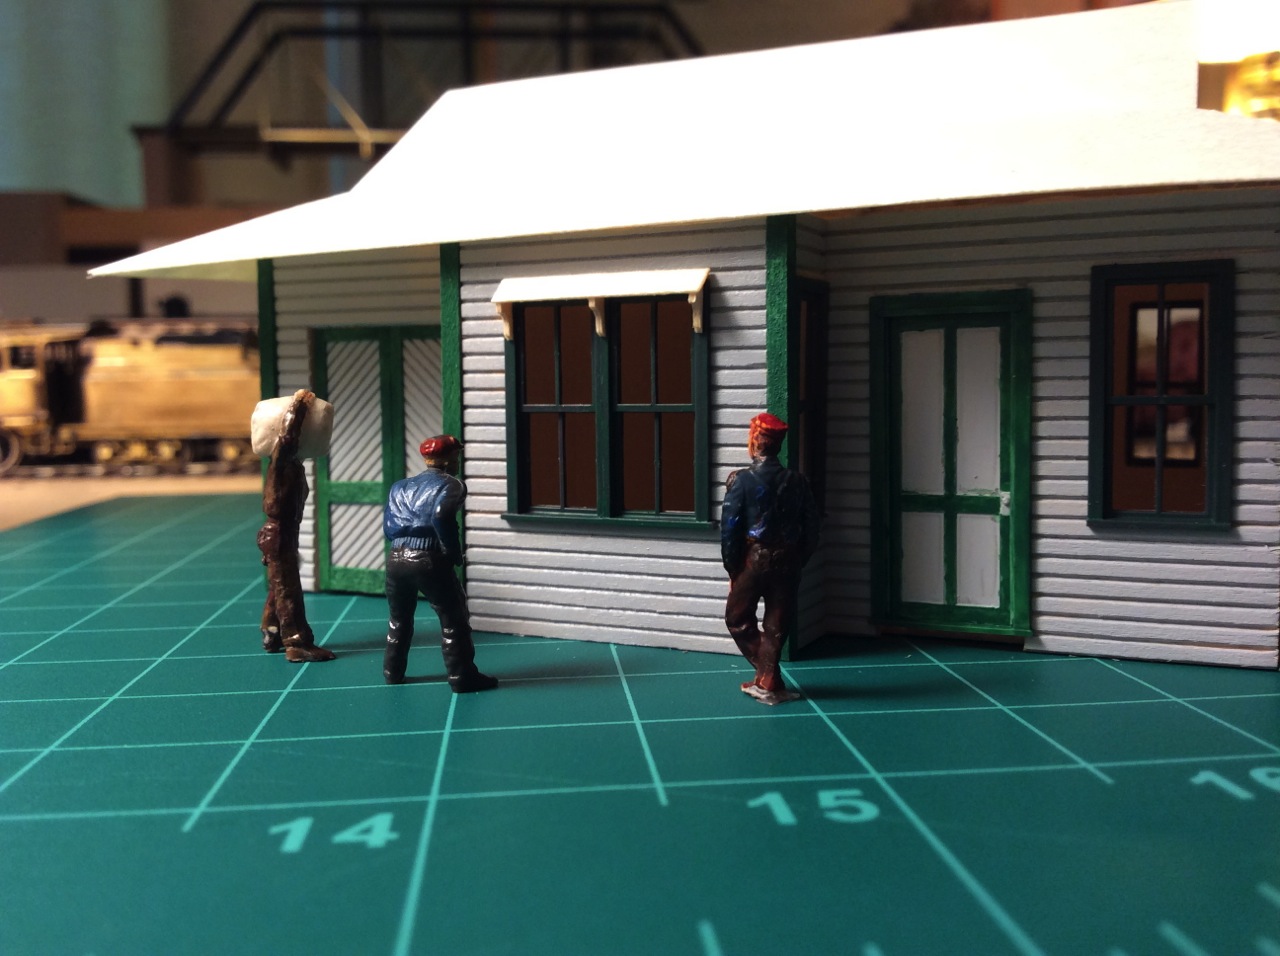
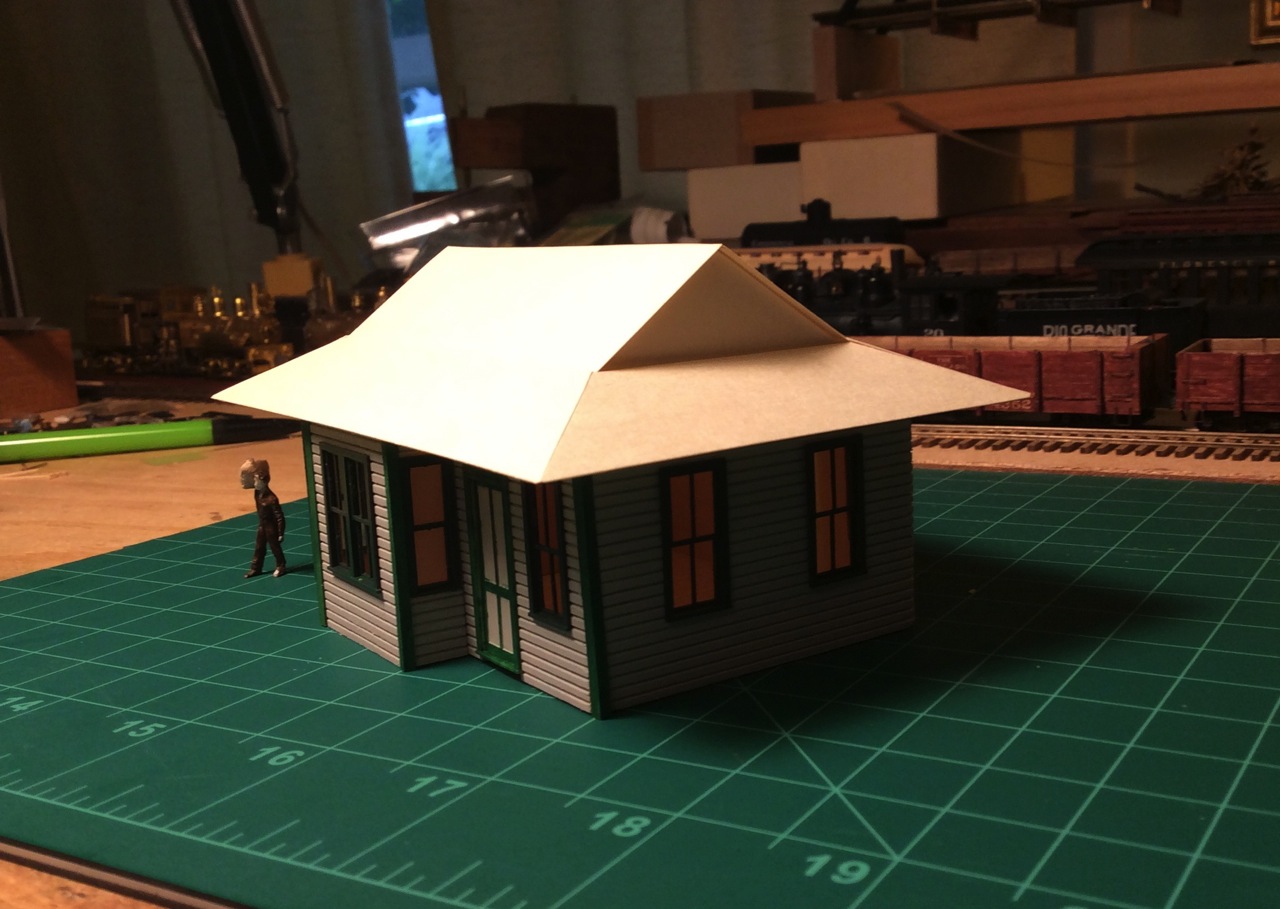
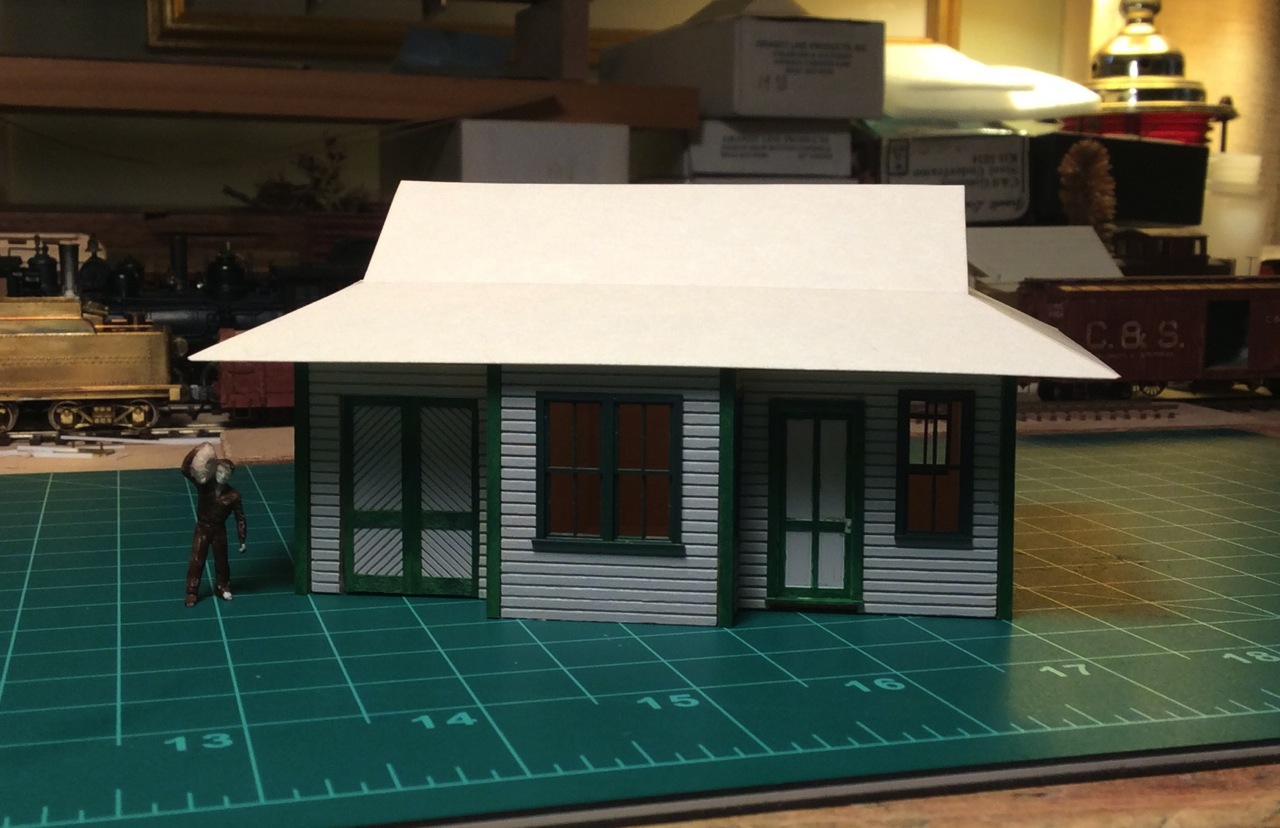
Seeing this, I made a second roof version to dimensions I derived from analyzing all the photos on this thread: ![]() Measurements of the pitch angles of the hip in this photo of the second roof match the real photo within about 1 degree, while the first version is 6 or 7 degrees too flat. The difference in the second roof is that the main gabled roof is 1 foot longer than the first version, and that change forces the hip pitch to be higher to meet the other constraints of the geometry. My measurements of all the other wall dimensions match Mr. Lane's plans just fine. So, I think I'll build my roof like the second version, maybe tweaked just a tad to get it spot on. The real roof was such a handsome thing, it's worth some trouble to have it look just right! 
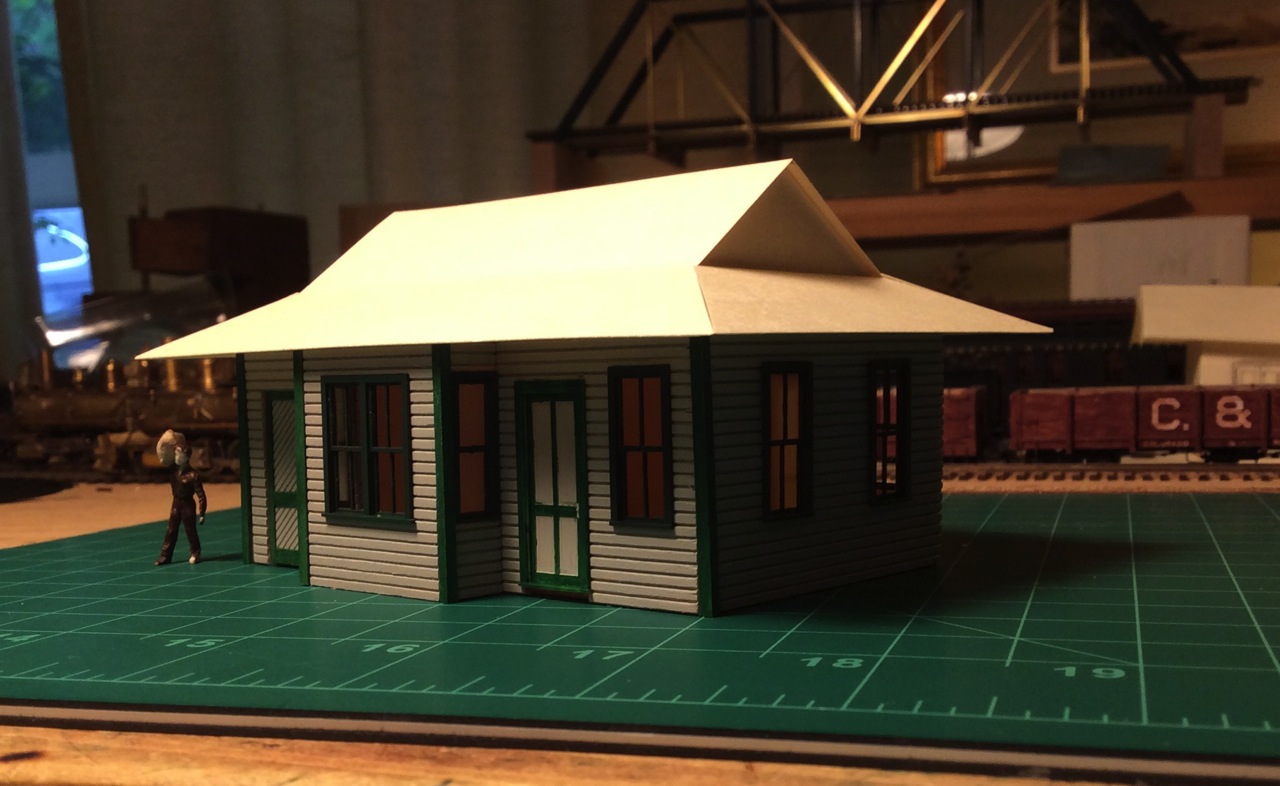
I'd like to give this building a simple interior to look in at through the windows, but I don't know anything about how it would have been configured. I assume there would have been a wall between the freight room on the left and the ticket office/passenger waiting room on the right- with a door between the two, or not? And by the position of the chimney I suppose there was probably a coal stove about in the middle of passenger side. As you can see in my photos I made the doors and windows like the reference photo. I'm assuming they might have been this way up to the move of the depot in the late 19-teens, and then sometime later were changed to the ones (door with transom window and arch-topped window frames) in the Lane plans and late photos. Any further information, or just informed speculation (all of yours would be better than mine) about the interior, or exterior for that matter, would be very welcome! Here are a couple more photos of my model with the second roof- let me know if things don't look right! ![]() ![]() ![]() ![]() 
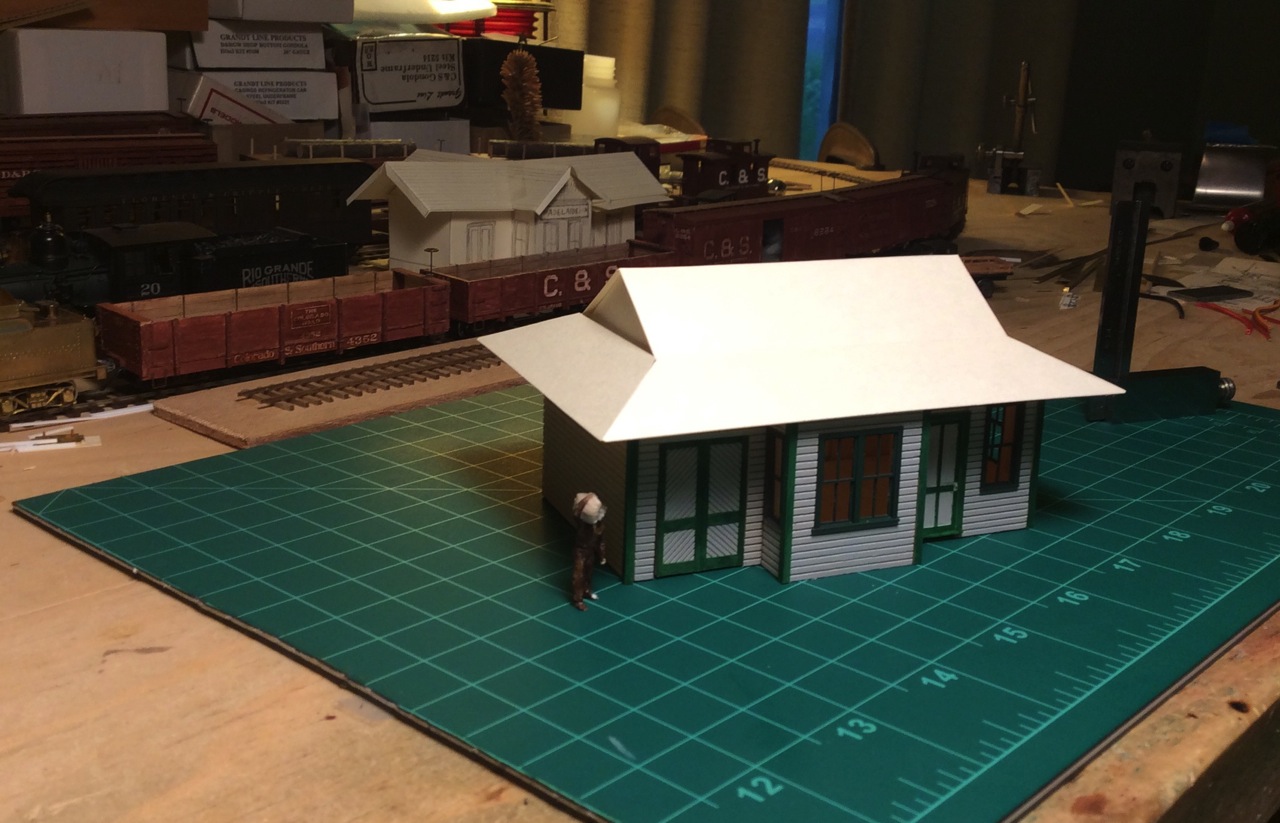
many thanks to all who have contributed to this thread- as usual, I would never try to build a model without taking advantage of all your expertise!!! John John Greenly Lansing,, NY
John Greenly
Lansing, NY |
|
John,
Very nice model of Kokomo. I spoke with Chris shortly after his drawing was published and we agreed that the length of the main roof should have been a bit longer. But since the plan had been published, there wasn't a lot he could do to change it. I believe your second roof nails it. Good work! I'm not sure why I never posted the below plan before, so here it is now. Regards, ![]()
Doug Heitkamp
Centennial, CO |
|
This post was updated on .
Doug,
thanks! that makes me feel better about my photo geometry detective work. I was not entirely trusting myself, since I was in disagreement with those very nice published drawings. Does your plan show three separate rooms- are those interior walls at both sides of the trackside bay windows? John
John Greenly
Lansing, NY |
|
I believe the ICC notes for the interior of the freight room say:
I'm taking that to mean the bottom 4' of the wall was covered with butt-jointed rough cut boards 1" thick and of varying widths, and that the top 4' is exposed studding? Doug, does Dimmler mention a ticket window elsewhere on the page? I presume there was one between the office (center room) and the waiting room, as wells as doors out each side of the office. John, any chance you'd be willing to share your roof outlines? Either as a simple outline onto paper mailed the old-fashioned way, or as a PDF? I picked up the Classic Miniatures kit but they went the other way to ease assembly: the roof gables are not inset from the outer walls at all. A quick word on shingles: The octagonal shingles for the gables that came with the Classic Miniatures kit are from Short Hill and Western. Their laser is much too wide, leaving the individual shingles too far apart. Builders in Scale's octagonal shingles appear better, but still a bit wide. Master Creations (BTS) use a much, much finer laser, so their shingles are nicely spaced. My go-to shingles are normally Wild West Scale Model Builders (I prefer their glue-on approach to the self-stick ones from Master Creations). But I use Master Creations throughout whenever part of the roof is decoratively shingled as it's too hard to match colouring/staining between brands. I used Master Creations on my Jefferson Schoolhouse so I can post pictures if you're interested. |
|
Hi Jeff,
I'd be more than happy to give you the depot roof dimensions- glad to be able to make a small contribution to the thread! Give me a little time to finish thinking this through. The dimensions of my thin paper mockup probably have to be adapted to the way the roof will actually be constructed. I think though that the best way to give it to you will be as a set of dimensions for you to lay out on your preferred roof substrate, rather than providing a paper template. The reason is that this low-pitched hip roof is extremely sensitive to small changes in the dimensions. One scale inch difference in the bottom or top edge length of those hip pieces makes a quite noticeable change in the pitch angle, because the mitered corners meet at such a low pitch angle. So a pencil line in HO scale is too wide to guarantee a good result! The dimensions are easy to specify- just the top and bottom edge lengths and the width. You lay out the top and bottom edges parallel to each other with centers aligned exactly and separated by the width, then connect the ends of the top and bottom with diagonal miter lines, and cut. But in our HO scale at least, the layout should probably be done with a needle point and knife edge, not a pencil. I'll give the dimensions in scale inches and feet, so it could be built in any scale. I should be able to post them here in a couple of days. Thanks for your shingle information! I'd be very interested to see photos of your Jefferson schoolhouse. I have some shingles on hand that were from Northeastern. They're laser cut, and the scalloped ones are a nice size. As to color, it looks to me from the one early photo of the depot end when it was I think grey and green (posted above in this thread) that those gable shingles were probably painted the same grey as the walls. Much lighter than the roof shingles in any case. What do you think? Cheers, John
John Greenly
Lansing, NY |
|
In reply to this post by John Greenly
Beautiful little depot, John!
How did you do the windows and doors? Are they Grandt or Tichey castings? If so, which ones?
Jim Courtney
Poulsbo, WA |
|
thanks Jim, I'm really enjoying working on this one. Aside from a paper model of an F&CC depot that I made 40 years ago while trying to figure out its dimensions from a photo (how life repeats itself…), this is my first Colorado narrow gauge RR building! In fact in my model railroading youth I never got around to making much beyond the trains and track.
Yes, the windows and doors-- I had some Grandt 5029 windows that were the right overall size and only needed to be changed from 4/4 to 2/2 by cutting out the extraneous muntins, and I also removed a trim piece from under the sill. The double bay window is made from two of those, cut narrower on the mating sides and joined together to get the right width. The side windows on the bay were more of a problem, I got some narrow Grandt 5250 windows that I took the muntins out of to make 1/1 panes, but they were too tall so I cut them both above and below the middle and shortened them to equal the height of the other windows. The doors are very tall, luckily Grandt 5259 peaked pediment doors were the right height. I cut off the pediment and transom window, and then added a small styrene strip to form the top properly. The freight door I made from wood. I haven't finished framing that door opening yet- the door needs to set back into the building a bit. Tonight I was in the mood for a small challenge so I made the little corbelled awning to go over the bay window. It came out pretty well, I'll post a picture later on when I get more done. If I ever start a rock band in my old age, I think it will be called the Extraneous Muntins. Cheers, John
John Greenly
Lansing, NY |
|
In reply to this post by Jim Courtney
Jim, I just put the finishing touches on a window and door sprue for Kokomo in 1:64 and 1:48, and ordered a test part for myself to evaluate. All the windows and doors you need are on a single sprue and thus just one part for Shapeways. (If this works, I will do something similar for Ft Logan / Dome Rock / Estabrook)
A couple other notes on the published plans. The drawing shows a sloped pedement (Greek Revival?) on the windows and doors, but Doug's photo shows a simple board. I picked this up in my parts. I was also able to model the brow over the bay window with the sweet corbels. The drawing also shows a transom over the door, and the photo does not, unless there is a high window in the open door in the photo. My sprues have a transom. Sorry that the Shapeways tolerances don't allow me to scale the part down to HO. Regarding the end walls on the roof, the simple way to do this would be to extend the end wall below through the roof: the prototype clearly does not do this, which makes for some odd framing. I may reach out to Mike at Wild West and see if he will run some fancy shingles for us.
Keith Hayes
Leadville in Sn3 |
|
In reply to this post by John Greenly
Hi John,
No worries on the timing of the roof details. I’m still busy at work on Jefferson. I planned on going the other way with the bay side windows: narrowing some windows that are the right height. (The windows in question came with the Classic Miniatures kit; I’m pretty sure they’re Grandt Line though.) I look forward to seeing your corbels. I had to do the same for the Jefferson Depot, but they were of a somewhat simpler form. ![]() |
|
In reply to this post by Jeff Young
Great job on the windows John.
You and Jeff are becoming window Ninjas. |
|
In reply to this post by Jeff Young
Jeff,
Your Jefferson depot is an inspiration- and great job with the extreme sport of HO corbel-making! Here's the set my crew made for Kokomo depot. They decided after some consultation that the legs of the corbels were initially too long, so they shortened them and then put it up to see how it looks. ![]() ![]() That poor guy with the flour sack has been waiting an awful long time for the agent to open the freight door. cheers, John
John Greenly
Lansing, NY |
|
Hmmm,
First a reworked brass C&S Rhode Island locomotive, then cabooses that never were, then beautiful freight cars, and now a depot! Wonder what's next -- a diorama perhaps??
Jim Courtney
Poulsbo, WA |
|
Thanks Jim,
yes, I guess I do have grandiose glimmerings of a small shelf diorama sometime in the far-off future. Some little run-down place like Kokomo, perhaps, but for now I just like that little depot a lot. Probably as usual will get deflected before I finish it, I begin to feel brasswork inspiration coming on, need to get back to old No. 59…. And then there are the cabooses, that whole line of inquiry seems stalled out at present, though. Frustrating. John
John Greenly
Lansing, NY |
| Free forum by Nabble | Edit this page |
