Kokomo
1 ...
56789


1 ...
56789
Re: Kokomo depot -- the box car bodies
|
This post was updated on .
I wouldn't bet my life on it, but I'm fairly convinced that the end fascia of the Kokomo backyard car body is peaked rather than rounded. So, I think the 26' Litchfield car is a good guess. Thanks, Jim!
As to the handcar shed, it is significantly different from the standard C&S drawing in the file. Measuring from the photos, the width of the eave end with the door is 10' and the roof pitch is 6:12. The side wall is about 6'6" high. I don't think we have a direct view of the side wall length, but from the photo taken from above and behind I can make an estimate. By scaling from the depot roof hip end I get the length of the shed roof to be 13 - 14 feet. So, if we say the sidewalls are 13' long with 6" roof end overhangs, that means that the footprint might be the same as the C&S standard shed (10 x 13) and the roof pitch is the same 6:12, but the side walls are much lower, 6'6" vs 10', and the doors are on the eave ends instead of the side walls. Odd that the handcar shed is crammed in right next to the depot so that the rain runoff from the depot roof hits the shed roof, which then would probably soak the depot wall, rotting it out (my bitter experience living in a 180 yr old house with weird roof configuration). Maybe the telegraph pole was there first, and the shed for some reason had to be put in between it and the depot rather than further away? But no, maybe not. Here's a crop of a photo posted earlier in the thread, showing a shed similarly crammed in next to the depot in its original downtown location: 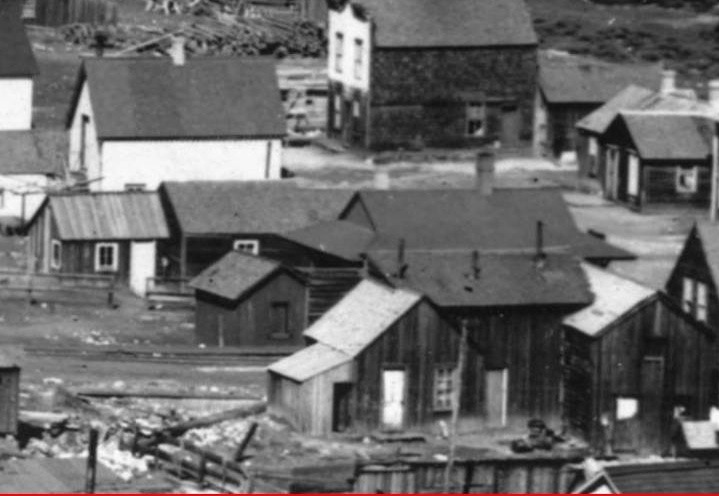 I think the track is on the near side of the depot in this picture? That would mean that this shed wasn't used for a handcar since a window, not a door, was in the end facing the track. In the view of the relocated depot from uphill and behind, the window in the shed does look to be the same size and position in the gable end, and the other dimensions agree as well. The downtown photo allows a little better estimate of the side wall length, and it also comes out to about 13'. Could be the same shed, in the new location with a big handcar door in the other end facing the track. In which case it was probably moved along with the depot, and somebody just really liked having it right next door. Hmm, or maybe this is all just a misleading coincidence, and the whole mess was moved there from Denver…. John
John Greenly
Lansing, NY |
Re: Kokomo depot -- the box car bodies
|
Modified windows and doors for my Kokomo depot.
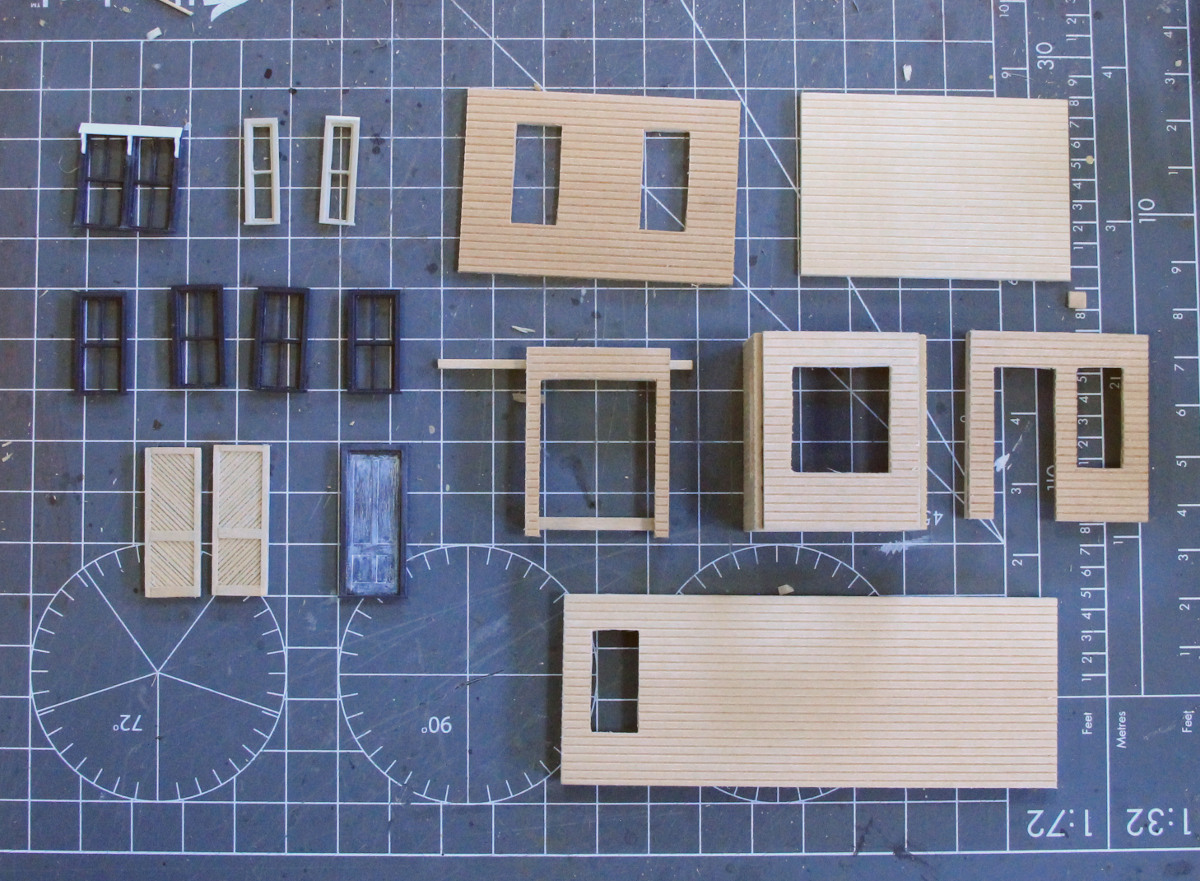 The operator's bay front is a siamese with added rain hood. The operator's bay sides are Grandt Line, narrowed, shortened, and a pair of glazing bars removed. The other windows are Grandt Line with 4 glazing bars and the bottom trim piece removed. The door is a Grandt Line door with transom, with the transom cross-bar removed and two doors pieced together to make a taller door. The freight doors are scribed sheet wood with a second set of scribes added (with a fine-tooth Xacto saw) and trim wood strips added. As you can see I'm going with a single window in the back. Cheers, Jeff. |
Re: Kokomo depot -- the box car bodies
|
Looking good, Jeff! I guess I used the same windows for the sides of the bay- both shortening and narrowing them was a bit of a pain.
Cheers, John
John Greenly
Lansing, NY |
Re: Kokomo depot -- the box car bodies
|
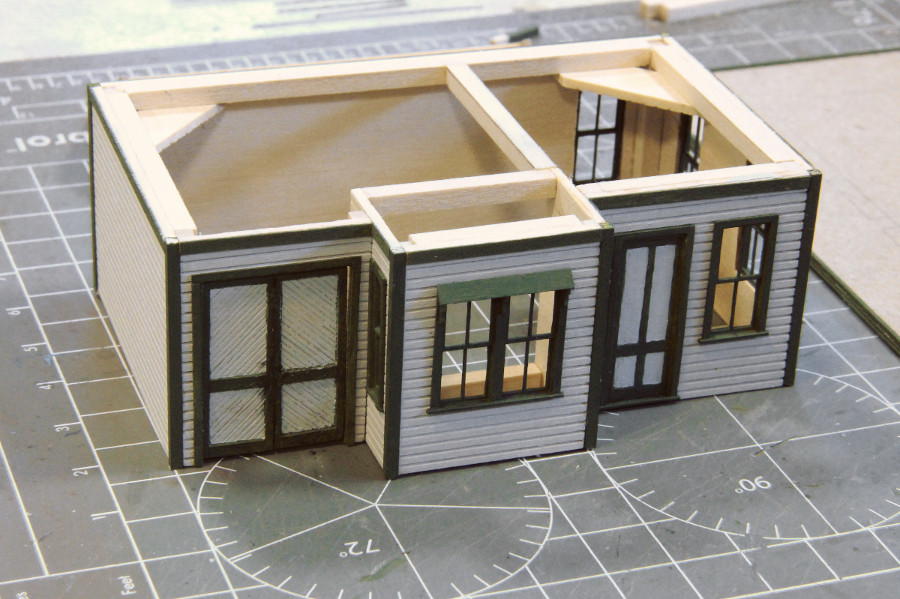
Walls framed.
 Roof bits. On the bottom is the soffit/roof base (upside down), and on top is the framing for the central section which will sit on top of the base. The lower, flatter slopes will then be added in-between. 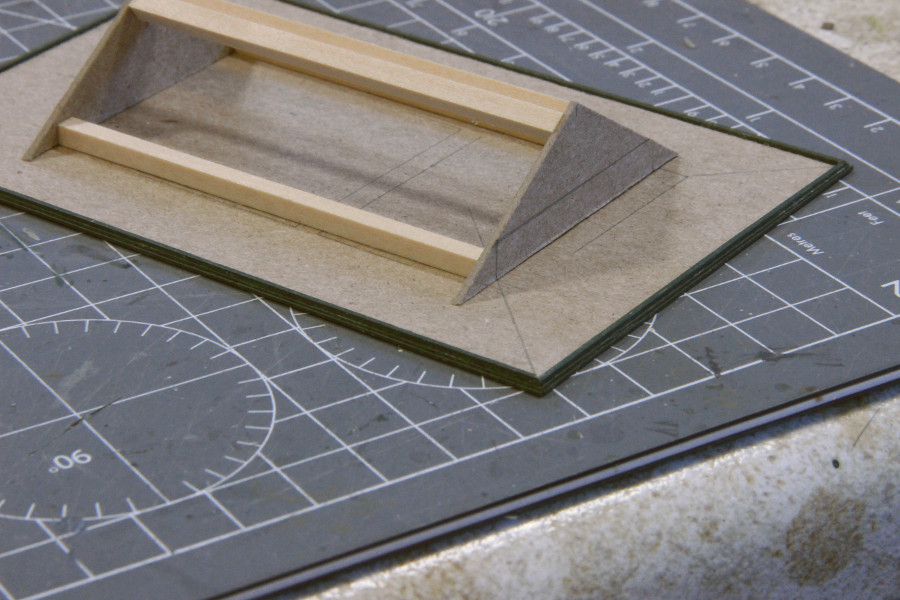 The soffit facing is a sandwich of 2x6, 1x4 and 1x2. |
Re: Kokomo depot -- the box car bodies
|
Jeff, that looks great. I'm learning from you already- that way of basing the roof structure on the single flat ceiling/soffit piece is a nice solution, I'm going to copy it when I get around to doing mine!
thanks, John btw, your wall/eave height looks just right to me.
John Greenly
Lansing, NY |
Re: Kokomo depot -- the box car bodies
|
Hi John,
Yeah, the soffit appears to be a common error. The kit I'm using has it following the underside of the rafters. While it's a bit hard to tell from the right half of this picture, if you follow the trim at the top of the walls around to the side of the operator's bay you can see that the soffit is indeed horizontal. 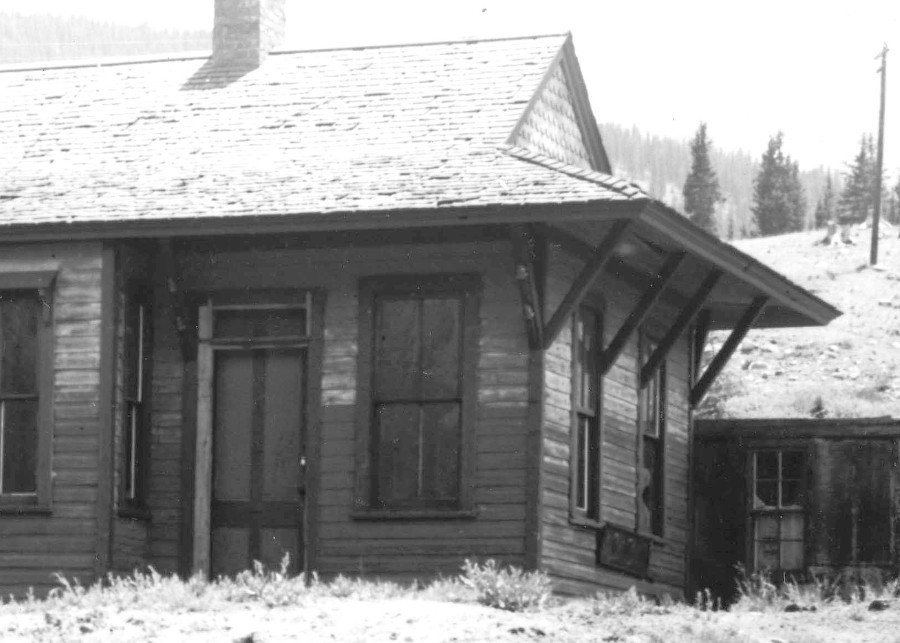 Cheers, Jeff. |
Re: Kokomo depot -- the box car bodies
|
This post was updated on .
Jeff,
yes, that's certainly right, I had noticed the horizontal enclosed soffits in that photo. What I hadn't thought of was your simple way of making it out of one big sheet to base the whole roof on. I was thinking of adding it separately under each side, which would have been needlessly complicated and messy. In this earlier view, it almost looks like the corner extended further up, but I can't really tell. The single color paint scheme doesn't show up the top edge of the wall the way your photo does. 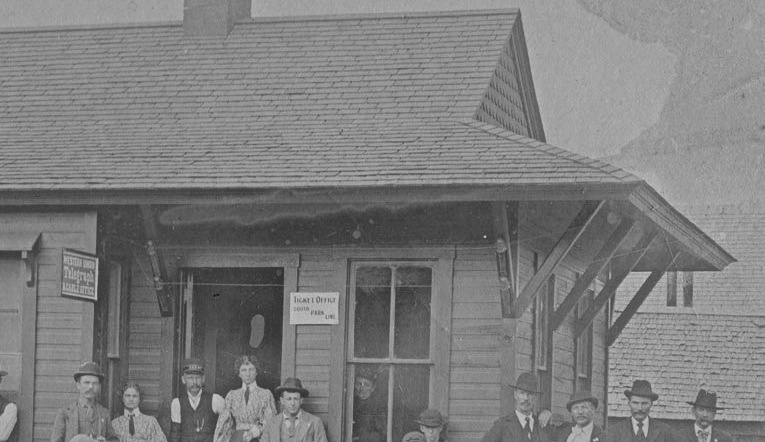 By the way, are you going to put on the telegraph wires? This enlargement does nicely show the insulators on the roof braces carrying the wires into the operator's bay. I wonder how to make those? South Park, if you're reading this, what should they be? thanks! John
John Greenly
Lansing, NY |
Re: Kokomo depot -- the box car bodies
|
" ... By the way, are you going to put on the telegraph wires? This enlargement does
nicely show the insulators on the roof braces carrying the wires into the operator's bay. I wonder how to make those? South Park, if you're reading this, what should they be? ============================================================ I have never had as much interest in the High Line as I do for the mainline to Gunnison. While I have covered almost every inch of the DSP&P between Waterton and Parlin, the overbuilt/development of much of the High Line area has kept me from hunting it for clues. Photos show a lot of CD 145 beehives in use, and this is what appears to be in use on those side pins on the Kokomo depot. The design was patented in 1884 and became the WU Standard until 1912, so it is likely original construction. To my eye, they look like H.G.CO. Petticoat beehives, which had a more tapered, or "flared" skirt than other mfr's. beehives.  Doubtful those used on the South Park lines had good color. 99% of this common early piece were light aquas and greens, but Pettos can be found in a spectacular rainbow of colors, such as this sapphire blue example.
"Duty above all else except Honor"
|
Re: Kokomo depot -- the box car bodies
|
S.P., that's great, thanks! Now I have to figure out how to make them.
I'm curious- were the glass colors intended to differentiate the different manufacturers' products, or…? John
John Greenly
Lansing, NY |
Re: Kokomo depot -- the box car bodies
|
John,
I used insulators from Rix Products clear-plastic telegraph pole arms. I painted them with Tamiya translucent blue and green paint. They're awfully fiddly in HO scale, but I managed to get them CA'd into place. I'm just doing insulators; no wires. Cheers, Jeff. |
Re: Kokomo depot -- the box car bodies
|
In reply to this post by John Greenly
" ... I'm curious- were the glass colors intended to differentiate the different manufacturers' products, or…?"
John, Insulators were largely made to individual company's recipe for "green" or "bottle" glass, which is cheap to make and rather strong and resilient to thermal changes. A few types of insulators were made in specific colors as markers, some to designate ownership of lines on shared poles, other times to indicate voltages or special circuits. Most times, the mfr. did not give a whit about anything beyond the performance of the insulator to screw onto a pin and keeping the line from shorting out or going to ground. But to answer your question more thoroughly, most mfr's. made glass that tended to be certain colors or show other qualities that make it fairly easy to spot their wares, or tell from what period in a given company's history a certain piece was made. As an example, the photo I posted above .... a mid-1880's Hemingray product that typically is made of glass with good clarity and few bubbles. Colors are typically light pastels in the lime green or aqua range, but can be found in lavenders and slate/sky blues. Potent colors are rare, but for reasons we will never really know, they were made and are highly sought after by collectors. Most insulator mfr's. made all sorts of other glass products, and after an order was filled for one of these products, the remaining glass in "the tank" was burned up pressing insulators to get an empty "tank" to begin the process of mixing up a different special color for the next special order. If that product was a colorful jar or tableware, those insulators made from the leftover glass would be quite colorful too. To the buyer, color was irrelevant, and so the orders were filled with whatever stock was on hand and shipped.
"Duty above all else except Honor"
|
Re: Kokomo depot -- the box car bodies
|
In reply to this post by John Greenly
Jeff,
The Depot is looking good. |
Re: Kokomo depot -- the box car bodies
|
In reply to this post by South Park
S.P.,
many thanks for taking the time to tell us about insulator glass color! This railroad modeling is becoming more and more for me an entry into the fascinating history of all sorts of things I never would have thought to investigate otherwise. John Jeff, thanks for the info about Rix, but unfortunately I can't find their clear (or the green-tinted) plastic crossarms in stock anywhere, they seem not to be making them anymore. The only version I find available is opaque brown plastic. I hope they resume production someday!
John Greenly
Lansing, NY |
Re: Kokomo depot -- the box car bodies
|
Hi John,
Yes, they are exceedingly hard to find. They had a lot of trouble getting the clear ones to release from the moulds so they don’t make them often. For the South Park I cut all my cross arms shorter, so I have a ton of cross-arm ends with 2 insulators on each. That’s where I sourced the depot ones from. Are you still at the same address? I can pop some in the mail to you…. Cheers, Jeff. |
Re: Kokomo depot -- the box car bodies
|
I too am here for the broadening historical perspective and
understanding of all this stuff that was interrelated. I may never model railroad again, but the level of research and knowledge present amongst modelers is utterly amazing. I do so enjoy these threads with photos and commentary about what was where, why, when, etc. To understand the context in which the artifacts I collect and study were part of makes them all that more meaningful to me.
"Duty above all else except Honor"
|
Re: Kokomo depot -- the box car bodies
|
Hey guys, what's up with the ridge tiles? Note on both the last two pictures of the depot posted that the corner ridges are clearly ridge shingles, while the main ridge is clearly not.
Metal? Long wood boards? |
Re: Kokomo depot -- the box car bodies
|
Ridgeboards were very common on Shingled rooves Jeff.
There seems to be a 60/40 split in favour of the cascading Shingles vs Boards at the Hips, based on memory and previous research.
UpSideDownC
in New Zealand |
Re: Kokomo depot -- the box car bodies
|
Thanks Chris. Boards it will be then.
|
|
Hi all you Kokomo-ists. I finally got up my courage to start on the final roof for my depot. Got the structure made out of heavy mat board to the dimensions I posted before, and now have done one end with BTS shingles. I'm not totally satisfied with it yet, invite comments and suggestions! I chose to use BTS's regular "cedar shingles", the shape seems to me to match the photos of the depot quite well.
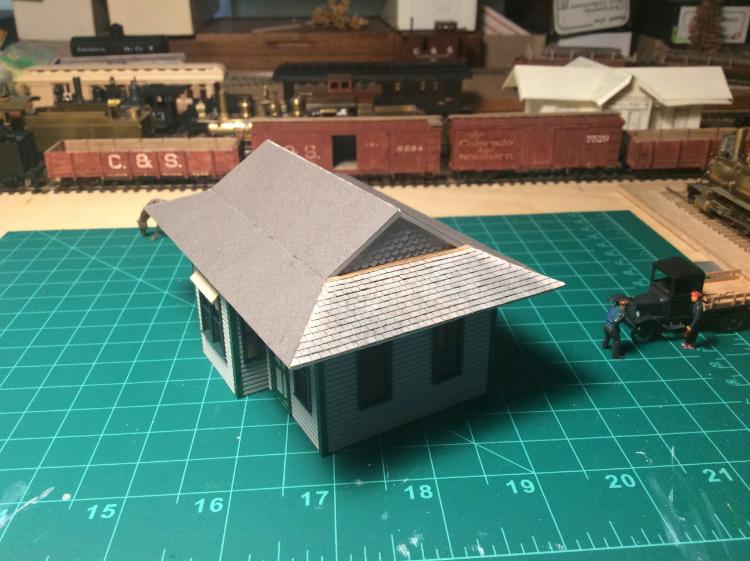 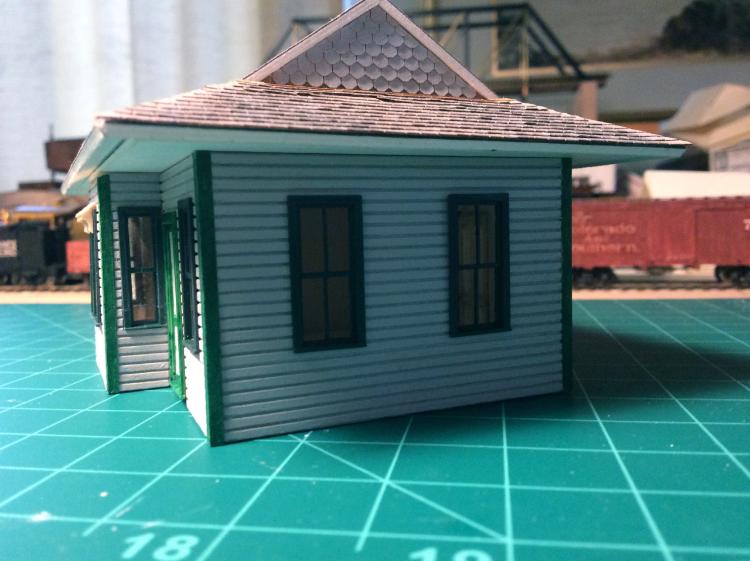 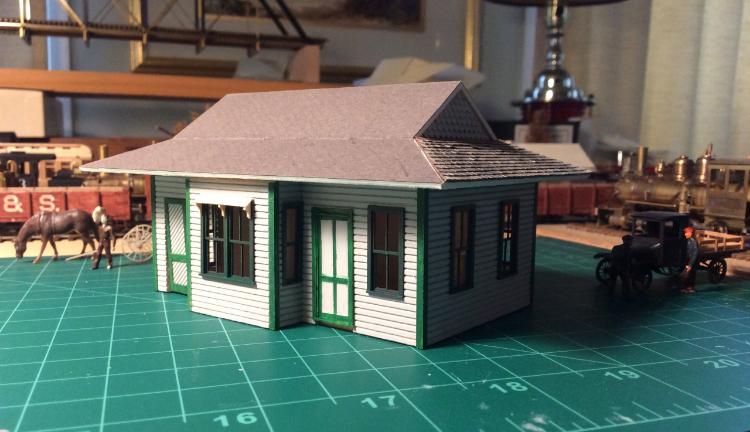 The surface texture isn't quite what I want, yet. I need to find a way to put some "grain" running vertically, I'm thinking of maybe wire-brushing the shingles a bit...? The color I'm aiming for is the bleached-grey beginning to blacken that I'm used to here on New England shake roofs. I imagine it would be the same up in the South Park? I'm using powdered graphite to darken the shingles, as BTS suggested in their directions. Probably will do a little more, then dullcote to finish. But I'm very much open to suggestions- this is the first shingled roof I've ever attempted! Cheers, John Jeff-- would you post some photos of your beautiful depot on this thread, so people can find them easier in the future?
John Greenly
Lansing, NY |
Re: Kokomo depot -- the box car bodies
|
In reply to this post by South Park
I moved to Wyoming recently. There is an old line 2 wire line, parts of which are gone, which have what I think are those exact insulators. One is loose up on the pole. I work the line every time I go out there. I'll let you know what it is if I get it down. It has the wood wedge also. JP
|
«
Return to C&Sng Discussion Forum
|
1 view|%1 views
| Free forum by Nabble | Edit this page |

