The Helix

Previous Topic Next Topic
 
classic Classic list List threaded Threaded
95 messages Options
12345
Reply | Threaded
Open this post in threaded view
|

The Helix

Keith Hayes
This post was updated on .
I think it is safe to say we all have a model railroad vision that is larger than the space we have to build in. My own basement is an ‘L’ shape, about 24’ along each of the long legs. Mapping out a plan, developing a double deck seemed to be the best way to pack my chunk of the South Park into the space. And this required a method to get from one deck to the next: I choose a helix.

Helices seem to be controversial: they eat up a lot of track, and potentially hide the train for a long period. No doubt, if I had the space I would expose the grade the whole way, but I don’t have that luxury. So, I have been considering a helix: more on the details of the helix later.

As I have built the layout it appeared easiest to build the layout from the top down, starting in Leadville. Contemplating the helix, this requires construction from the bottom up. The early premise for the layout involved a return loop under the helix that would comprise east end staging (two consecutive sidings). At one time, this was D&RGW staging, but as my modeling interest has focused on the South Park, the staging will now represent Como and points east. Being the South Park in the 1930s, staging requirements are minimal—just the Denver-Leadville passenger train (maximum three cars and a locomotive, about 48”; and a west bound freight train (could be multiple locomotives and multiple cars—a two car train could be 84” to 96” long or so). The staging will be built first, and it could be a while until I connect the track to the rest of the layout, so I pondered how I could make this useful in the short run (pardon the pun).
Then it occurred to me to use the inner track to create a loop that can function as a test track until the railhead gets past Breckenridge. (see the drawing) In this case, both the sidings are about the same size—about 94” long. The first train into staging pulls into the bottom of the loop, and this leaves the upper portion free for a second train (and then both trains may escape when the time comes). The intent is that this track is level, so it will serve nicely as a test loop.

I will leave construction of the helix support structure for another post. Suffice to say that I observe that torsion control (the helix is a spring, and subject to small, rotational forces) is an issue that I would like to address in an elegant fashion. The plan is to construct an inner frame with a couple ‘L’ girders (like a sedan chair) which will support the benchwork for the helix.
Keith Hayes
Leadville in Sn3
Reply | Threaded
Open this post in threaded view
|

Re: The Helix

nedsn3
Keith- I'm "listening" keep it up. I have a helix in the far away plans for my Sn3 C&S line which will connect with the SP somewhere to be determined.
Ned
Reply | Threaded
Open this post in threaded view
|

Re: The Helix

Keith Hayes
This post was updated on .
In reply to this post by Keith Hayes
The helix is sufficiently complex, I decided to build a model of it before I commit the resources to build the real thing.

Here is the core structure (with greatly exaggerated legs).

Keith Hayes
Leadville in Sn3
Reply | Threaded
Open this post in threaded view
|

Re: The Helix

Keith Hayes
Do the the 'L' girders and the cross pieces.
Keith Hayes
Leadville in Sn3
Reply | Threaded
Open this post in threaded view
|

Re: The Helix

Keith Hayes
The staging level.

Keith Hayes
Leadville in Sn3
Reply | Threaded
Open this post in threaded view
|

Re: The Helix

Keith Hayes
The first loop entering from Solitude.

Keith Hayes
Leadville in Sn3
Reply | Threaded
Open this post in threaded view
|

Re: The Helix

Keith Hayes
The second loop.


Rising about 4 1/2" per circuit on a 30" radius with a 12" straight section works out to a hair over a 2% ruling grade.
Keith Hayes
Leadville in Sn3
Reply | Threaded
Open this post in threaded view
|

Re: The Helix

Keith Hayes
This post was updated on .
The herniated circuit, which will be Kokomo.


Each circuit is about 17' (!), and I thought it would be nice to see the train halfway. Kokomo has a nice depot and water tank, so it justifies a stop on the way uphill westbound. And, there were snowsheds on either side of Kokomo, so that provides a convenient method for the track to enter and exit the helix.
Keith Hayes
Leadville in Sn3
Reply | Threaded
Open this post in threaded view
|

Re: The Helix

Keith Hayes
The fourth circuit.

Keith Hayes
Leadville in Sn3
Reply | Threaded
Open this post in threaded view
|

Re: The Helix: Prototype

Chris Walker
Keith, you're modelling the wrong line

UpSideDownC
in New Zealand
Reply | Threaded
Open this post in threaded view
|

Re: The Helix

Paul R.
In reply to this post by Keith Hayes
Keith,
The local club's N gauge layout has 2 helix and use threaded rods to support  angles that support the trackbed  with nuts that can be adjusted for height. Will get a photo when I go out there next week. Paul R.
Reply | Threaded
Open this post in threaded view
|

Re: The Helix

Keith Hayes
This post was updated on .
In reply to this post by Keith Hayes
And the top at Fremont Pass with the branch to the Climax mine off the tail of the wye.


Fremont Pass is marked by the siding.

While I have not entirely dismissed the threaded rod strategy, I built the model in part to study other methods of roadbed support.
Keith Hayes
Leadville in Sn3
Reply | Threaded
Open this post in threaded view
|

Re: The Helix

nedsn3
A space saver! An entire layout in one helix! Good idea to build a model first- that sucker is complicated!
Reply | Threaded
Open this post in threaded view
|

Re: The Helix

Geoff Hamway
Keith,
Thanks for sharing your concept and model.  I have a helix in my future also, and your thoughts are very helpful.  If not threaded rod, are you planning to support the helix turns with brackets off the central structure, or blocks between levels, or something else?  

I'm sure you already know that Murphy's Law applies with particular rigor to hidden turnouts, so you'll want to make sure those are bullet-proof.  I simplified my own design a bit when I thought about trying to get my hand and a soldering iron into the middle of a helix stack!

Please keep us posted.  It's a daunting prospect and I need all the advance learning and encouragement I can get!
Geoff
Reply | Threaded
Open this post in threaded view
|

Re: The Helix

Keith Hayes
In reply to this post by nedsn3
Thank you, Ned and Geoff. One think I have learned from building a layout is, "keep it simple (stupid)." To paraphrase Ludwig Mies van der Rohe, "Less is more." Railroads were very simple out of necessity, and invariably it is the complicated track that gives me fits. Though I put a lot of thought into the length of my sidings, and they are too long by a locomotive length. We shall see as the layout progresses and we actually start to operate it.

The model has been very helpful. I can better see how to support the track circuits. The inner frame was designed for structural stability, and the cutouts designed for access to the helix from the inside in the event of derailments. I can see I need to reverse/ invert the cutouts on the short sides to improve access. My plan is to support the circuits from brackets off the center structure. The herniated loop appears to work well for Kokomo, and the bottom portion of the loop can be extended for some additional daylight running. I may even be able to fit in a short spur at Kokomo (KISS, darnit!). Also, the tail of the wye will work well, extending to Climax. After seeing some of the images posted in other threads, I am thinking of a row of five Sears houses at a diminishing scale on the inside of the loop to conceal the top circuit of the helix. Also, Mike Trent alerted me to Clint Crow's snow fence, and I am thinking of using a line of 1:48 snow fence at the outside edge of the spur with smaller scales to the inside to add some perspective. Excitement for this project is growing.

Another concern has to do with expansion and contraction. I have to believe that the rail will grow and shrink some in each circuit. I have been contemplating a way to file the rails to create a sliding joint to provide for seasonal temperature swings. Thinking about it now, perhaps this occurs in the short tangent sections on each circuit.

We all need some encouragement.
Keith Hayes
Leadville in Sn3
Reply | Threaded
Open this post in threaded view
|

Re: The Helix

Doug Tagsold
Keith, regarding the expansion / contraction issues, the issue is more the wood roadbed is changing size than the rail, regardless, that can be a problem.  In the past helix's I have built in HO standard gauge layouts, I always uses 3 ft. lengths of flex track in the helix, and only attached (spiked) the track to the roadbed at the ends of the flex track sections, allowing the middle portions of the track to "float" on the roadbed, moving as needed, but always still keeping an even curve.  I also soldered the joints between the sections of track, guaranteeing that no kinks formed at these locations.  Doing this, I never had any expansion / contractions problems with the track in the helix.  

I know you prefer to hand lay your track, but using flex track in the hidden portions of your helix may prevent future problems from arising.

Doug Tagsold  
Reply | Threaded
Open this post in threaded view
|

Re: The Helix

Jeff Young
In reply to this post by Keith Hayes
Hi Keith,

Curved track is rarely a problem with expansion/contraction (as the curve radius only needs to change a tiny amount to make up for it).  Straight track is usually where the problems occur….

Cheers,
Jeff.
Reply | Threaded
Open this post in threaded view
|

Re: The Helix

Jeff Young
In reply to this post by Keith Hayes
Cross-posted with Doug.  I agree with his assessments as well: my track will be 99% hand-laid, with the portion inside Alpine Tunnel being the single exception.


> On 5 Nov 2017, at 18:00, Jeff Young <[hidden email]> wrote:
>
> Hi Keith,
>
> Curved track is rarely a problem with expansion/contraction (as the curve radius only needs to change a tiny amount to make up for it).  Straight track is usually where the problems occur….
>
> Cheers,
> Jeff.

Reply | Threaded
Open this post in threaded view
|

Re: The Helix

Jim Courtney
This post was updated on .
In reply to this post by Keith Hayes
Well, Keith . . . after the Mies van der Rohe reference, I will now forever think of your helix as the "Bauhaus Helix".

Having designed a helix into my aborted layout project and having only built the first loop, I would caution you to carefully consider vertical clearances.

Sn3 locomotives, especially our favorite C&S locomotives with the tall extended Ridgeway spark arrestors, are significantly taller than even large HO scale standard gauge locomotives. I figure minimal vertical clearance from rail top to be at least 3 inches. Add in the track and 1/2 inch homasote roadbed and your talking about 5/8 to 3/4 inch extra before you get down to the rising base of the helix. I planned for 4 inches of absolute vertical clearance, taking into account all obstacles.

Then you have to decide how thick of a material for the climbing helix loops -- I had planned to use 1/2 inch 7-ply cabinet plywood, but wonder how much warpage might occur between supports. Would 3/4 inch plywood be better? Would sealing both sides of the material (varnish say) prevent this?

Finally, with 30" radius loops, I couldn't figure out how to cut more than half circles out of a 4'x8' sheet of plywood, and with a lot of wastage, at that.

The more segments of helix base per circle, the more joints are required:
 
How will you join each segment?  A half-inch plywood splice, under each joint, will further cut into the vertical clearance at the top of the loop below. I figured that I'd need 4.5 to 4.75 inches of vertical clearance, from the top of the helix sub-roadbed of loop (n) to the bottom of the helix sub-roadbed of loop (n+1). With a 30" radius helix loop, this increased the grade to about 2.6% as I recall.  

How many Sn3 cars will an Overland 2-8-0 pull up a steady 2.6% grade on a constant curve? I feared I might build the thing only to find out I had a helix for light engines or caboose hops!!

How would one go about milling the joints of the circle segments, removing the top half off one piece and bottom half off the next piece, so the joints would overlap without lower reinforcement? And do it squarely at the end of a circular piece? Surely there is a tool for this!

I'm not trying to discourage you . . . I simply got scared off by the complexity of the wood working.  

I look forward to seeing how you solve all these problems, so I make fewer unforeseen mistakes, if I ever attempt my helix.
Jim Courtney
Poulsbo, WA
Reply | Threaded
Open this post in threaded view
|

Re: The Bauhaus Helix

Keith Hayes
Ah Jim...so many questions!

First, to clarify for Doug I actually use flex track and build my turnouts in a Fast Tracks jig. One reason I started with Leadville is I wanted to tune up my skills before I built some turnouts that are essentially hidden. I may construct the staging loop and keep it open and operate it for a few months to assure dependable operation before I start on the helix itself. Also, as I type, I may fully hinge the points to allow for less stress on the soldered tie rod at the points. Details. (It is a truth that the least accessible turnout will be the problem child: locos tend to derail on the turnout for the outbound lead from the roundhouse--I don't know why, and have to get up there on a ladder to scrutinize the issue in detail).

Good to know the problems tend to be on the tangent sections. My plan is to solder the flex track rails to longer pieces to avoid kinks on the curves. Also, I have had a careful wiring plan with my bus using red and white wires, red is always the rear rail: on the helix it will be the outside rail, and on the lower level, this will be reversed. Unless I make the lower level a separate power district with a reverse section, which I may. In fact, the Helix may warrant being a separate power district, too. Another issue is a reliable routing of the bus to the track--I run leads to each section (and still have trouble with dirty rails!).

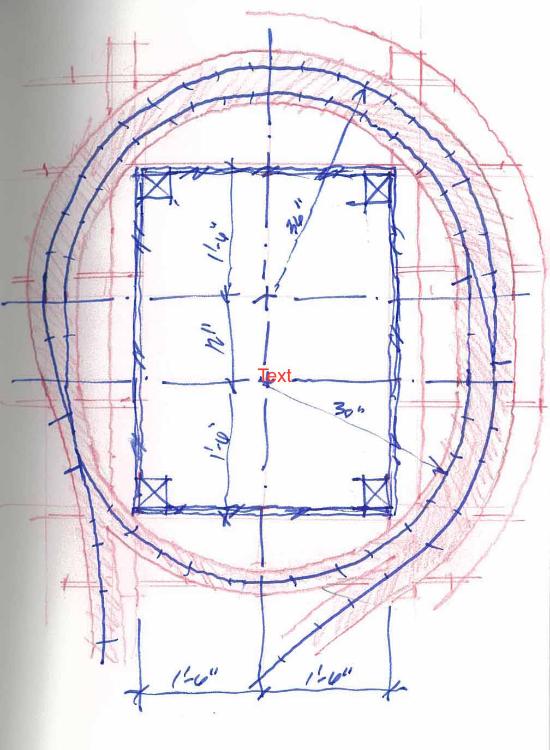
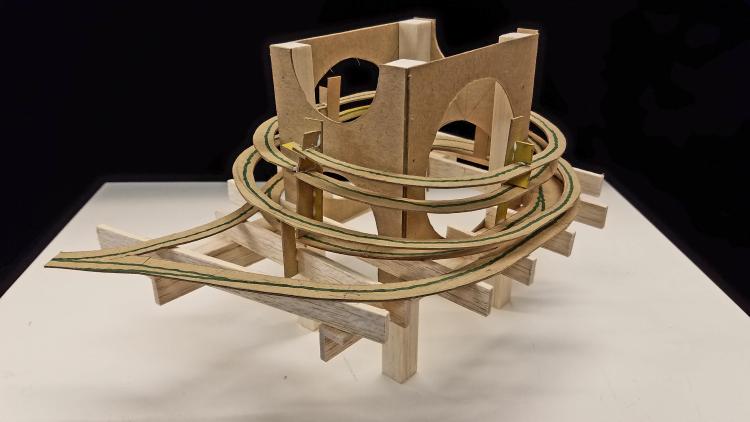
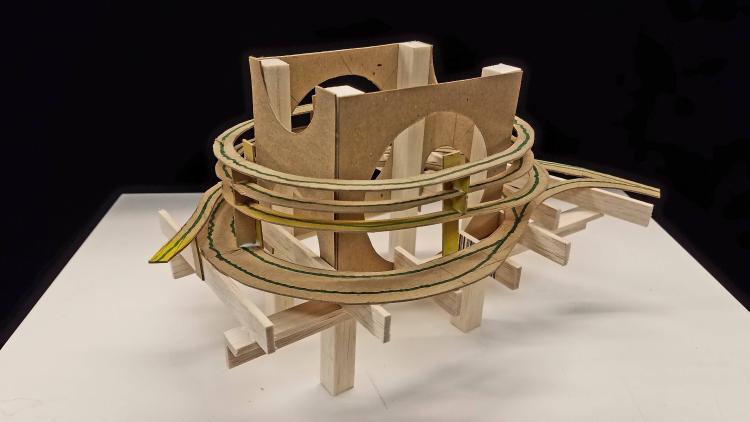
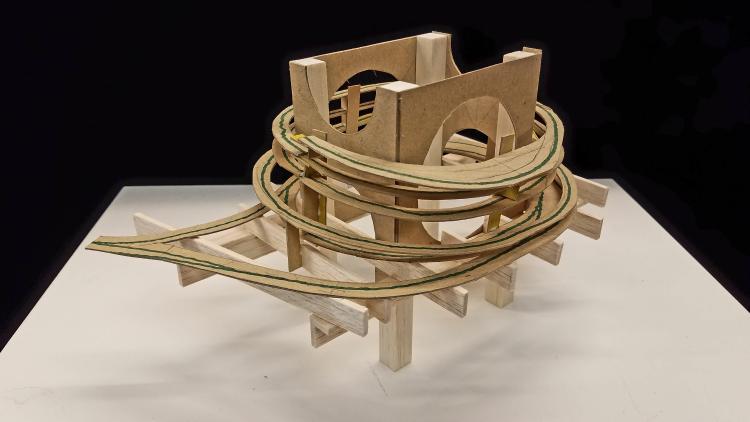
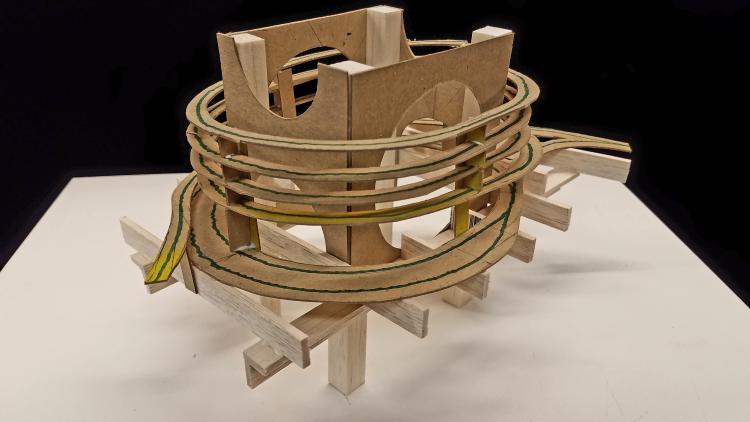
Don Meeker shared some of his helix secrets. If I used cookie-cutter methods, it would indeed eat up a pallet of plywood. Don (a former math teacher) figured out that for a 30" radius, you can cut 8" strips of plywood and cut them to length at a 12 degree angle (I think). You do this with two layers of wood, glue it up and use a saber saw to cut the decagon (or whatever) to shape: the result is far less waste. The plan is to use two layers of 1/4" plywood. This method will probably result in using only a half pallet of plywood--a great savings. 
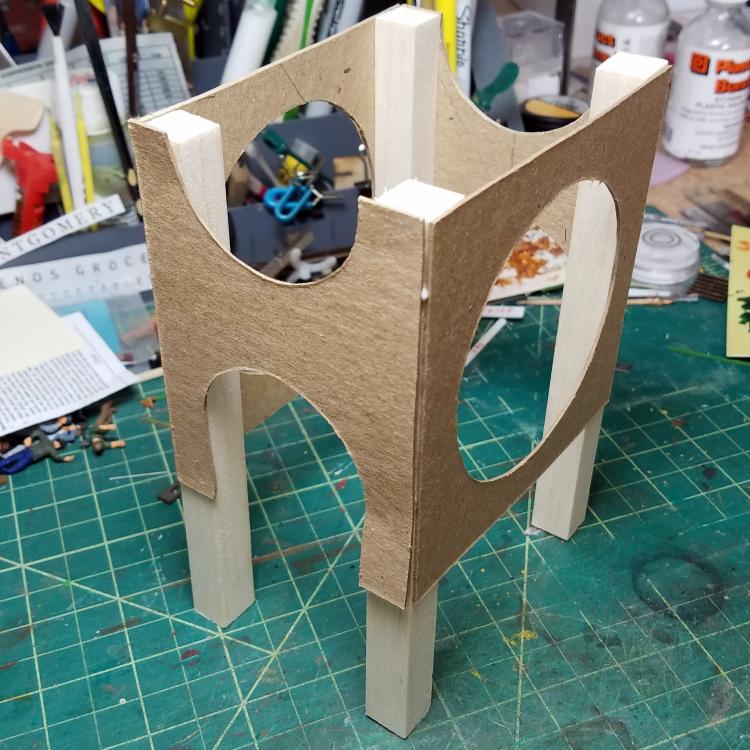
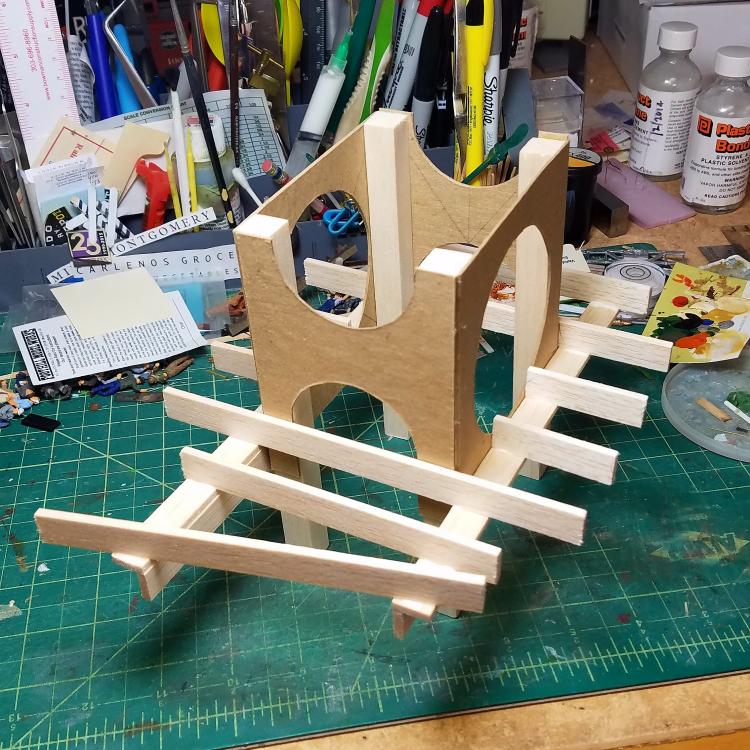
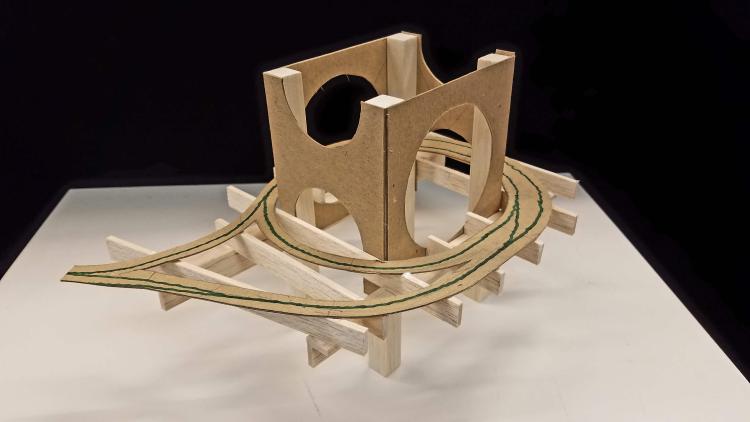
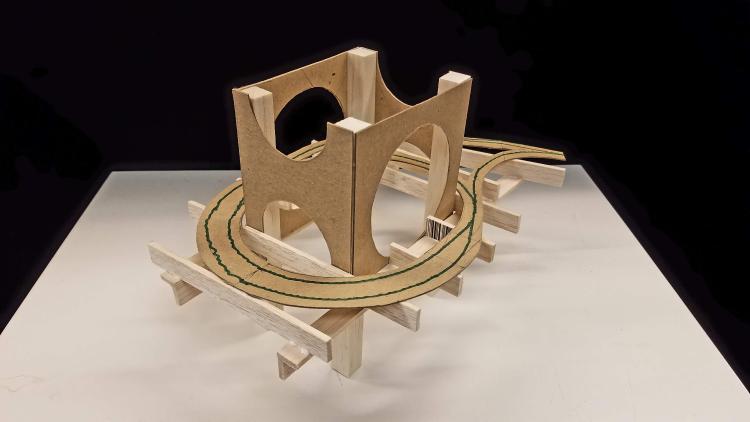
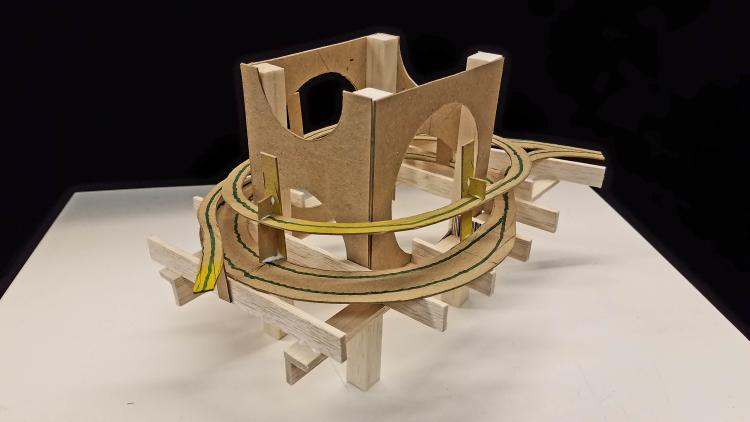
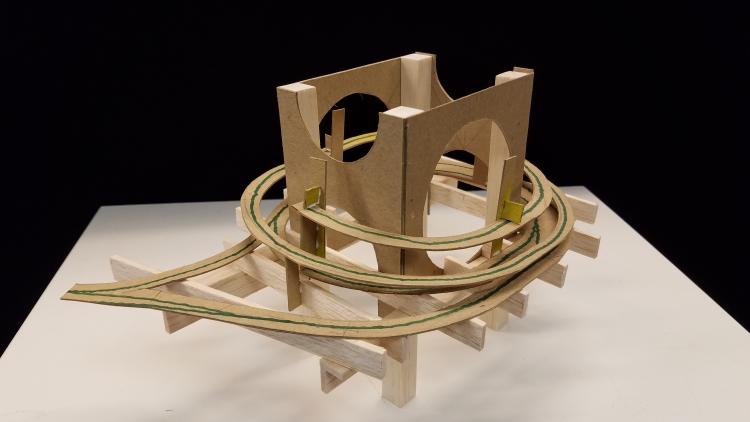
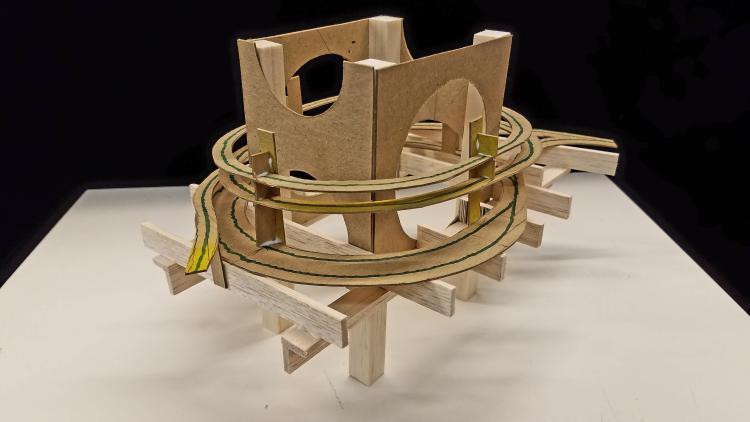
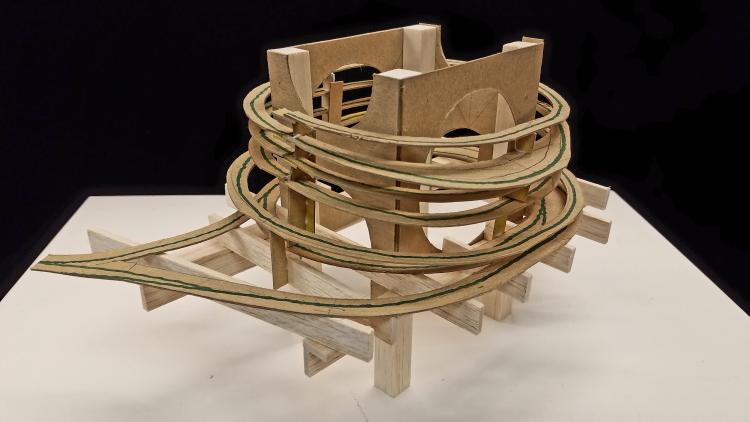
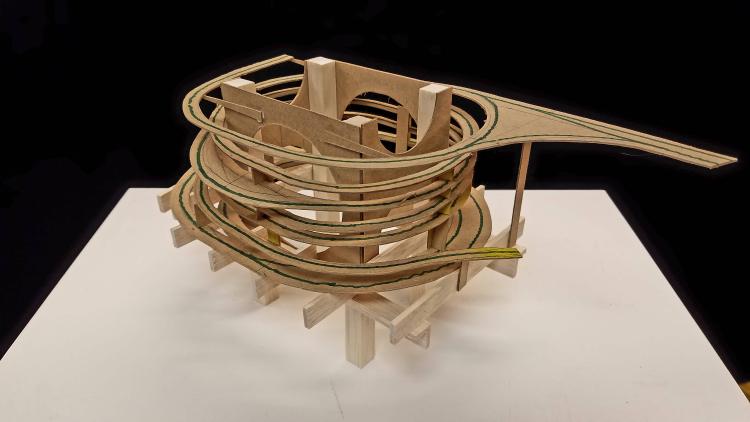
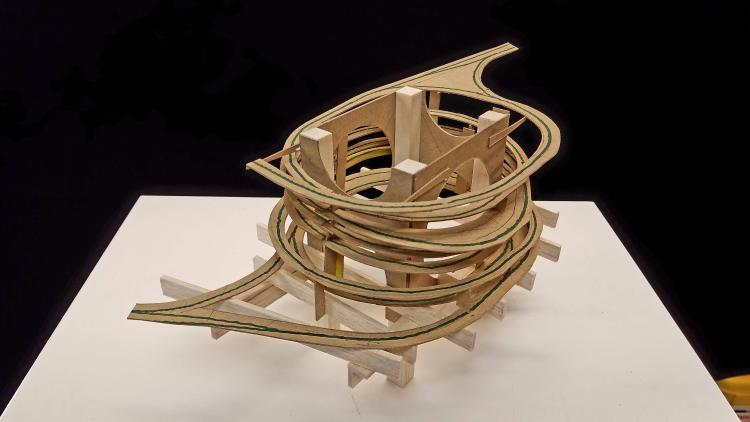
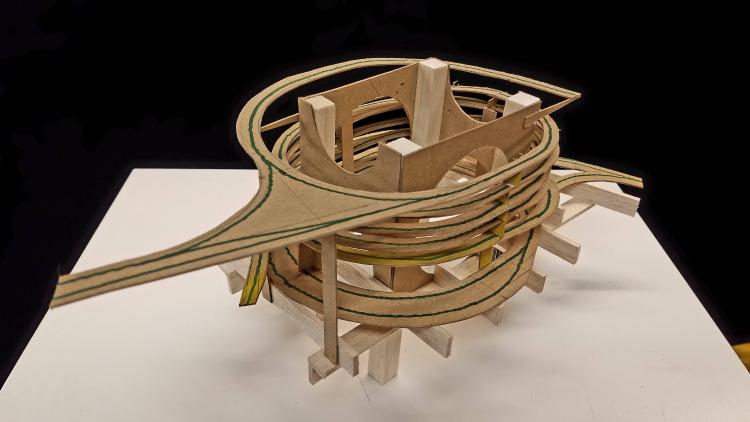
One benefit of my model is that it helped to illustrate opportunities for splices on each segment. The first circuit will have a bottom layer extend to support the next circuit, which will match the top layer. It will take some planning, and I bet I screw one up, but it should work.

Colorado is blissfully dry, and I have never had issues with shrinking and swelling that others report. Plywood always has an odd number of plys, and they are laid up in opposite directions (the faces are always in the same direction), so plywood is more dimensionally stable than other (solid) wood products. That is not to say it is perfect, and my Dad and I found 1/4 plywood to be especially crappy. I am hoping that that two layers glued up will be more stable. I guess I could varnish the works before I install it: I am more apt to want to run a router around the edges to take care of any splinters.

Yes, our prototype did favor us with extra tall appliances on the locos. I thought I measured them a while back, but had planned for something like 4" clear. The track will be laid on 1/4" homobed directly to the plywood substrate--that seemed to have among the best sound characteristics when MR published tests years ago. The 12" tangent section helps extend the length of each circuit and keep the grade to about 2%. Half the first circuit beyond Solitude will be at the ruling grade and not hidden, so any issues will get ironed out in the open. Also, even B-4-Fs are only good for 4-5 cars on the heavy grades, so two and three-engine trains will match the prototype.

I have been collecting information on helices for about ten years now. It is astounding how many problems there are to solve in the construction of one of these beasts!
Keith Hayes
Leadville in Sn3
12345