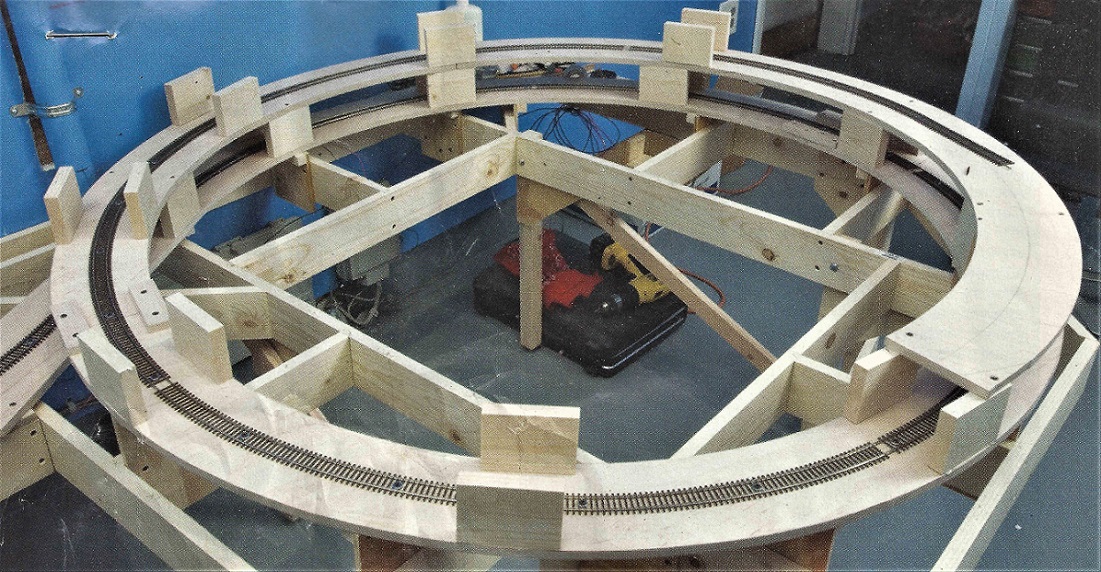
The Helix

Previous Topic Next Topic
 
classic Classic list List threaded Threaded
95 messages Options
12345
Reply | Threaded
Open this post in threaded view
|

Re: The Helix

Geoff Hamway
Jim,

Rather than trying to cut special joints in your 1/2" plywood arcs, you might consider laminating 1/4" arcs with staggered joints.  More work to cut and assemble (twice as much woodworking fun!), but eliminating the 1/2" splice plate would reduce the grade considerably.  I've also experimented with steel Strong-ties (Home Depot) to splice plywood sections in some places, with good results.  Caveat:  I haven't used the plates where there's a vertical curve or into less than 3/4" plywood, but that's not to say they wouldn't work.

You might also reconsider the 1/2" homasote -- I think the 1/8" stuff (actually 3.5 mm) is plenty, but there are those who don't use any in their helix and don't miss it.  I expect that my resulting grade will be back in the 2.1% range, which should allow my little consolidations to pull a caboose AND a freight car or two to the top!  

Geoff
Reply | Threaded
Open this post in threaded view
|

Re: The Helix

Jim Courtney
This post was updated on .
Excellent suggestions, Geoff.

I had considered using sub-roadbed half circles of 1/2" plywood cut extra wide, to allow 2 to 3 inch long wood blocks that would be about 4 inches tall, to be used as the support risers on each side of the track. The joints would fall on the longer blocks, with 1 1/2" of the block to screw the abutting circle segments down onto.

Any advantage to using 1/4" tempered masonite, sandwiched together with staggered joints (as with Keith and Geoff's 1/4 inch plywood method)?? Would it be more or less likely to warp or sag than plywood?

And Geoff, since you are modeling the Telluride branch in the first decade, I suspect your helix will become known as "Keystone Hill(ix)" . . .
Jim Courtney
Poulsbo, WA
Reply | Threaded
Open this post in threaded view
|

Re: The Bauhaus Helix

Paul R.
In reply to this post by Keith Hayes
How about metal joining plates under each joint to strengthen them? Paul R.
Reply | Threaded
Open this post in threaded view
|

Re: The Bauhaus Helix

Jeff Young
I’d be worried about internal voids using 1/4” plywood, unless you use Baltic birch or Appleply.  Otherwise, I think I’d go with two layers of 3/8”.

And definitely stagger the joints.

Reply | Threaded
Open this post in threaded view
|

Re: The Bauhaus Helix

Don Gustavson II
I like they idea of exposing some of the helix for Kokomo. Looking forward to seeing how that turns out.
HOn3 is the path I have chosen.
The Nearly Historical Railroad.
http://www.nhrailroad.com/
Reply | Threaded
Open this post in threaded view
|

Re: The Bauhaus Helix

Pat Student
On my last layout I made the sub roadbed from 3/4" plywood and used biscuits to join the sections, no splice plates.  For supports I cut a number of 1 X 3's on a chop saw for consistent length.  Thee first turn was supported every 90 degrees and subsequent turns were only supported by the 1 X 3 supports.    No need for center frame work as Kieth has shown.
Reply | Threaded
Open this post in threaded view
|

Re: The Helix

Jim Courtney
In reply to this post by Jim Courtney
Here is my planned method for building my aborted helix (who knows, maybe it isn't aborted, just paused):


The photo is from an article by Jeff Johnson, "Construct a Simple and Reliable Helix", in the April, 2008, issue of Model Railroader.

With the same height wood risers attached to the top of loop (n) and supporting the bottom of loop (n+1), there may well turn out to be some horizontal clearance issues with long locomotives with a wide overhang on the curve. With this method, Keith likely couldn't used leased D&RGW K-37s for C&S road power.
Jim Courtney
Poulsbo, WA
Reply | Threaded
Open this post in threaded view
|

Re: The Helix

Chris Walker
Now I'm not modelling anymore and have never built a Helix but since building my fullsize tramway I have come to understanding that obtaining a quote from a profile cutter, be it laser, waterjet or plasma etc is well worth the effort of a phone call or visit to discuss your requirements, the results way cheaper than you would think.

I'd see no problem in having the radial roadbed  profile cut from 1/8" steel sheet, the joints being placed at the location of the paired support columns.  These columns would only need a sawblade curf cut in at a spaced interval to hold the steel plate curves, and a short cross-wise rod keeping the columns put every so often perhaps at 120 degrees?  3mm or 1/8" would provide all the support you need if the length was kept at or under 2ft.
UpSideDownC
in New Zealand
Reply | Threaded
Open this post in threaded view
|

Re: The Helix

Pat Student
In reply to this post by Jim Courtney
Jim

This method doesn't present clearance problems by itself. Consider the combination of the elevation difference between the entry and exit points, the maximum grade allowed (hence the number of turns to gain the elevation), thickness of the subhead bed, and track radius;  adjustment of one eliminates any clearance issue.

From you photo it appears the you used 1 X 4's on edge (3 1/2").  I used, I believe, 4 1/2" long supports with Homosote road bed with no clearances issues including the entry/exit points having vertical transition curves.  K-36 / K-37's no issues. Scale: Sn3, of course.
Reply | Threaded
Open this post in threaded view
|

Re: The Helix

Keith Hayes
In reply to this post by Keith Hayes
Here we go!

Nothing ventured,  nothing gained.
Keith Hayes
Leadville in Sn3
Reply | Threaded
Open this post in threaded view
|

Re: The Helix

Keith Hayes
I knew that the helix was going to take up some real estate and it does.

Leadville is in the background and the high line is to the left.

I realized that with some planning,  the lowest level,  which will be the return loop/ Denver staging could function as a test track. The inside radius is 30" and the outside radius will be 34". That should easily accommodate the passenger train.
Keith Hayes
Leadville in Sn3
Reply | Threaded
Open this post in threaded view
|

Re: The Helix

South Park
  Take up lots of real estate ?

  You hit upon one of my annoying places in life ...  the disconnect between what
I can see in my head, versus the crushing reality of, well, .....  reality !

  I guess the realities of cubic underestimation are still rock solid obstacles, some
40 years later !
"Duty above all else except Honor"
Reply | Threaded
Open this post in threaded view
|

Re: The Helix

Todd A Ferguson
In reply to this post by Keith Hayes
Being both a modeler and woodworker I find the helix an interesting construction.  I would recommend that any and all wood benchwork be sealed with either a varnish or paint to help reduce any expansion and contraction issues.  Plywood is more stable than solid wood especially in quality plywood intended for cabinets.  Solid wood expands and contracts in width primarily, thickness to a much lesser extent and in length virtually not at all.

As to the helix construction itself if you choose plywood I would suggest that 1/2” plywood with as many plus as possible would be best.  This would suggest Baltic birch or cabinet quality plywood...$45 a sheet and up.  Not inexpensive if using cookie cutter design.  I have woodworking specialty tools for but joining such pieces securely but most would not nor could the cost be justified for a helix for most people.  I would suggest a high quality 1/4” plywood splice plate glued to the bottom of any joints and clamped until they dry.  If you want accurate repeatability of parts make a template and router copies.  You could then also easily include bump outs for holes for threaded rods if that was selected to separate the helix levels.  Threaded rods enable fine adjustment but consistently cut blocks can also provide even support between levels and probably are easier and less expensive to build with too.

The other option would be a spline construction with 3 or 4  1” wide strips with 3/4” thick, 1” wide blocks glued in a staggered arrangement between the strips.  This construction requires a way to accurately cut the strips which can be a challenge.  Also the blocks need to be cut, I cut them from 3/4” plywood scraps.  This method is much more material efficient in my view but more time to build for some people.  A jig can be set up to produce the pieces off layout and then install if desired or it can be built in place.  You get automatic easements into curves using this method too.  And it is easy to add on later or modify if needed compared to plywood cookie cutter construction.  

There are lots of examples of helix construction on the web I’m sure.  If anyone has any questions feel free to ask me.

Todd
Reply | Threaded
Open this post in threaded view
|

Re: The Helix

South Park
  I might add to Todd's comments that using a penetrating oil, such as a 50/50
mix of linseed oil and mineral spirits, will do a much better job of making wood
resistant to any atmospheric moisture being absorbed, causing expansion and
contraction, than surface "skinning" treatments, such as paint or varnish.  One
can always apply more to areas where new cuts are made, holes drilled, etc.

  Once absorbed IN TO the wood, it repels internally, as opposed to a surface
coating that can be breached through cuts and dings and scratches.
"Duty above all else except Honor"
Reply | Threaded
Open this post in threaded view
|

Re: The Helix

Geoff Hamway
In reply to this post by Todd A Ferguson
Hi Todd --

I built my helix using the same approach you suggested, 1/2" Baltic birch sections with 1/4" Baltic birch splice plates.  Despite my rudimentary carpentry skills, the resulting helix is very sturdy and was relatively easy to build.  For simplicity, I used blocks to separate the levels -- getting a consistent grade takes a little fussing on the first turn, but after that the blocks are all the same height.  Like everyone, I'd prefer not to have a helix, but it works fine.  Mine is built over stacked return loops so it looks more complex than it really is, but if I can do it, anyone can!

Geoff Hamway

Reply | Threaded
Open this post in threaded view
|

Re: The Helix

Todd A Ferguson
Very nicely done...  the beautiful Woodworking is that there are many paths to a successful result.

Sent from my iPhone

On Sep 18, 2019, at 12:17 PM, Geoff Hamway [via C&Sng Discussion Forum] <[hidden email]> wrote:

Hi Todd --

I built my helix using the same approach you suggested, 1/2" Baltic birch sections with 1/4" Baltic birch splice plates.  Despite my rudimentary carpentry skills, the resulting helix is very sturdy and was relatively easy to build.  For simplicity, I used blocks to separate the levels -- getting a consistent grade takes a little fussing on the first turn, but after that the blocks are all the same height.  Like everyone, I'd prefer not to have a helix, but it works fine.  Mine is built over stacked return loops so it looks more complex than it really is, but if I can do it, anyone can!

Geoff Hamway


If you reply to this email, your message will be added to the discussion below:
http://c-sng-discussion-forum.41377.n7.nabble.com/The-Helix-tp9915p14462.html
To unsubscribe from The Helix, click here.
NAML
Reply | Threaded
Open this post in threaded view
|

Re: The Helix

Keith Hayes
This post was updated on .
In reply to this post by Keith Hayes
This is the frame,  which I call the "sedan chair" as it resembles the thing a nobel would be carried around in pre-carriage.
The holes provide access to track from the inside and stiffen the frame.

And the return loop/ staging track.
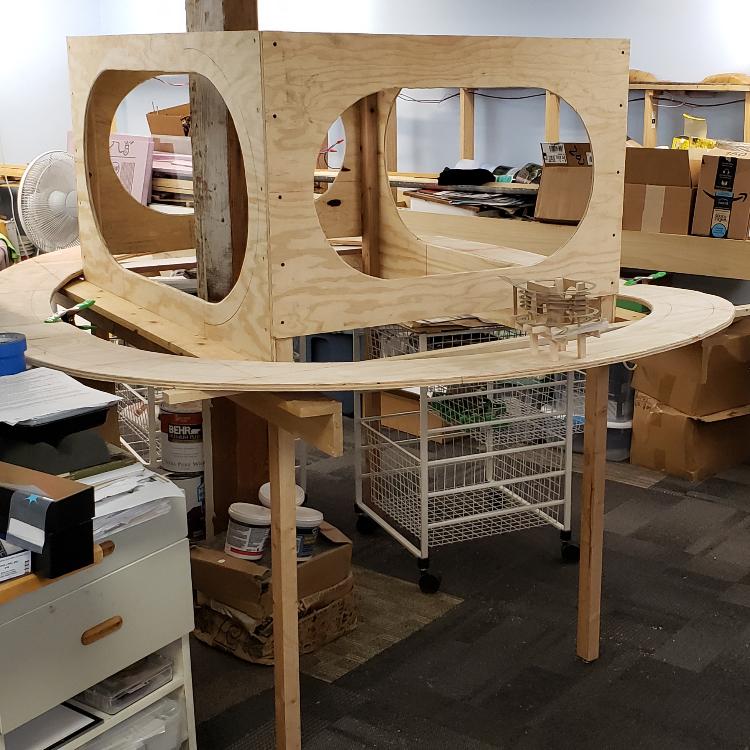
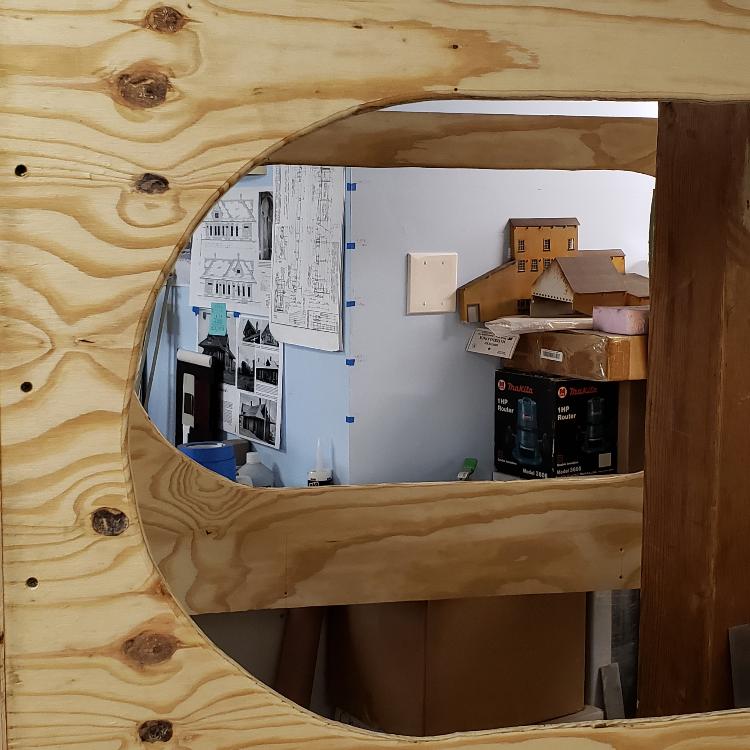
The blue tape marks indicate the helix track heights.
Keith Hayes
Leadville in Sn3
Reply | Threaded
Open this post in threaded view
|

Re: The Bauhaus Helix

Pat Student
In reply to this post by Keith Hayes
Kieth

The cutting angle is 22.5º.  Adding 48" of tangent to a circle of 30" radius will lower the grade from 2.12% to 1.69%;  adding 60" of tangent will only lower the grade to 1.61% for a helix with 4" TOR to TOR.  For 5" TOR to TOR the grades would be 2.65%, 2.11%, and 2.01%.

I would stay away from laminating 1/4 plywood.  It would need to be clamped with screw action clamps across the width about every 6", clamp centers, and a 2" wide clamp face.  Anything less risks de-lamination and warping.  Also, I've had experience with cutting 1/4" plywood where the pieces  warp, twist or cup.  This is my experience from woodworking shy of using a vacuum bag which does not lend itself to this project.

Would use 1/2" plywood minimum with biscuits to align the ends with blocks outside the track clearance to separate the layers of the helix.

Pat
Reply | Threaded
Open this post in threaded view
|

Re: The Bauhaus Helix

Todd A Ferguson
If one wants to laminate pieces together and has a lack of clamps it is pretty easy to use drywall screws every few inches randomly placed to act as clamps until the laminated pieces dry.  If doing 2 pieces of 1/4 you might want to screw to a thicker piece of 3/4” plywood to keep things flat.  I have use this technique to laminate 3/4” wood to 7 inches thick for large window frames.  When the laminate dries you simply remove the screws and reuse them...

Sent from my iPhone

On Sep 30, 2019, at 12:53 PM, Pat Student [via C&Sng Discussion Forum] <[hidden email]> wrote:

Kieth

The cutting angle is 22.5º.  Adding 48" of tangent to a circle of 30" radius will lower the grade from 2.12% to 1.69%;  adding 60" of tangent will only lower the grade to 1.61% for a helix with 4" TOR to TOR.  For 5" TOR to TOR the grades would be 2.65%, 2.11%, and 2.01%.

I would stay away from laminating 1/4 plywood.  It would need to be clamped with screw action clamps across the width about every 6", clamp centers, and a 2" wide clamp face.  Anything less risks de-lamination and warping.  Also, I've had experience with cutting 1/4" plywood where the pieces  warp, twist or cup.  This is my experience from woodworking shy of using a vacuum bag which does not lend itself to this project.

Would use 1/2" plywood minimum with biscuits to align the ends with blocks outside the track clearance to separate the layers of the helix.

Pat


If you reply to this email, your message will be added to the discussion below:
http://c-sng-discussion-forum.41377.n7.nabble.com/The-Helix-tp9915p14553.html
To unsubscribe from The Helix, click here.
NAML
Reply | Threaded
Open this post in threaded view
|

Re: The Helix

Chris Walker
In reply to this post by Keith Hayes
Keith

that Sedanchair you envisioned,
my mind saw this ....

\

UpSideDownC
in New Zealand
12345