The Cimarron Ingoldsby Dump Car

Previous Topic Next Topic
 
classic Classic list List threaded Threaded
26 messages Options
12
Reply | Threaded
Open this post in threaded view
|

The Cimarron Ingoldsby Dump Car

Keith Hayes
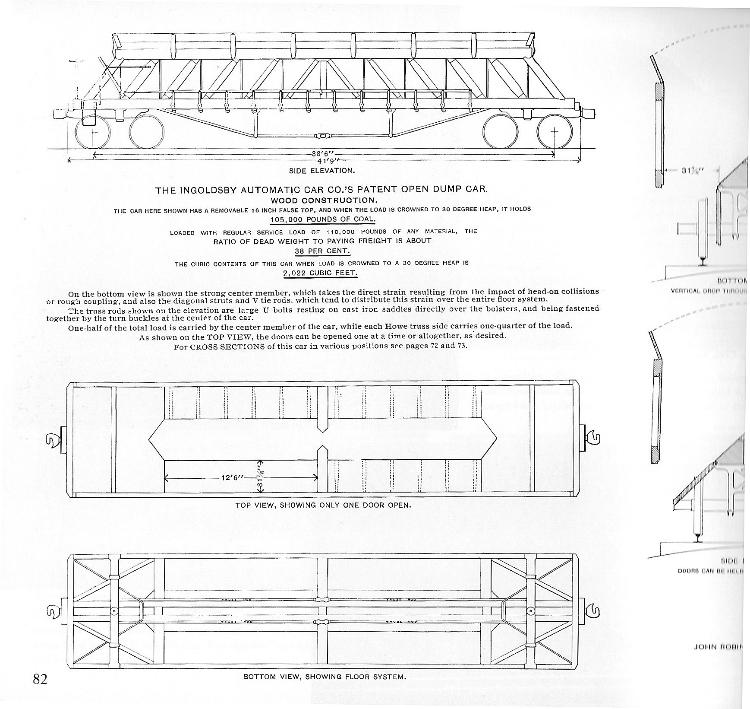
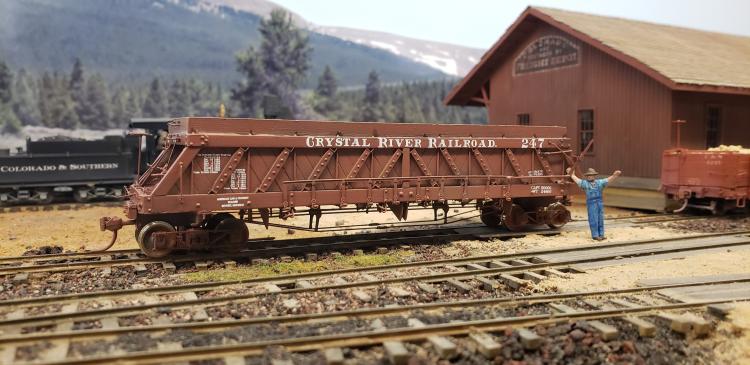
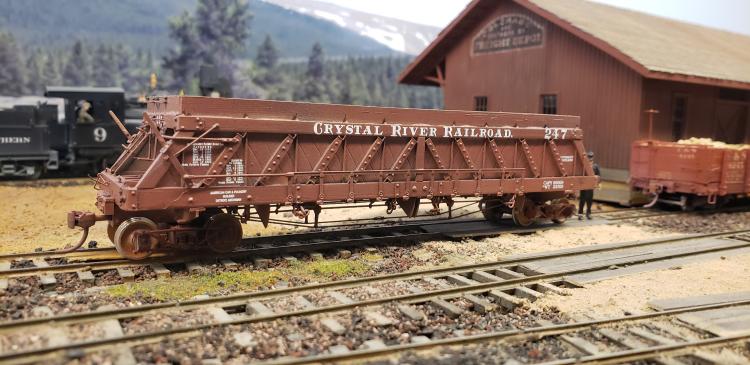
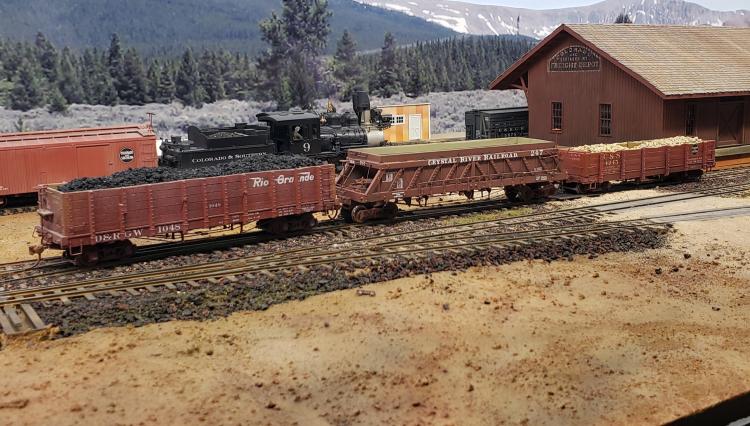
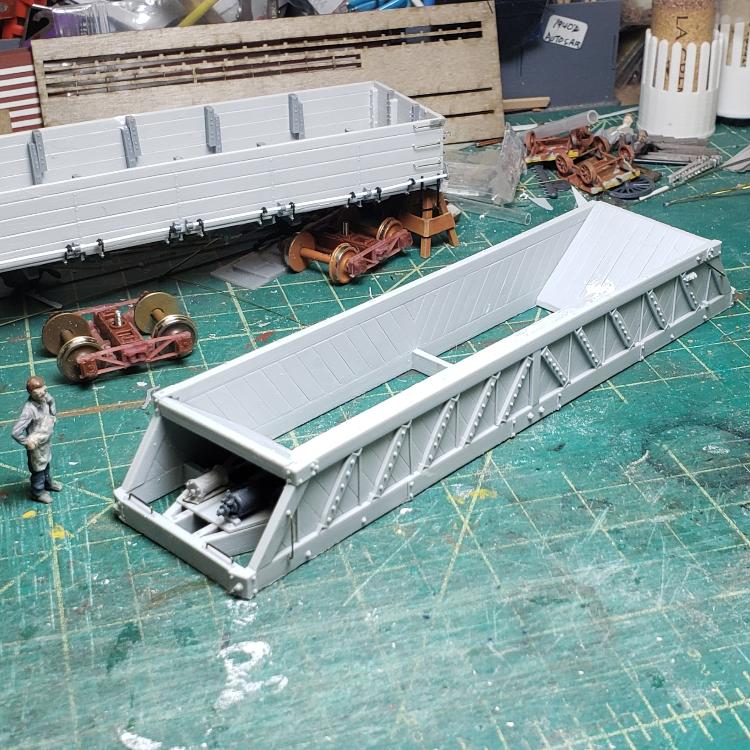
I was looking for something different to build lately, and spied the Cimarron Ingoldsby Dump Car in the cabinet. Though not a C&S prototype, it is odd enough that it may be of interest here. According to Sloan, The Ingoldsby cars were designed by Frank S. Ingoldsby of Cripple Creek and licensed to ACF for construction. The Crystal River Railroad ordered 40 in 1900 and another 10 in 1902 for use between Coal Bank and Redstone to move coal to the coking operation at Redstone for CF&I. This was the same operation that the C-21s and C-25 were built for. The operation closed down and the D&RG acquired the dump cars in 1916.

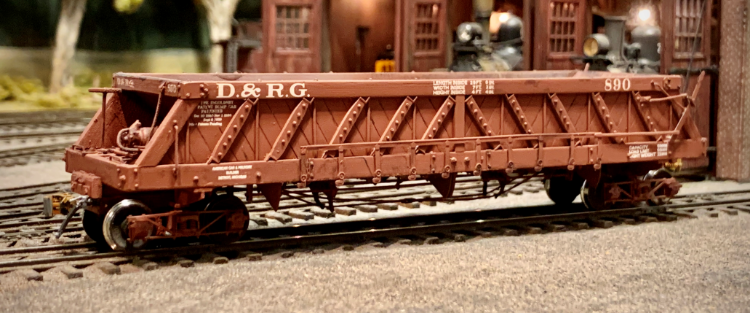
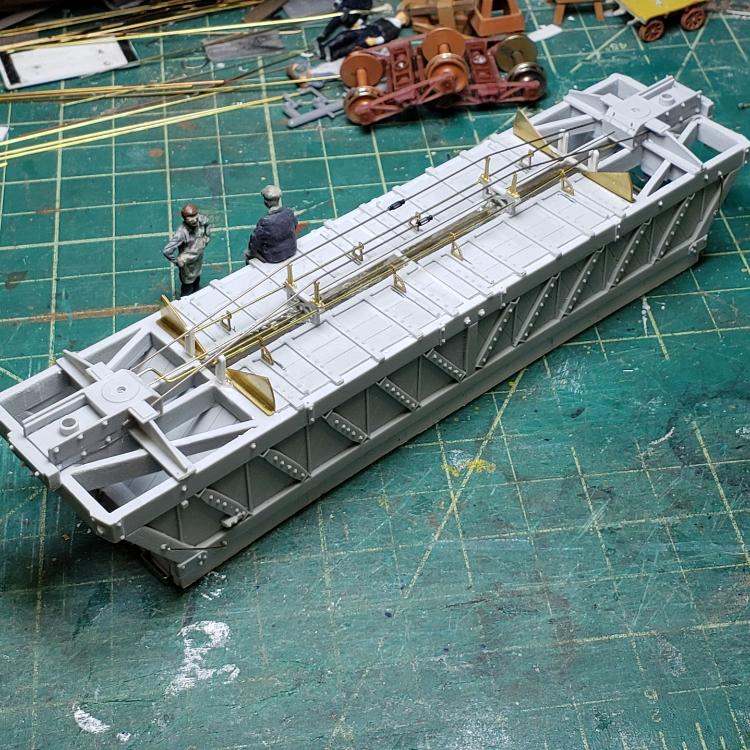
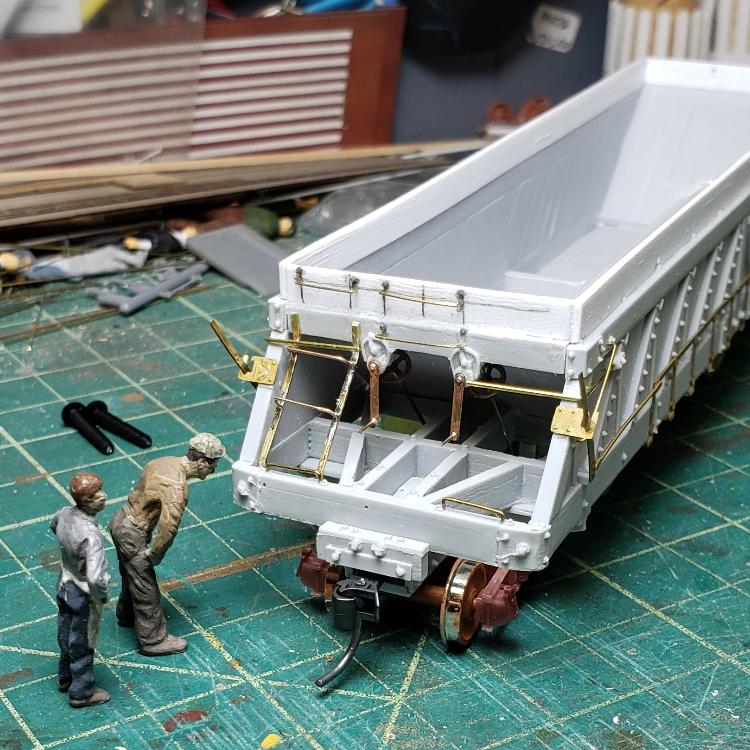
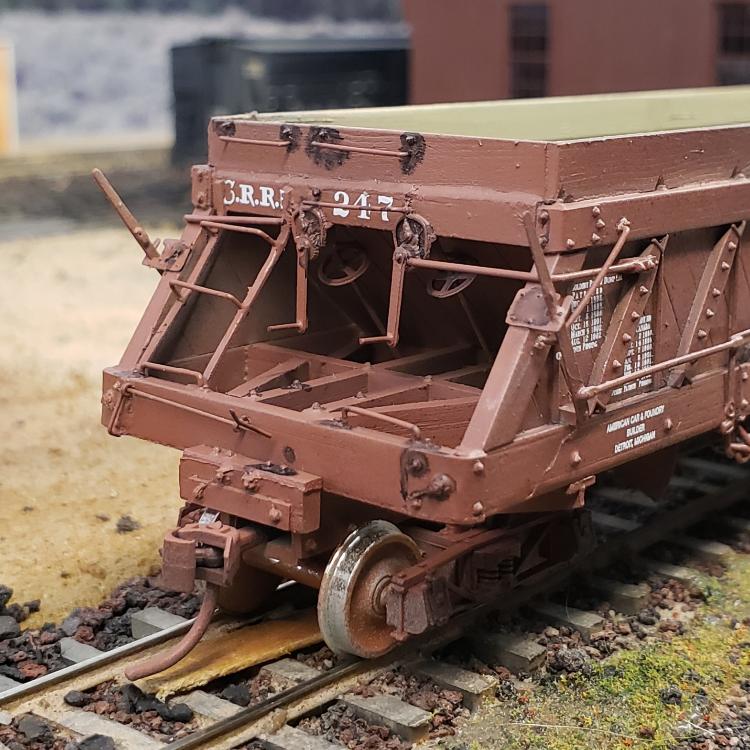
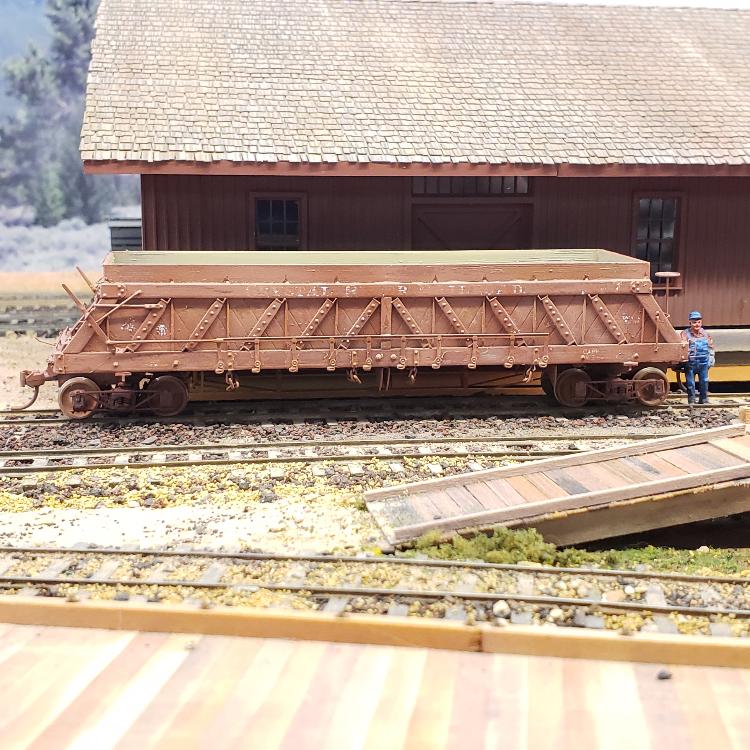
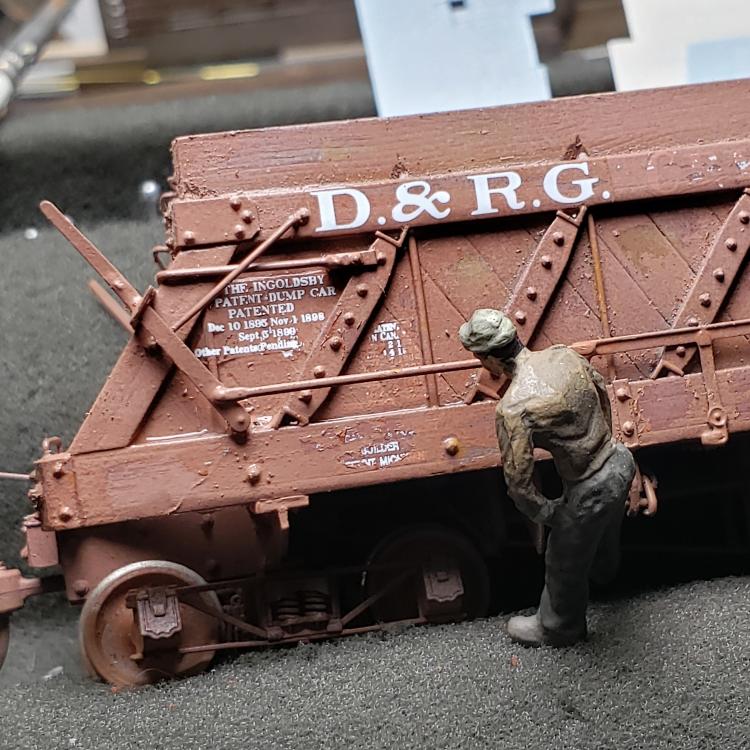
Cimarron released their resin kit in 2008. There is a nicely detailed body casting, the slope sheets, bolsters, sill crown and doors are separate parts. I started on the model and posted a picture on the D&RGW Facebook site and Marc LaChey quickly shared a pic (above) of a built model he acquired from Tom Troughton. This was very helpful as I had completed the body and was contemplating the next steps.

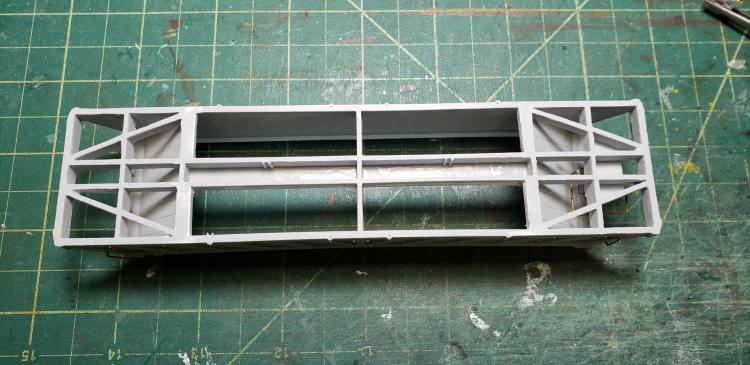
The bottom of the body casting is flat, and initially I thought there might be a steel plate at the bottom of the car to get the model up to weight. The resin part had a thin layer of resin at the bottom that is to be removed between all the body sills and cross pieces. The dump doors fit tightly between the sills, so there is no place for weight. I asked Marc if he could share a pic of the bottom of his model and he readily agreed:

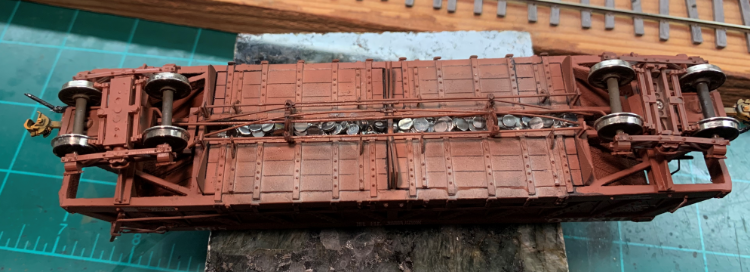
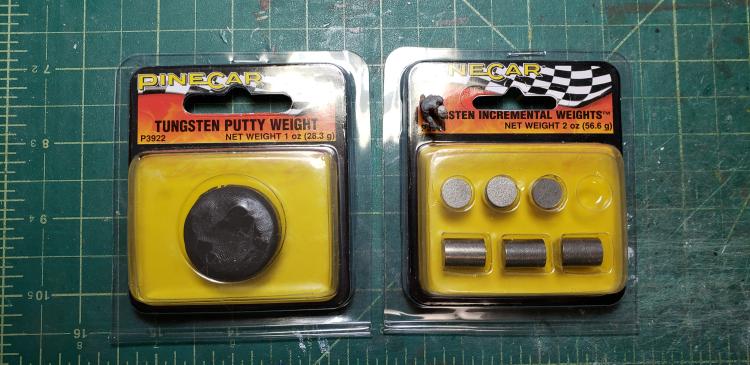
This image is very informative, showing the truss rods, queen posts and doors. I also noticed the small silver discs in the space between the center sills. I asked Marc, what are the silver discs? He replied that the model was very light when he received it. Marc shared that he Googled 'Pinewood Derby Weights' and discovered these discs made of tungston, which is denser then lead. I found Woodland Scenics has a Pinewood Derby division, and there are a variety of weights for purchase including the small discs in ounce increments, some with double stick tape, and most interestingly, a tungsten putty! Marc shared he would have preferred to use the putty, but the air line and truss rods were in the way. I have some on order and plan to fill the cavity of my model.

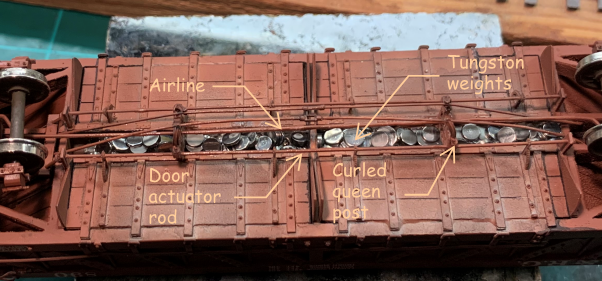
I noticed in the photo of the underside that the queen posts had curled. These are resin parts cast as one piece with the cross-braced frame to be inserted between the center sills. The current question is whether to use the resin part or replace them with some 12" Tomalco brass castings from the parts box? The outer queen posts on D&RGW high side gons are more exposed and apt to bend; being on the center sills, the Ingoldsby queen posts may be more protected.

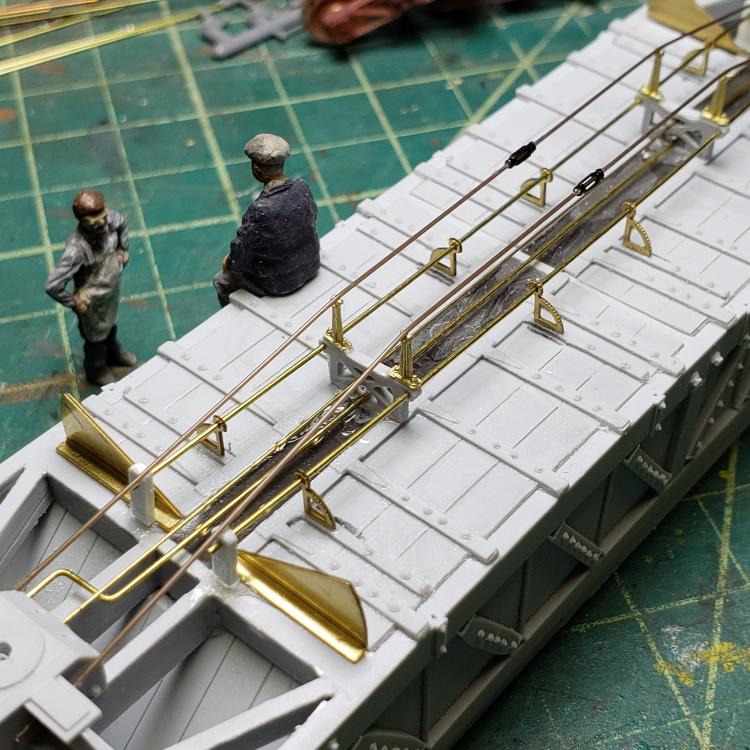
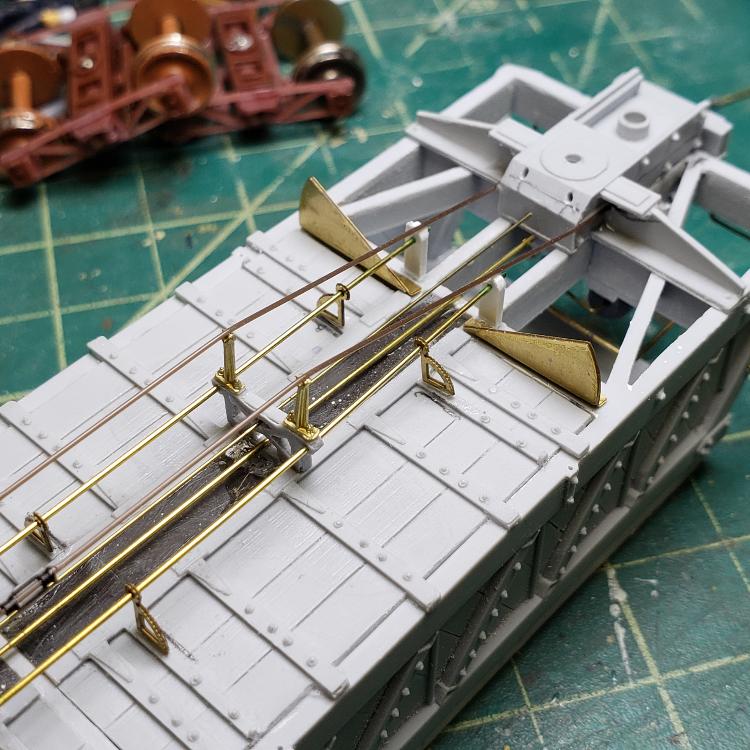
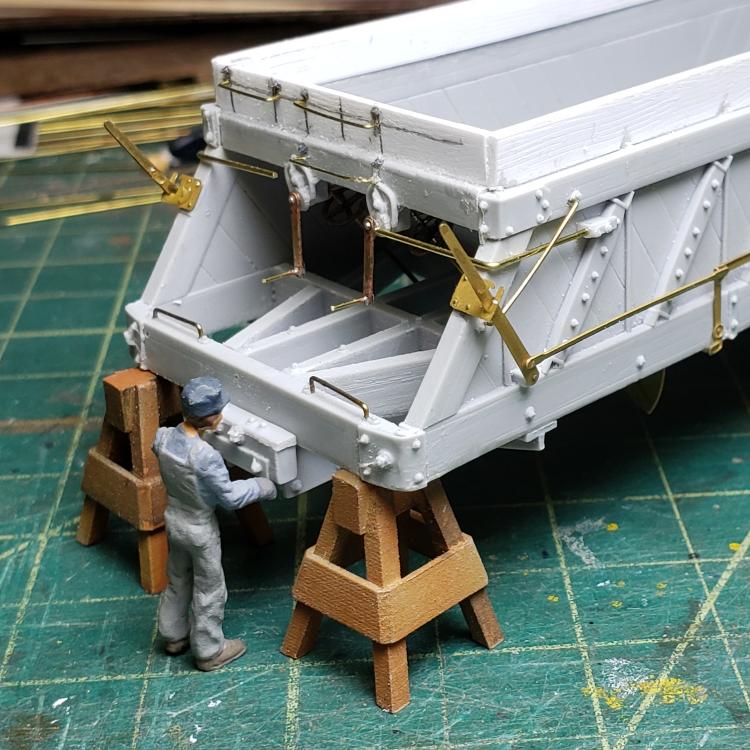
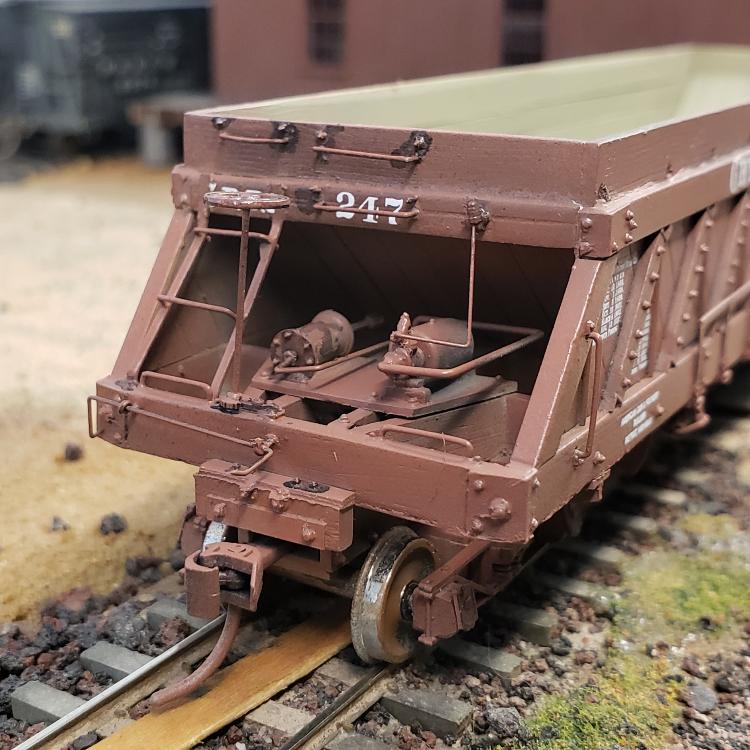
This is one notable feature of the Ingoldsby design: queen posts and truss rods are only provided at the center sills; the sides are trusses that span between the bolsters. Handles on the A end of the car actuate a gear drive along the center sills that opens the bottom doors. Cimarron provides an etched brass fret with gears, door guards and the side latch mechanism. The brake cylinder and reservoir are mounted side-by-side on the B end. The cylinder actuator extends towards the car over the truck: one missing detail is the connecting rod between the trucks, which likely ran along the air line at the center of the car.

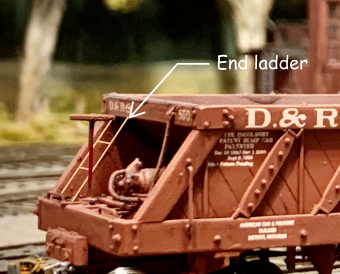
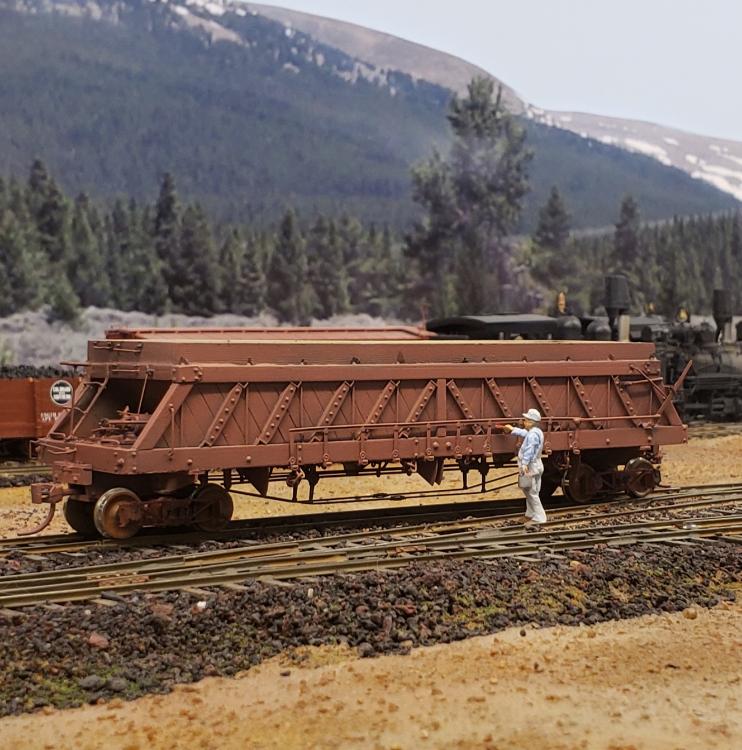
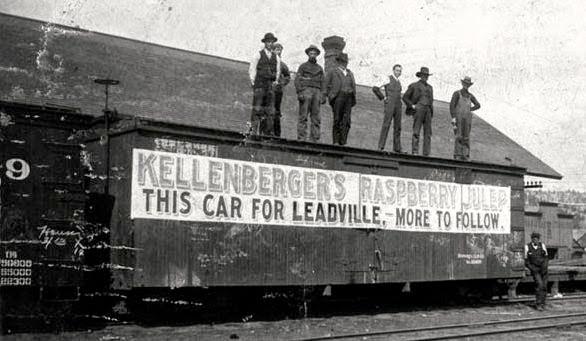
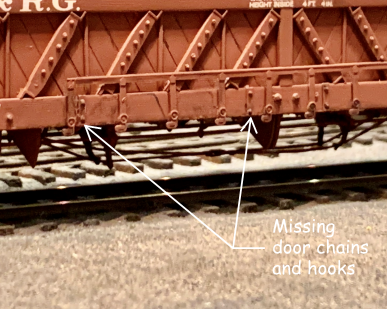
Being 1900-constructed cars, the original construction pre-dates the safety appliances. The minimal number of grab irons is a relief. There seem to be few photos of these cars. A couple builders images, a photo of the cars in use on the Crystal River and an end view in Durango. On the D&RGW boards were added at the top of the car to increase capacity along with some added grab irons and fabricated end ladders. These seem like interesting details to consider for this model. Another item shown in the photos included in the directions are chains on the doors. Hooks on the side of the cars support chains connected to irons on the bottom of he doors to restrain the doors.The hooks would be a nice etching; I will use a segment of brass rod and some chain.

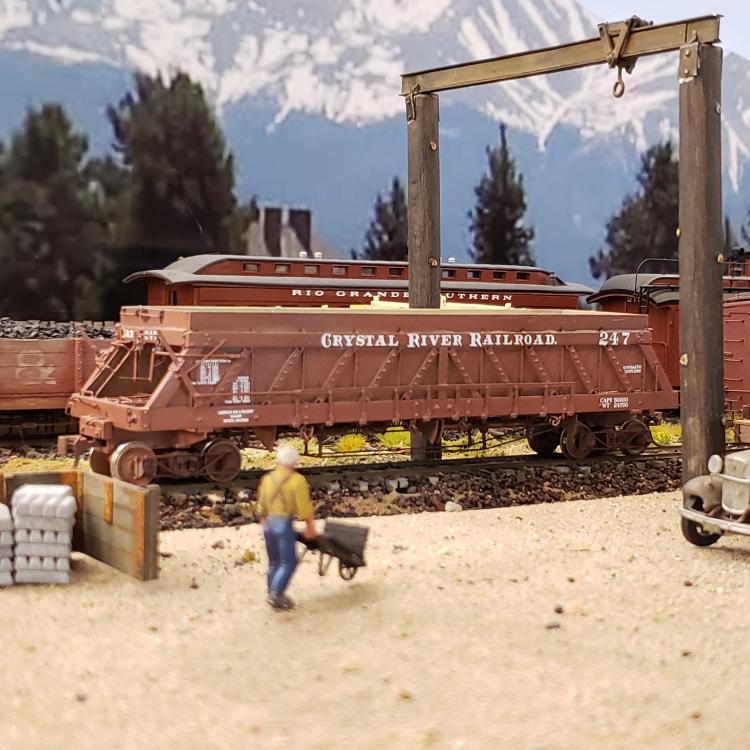
When finished, this car will move from the Gunnison country with Baldwin coal for the smelter in Leadville and return with mine waste used for ballast and rip rap. This will be an opportunity to use the Vallejo chipping medium so the Crystal River lettering will peak through the subsequent paint layers.

More updates after the tungsten putty arrives!
Keith Hayes
Leadville in Sn3
Reply | Threaded
Open this post in threaded view
|

Re: The Cimarron Ingoldsby Dump Car

Pat Student
AFE 4027 , 2-6-18 for Narrow Gauge Dump Cars 901 to 941 completed 12-31-19, $47.50 average / car,  $1,947.56 Total

12" side planks & strengthening of arch bars on trucks to take care of increase capacity.

From Marshall Pass hill job records of 1924, the cars were almost exclusively used to transport company coal to Salida with just a couple loads of company coal to Leadville.

All cars were off roster in 1928.

Reply | Threaded
Open this post in threaded view
|

Re: The Cimarron Ingoldsby Dump Car

Geoff Hamway
In reply to this post by Keith Hayes
Hi Keith --

Thanks for posting this!  Not only are Marc's photos very clear and informative, but it's also reassuring to see that someone has actually built one of these things.  My kit is currently stored in the "next lifetime" section of my overflowing kit storage.

If you have access to Dell McCoy's "Crystal River Pictorial," you'll find a fair number of in-service photos of the cars during their Crystal River RR years.  I don't think any of these are clear or close enough to give you any additional detail info, but they're worth a look (not worth buying the book for, though).  There's also a John Robinson drawing of the cars, which might prove useful.  I can't get a great scan of it, but perhaps the partial scan below will help.  


Good luck and keep us posted on your progress!

Geoff Hamway
Reply | Threaded
Open this post in threaded view
|

Re: The Cimarron Ingoldsby Dump Car

Keith Hayes
Thanks for the drawing, Geoff. I have the Crystal River book somewhere and of course now remember the drawing.

Here is the space between the center sills for the weight.

They are each 3/16" wide and about an inch long. I made the decision to use my 12" brass queen posts, so cut off the resin ones and epoxied the brass in place.

Then I waited for the mail.

The pinewood derby weights came. The solid discs are 3/8" diameter, so too large for the space, but the putty will work, and of course fits the whole cavity. I will find a use for the metal elsewhere.

I pressed the putty into place using some 40 mil styrene as a press and spacer. the putty will stay soft, so I sealed the works with a layer of epoxy,  which will be sanded flush later. I was able to get less than an ounce in the space, so the voids under the brake platform at the B end were also filled with putty. I wish there was room for more weight, but it still makes a difference!
Keith Hayes
Leadville in Sn3
Reply | Threaded
Open this post in threaded view
|

Re: The Cimarron Ingoldsby Dump Car

Jeff Young
There needs to be a category in the train show competitions for posing figures with work in progress.

All the rest of us could compete for second place.
Reply | Threaded
Open this post in threaded view
|

Re: The Cimarron Ingoldsby Dump Car

Keith Hayes
Jeff, thanks so much--the compliment means a lot!

I forget where I got that from. Maybe Ken Patterson? I wish I had more people in appropriate poses. There are clearly the go-to fellas around the shop that really do all the work. But we have some other ne'er do wells around town that occasionally wander in to tell the guys they are,"doing it all wrong."

During the layout tours at the Narrow Gauge Convention a few years back the a couple modeler's wives stopped by to thank me for including women on the layout. So a word to the wise, you should include some ladies, and I need to bring some in the shop too.

Speaking of which, Happy Mother's Day to all the Mom's out there, including my own, and my wife who tolerates so much.
Keith Hayes
Leadville in Sn3
Reply | Threaded
Open this post in threaded view
|

Re: The Cimarron Ingoldsby Dump Car

Keith Hayes
In reply to this post by Keith Hayes
More progress on the Ingoldsby.


The queen posts and truss rods are installed. The door guards operating rods and gears are in place. The train line runs in the upper opening of the queen post; I added a connecting rod in the lower opening to connect the brakes in the trucks.

Now to figure out how to form the center door guard.

The car is reasonably heavy now. It rides very high and looks unusual compared to other narrow gauge gondolas. As the doors on one side open at the same time, I wonder if these cars tended to tip over?
Keith Hayes
Leadville in Sn3
Reply | Threaded
Open this post in threaded view
|

Re: The Cimarron Ingoldsby Dump Car

Keith Hayes
Whew!

This is quite the build, moreover due to the need for safety appliances installed by the D&RGW. Not quite done, but getting close.
Keith Hayes
Leadville in Sn3
Reply | Threaded
Open this post in threaded view
|

Re: The Cimarron Ingoldsby Dump Car

Lee Gustafson
Keith,

Your craftsmanship is evident in the photos of your progress on this car. I appreciate how intricate and delicate this car is. What adhesive did you use to attach the etched brass to the resin part of the car? Thanks for sharing your work. I respect the quality and quantity of your work. Again thanks.

Lee Gustafson
Reply | Threaded
Open this post in threaded view
|

Re: The Cimarron Ingoldsby Dump Car

Keith Hayes
In reply to this post by Keith Hayes
Progress on the Ingoldsby.

Back in the day, I ascribed to the Gazette painting method,  applying layers of black, yellow,  grey and red Floquil paint and scratching through the layers with a fiberglass eraser. Acrylics don't lend themselves to the scratch method and I have been trying this and that since switching to acrylics 20 years ago.

The military guys like to apply black to highlight panel lines. The car first got a bath and a primer coat of Testors light full gray. This was followed by a thin coat of Vallejo black at about 15 pounds.

Then came the red. Why not? The black dried pretty quickly. Some browns went in the pot with a drop of white and a drop of red for a sunburned and well aged eeffect.

After drying for four hours, the car got a light dusting of gloss coat. A wind storm blew over a section of fence and the repair distracted me for about four hours today. The car did not smell of enamel this afternoon so I started in on the lettering.  The Cimarron decals are excellent: I dipped them in water and set the in place with a drop of MicroSet to soften then they slid off the backing and into place. I wish I could say the same of my many Foothills sets I am using for the Phase I coals: these often fall apart.

Anyway the CRR lettering is half done.

Applications of MicroSol will follow to snuggle the lettering into the crevices and after that a clear coat and then chipping fluid and more paint.
Keith Hayes
Leadville in Sn3
Reply | Threaded
Open this post in threaded view
|

Re: The Cimarron Ingoldsby Dump Car

Jim Courtney
Beautiful work, Keith!

I'm curious about this "chipping fluid" -- please go into detail when you tell us about it.
Jim Courtney
Poulsbo, WA
Reply | Threaded
Open this post in threaded view
|

Re: The Cimarron Ingoldsby Dump Car

Dave Eggleston
In reply to this post by Keith Hayes
Looking great! It is so amazing how large that car is. It seems bigger every time I see your pictures.
Dave Eggleston
Seattle, WA
Reply | Threaded
Open this post in threaded view
|

Re: The Cimarron Ingoldsby Dump Car

Lee Gustafson
In reply to this post by Jim Courtney
Jim,

Check out  ak-interactive.com for commercial chipping fluid.

Lee Gustafson
Reply | Threaded
Open this post in threaded view
|

Re: The Cimarron Ingoldsby Dump Car

Keith Hayes
This post was updated on .
In reply to this post by Jim Courtney
Watch and learn, Jim!

//https://www.youtube.com/watch?v=kZxkYRKUleA

This may work better for steel than for wood, but we shall see. I am creating a couple test pieces to experiment with.

I have already started to paint my Murphy roofs with silver paint before the red to provide some galvanized bits shining through the paint. I think this will start to take it to the next step!

As this is a new technique, and Ingoldsby models don't pop up on the open market every day, I am going to test the technique.

Stay tuned.
Keith Hayes
Leadville in Sn3
Reply | Threaded
Open this post in threaded view
|

Re: The Cimarron Ingoldsby Dump Car

Jim Courtney
This post was updated on .
Interesting, a "modern" variation of the old rubber cement mask and peel technique for simulating old flaking paint.

For other thoughts on painting and weathering C&S models, see new thread: http://c-sng-discussion-forum.41377.n7.nabble.com/C-amp-S-Outside-Metal-Roofs-Painting-and-Weathering-Models-td15730.html
Jim Courtney
Poulsbo, WA
Reply | Threaded
Open this post in threaded view
|

Re: The Cimarron Ingoldsby Dump Car

Bill Uffelman
In reply to this post by Keith Hayes
Link did not work for me.

Bill Uffelman 


On Wed, Jun 10, 2020 at 10:07 PM, Keith Hayes [via C&Sng Discussion Forum]
Watch and learn, Jim!

http://https://www.youtube.com/watch?v=kZxkYRKUleA

This may work better for steel than for wood, but we shall see. I am creating a couple test pieces to experiment with.

I have already started to paint my Murphy roofs with silver paint before the red to provide some galvanized bits shining through the paint. I think this will start to take it to the next step!
Keith Hayes
Leadville in Sn3


If you reply to this email, your message will be added to the discussion below:
http://c-sng-discussion-forum.41377.n7.nabble.com/The-Cimarron-Ingoldsby-Dump-Car-tp15591p15722.html
To start a new topic under C&Sng Discussion Forum, email [hidden email]
To unsubscribe from C&Sng Discussion Forum, click here.
NAML
Reply | Threaded
Open this post in threaded view
|

Re: The Cimarron Ingoldsby Dump Car

cdressel
The link should not have the first "http://".

Should be https://www.youtube.com/watch?v=kZxkYRKUleA

Chuck
Reply | Threaded
Open this post in threaded view
|

Re: The Cimarron Ingoldsby Dump Car

Keith Hayes
In reply to this post by Keith Hayes
Before I make my next step and weather the Ingoldsby car the thought occurred that I should take some record shots with the Crystal River lettering, "builder's photos" for all our benefit.


The 'A' end:

This is where all the door operating levers and gears are.
The 'B' end:

The car has a split brake cylinder and reservoir. The lines to the retainer and between the cylinder and reservoir are...unorthodox...but I guess this is how it was plumbed. The car has a 12" extension as added by the D&RG, along with safety appliances.

A Facebook friend commented on the size of the car.

Here is an image withe a D&RG high side gon and a C&S coal for comparison. The load area is about the height and volume of the HS gon, which makes sense as the cars have the same capacity. Size-wise, the car is like a HS gon with platforms on the ends.

So there you are. Now back to the chipping stuff.

In other news, Dave Grandt posted this AWESOME image over at the Narrow Gauge Discussion Forum. I am thinking when I get back to my Tiffany refer project that this banner HAS yo go one one side! The car in the image appears to be a D&RG 30' refer. Maybe it is a C&S car? Looks like the car was painted red at the time, but Pat Student can edjumacate us all.

Anyone handy with Photoshop?
Keith Hayes
Leadville in Sn3
Reply | Threaded
Open this post in threaded view
|

Re: The Cimarron Ingoldsby Dump Car

Jim Courtney
Beautiful craftsmanship on the Ingoldsby car Keith!

As for the "raspberry julep" reefer, it is one of the 32 foot reefers built by the D&RG in 1898 and 1900,
They were numbered 82-99, 107-119, 124, 126, 127, 135, 136, 138-141 and 144-149, to fill in gaps of early reefers that had been removed from service. Some were later rebuilt to 30 feet. They were odd cars with a single ice hatch at either end of the car, located in the center of the car with running boards on either side. They rode on Thielson 3'-7" trucks.

Yes, they were painted red with white lettering. All disappeared in the mid 1920's, so they must have acquired USSA appliances at some point.

Sloan, in his spiral bound freight car book, refers to this as a "class 3r" reefer and has Russ Simpson S scale plans for the car on page 36, very cool. The boxcar to the left in the photo has a chalk mark that suggests the date is sometime about 3/1913.
Jim Courtney
Poulsbo, WA
Reply | Threaded
Open this post in threaded view
|

Re: The Cimarron Ingoldsby Dump Car

Keith Hayes
In reply to this post by Keith Hayes
Troops, work on the Ingoldsby continues.

I worked the test strips with some water as in the video. I applied it with a brush and let it set and repeated.

I cannot say that this is the solution to all our model needs, but it is another tool. Water softenes the paint and makes it craze. I used a variety of stiff brushes and a  knife. If you start a chip with the knife and the water gets under the paint a whole bunch will come off. As with most endeavors, patience and slow work will carry the day. I was disappointed that the water and brush would soften the inside corner of the batten, but not the face. If you craze and soften a large area, the paint will relax over time. In the end I returned to the trusty fiberglass brush.

In the meantime I had applied chipping fluid to the Ingoldsby,  along with under painting some rust on the metal parts and over spraying the CRR lettering with a faded brown.

Water and the  fiberglass brush resulted in this look.


I choose not to seal this,  but went right to the D& RG decals instead. There is still work to be done, but I think this will be an interesting car towards the end of it's career.

Note I don't want to weather the car number too much, or it will make it too hard to identify, even though it will be unique.
Keith Hayes
Leadville in Sn3
12