Type C/UP trucks
123456
123456
|
Wow, great news, Michael's back!!
 (See Michael's post at the end of the prior page.) When you stopped posting last year, I was afraid you'd given up on this project. Or worse, maybe COVID had gotten you. Sorry to hear about the divorce -- been there, done that, not fun. The U.P. type C truck drawings look fabulous. Just need to pull the brake shoes in a bit. I'd say you're ready for a test print soon. I will be happy to be the Sn3 beta-tester. Just let me know when to buy a couple of prints to try out. In the long run I'm gonna need about 18-20 pair. I (and most Sn3 folks) will be using PBL's 26" wheelsets, specs were posted on the first page of this thread. And please don't forget a test print of the Litchfield 12 ton trucks in Sn3, I'm gonna need a bunch of those, too. One last question, Is it possible to print the trucks in brass as well?? I found another use for the type-C trucks: 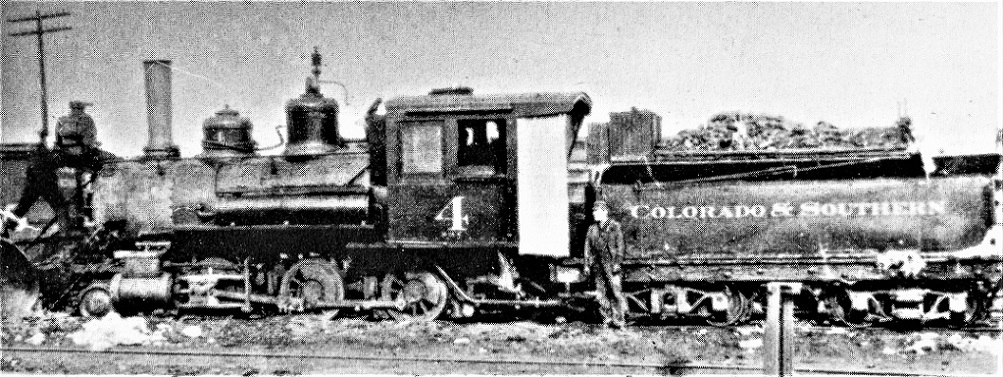 In Margaret Coel's Goin' Railroading. This is engineer "Jumbo" Miller's C&S locomotive number 4 about 1908-1909, being serviced in Como after arriving from Leadville with the passenger train. Note that the front tender truck is a UP 14 ton truck, while the rear truck is a standard Cooke truck. A print in brass would certainly help with electrical pick-up, assuming Shapeways brass conducts electricity . . .
Jim Courtney
Poulsbo, WA |
|
I checked some of my current model files, and I would expect that a brass version in S scale would be approximately $80 per pair. I'm not sure what modifications would be required on my end, but I know that their process is to print it in wax before it goes through the traditional investment casting process.
It would probably be easier (and cheaper) for me to design some sort of wiper supports so that you could add some phosphor bronze wire/strip pickups. I rather like the look of that mogul with mismatched trucks. The 14t trucks are where they should be...under the lighter part of the tender! Since one of those truck has 7t capacity, the tender would have weighted around 25t fully loaded, that leaves 18t for the Cooke truck to carry! I'd be the loading was something more like 10t on the front and 15t on the rear truck. One of the Oahu Railway 0-6-0s had elliptical springs in one truck and coil in the other, naturally, that's the one I want to model first! |
|
In reply to this post by Michael York
Thoughts/comments on my trucks?
From an old Enginedriver's point of view......  .....I'd want to see a whole lot more meat on those brakeblocks before I'd be setting off downgrade, even on a 2%. .....I'd want to see a whole lot more meat on those brakeblocks before I'd be setting off downgrade, even on a 2%. 
UpSideDownC
in New Zealand |
|
In reply to this post by Michael York
Yep, I figured printing (casting?) trucks in brass would be pricy.
I can see how I could drill and tap a hole in the bottom of the plastic bolster for a small metric screw and mount a piece of PCB, with attached phosphor bronze wire pickups from the wheels and a lead from truck to tender frame. One other thought, the brake beams/shoes seem to be a bit low, the bottom of the brake shoes almost touching the rail--would raise them to as close to horizontal as possible. Pardon my enthusiasm but these are going to be great!! As an aside, C&S number 4, rebuilt in the summer of 1900, seemed to have tried out every type of C&S truck on its tender: 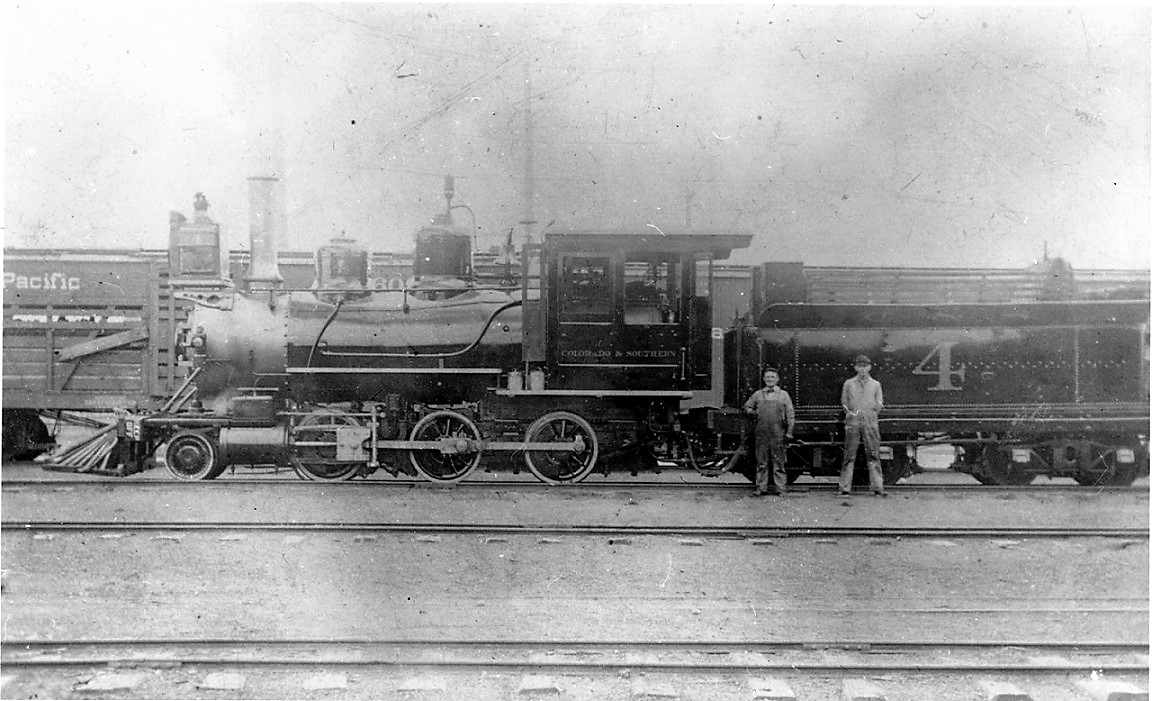 Shortly after leaving the C&S shops, the tender seems to be rolling on Peninsular style 20 ton trucks. The tender is also longer than the standard Cooke tender of the era, perhaps from one of the larger 2-8-0s or a copy of one. And there is another mystery stock car for Chris . . .
Jim Courtney
Poulsbo, WA |
|
I was thinking about just including the brakebeams with holes in them for brass wires to hold them to the truck bolster. That would make them slightly cheaper and give the modeler more freedom to select their choice of wheel size.
I'll do some electronic surgery on them to reduce the material in the bolster and spring plank...that's part of the variation between scales since the minimum wall thickness is the same for any scale. |
|
If you go the route of separate brake beam, please consider offering a print of 4 to 8 brake beams as a separate item.
I have several pair of brass TLS 20 ton trucks that I'm going to mount NWSL wheel sets in to use as tender trucks c.1901-1909. Plastic replacements for the brass brake beams would minimize the chances of shorts.
Jim Courtney
Poulsbo, WA |
Definitely! Insulated brake beams are nice! I had a chance to re-contour the brake shoes for 24" wheels. I went with a 12.5" scale radius on the face, but that was silly since it should match the wheel  I aligned the height of the brake beam based on the tie bar at the bottom of the truck...which is what I think I see in the photos. 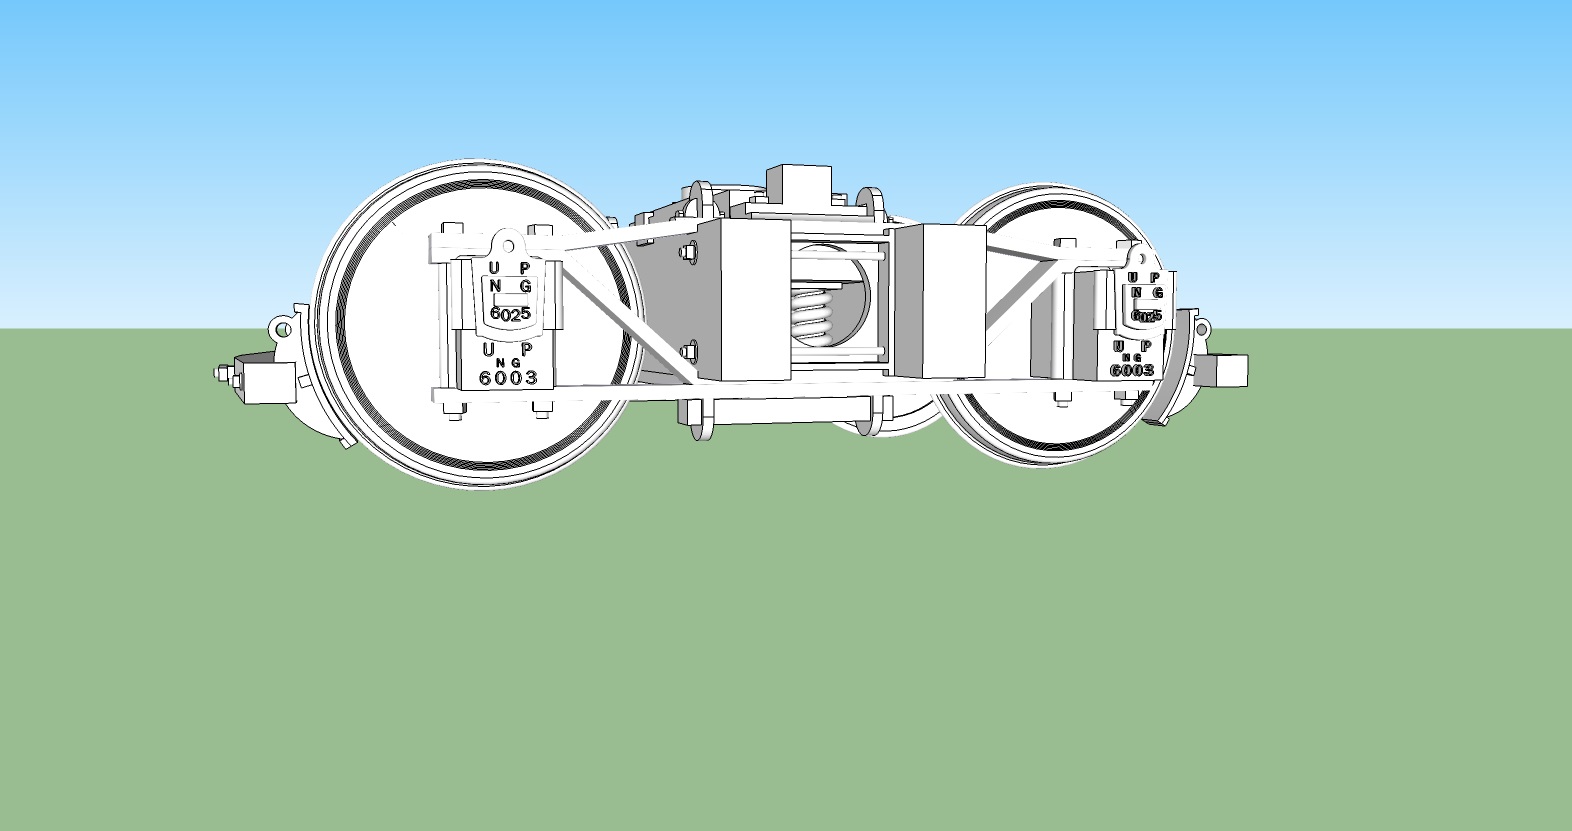 |
|
That is one beautiful truck!!

Jim Courtney
Poulsbo, WA |
|
I've uploaded an On3, Sn3, and HOn3 version to Shapeways for test prints. I haven't made them available yet, but they are ready.
I'm going to play around with the files a little bit to maximize the economy on how I've packaged them...it's more complicated than the last time I uploaded a model. I also have a set of these seats to order when I place my truck test order: 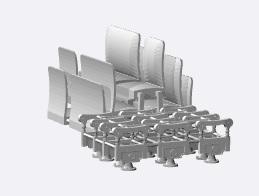 2-1 seating for Combine #20. I started building Wiseman's kit in January 2020, but set it aside when it was time to add the seats...I drew these based interior photos of the existing C&S passenger cars. |
|
Looking forward to beta testing the UP trucks in Sn3.
The combine seats look great! Any chance of printing them in S scale as well? I'm drawing plans for combine 20 for my 1901 passenger roster, when it still had a duckbill roof. It was still numbered 121 in those days: 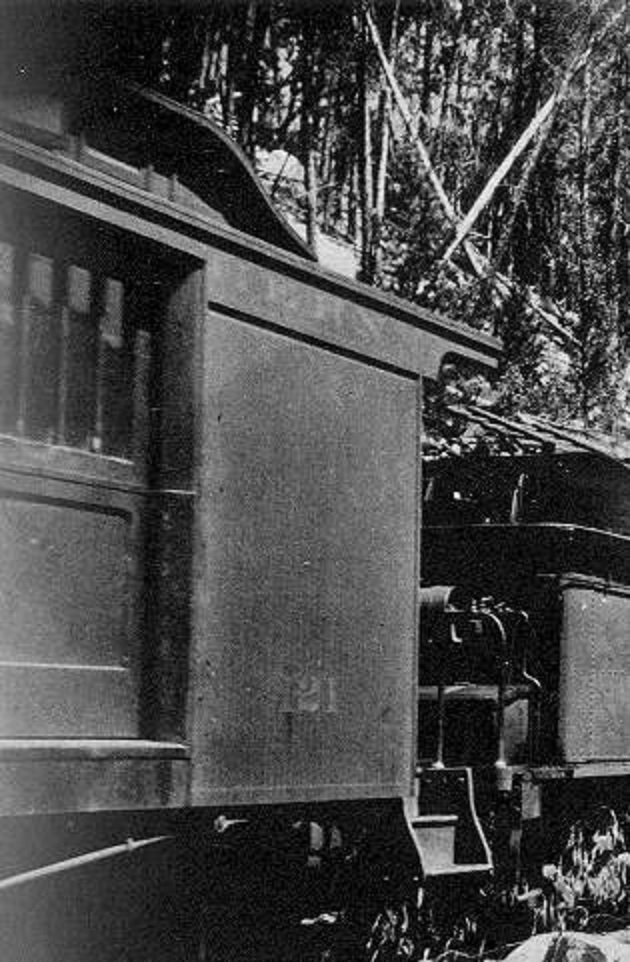
Jim Courtney
Poulsbo, WA |
|
I just ordered my test prints in On3 and HOn3.
I have made the Sn3 version available, so you can order a test print. I've included two materials, the smooth detail plastic I've used in the past, as well as Multi Jet Fusion which has a little less detail but stronger mechanical properties. I've ordered the On3 version in both materials, so I'll share how it goes. I also ordered my seats for #20, so hopefully those are good too. https://www.shapeways.com/product/NV23AUFN3/dsp-p-up-14t-trucks-2pr?optionId=215604111&li=shops Michael |
|
Those are looking really nice in the preview at Shapeways! Looking forward to the HOn3 trucks...
Dave Eggleston
Seattle, WA |
|
In reply to this post by Michael York
Ordered the Sn3 trucks, eager to check 'em out.
Mike |
|
In reply to this post by Michael York
I just ordered 2 sets (2 pair each) of the trucks, one in each of the two materials.
Michael, is the "Multi-Jet Fusion" material cleaned the same way as the other plastics? I use a brief soak in Bestine and then cleaning with Dawn and warm water . . . Looking forward to checking these beauties out!! 
Jim Courtney
Poulsbo, WA |
|
In reply to this post by Michael York
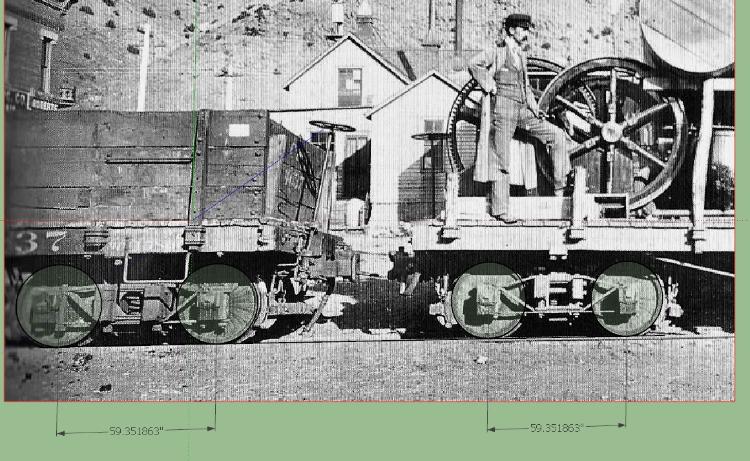 I think we are seeing an optical illusion based on the vanishing point. I think this is the second time I've checked it! I drew circles over the wheels under the Litchfield truck and then copied and pasted them onto the 14t truck...didn't alter the spacing. Note: the dimensions are arbitrary. Michael |
|
Speaking of Litchfield trucks (cough, cough), I sure would like some in S scale, if that is possible. Again, using P-B-L wheelsets.
Jim Courtney
Poulsbo, WA |
|
In reply to this post by Jim Courtney
I don't know! I guess I need to look into that! I would let the detail plastic sit in the sun for a few hours, drop it in my ultrasonic cleaner with warm water and some dish soap. Then, maybe a little of the citrus goo gone soak followed by another soap and water bath in the ultrasonic cleaner. I might pull them from the shop just in case there are issues which I need to fix  I started working on the Litchfield refinements today. I can clearly see a similar swing motion swing in that photo... |
|
Hi Michael,
In studying the Shapeways image of the final print, I see you've have gone from a single spring behind the circular cutout to double springs. In the Idaho Springs photo, my eye always saw a single spring: 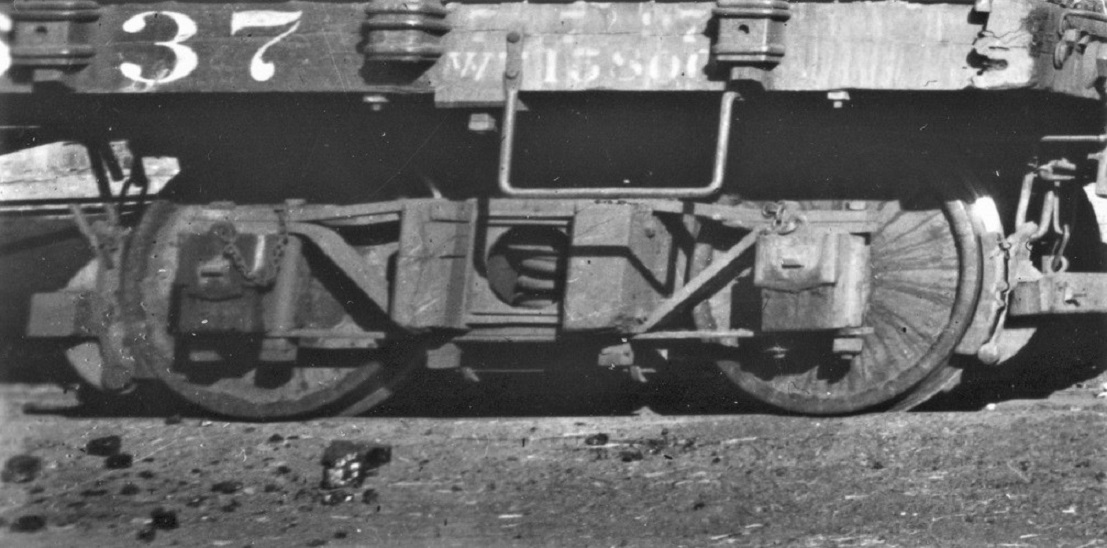 I can see now that a second spring, to the right, might be hidden behind the protruding right transom. Is this your reading??
Jim Courtney
Poulsbo, WA |
|
I'm not sure whether that is just our angle of view hiding a second spring or if it has a single spring. I'm tempted to check with the software...
I drew it with both options and planned to offer both versions. The clear photos seem to show 0 or paired spring nests, hence why I decided to test print the paired version. |
|
Playing with the angle in the software, I think there are two springs side by side. As you noted, the right transom is obscuring our view of the second spring.
|
«
Return to C&Sng Discussion Forum
|
1 view|%1 views
| Free forum by Nabble | Edit this page |

