Last summer I bought 12 pair of Michael's revised version of the Sn3, 14-ton, "type-C" trucks.
Typically life got in the way for about a year, and I just finally finished assembling 6 pair of trucks . . . err, 5 1/2 pair, see below.
Michael kindly addressed several issues of the first Sn3 version of the trucks:
1. The printed bolster / side frames have the "bars" of the arch bar side frames beefed up.
2. The flange grooves on the bolsters are wider, less likely to foul the flanges of hinky wheel sets.
3. The spacing between opposite journal boxes with axle holes has been increased a bit, to make it less likely to snap a side frame when inserting a wheel set.
4. The holes for the 0.019" wires that support the brake beams, both on the bolster and the end beams, have been printed through--just need to gently ream them out with a #76 drill.
Shapeways prints always seem to have a printing artifact on some surfaces, a linear, grainy "fuzz". One surface may be printed glassy smooth, while the opposite side (or top, or bottom) will have the fuzz. This "fuzz" can be easily removed with a fiberglass eraser pen, prior to painting.
While cleaning the prints, it suddenly dawned on me that the conical axle holes could also have this artifact fuzz in one or more axle holes on each print. Michael suggested that I get one of the MicroMark "truck tuning tools" to remove any residual wax from the axle holes, so I had purchased one.
No, there is no way to get the tuning tool between the journal boxes of an Sn3 truck assembly. So, I clamped the cutting end of the tool in my bench vise and used a carbide cut-off disc in a Dremel tool to remove the non-cutting end of the shaft, just past the rubber thumb wheel:
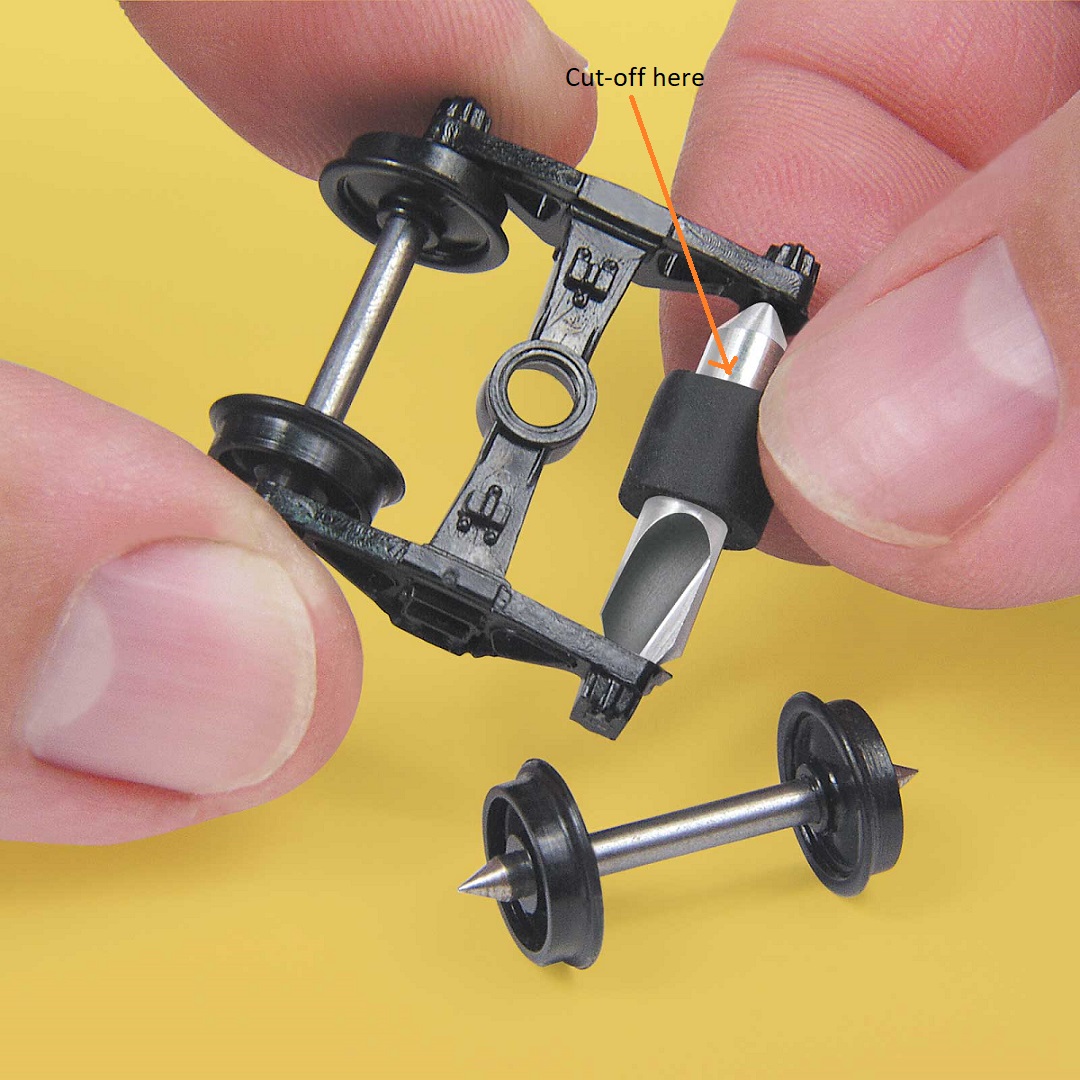
I could then hold a journal box between my left thumb and index finger and use the tool to clean/polish the axle hole. I found that about 40% of the axle holes (n=48) had no discernable fuzz in the hole. About 40% of the axle holes had small amounts of fuzz that was easily removed. The remaining 20% of holes had significant gritty fuzz inside--you could actually feel the tool cutting the gritty material as it was turned.
After cleaning all the holes, the truck were painted and assemble as above. The wheel sets went in far easier than with the first iteration of the prints. I only broke one side frame off when inserting the wheelset (hence 5 1/2 pair of trucks), only because I accidently picked up a wheel set with a much longer axle length (0.092" vs the prescribed 0.088").
When completely assembled, the trucks are now extremely free rolling! So lesson learned--->Any 3-D printed truck needs to have its axle holes cleaned out before assembly.
BTW, still hoping for those Litchfield type A trucks< Michael.

Jim Courtney
Poulsbo, WA

