Platte Canon progress report
12


12
|
Keep in mind that I had to compress my Platte Canon into about 3 square feet, so it looks nothing like the actual Platte Canon.
And I haven't added water to the river yet, as I think it would be a good idea to do a practice one first. Anyway, enough of the excuses; on to the pictures: 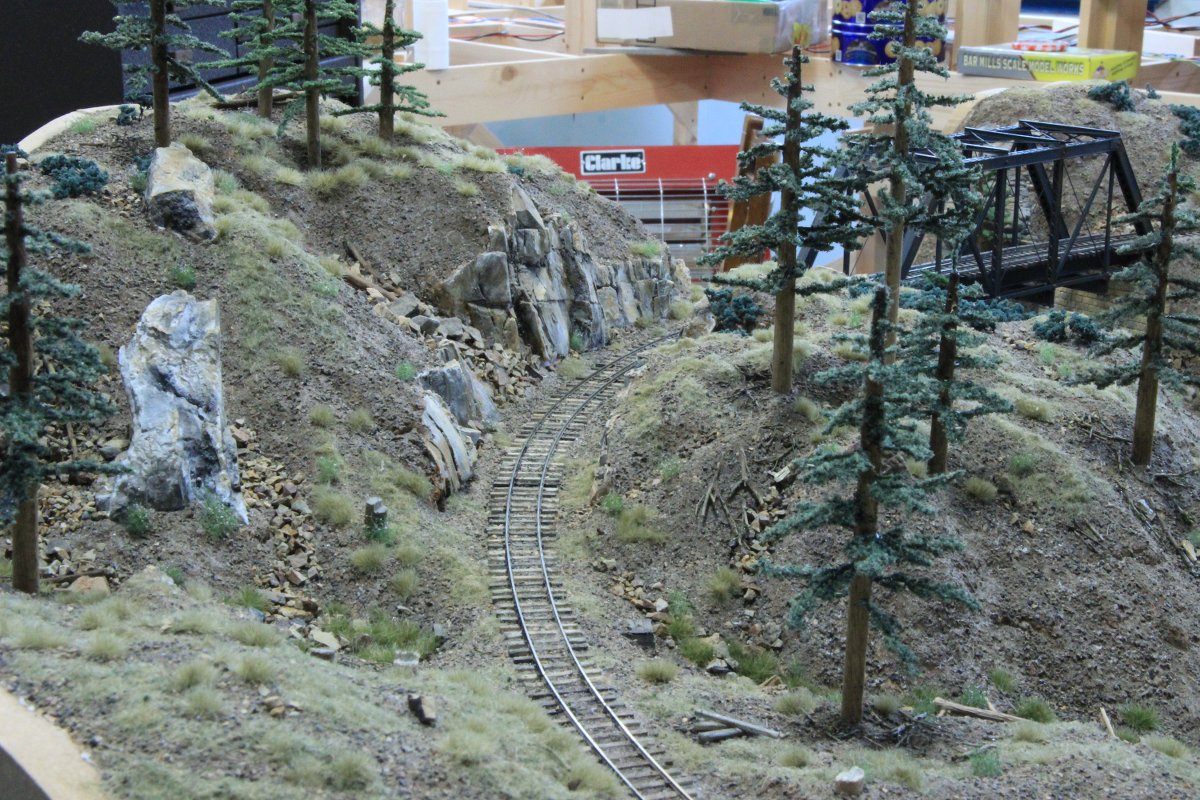   Cheers, Jeff. |
Re: Platte Canon progress report
|
This post was updated on .
Beautiful, inspiring work, Jeff.
The model of the 2nd Deansbury bridge is fantastic, the abutments well done, and Chris will appreciate the guard rail on the curve leading to the bridge! You have a talent for scenery. The ground cover, rock outcroppings and talus slopes are beautifully executed--the late Paul Scoles would be impressed. Looking forward to following your progress to Jefferson. Jim
Jim Courtney
Poulsbo, WA |
|
Thanks, Jim.
I've got one more, just for you, showing that the box culvert is in fact a "double wood box": 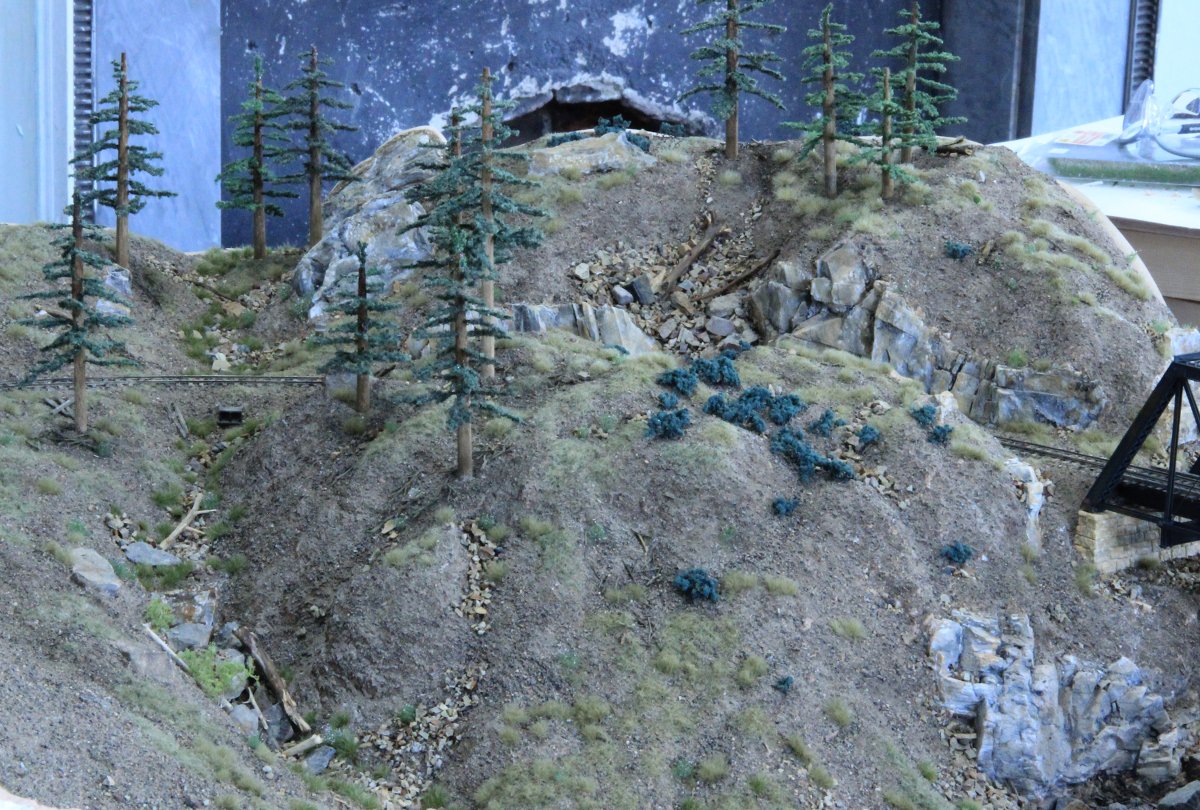 Cheers, Jeff. |
|
I love a good box culvert.
Keith Hayes
Leadville in Sn3 |
Re: Platte Canon progress report
|
I love a good box culvert.
Especially when the culvert is Siamese twins! (BTW, how're the coal cars coming??) 
Jim Courtney
Poulsbo, WA |
Re: Platte Canon progress report
|
Wow. I'm very impressed at your scenery talents, you indeed have a knack of composition especially with your rock placement. I wonder had you have more space just what the results would be?
UpSideDownC
in New Zealand |
Re: Platte Canon progress report
|
In reply to this post by Jeff Young
Jeff, this is absolutely wonderful! I don't think I've ever seen such natural, totally convincing modeled rocks, ground cover and the topography overall. This really is an inspiration.
The bridge is superb. I assume that you scratch-built it? Are there plans available? I've been thinking that I'd like to try building a bridge like that one. John Greenly Ithaca, NY
John Greenly
Lansing, NY |
|
Thanks, Chris and John!
John, the bridge is mostly scratch-built, although I poached a good few pieces from a CVMW bridge kit. The floor beams are 3/8" Evergreen I-beams, with 0.030" brass rod hanger bolts and Tichy NBW castings. I constructed a styrene drilling jig to get the holes more-or-less even: 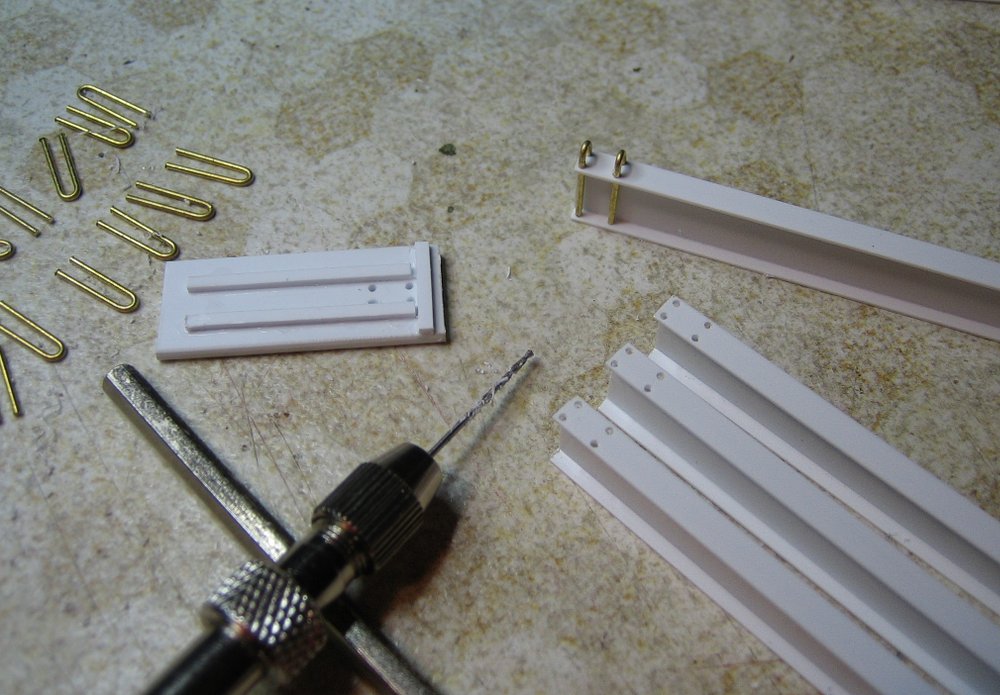 The stringers are also 3/8" Evergreen I-beams. I used a bench grinder to grind down some metal palette strapping so it would fit in the web of the I-beams and expoxied it in: 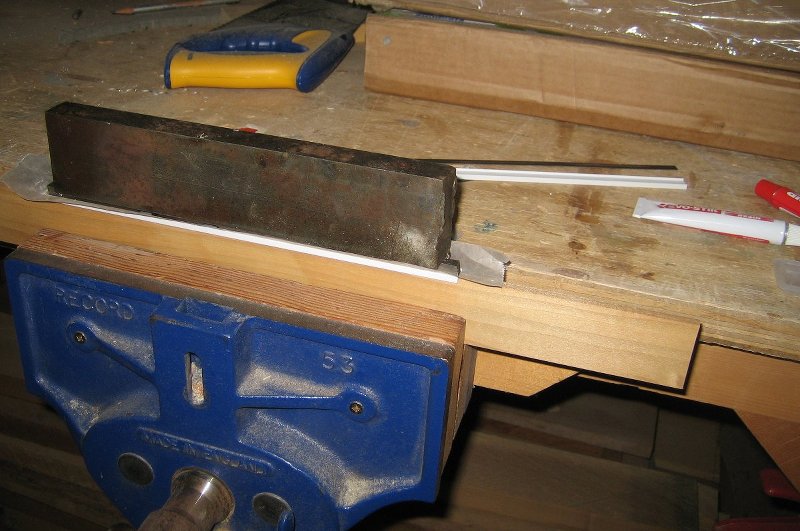 The floor beams were then glued to the stringers. I took some of the rivet plates from the CVMW bridge kit and cut them down to small squares with just a NBW surrounded by 6 rivets, and glued these to the floor beams to act as stay rod anchors. (You can see a small piece of bent 0.030" brass rod in the middle left of the picture; I used this as a spacer to get them even.) The stay rods themselves are 0.020" brass rod:  The middle truss bars are attached to the under-structure. (The outside truss bars are part of the super-structure so that it can be removed as a single piece.) The truss bars are glued to the outsides of the hanger bolts, with circular paper washers and Tichy NBW castings applied: 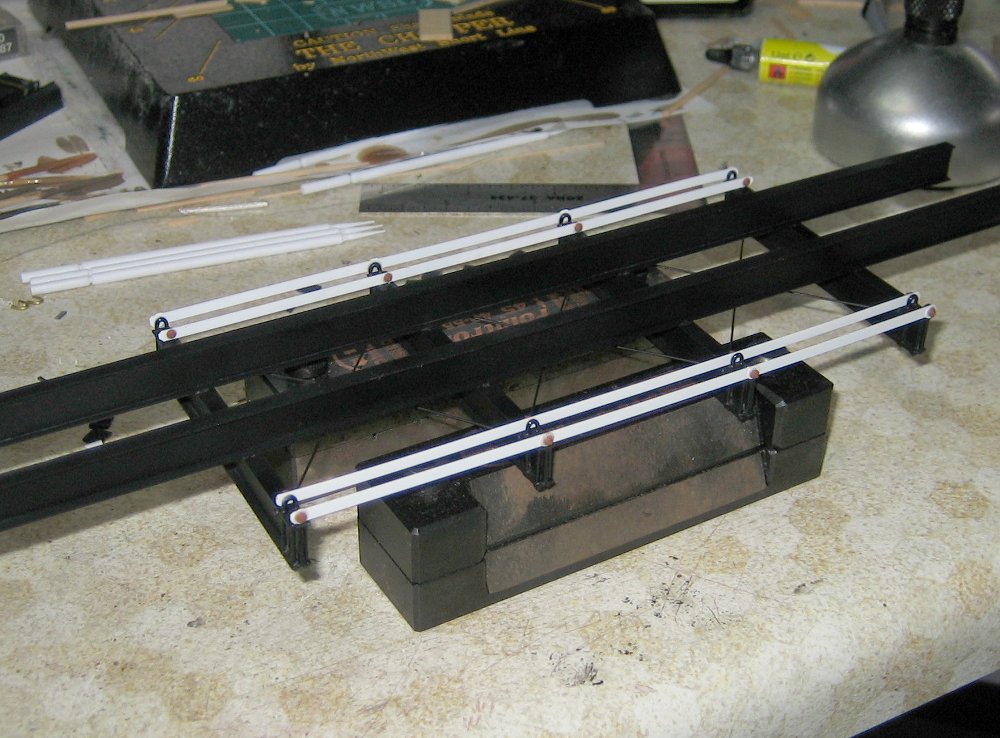 The deck is scale 8"x8" ties with 5"x8" outside timber guards and Grandt Line NBW castings:  The completed deck:  The outside sets of stay rods had to wait for the piers to be installed. The piers are balsa foam, carved with a dental pick, sealed with two coats of gesso, and then painted with acrylics: 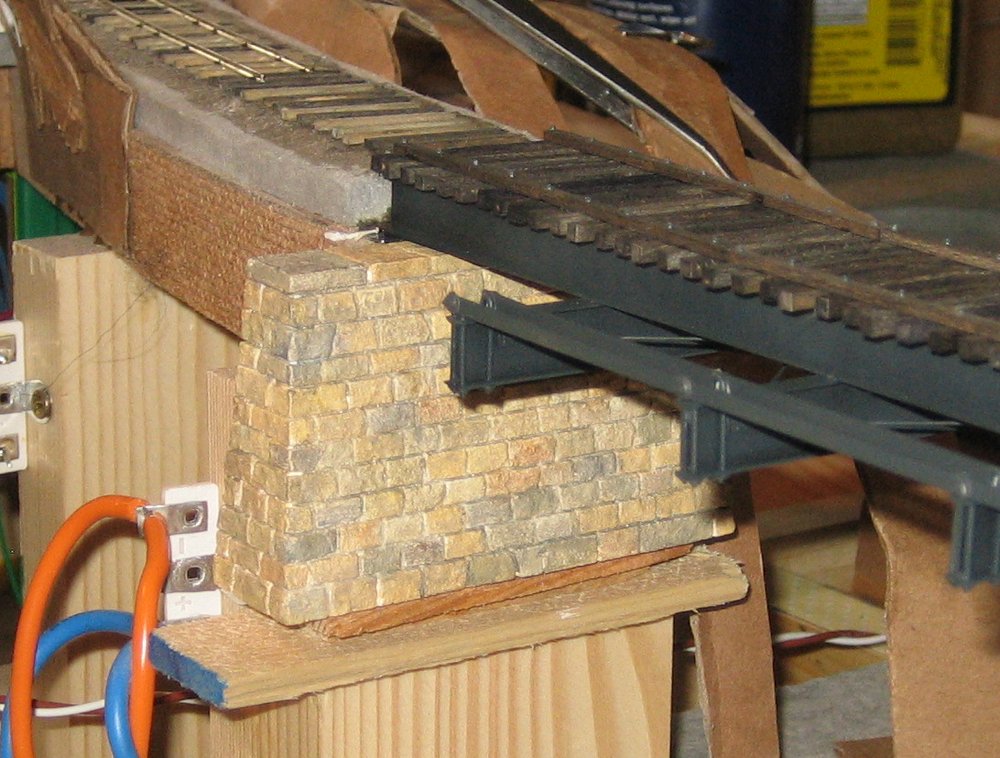 The bridge shoes are scratch-built from styrene sheet, with 0.020" holes for the stay-rod ends, and Grandt Line NBW castings:  Super-structure to follow.... |
|
I drew up a couple of drawings to try and get the proportions looking "right", and then cut CVMW lace girders and Evergreen strip styrene. The strip styrene tends to buckle if the bridge geometry changes with temperature, so try to only glue one end of each strip:
 Similarly, the tension rods were glued at one end, and left floating in a hole at the other end. Drilling the holes:  Side with tension rods installed at top: 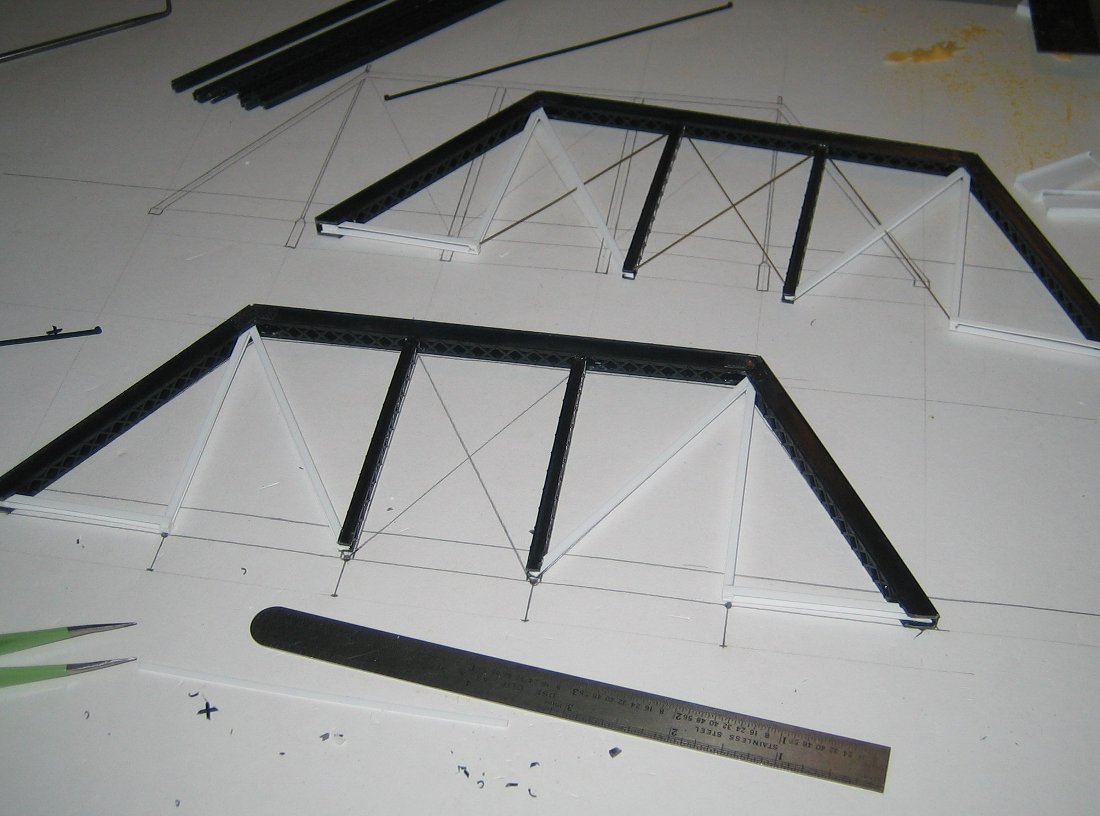 The sides then had CVMW rivet plates added at the corners, and Tichy NBW castings added where the middle lace girders hang. The bottoms of the outside girders fit loose in the bridge shoes, while the bottoms of the others fit loose between the hanger bolts on the floor beams. The roof girders are Evergreen I-beams with NBWs added to anchor the tension rods. This picture also shows the sides of the bridge shoes clamped together for shaping with a file, and my first attempt at portal corner braces: 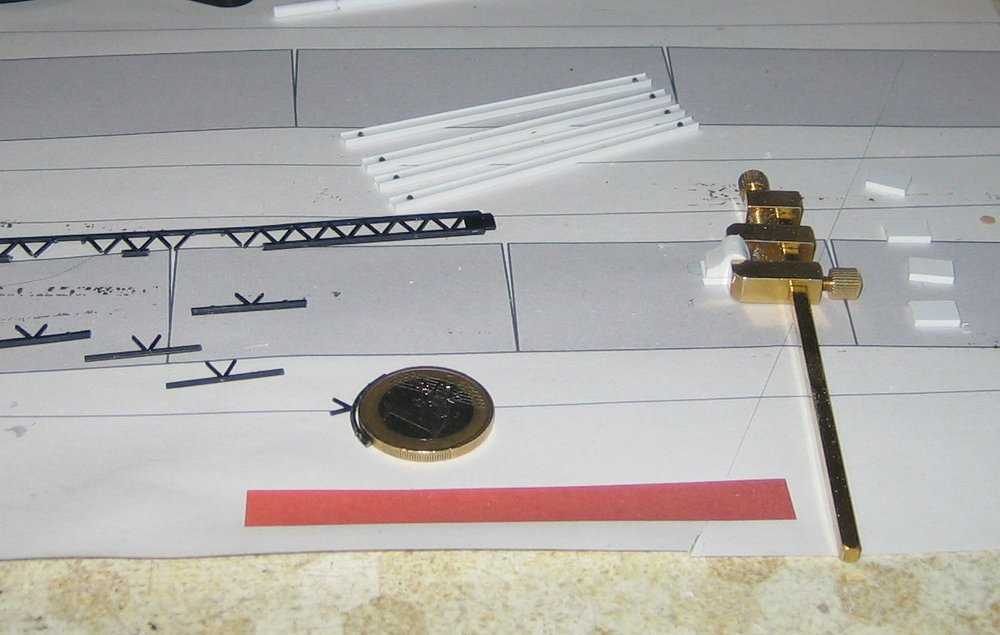 The portal corner braces looked too dainty, so I tried the portal braces that came in the CVMW kit. They looked too chunky (and they had the wrong date in them). So I cut out the middle sections, and glued the tops/bottoms back together: 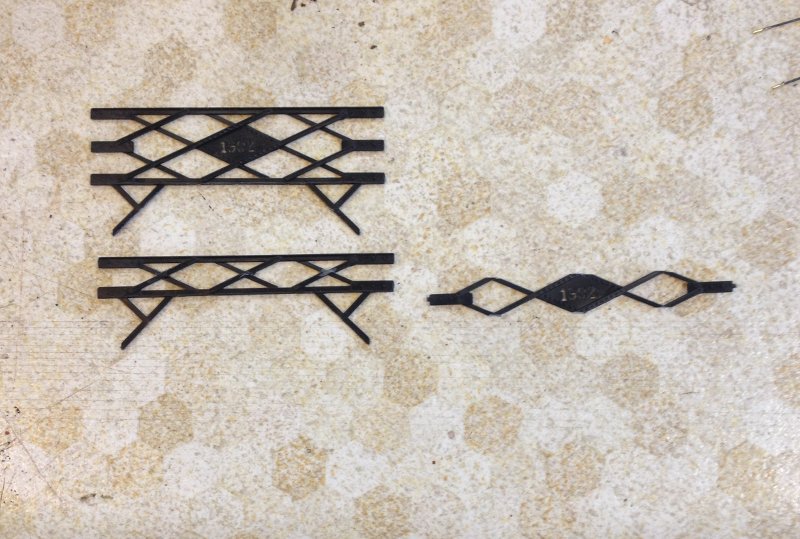 That's about the sum of it. Any questions, please ask.... Cheers, Jeff. |
|
You scratchbuilt modelers DO realize (don't you ?), that with a lot more
space, but the same amount of effort, you could build this in 12":1ft. scale and run REAL trains on it ! 
"Duty above all else except Honor"
|
|
Yep... done a bit of that last year:

|
Re: Platte Canon progress report
|
In reply to this post by Jeff Young
Beautiful craftsmanship, Jeff!
 I've always been intimidated by the thought of building a pin connected truss bridge, but I guess it's like building a coal car -- just a matter of breaking down the component parts and patiently putting then all together. What is your source of "balsa-board"? Are you an artist by training, or just a talented hobbyist? BTW, the only thing missing from your photos is a C&S train crossing the South Platte -- they don't even have to run for a photograph! Jim
Jim Courtney
Poulsbo, WA |
|
Hi Jim,
If I were in the US, I'd get my balsa foam here: http://www.dickblick.com/products/balsa-foam/ . My career was spent mostly as a software architect, although I also did a lot of user-interface design, which I suppose is tangentially artistic. Cheers, Jeff. |
Re: Platte Canon progress report
|
Jeff, thanks so much for documenting your bridge design and construction! I've learned a lot that will be very helpful.
I had never heard of the balsa foam material. It looks to be extremely useful stuff. I find two different densities available. Do you prefer the lighter or heavier type? Do you use it for some of your rock outcroppings as well as those excellent bridge abutments? many thanks again, John
John Greenly
Lansing, NY |
|
Hi John,
I suggest you experiment with both densities: I’m finding I mostly use the lighter type, but they both have their plusses and minuses. (The denser stuff seems to carve better with edged tools, while a dental pick works nicely on the lighter stuff.) I use balsa foam only for stone walls and brick. My rock outcroppings are plaster (from Bragdon molds). The best thing about the balsa foam is that it carves so quickly that if you make a mistake it’s easy to just chuck it and start over. Cheers, Jeff. PS: you might have seen these on the Silica thread, but here are a few more pictures of balsa-foam in action. First coat of gesso on the lime kiln:  Finished lime kiln to the right; balsa foam brick foundation on the shack to the left: 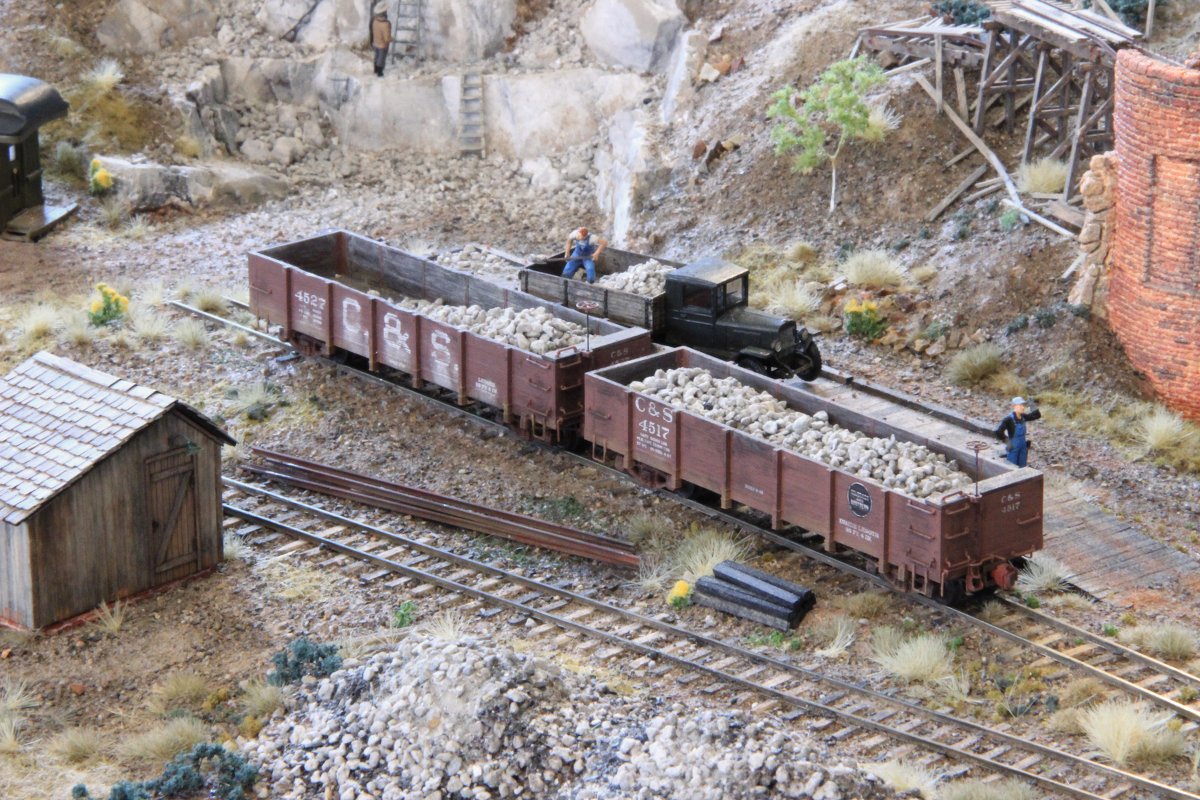
|
Re: Platte Canon progress report
|
In reply to this post by Jeff Young
Are you a member of the DSP&P Historical Society?
|
|
I don’t think so. I ordered their Bogies and the Loop back issues CD, which might have included me getting a membership, so I’m not 100% sure.
I have worked with them in Como, though. Cheers, Jeff. |
Re: Platte Canon progress report
|
If you haven't paid a $45 membership fee and been receiving new issues of B&L you aren't-but its real easy to join.Check out the DSP&PHS website for details.I just sent in my membership renewal the other day.This years convention will be in Buena Vista July 29,30,and31.
|
Re: Platte Canon progress report
|
In reply to this post by Jeff Young
Jeff, just to show you that you are a true inspiration, here are a couple of photos of the beginnings of my attempt at a pin-connected truss bridge. I found the wonderful photos and plans of the Waterton bridge in the older thread here (many thanks to Chris for posting these):
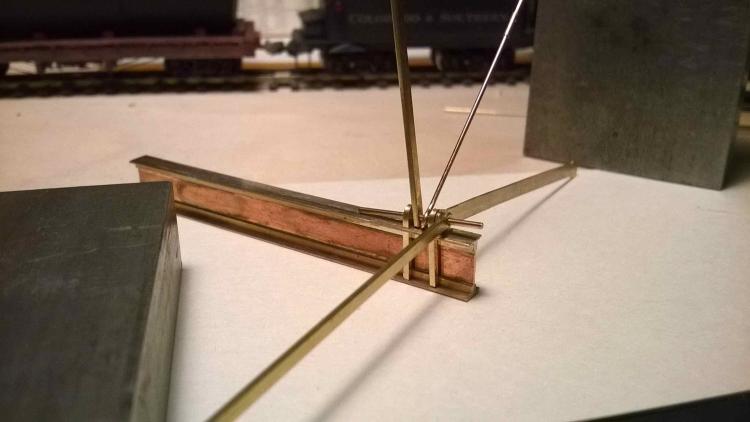
http://c-sng-discussion-forum.41377.n7.nabble.com/Waterton-Bridge-HAER-Resource-4-td2458.html Following Jeff's lead, I bought Central Valley lace girders instead of trying to duplicate those unique ones of the Waterton bridge- that's a challenge for another day. (How to fabricate those tiny delicate clamping bits that hold the four sectors of the girders together???) Here's the basic girder layout for my bridge: 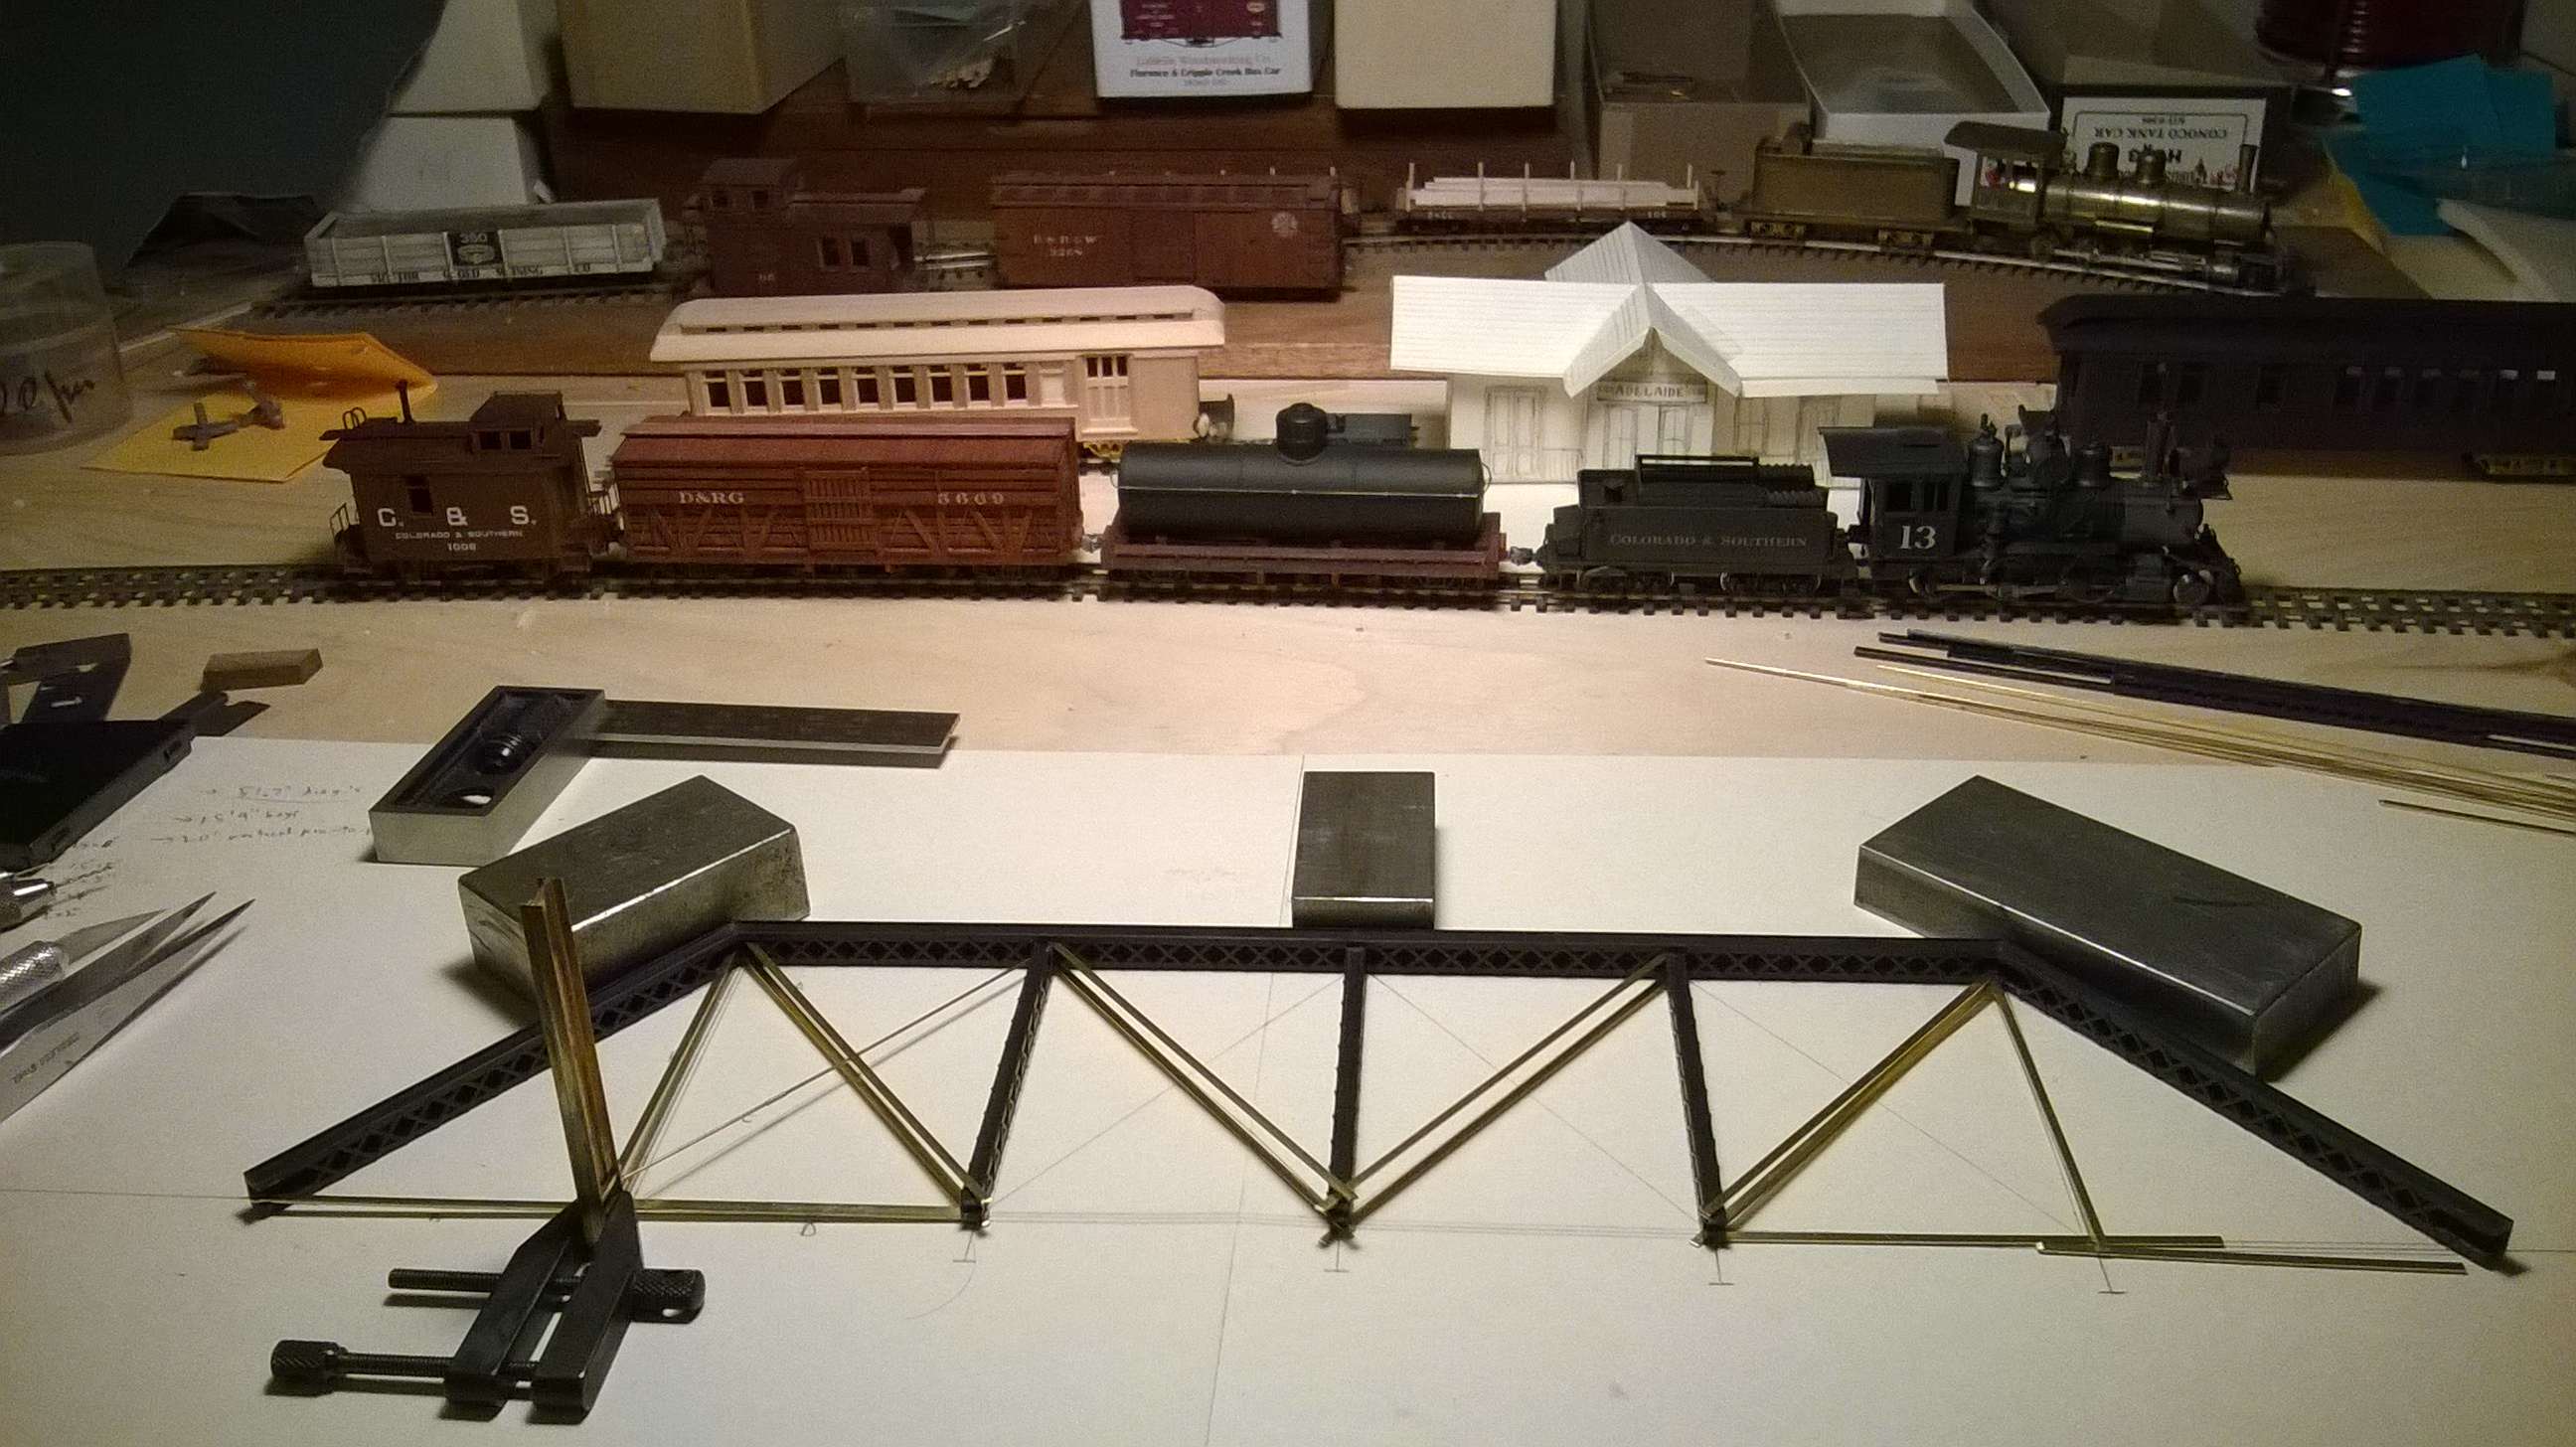 I'm fascinated by the way the rods all connect with the hanger bolts to the bottom floor girders, so I decided just for fun to see what it'd be like to make the bottom chord actually pin-connected. Here's the result of a first experiment in forming the I-beam, the hanger bolts (or hairpin connectors as it says on the drawings) and the different types of rod ends:  I love to work with brass, and I encountered an interesting soldering challenge in putting together the four L-pieces and the plate to make the I-beam. After some thought I found a method that worked like a charm. I clamped all five parts together using machinist's clamps with their jaws insulated with Kapton (polyimide) tape to keep them from being a heat sink. I mounted the assemblage horizontal, put drops of liquid flux into the top joints, and placed three small bits of solder (I use Stay-brite, very nice stuff) along the joints that I guessed to be the right amount. I heated the whole thing up with a propane torch gently, not melting the solder. Then finally I touched a small soldering iron to the preheated assembly. This added heat melted the solder almost instantly, and moving the iron tip along the joint helped the solder flow to fill the whole length nicely. I then turned the assembly over and did the bottom the same way. Some of the dimensions are not correct on this test piece, but I think I've worked out fairly efficient methods to fabricate all the parts, and the dimensions will come out so that the total length of the pins and the spacings of the various rods along the pins will be in the right relationship with their positions at the top girder connections so that the pairs of diagonal rods will look right in their spacing from top to bottom. I won't bother with actual pin connections up top because they're all hidden within the girder. The one thing I haven't tried yet is making the nuts for the ends of the bottom pins. That's a bit of a puzzler. Now, this is the first time I've tried to upload photos, lets see how that turned out…. Cheers, John
John Greenly
Lansing, NY |
Re: Platte Canon progress report
|
Whoa, the photos are WAY too big. Let me try again:
John Greenly
Lansing, NY |
«
Return to C&Sng Discussion Forum
|
1 view|%1 views
| Free forum by Nabble | Edit this page |

