Loco's #71-73 advice
|
Hi all,
Looking for some advice on loco's 71, 72 & 73. My understanding is that the three were identical when delivered. The reason I ask is over the years I've somehow purchased three Hon3 Key brass #71's. After hoping that 72 and 73 would become available for purchase or trade, I'm now considering decaling them for #'s 71-73. Not wanting to be accused by a rivet counter at a club run of not being an informed modeler, I thought I'd seek advice. Thanks John Miller Carlsbad, CA |
|
Educating oneself is always a good plan. Stuffing a chair leg through the
back of some uppity rivet counter's eye seems like an even better idea ! I would welcome such an encounter, just to hand the guy his ass. 🎉
"Duty above all else except Honor"
|
|
In reply to this post by amwing1588
Hoping to not get my head bashed in by a chair leg for pointing out the differences, but...
The 71, 72, and 73 were pretty similar. There was more difference on each one based on the date than between them. If you're going for 1930s appearance like the Key 71, the most noticeable differences were the headlights, smokebox fronts, and cab windows. The 71 had a pretty distinctive boxy headlight with an arched top, while the 72 had a small cylindrical light with a visor and the 73 had a similar but larger one. There should be castings available that are close for both of those. Also note that none of them have a platform on top of the original cast headlight brackets like the model. On 71, the headlight sits directly on straps on which are attached directly to the brackets. Either the headlight is too narrow or the brackets too wide (or both) on the Key model for that to line up correctly. I'm pretty sure PSC makes (or made) appropriate brackets, but those are pretty tough to get installed square, centered, and level. I'm pretty sure that the Key model actually has single piece stamping that forms both cast brackets and the incorrect platform. The 72 and 73 both had platforms, but they were on top of the straps, not on top of the cast brackets like the model. The 72 got a new smokebox front in the late '20s or early '30s (about the same time it got that distinctive headlight), and the Key model has that newer flat front. Both 72 and 73 kept their original smokebox fronts. I'm not sure if a suitable casting is available in HO. I've turned one of these fronts in O scale (many years ago), but that does take some time and the right tools. The cab windows are different on each, with 71 having two equal (or nearly) sized sashes on each side with two vertical panes per sash and a fixed divider between sashes. The 72 had similar windows, but with the front sash being narrower than the 71's with two horizontal panes in the front sash. The 73 had a continuous opening (no fixed divider) with three single-pane sashes. If you're comfortable with a little cutting, it shouldn't be too hard to remove the 71 windows and make up the right ones for 72 and 73. You could get away with just the divider on 72 and just the front sash on both since all photos show the windows open. It you want to make these look better, the problem that's always bothered me with the Key locos (and most HOn3 C&S loco models) is the way the cinder tube snakes its way from the spark arrestor to where it dumps by the pilot wheel. It should have two straight sections with a single bend between them. I've seen plenty of the Key models that were fitted with PSC spark arrestors with the correct tube, which makes a huge difference in the appearance. There's a lot that can be done to make these models look more accurate (even for 71), but if you goal is primarily to distinguish them, then changing headlights and cab windows would go a long way. Here's the 71's headlight and smokebox front: 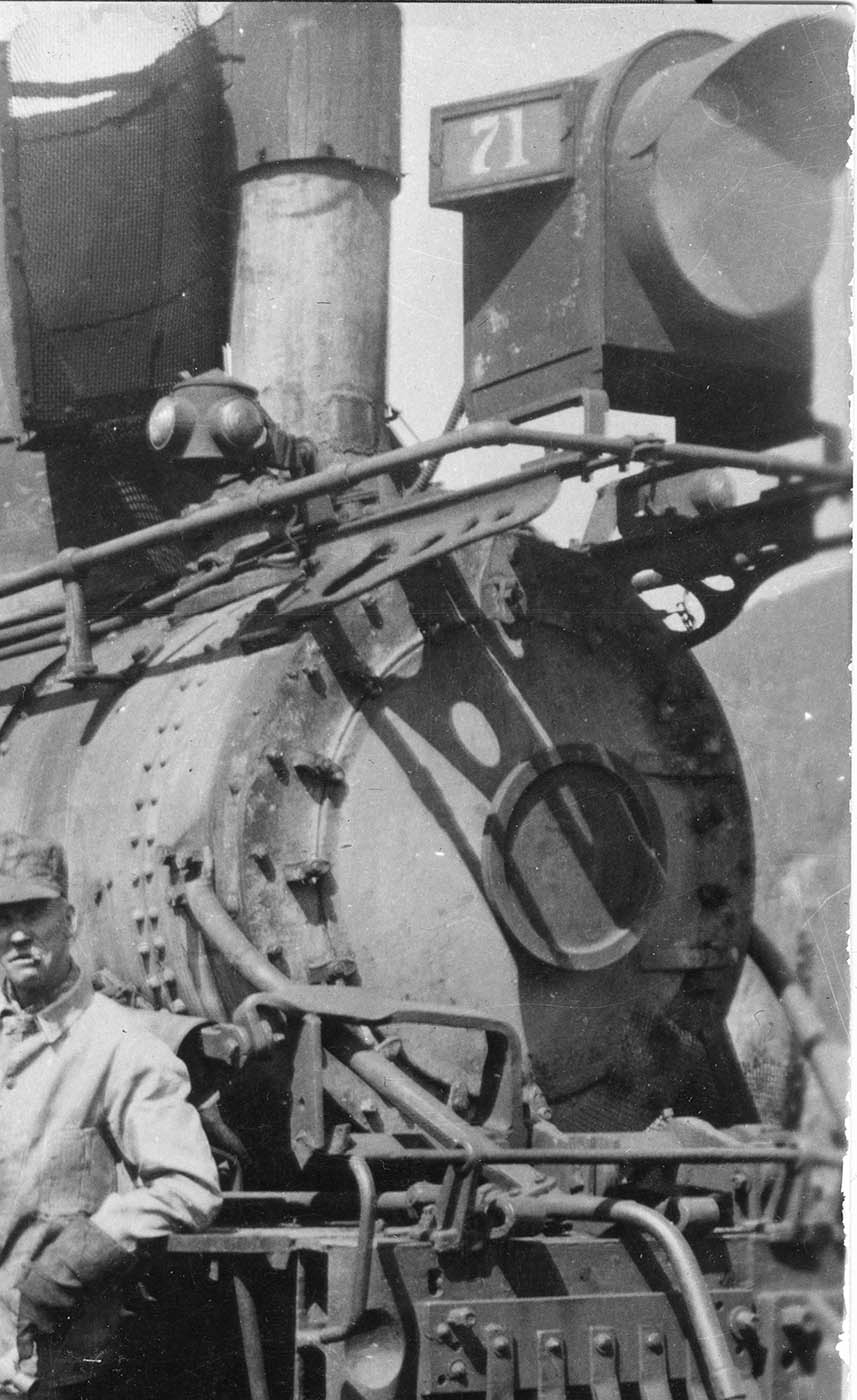 71's cab windows: 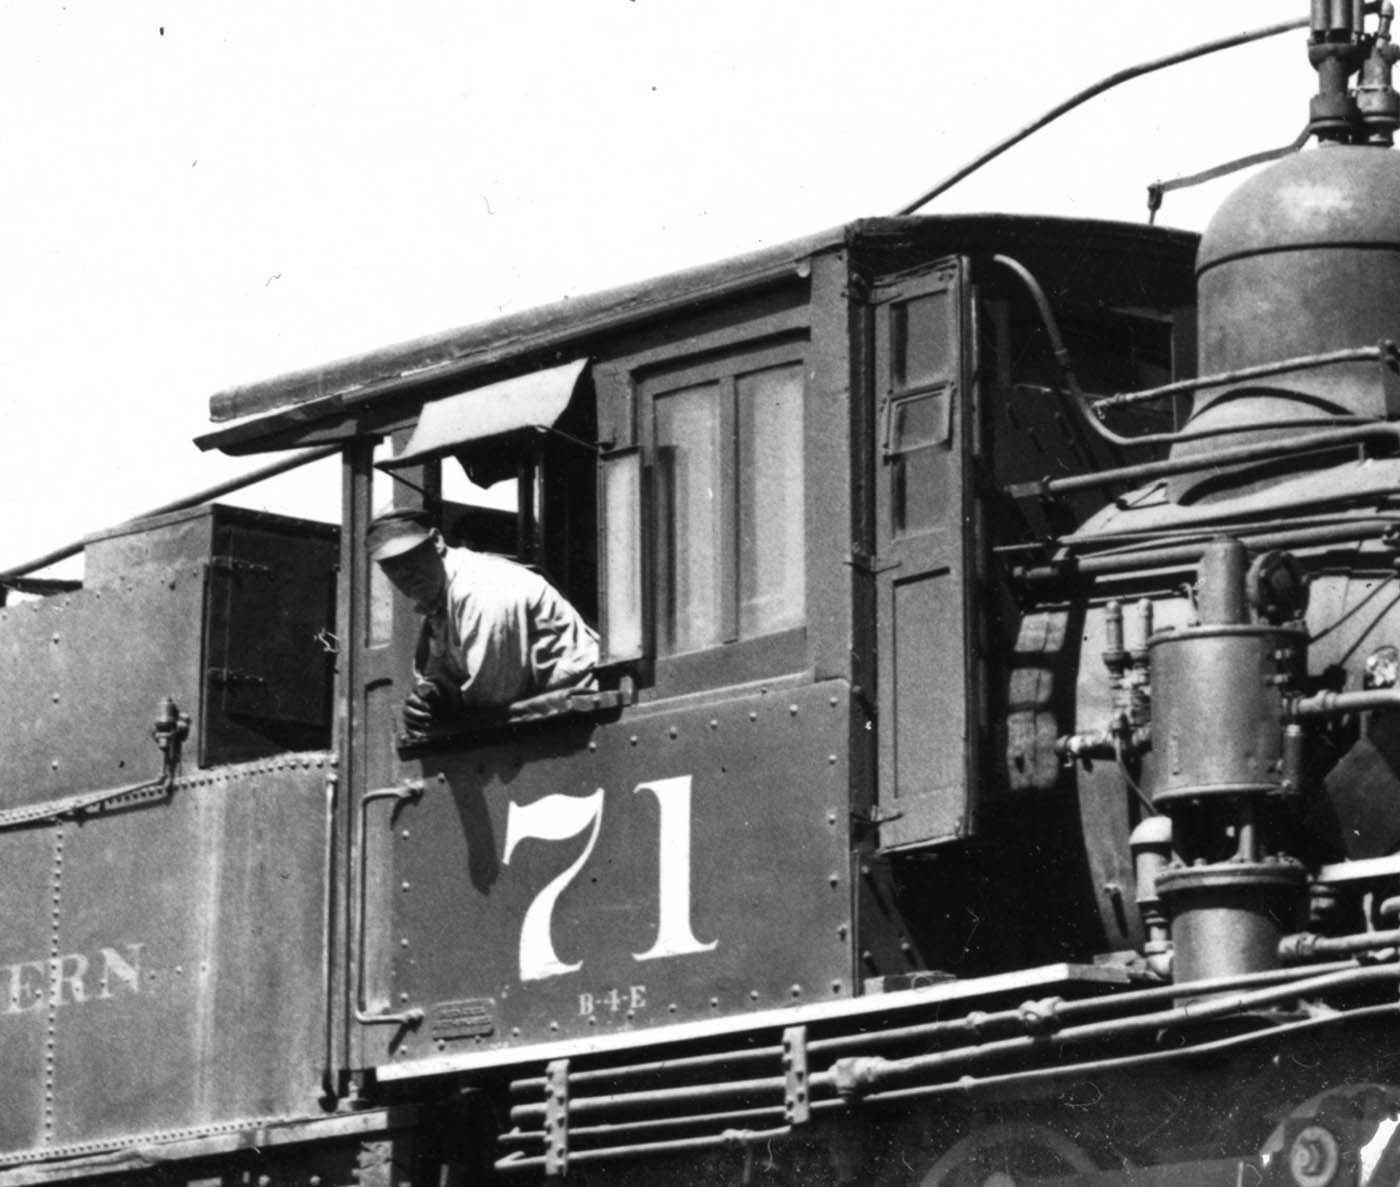 72 (with the cinder tube that's the same on all of them): 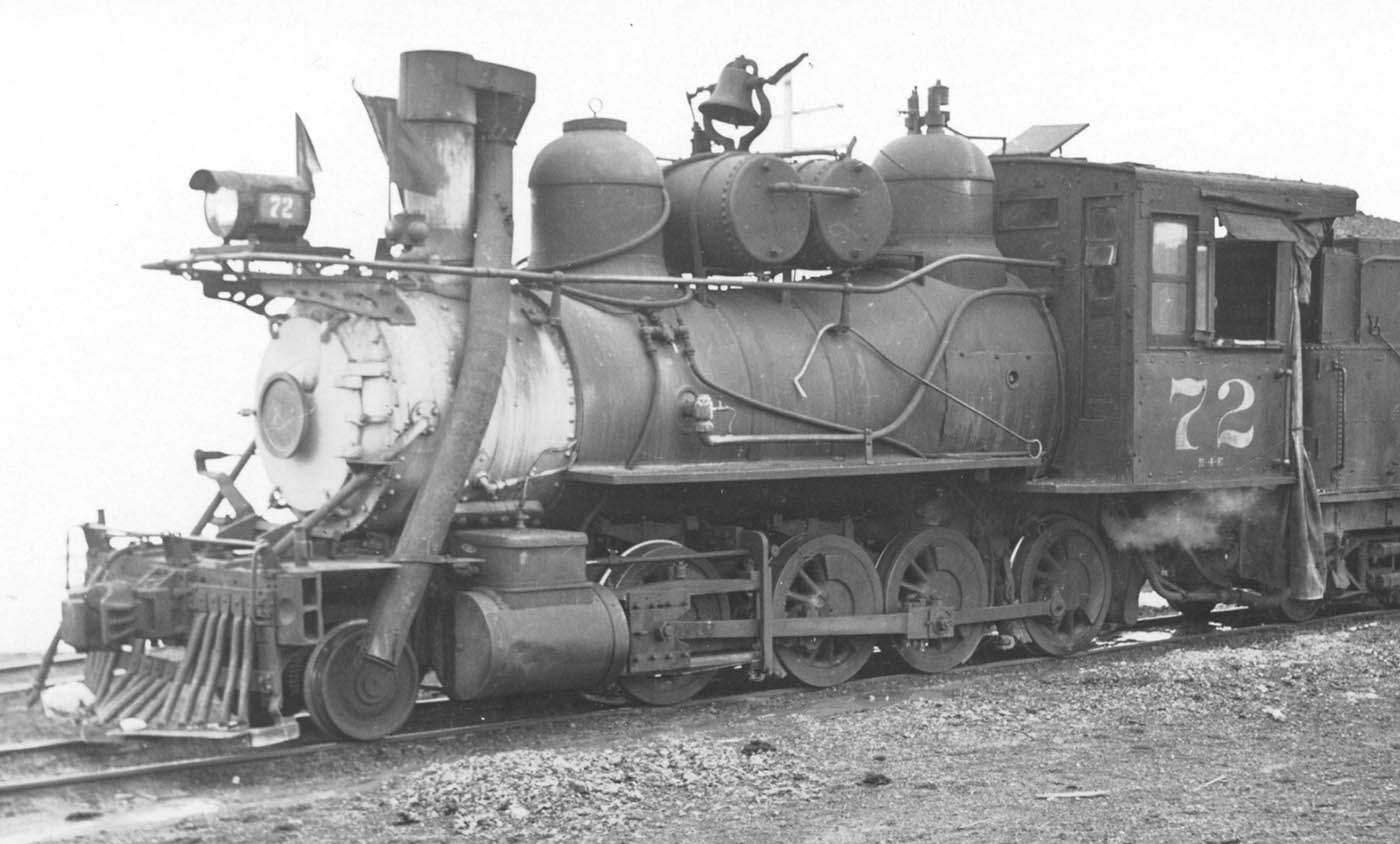 And 73: 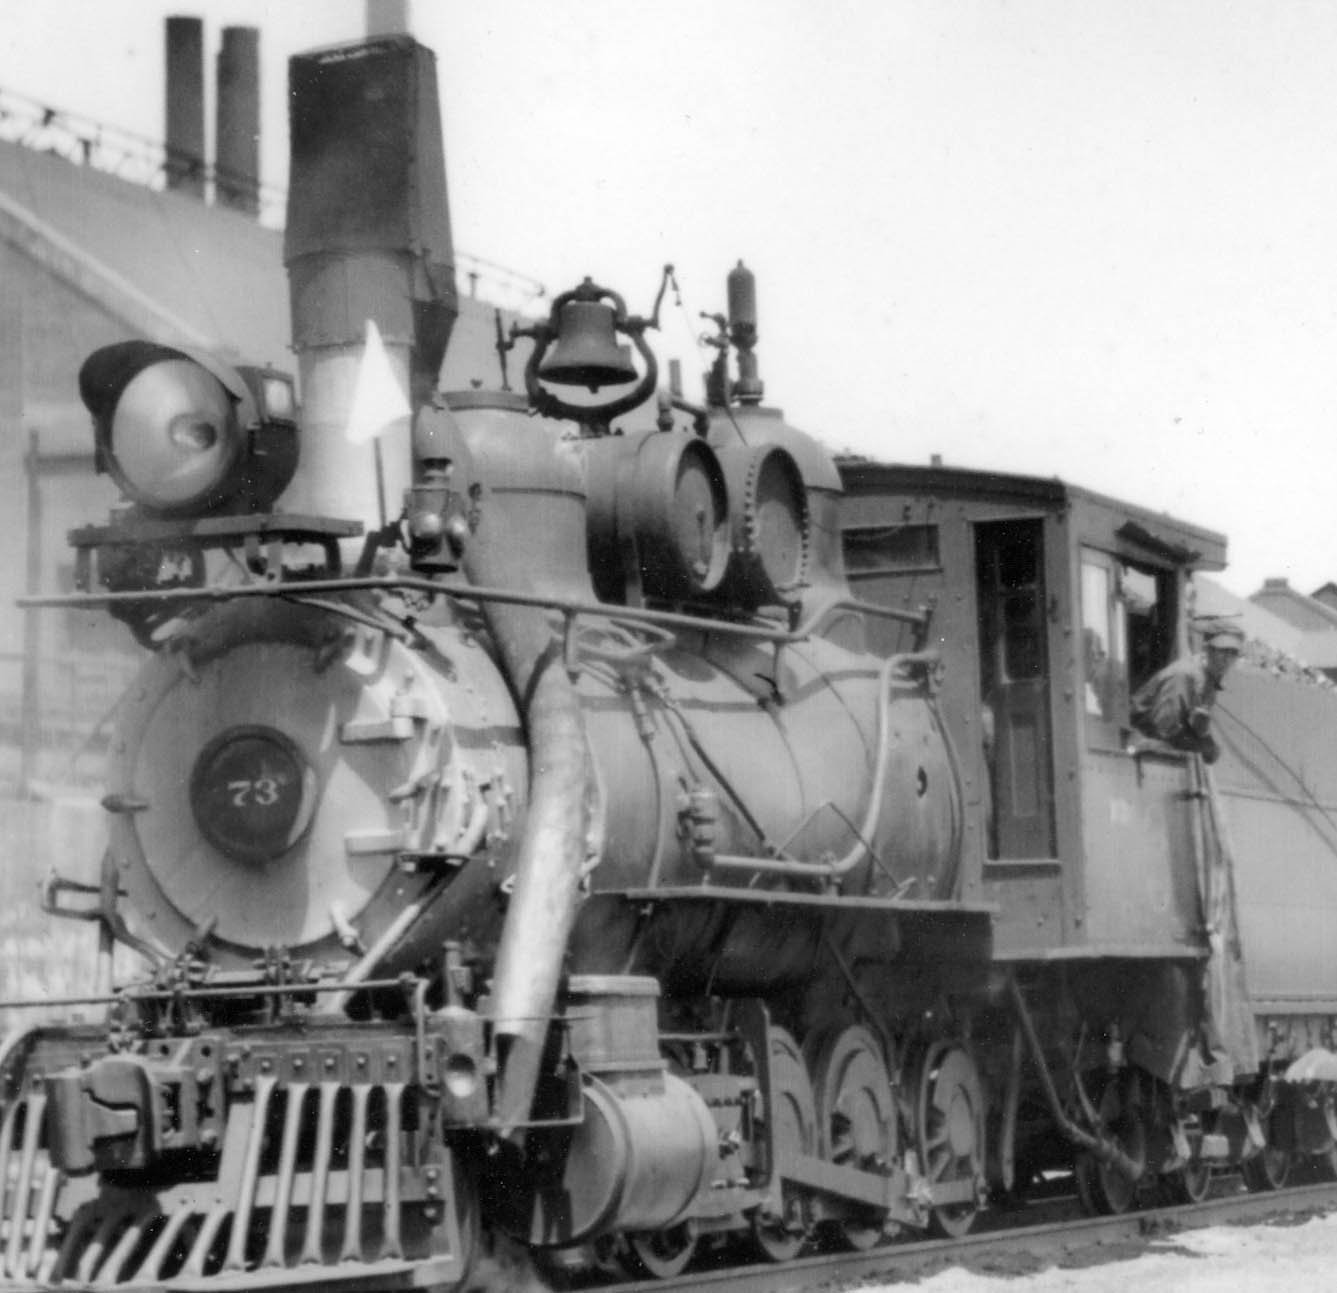
|
|
Don't forget the Air Reservoirs.... Cab rain gutters.... Cinder tubes.... Smokebox fronts...
 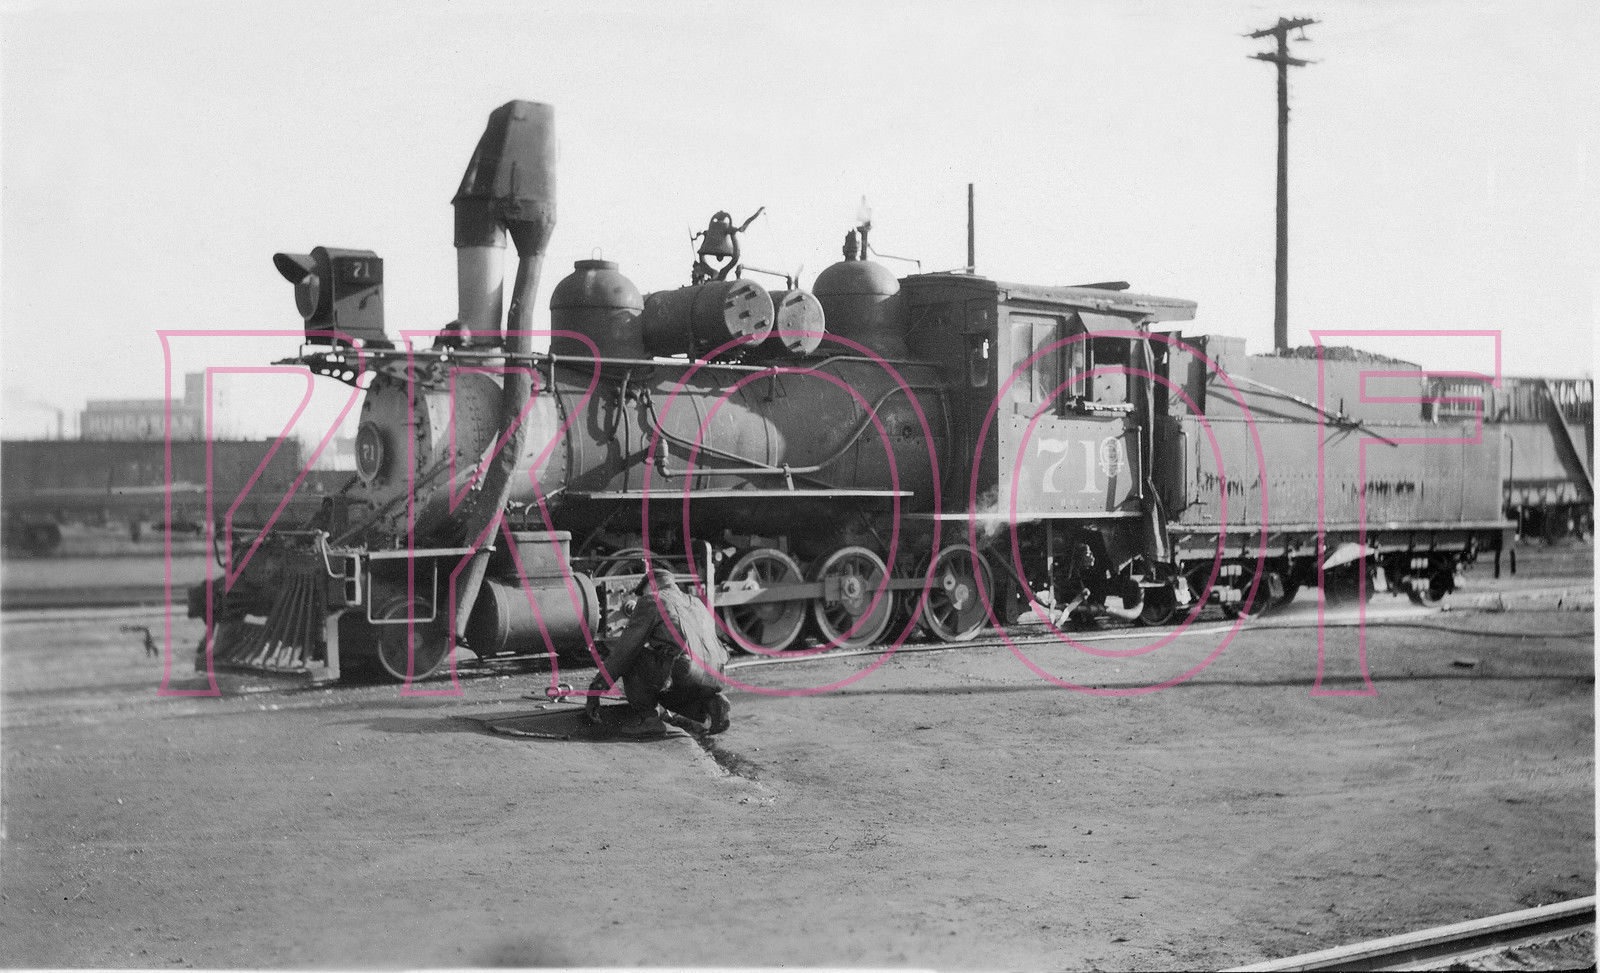 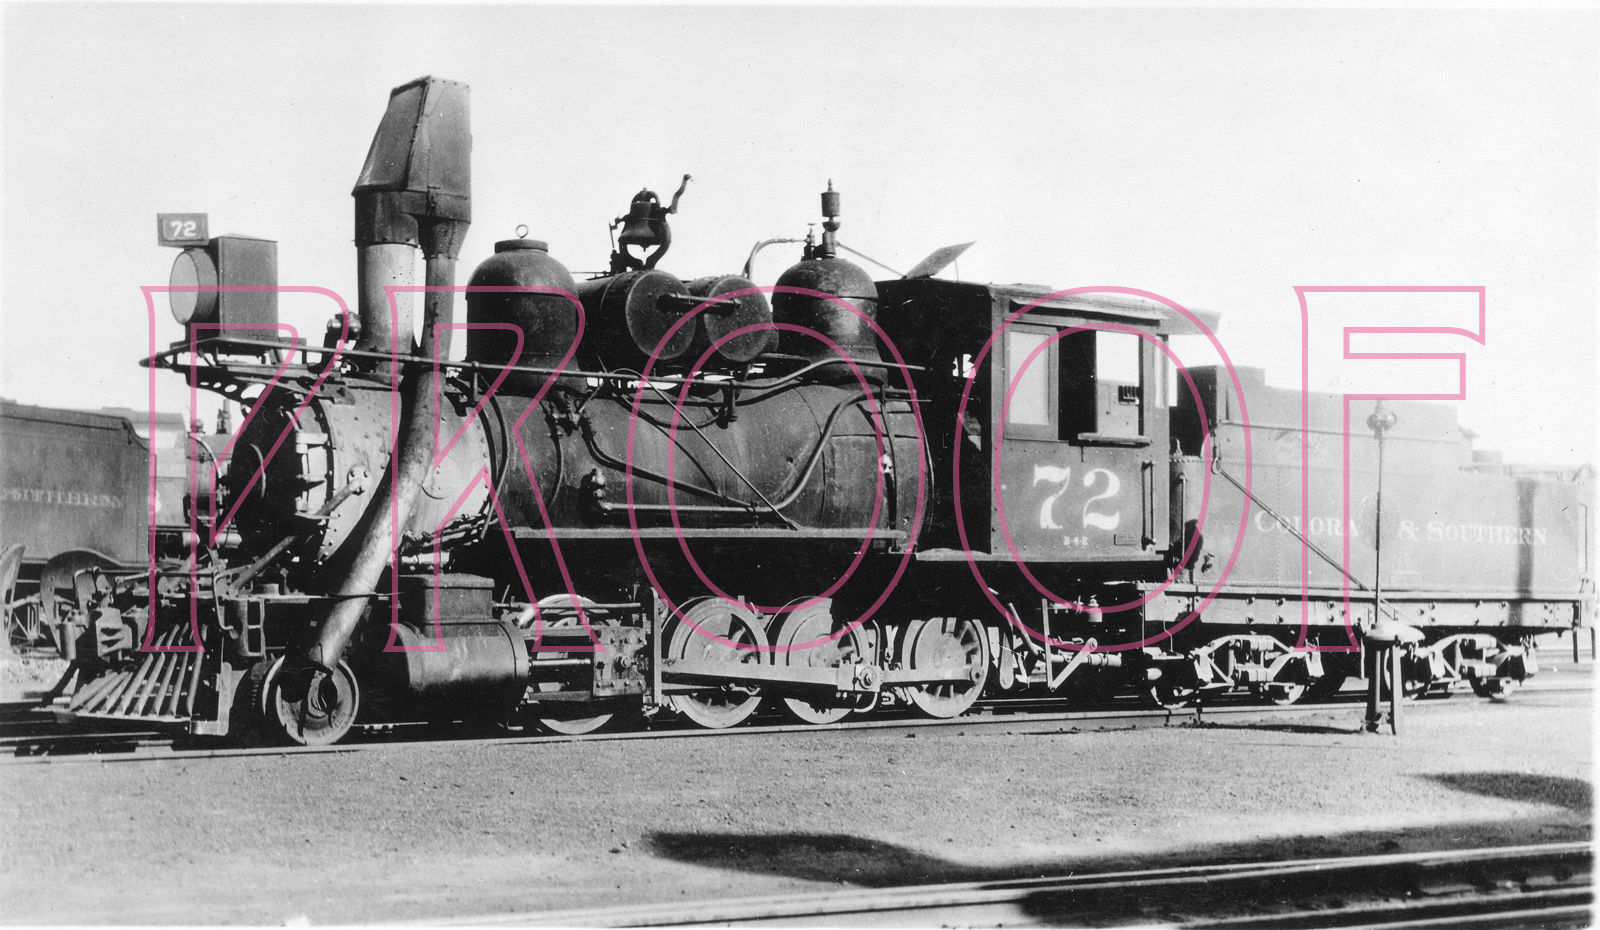 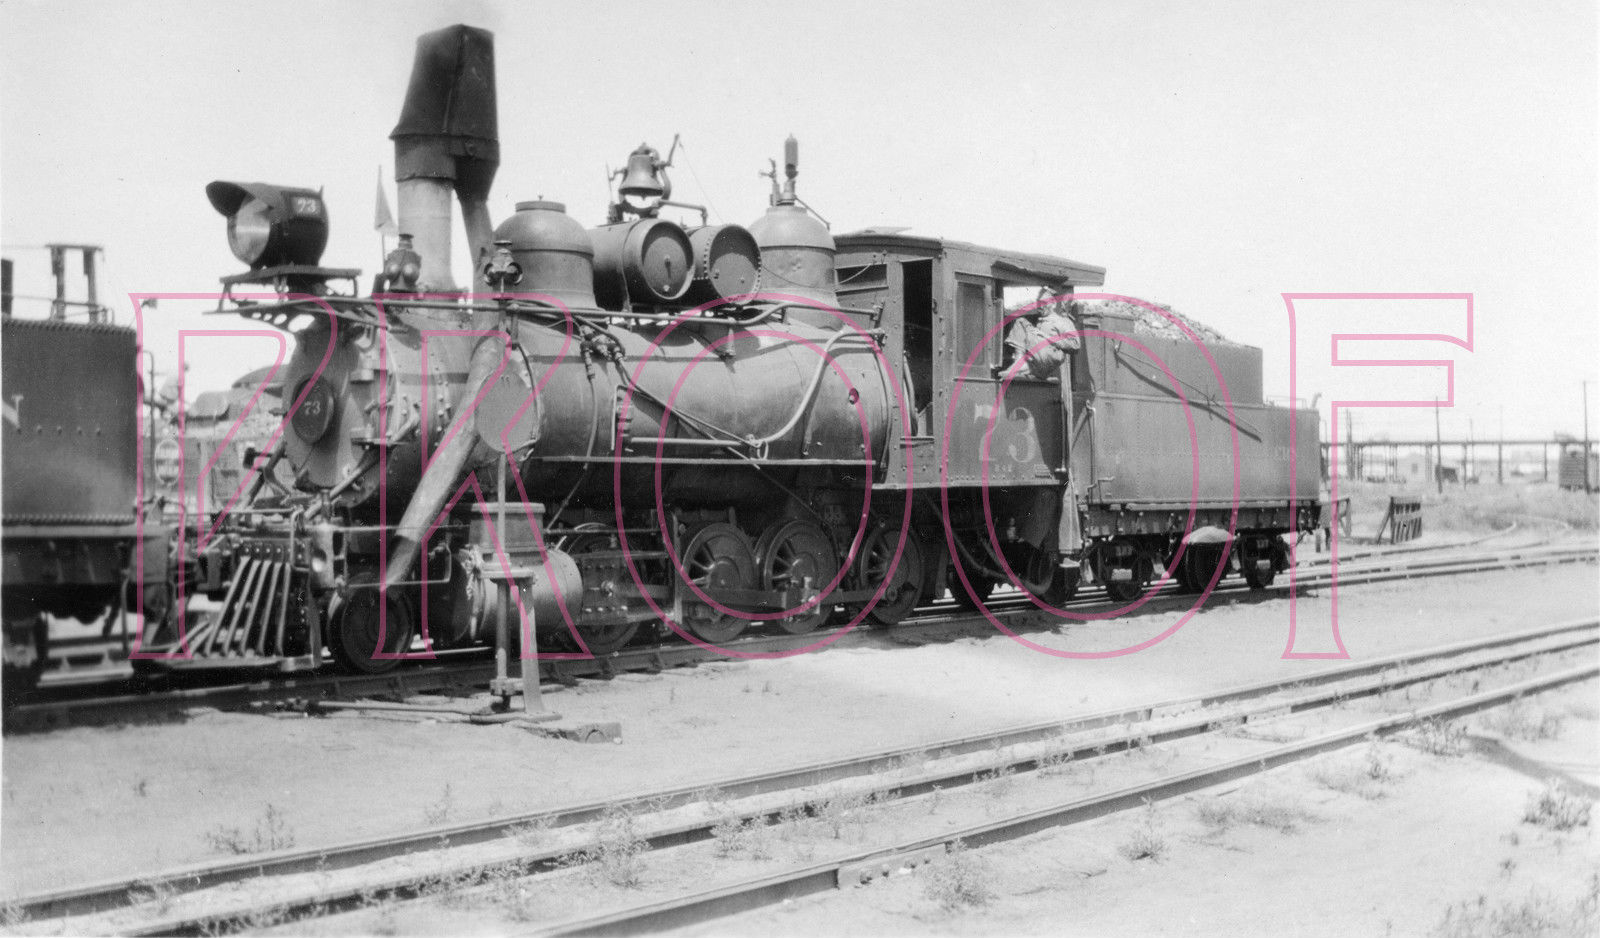
UpSideDownC
in New Zealand |
|
Administrator
|
Note #72's nice box headlight in Chris' picture. I've always preferred that over the little pyle headlight which replaced it after the Como Roundhouse fire in about 1935.
|
|
This post was updated on .
The big B4-Es were a neat class of locomotives. Their appliances, cabs, etc. constantly changed over the years:
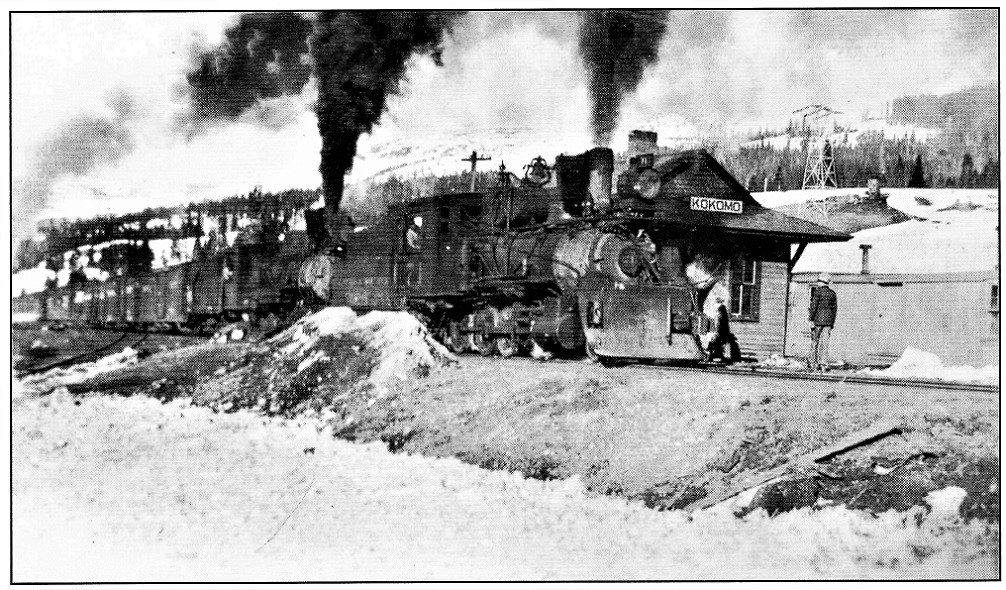 1922 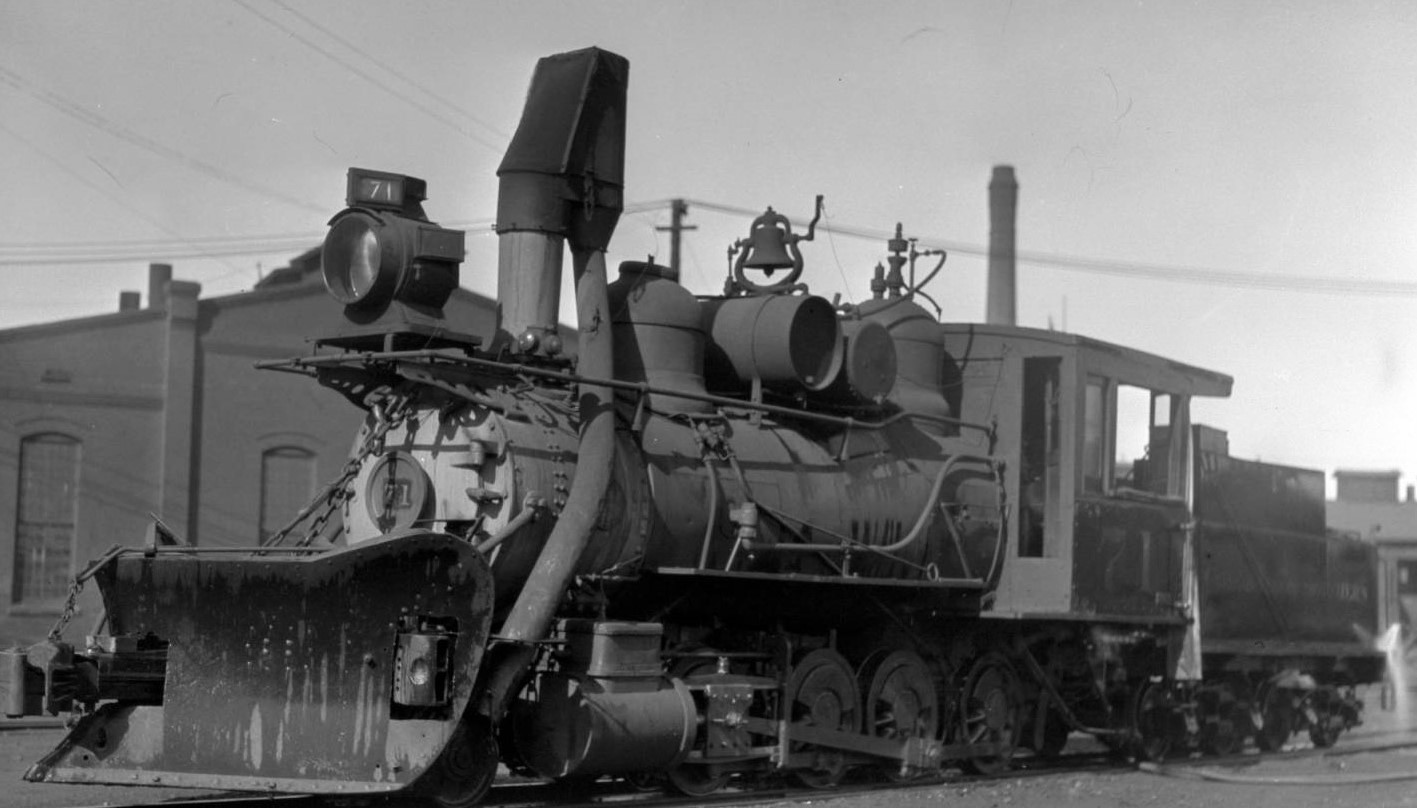 1926 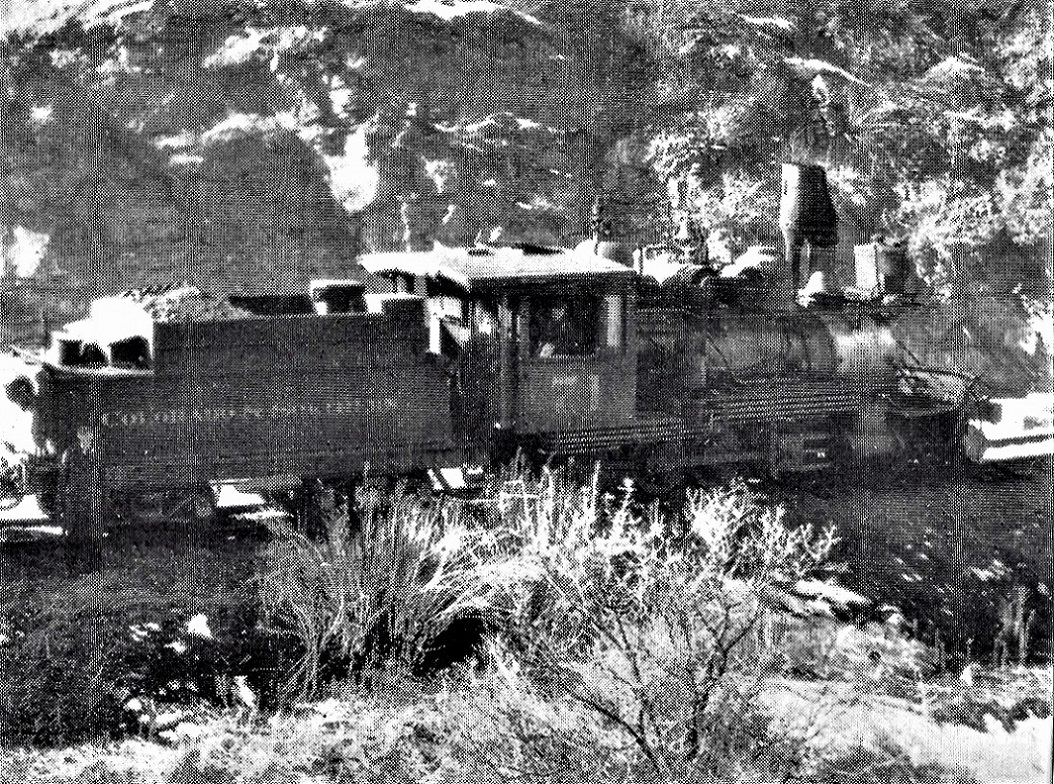 1929 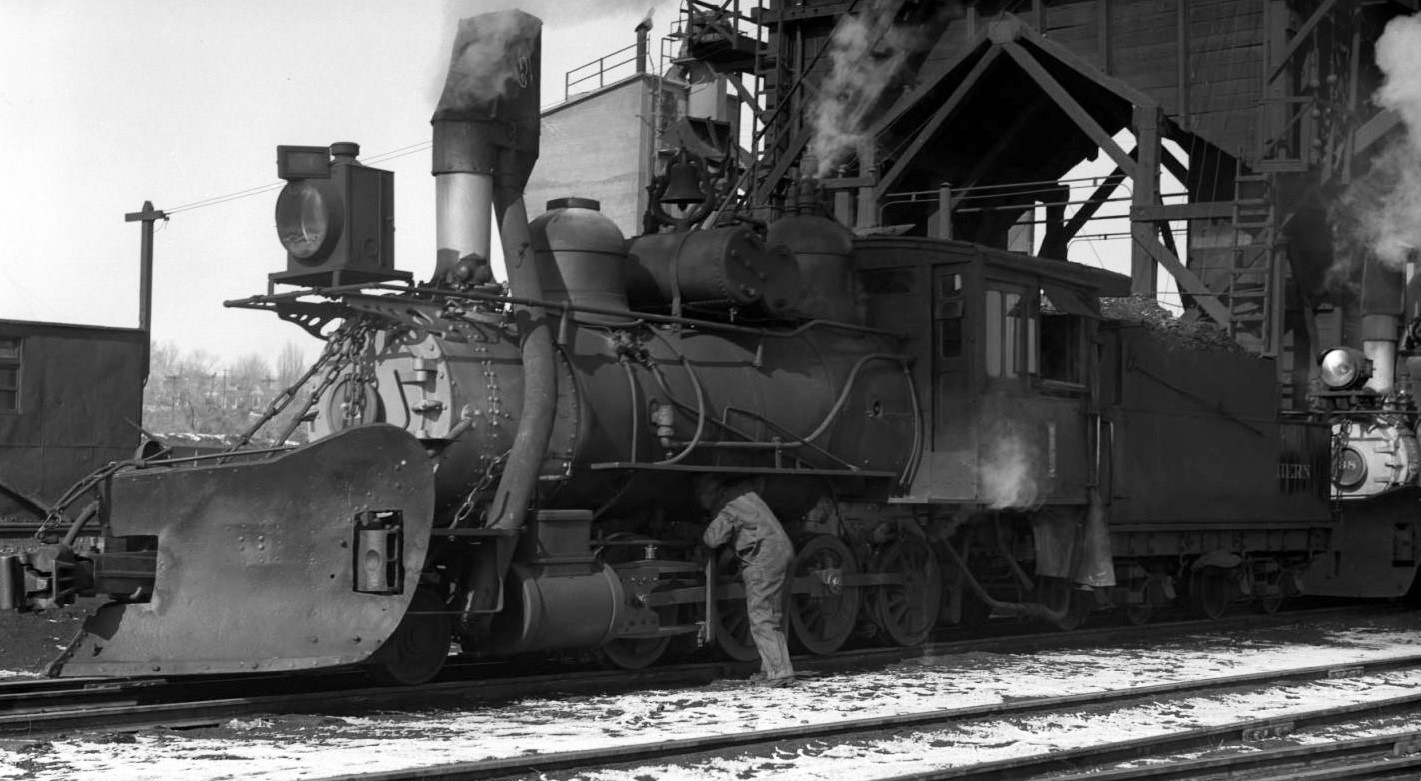 1934 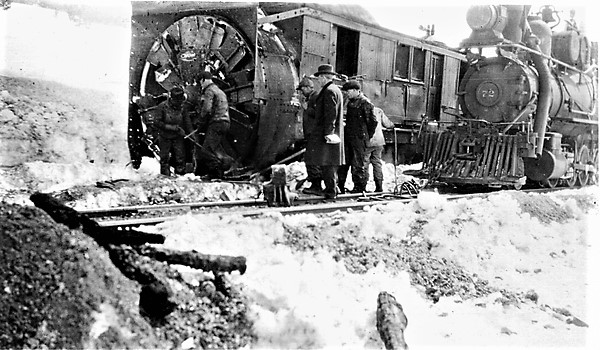 1921 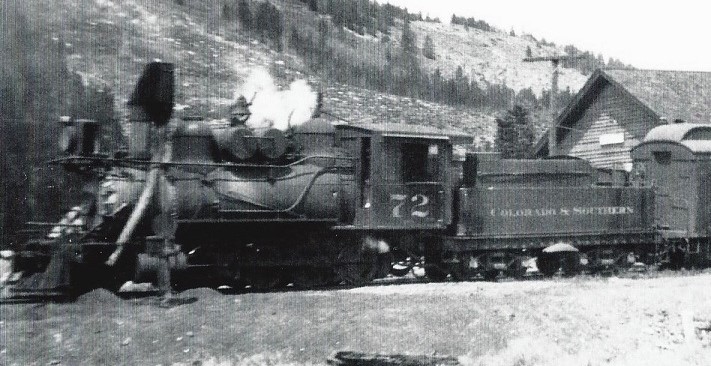 1924 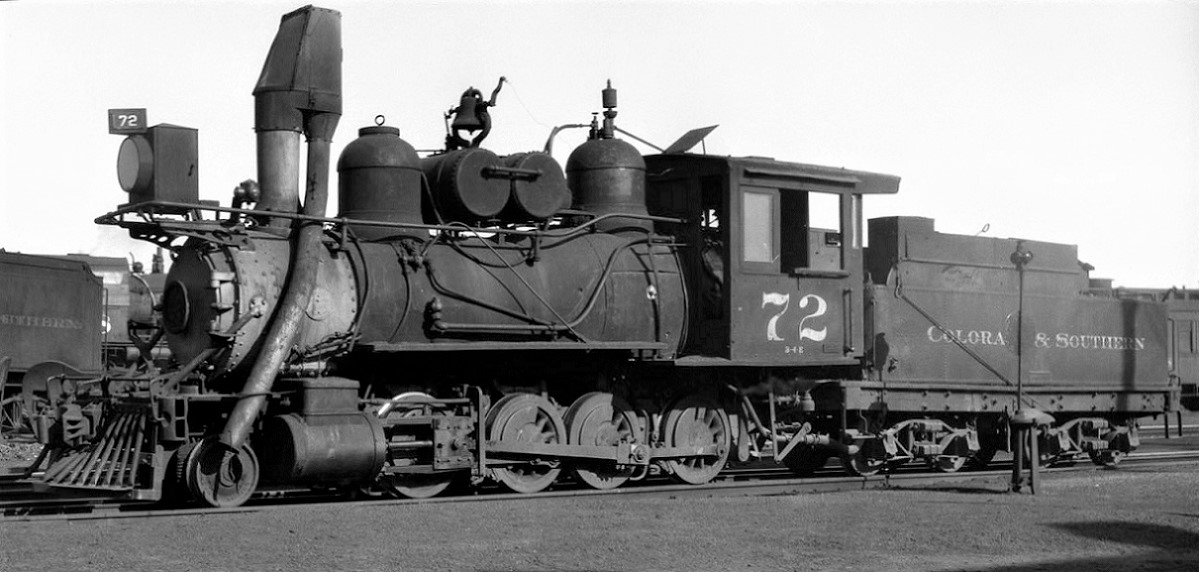 1927 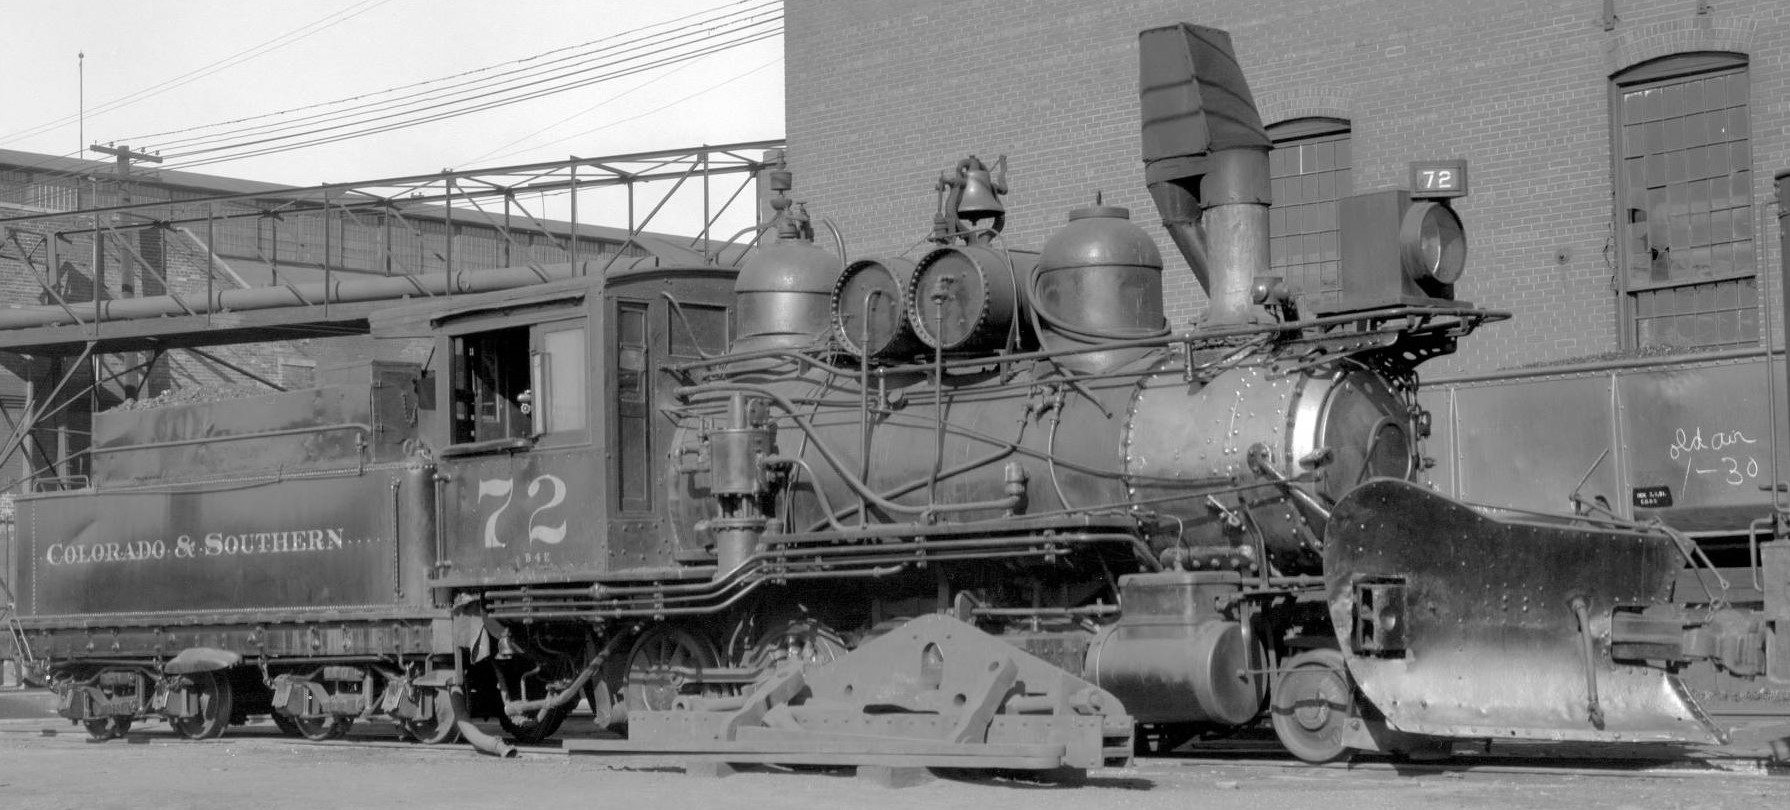 1931 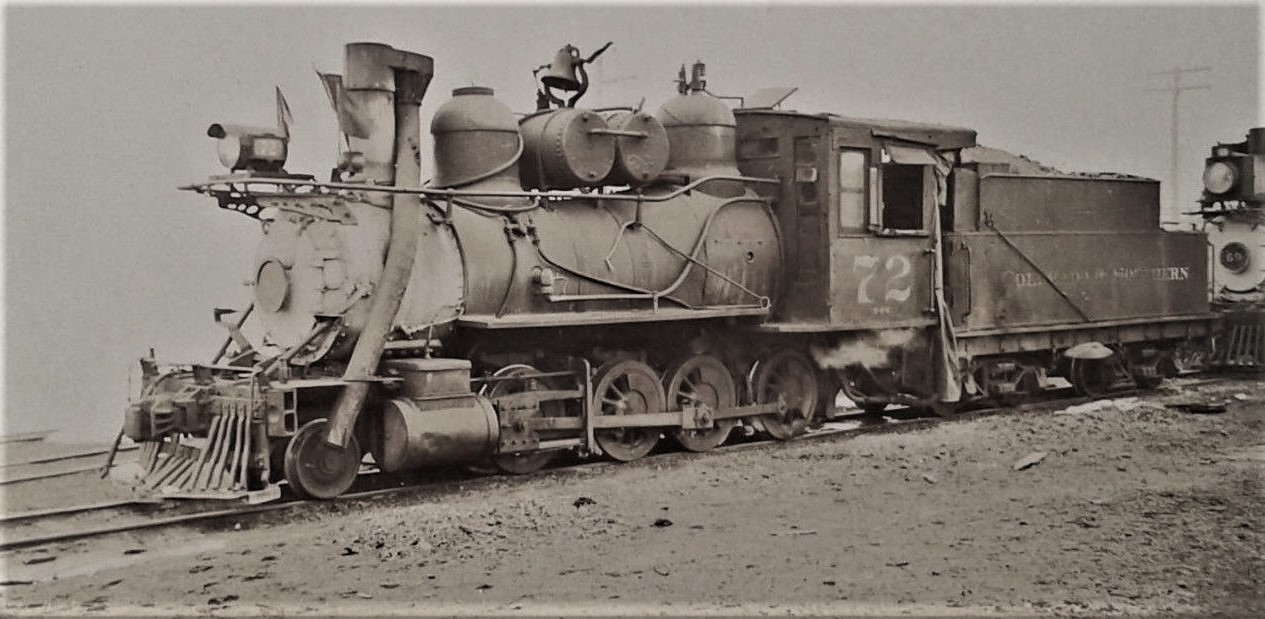 1936 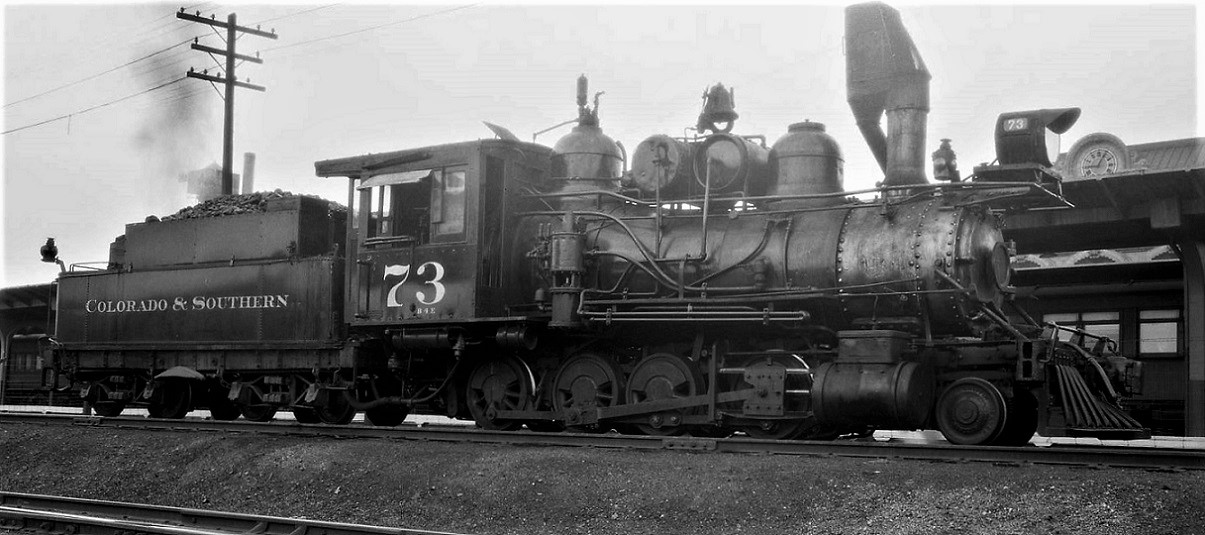 1929 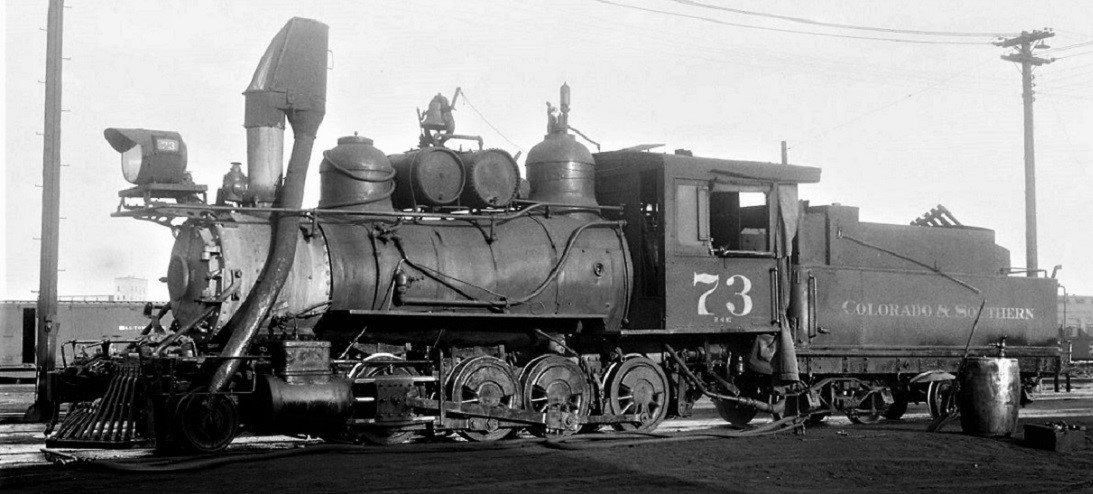 1931 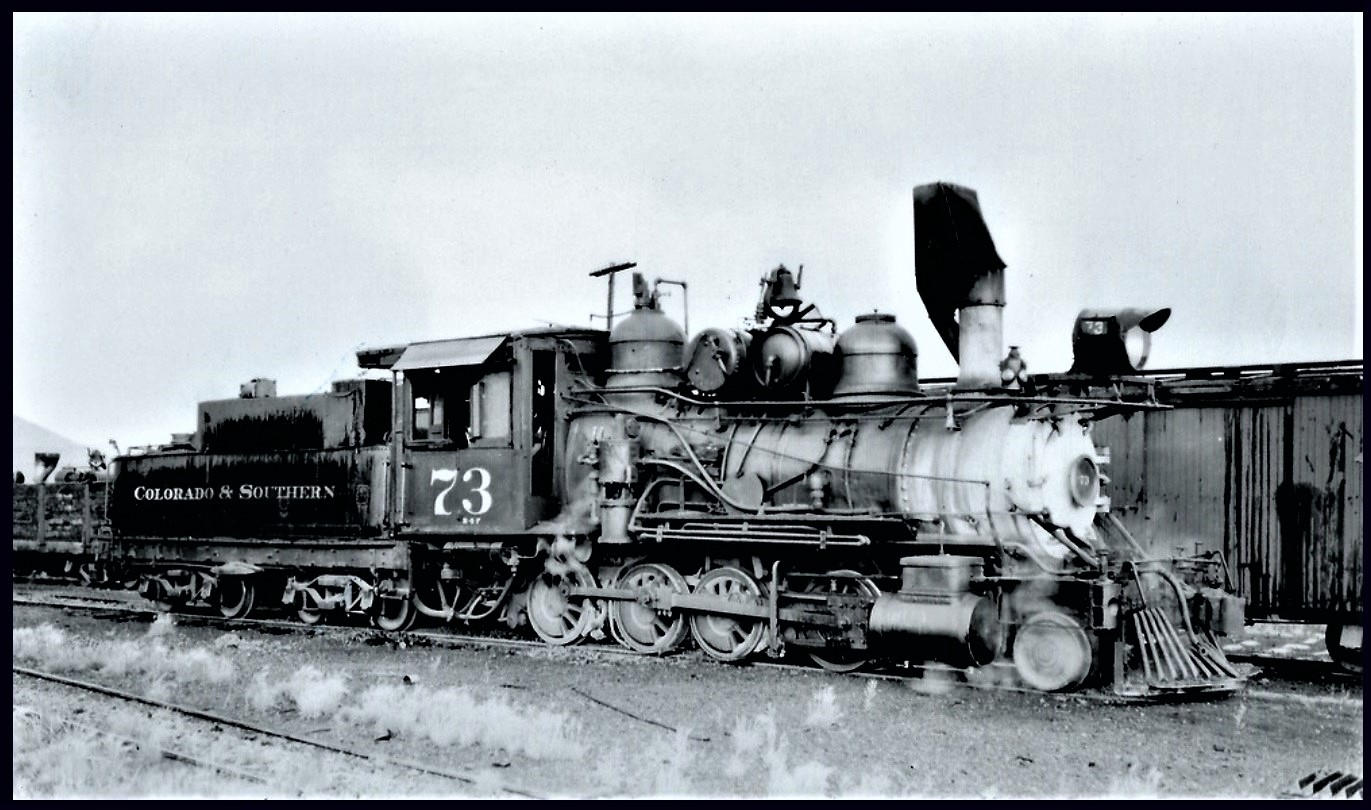 1934 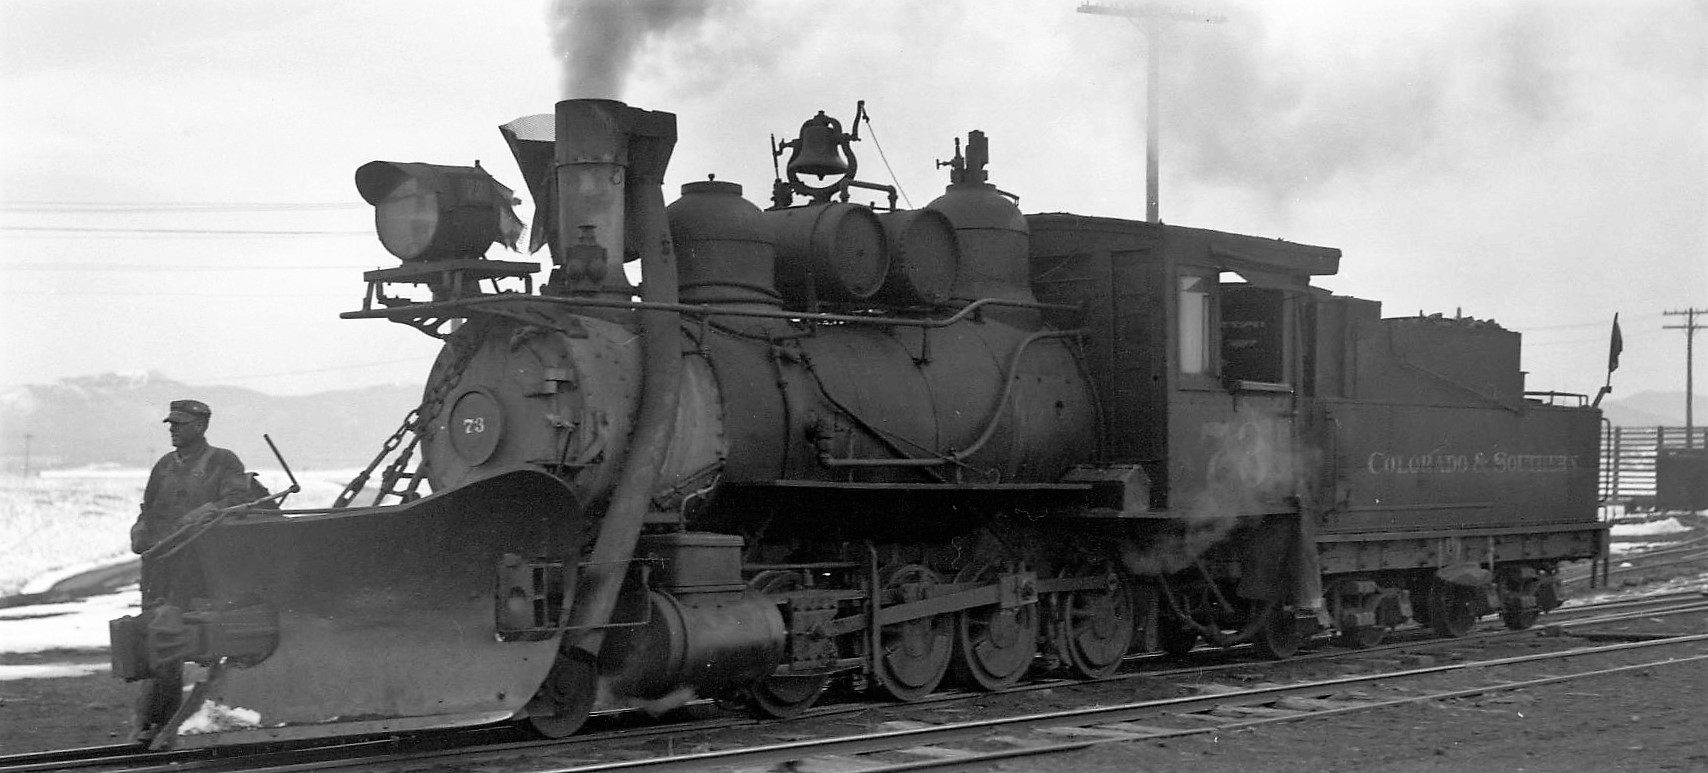 1936 Like Mike, I prefer the CB&Q style box headlight on 72, compared to the last visored soup-can headlight in the late 1930's. The Key 71 can use some upgrades like a butterfly pilot plow and correct spark arrestor. American Scale Models still offers both: https://americanscalemodels.com/HO/HON3_DETAIL_PARTS?product_id=1135 https://americanscalemodels.com/HO/HON3_DETAIL_PARTS?product_id=1134 In HOn3, Wiseman at one time offered a good brass casting for the box headlight, but I can't seem to find it now. I think I have a couple in my parts box--contact me off forum if you want them.
Jim Courtney
Poulsbo, WA |
|
In reply to this post by Todd Hackett
Todd,
Wow...thank you for all this information. I'm trying to model the pre-depression era...say 1927-29. Changing that many parts like the cab windows, headlight, air tanks and boiler front sounds like a bit more brass repair than I've done in the past. I guess to do it properly it would require a resistance soldering machine... especially for the small fine details? I have neither currently. Perhaps I need to look harder for the 72 & 73 first? |
|
In reply to this post by Jim Courtney
Jim,
Thank you your detailed information with dates...which help me see all the small differences between the three locomotives. I'm trying to focus my time period around 1927-1929 (pre-depression era). Since e don't have a resistance soldering machine, I fear making all the small detail changes might be more than I care to try...but I will definitely purchase the new butterfly plow and bear trap from AMS. At least one of the 71's will look more accurate. I will try to hunt down a 72 & 73 (if they were ever made) but in the mean time, I'll study the photos you sent and hunt for the correct parts...just in case! Thanks again John |
|
This post was updated on .
I dunno, John.
I don't think a resistance soldering set up is necessary for working on small re-detailing parts in HOn3. I only use my resistance set for soldering large brass castings to superstructures, like air pumps, air tanks and such. Increasingly, I'm using a Weller variable temp iron (up to 850 F) with a small tip for most detail work: 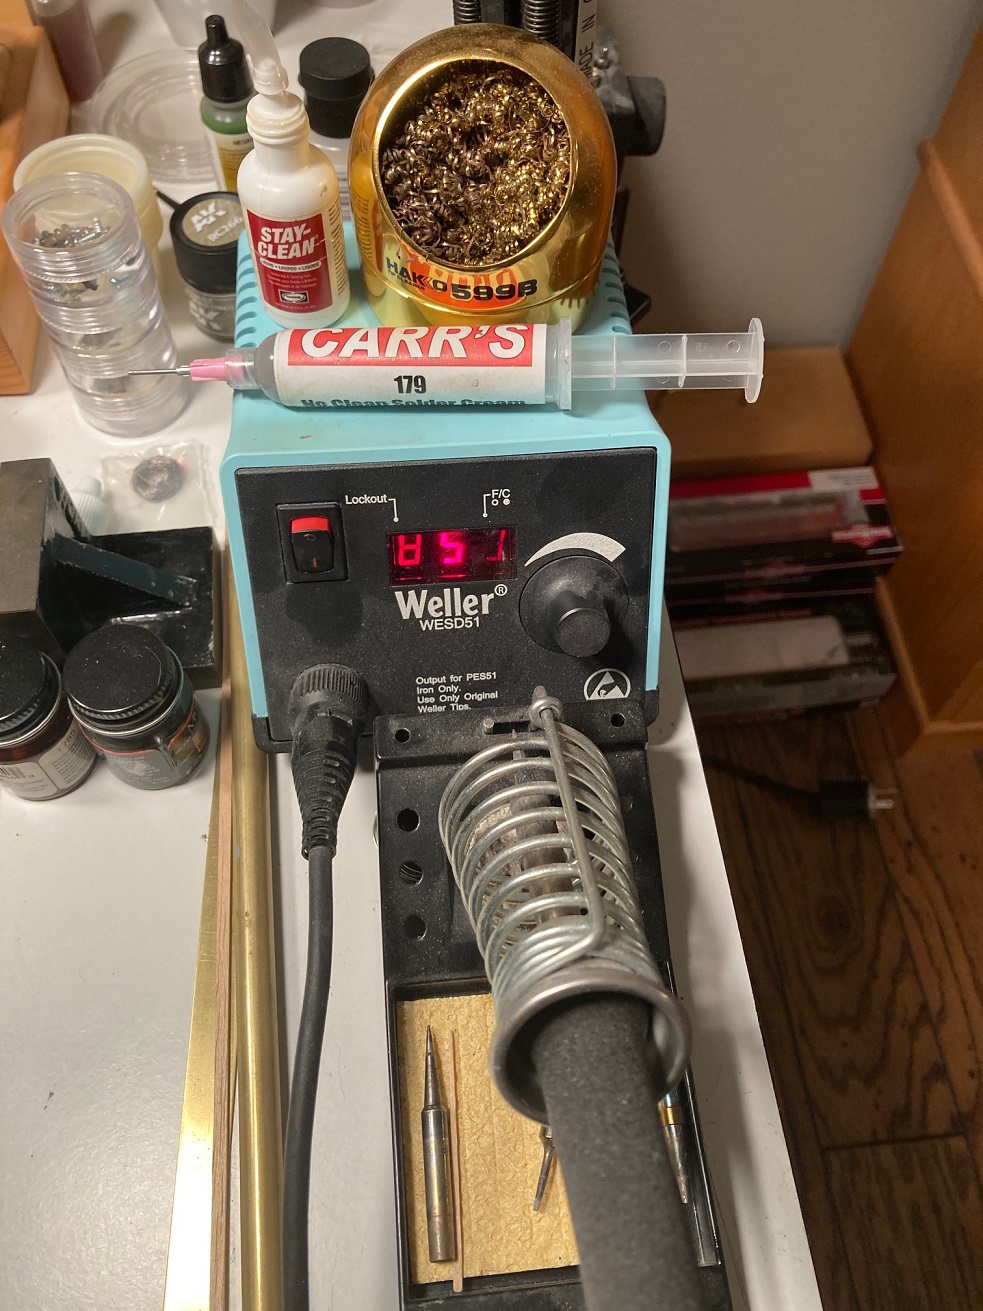 I use a fiberglass eraser to remove all oxidation from the parts, a good flux and some micro solder from Fast Tracks. I also like Carr's Soldering cream; it is a UK product, used by folks there, to solder together thin brass etchings, works well with brass or nickel silver sheet. FWIW, here is my Sn3 Overland C&S 71, that I'm backdating per the Otto Perry 1926 portrait, a work in progress: 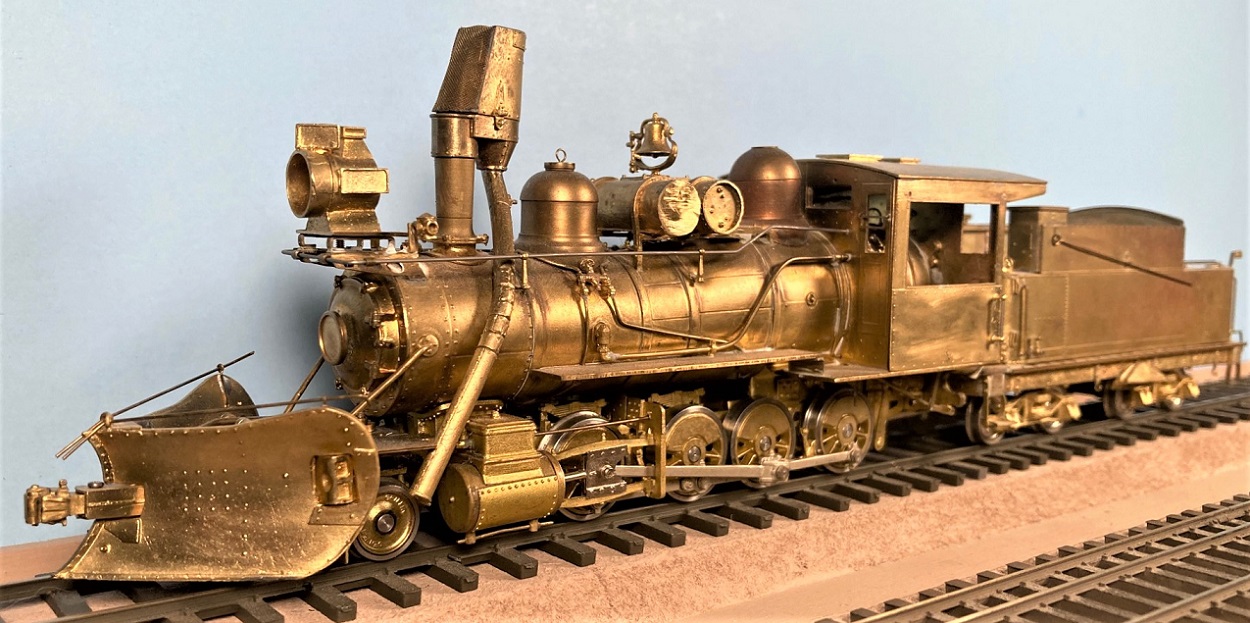 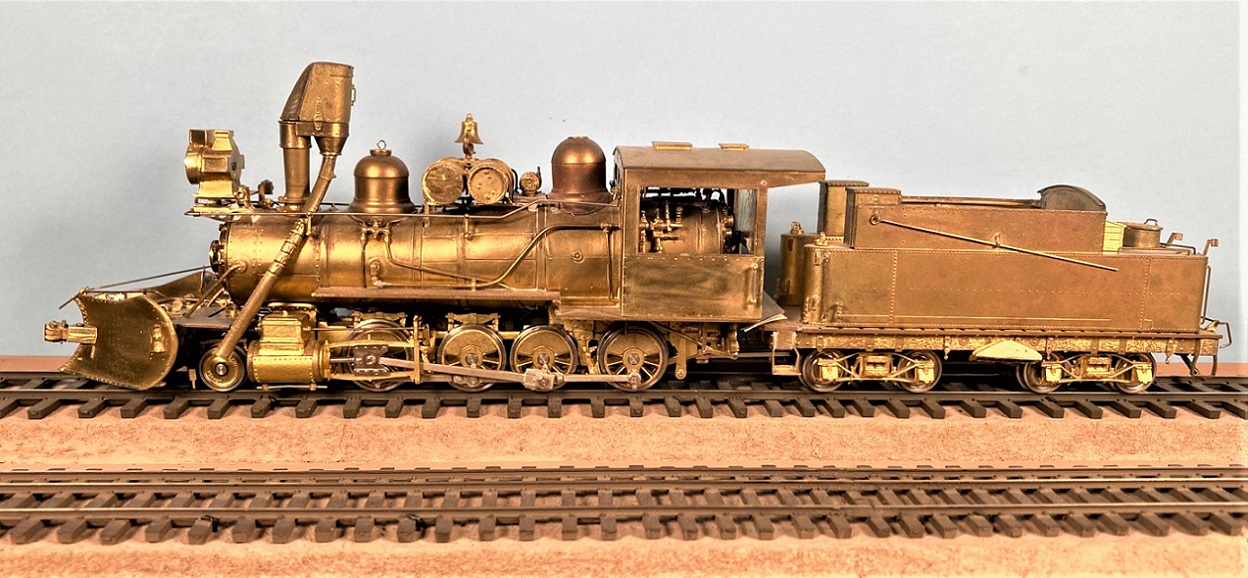 And not everything has to be soldered. I'm making all my headlight castings removeable. A hole drilled in the bottom of the casting, then tapped for a small diameter metric screw holds this headlight to the existing bracket. Will make changing burnt out bulbs easier. And don't overlook the new cyanopoxy glues. If they can hold the skin on stealth fighters, they will likely keep an HOn3 air pump in place. PS. The only imported B4-E in HOn3 was the Key number 71. But with minor changes, could easily become a 72 or 73.
Jim Courtney
Poulsbo, WA |
|
Administrator
|
In reply to this post by amwing1588
John, don't be afraid to use a good cyanocrilate adhesive or epoxy for the modifications you are considering. There are parts I have placed on On3 locomotives that way that have held up just fine for over 45 years. You'll be fine. The important thing is to make the changes you want and remember the great Bob Stull's immortal rule #1, "it's my railroad!" Feel free to write me with questions.
|
|
In reply to this post by Jim Courtney
Speaking of the Key C&S 71, one just listed on eBay (pricey though):
https://www.ebay.com/itm/125801802003?hash=item1d4a5f2913:g:gKEAAOSwwNpkApUr&amdata=enc%3AAQAHAAAAwHGqZkaeu3xFP2ECLSxo%2ByuKmZrjsw77bYjV8qHgZ%2FDLw%2FUlRRuMV3jAvY1Dd2aBPq4rQctYLNelJDSvlhltOVvE4kmbY91w6Q16TBp33eyEJR3Gjfbmoznw7NMT9FroOMLhAHfVjrqITJ%2F9Fcp7z9JNnLcj9qCbkABGwYAQ64o1Cks8bks%2F1DMekZ%2BZJFyqaudvXQVK8Zrmh9HxfiwBYAjgKAtgvmjo8ZAZo7tX6tVYOk7XxIbUg%2FnmBeb6Pu2AFg%3D%3D%7Ctkp%3ABk9SR5CXi4HmYQ
Jim Courtney
Poulsbo, WA |
|
"Hoping to not get my head bashed in by a chair leg for pointing out the differences, but... "
=========================== Not to worry, Todd. This forum seems remarkably free of in-your-face choo-choo nerds, like we all know swim the railfan waters. The way this crew does and presents research is very much a pleasure to learn from, and your above post is exemplary of this. Thanks to you and pretty much all our regulars for making this an exceptional venue for C&S narrow gauge learning and discussion.
"Duty above all else except Honor"
|
«
Return to C&Sng Discussion Forum
|
1 view|%1 views
| Free forum by Nabble | Edit this page |

