CB&Q #537
1234


1234
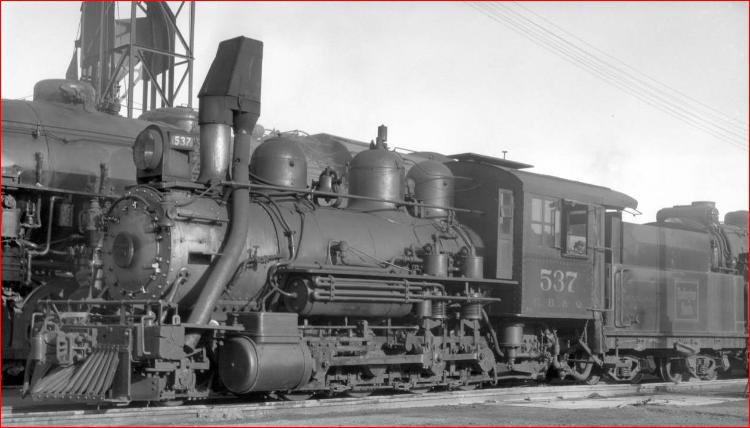 http://digital.denverlibrary.org/cdm/fullbrowser/collection/p15330coll22/id/68932/rv/singleitem/rec/3 Note the modern-style cab curtains, Bettendorf trucks and Markerlamps present on the rear of the Tender.
UpSideDownC
in New Zealand |
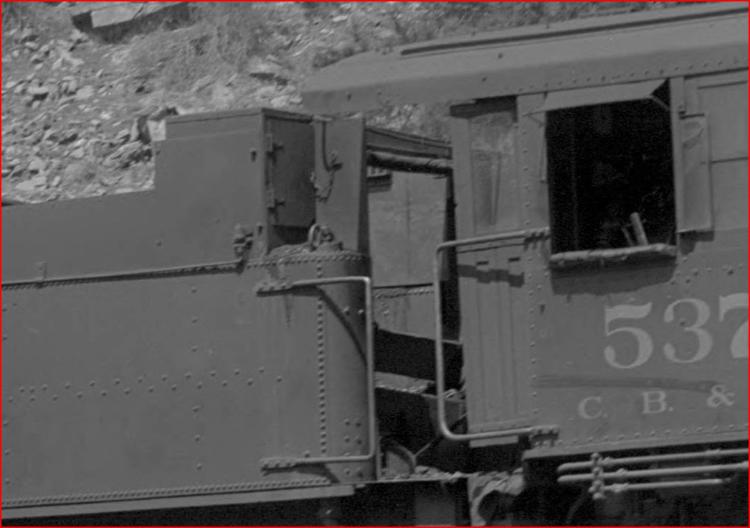 http://digital.denverlibrary.org/cdm/fullbrowser/collection/p15330coll22/id/68977/rv/singleitem/rec/1 Unusual treatment of the bunker slats for a modified tender in the C&S care. There appears also to be a curtain rolled up under the tender top-crossplate.
UpSideDownC
in New Zealand |
|
Administrator
|
Hi Chris,
The first of your most recent photos is of #537 between 1927 and 1931, at which time it received #70's tender. You will note that the bunker side sheet is different than you'll find on any other C&S tender, and that the headlight at that time was mounted slightly behind the front edge of the smokebox. Hol Wagner and I discussed this photo back in the days when I was building the model, and at that time we were convinced that what this tender was is a mystery. Maybe someone here can figure it out. The rivet patterns are not in any way consistant with #537's tender from the Black Hills. For whatever reason, when #70 was brought in for conversion to oil in '31, it's tender replaced this one on #537, and these Bettendorf trucks were fitted on to the old #537 tender which we all know was one of #70's distinctions. The second photo shows a great and rare view of the lower coal slats in #70's old tender. These lower boards were held by steel brackets, which I believe were usually vertical, but I'm pretty sure I've seen a hint, if not this clear, of at least one of them being angled like this one. #71's brackets are verticle. #60's may be missing, I don't remember. #74's are definitely missing, having been removed by the RGS when it received a four piece steel door coal gate. There is a photo of DSP&P Mason Bogie #42 that shows a wood coal gate, so that would be another item to list with respect to early UP roots of later C&S practice. Chris, do you think that is the rolled curtain attached above the coal gate so that it could be hung on the cab roof overhang? |
Mike, to my eyes the whole tender frame goes with those Bettendorfs and that was what ended up behind the 70 oilburner, it is quite distinctive, not that I have seen the Black Hills pictures, I'd say they just swapped out the Tank or rebuilt it without the coalbunker sides, I really need to dig into this to refresh my memory. The tank does change considerably. I'll check out that curtain roll suggestion later, but at this gut feeling, I wouldn't think they would store it there, too much hassel to refit it up under the roof overhang, more like a shorter curtain seperate from the overhang Top-roll I think.
UpSideDownC
in New Zealand |
|
Ever notice how what appear to be swing beam freight trucks appear on some TOC tenders?
|
Re: CB&Q #537 and C&S#70 Tender Comparison.
|
Just a quick observation, #70's coal tender had a narrow frame that is difficult to make out the details.
http://digital.denverlibrary.org/cdm/fullbrowser/collection/p15330coll22/id/42293/rv/singleitem 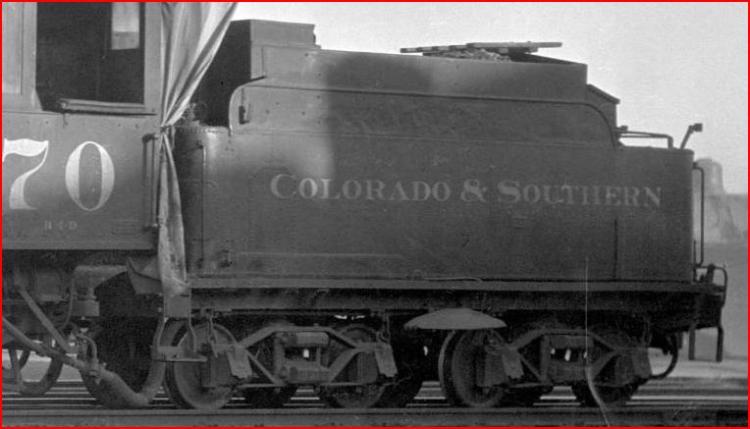 #537's early tender had a wooden underframe with Bettendorfs http://digital.denverlibrary.org/cdm/fullbrowser/collection/p15330coll22/id/68932/rv/singleitem/rec/2 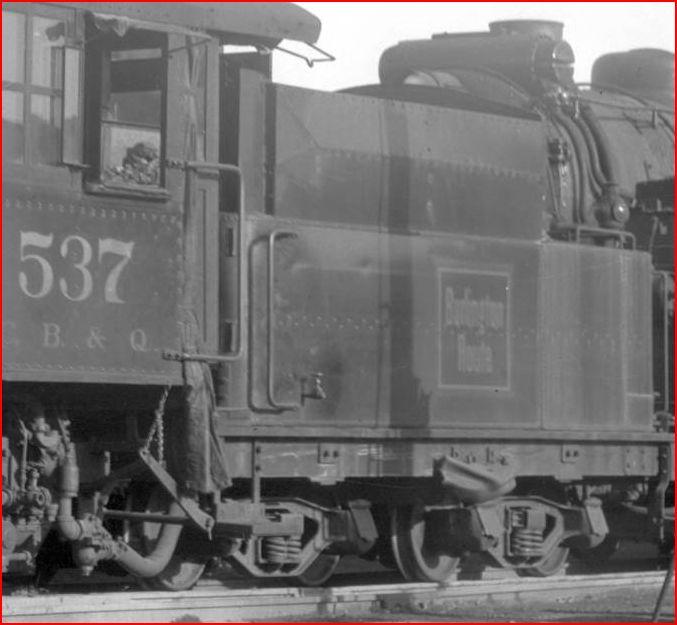 went under #70 oiltank...tank is now narrower than behind 537. http://digital.denverlibrary.org/cdm/fullbrowser/collection/p15330coll22/id/42299/rv/singleitem/rec/78 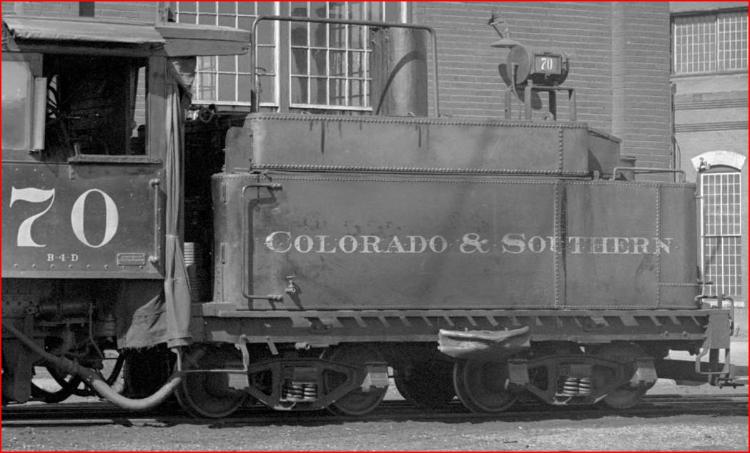 #537's last tender has a steel underframe http://digital.denverlibrary.org/cdm/fullbrowser/collection/p15330coll22/id/30843/rv/singleitem/rec/240 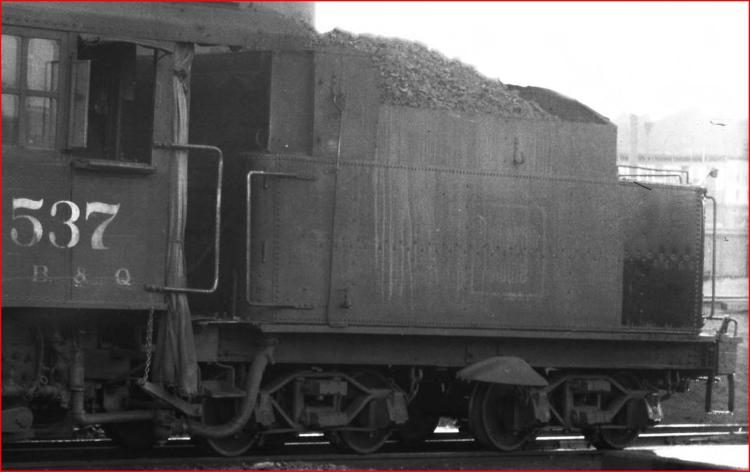 No two tanks are the same therefore the tank had to come from another tender.
UpSideDownC
in New Zealand |
Re: CB&Q #537 and C&S#70 Tender Comparison.
|
Administrator
|
Thanks for posting them all together. It still gives me a headache after all these years!
|
Re: CB&Q #537's asymmetrical Handrail.
|
In reply to this post by Chris Walker
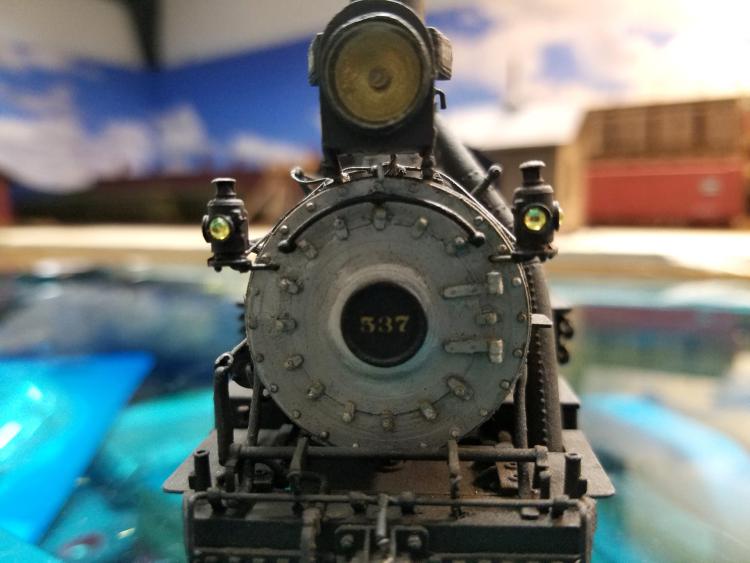
Mike, Thanks for the memory jog on your #537, now to the unfinished business! This has always bugged me about this loco; I recall getting docked points on one of my models here in a contest, I failed to point out in the entry form that the wonky bit was on the prototype, and thus the judges assumed it was a poorly executed part. I'm not certain if Mike has modelled this faithfully (since I can't tell from the photo's) or chosen to make it more "even" to forgo the "finger pointing". I am referring to the lop-sided smokebox front handrail here..... 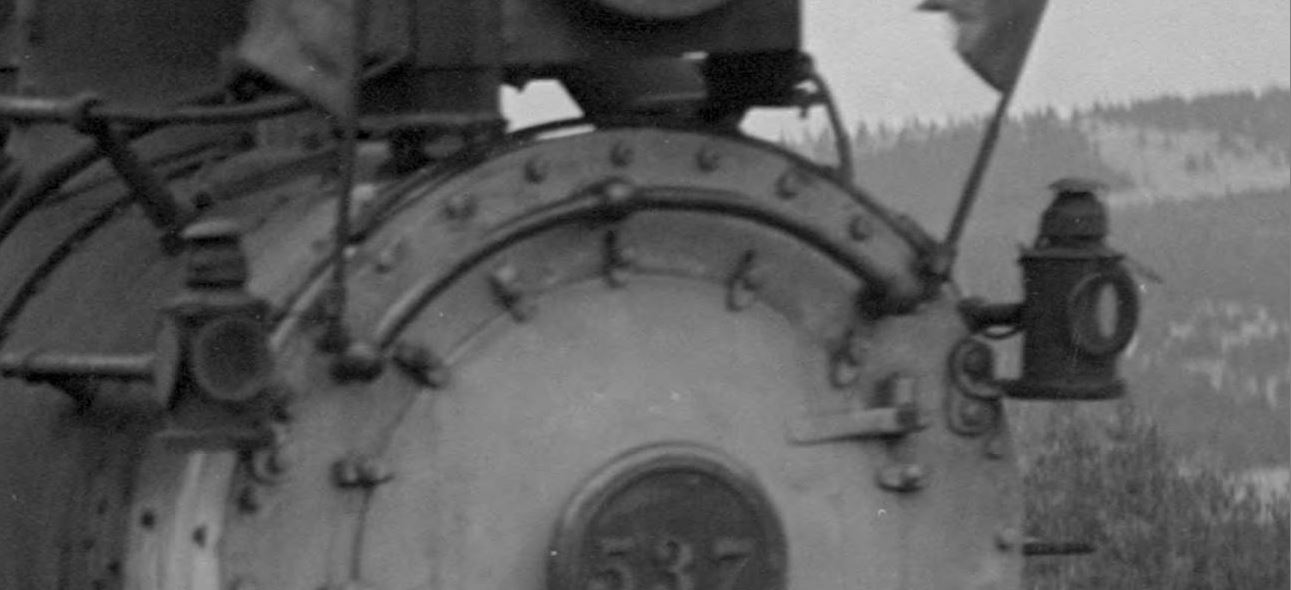 http://digital.denverlibrary.org/cdm/fullbrowser/collection/p15330coll22/id/45812/rv/singleitem/rec/26  http://digital.denverlibrary.org/cdm/fullbrowser/collection/p15330coll22/id/68932/rv/singleitem
UpSideDownC
in New Zealand |
Re: CB&Q #537's asymmetrical Handrail.
|
Administrator
|
Hi Chris, I got a pretty good chuckle out of this.
My philosophy on this sort of thing is that as modelers we always should feel some level of comfort in knowing that if we can score a near miss now and then, we will probably end up with similar results as the prototype. All anyone really needs to do is not just look at, but actually study any real locomotive up close and you will be amazed how crude many details are. Running boards are shaped out of sheet iron with cutting torches, rarely straight, many surfaces have a mottled appearance from rust and who knows what else, etc. There are parts that have been repaired or replaced with odd or mismatched results and the list goes on and on. So I've always tried to strike close to the mark so it "feels" right and not worry too much about making sure It's perfect, because in almost every case, the prototype wasn't perfect either, whether you can see it in photographs or not. My practice is generally not to strive for modeling prototype mistakes like this one, because I'd be doubling imperfections and that can't be good. Why look for trouble? One detail on 537 that I did take on is an odd thing with one of the air pumps. One of them appears to have a home made look to it in that the lower half seems to have been rebuilt from what would actually have been an upper half casting, as it has no cooling fins. So I had to chop up two perfectly good 9 1/2" pumps to make that one. No one ever notices this, but its just as it should be. I always study every photograph I can get my hands on with the idea that if I can't find something I can learn from it, I'm not looking hard enough. Even if it is a same photograph I've seen before, the contrast or cropping may be different. Thats how I found this. Another photograph had a perfect view of the backhead which showed me how to do that. Photographs of the wreck on Boreas showed me details of #75's tender that would otherwise had to have been guessed at. There is always something there. I'll post a detail picture of the airpumps shortly. Another thing I just remembered is that the steam delivery piping to the pumps from the split are a smaller diameter than the delivery pipe to the split to maintain pressure. You can be rewarded in knowing you have done all this stuff, but don't expect anyone else to ever see it, or even care. Good eye, Chris, to find that crooked grabiron. Mine is probably off too, but it wouldn't be off on purpose. Like I said, why look for trouble? |
Re: CB&Q #537's asymmetrical Handrail.
|
Only Adrian Monk would worry about it "being crooked"
|
Re: CB&Q #537's asymmetrical Handrail.
|
Administrator
|
This post was updated on .
In reply to this post by Mike Trent
Had to laugh again. Looks like mine also has a slightly crooked grabiron. Maybe not as bad as the real one, but it looks a bit off. I can't remember if I did this on purpose or not. After writing what I did this morning, I'm going with that it just happened. But when you're in the groove, you're in the groove, right?
 Here's a close up of #537's twin 9 1/2" air pumps. The one on the right is the one missing cooling fins on the lower half, which may mean that it was built using parts from two, like I had to do to copy it. It probably had two upper halves, one modified to be used as a lower. I happened to have a real print from Ed Haley which showed this detail very well in perfect light from the sun. Also note the somewhat smaller steam delivery pipes from the Y connection to the pumps to keep pressure after the split (the upper half is steam powered, with an input and an exhaust which goes to the smokebox, the lower half pumps air, which feeds into the cooling coils) 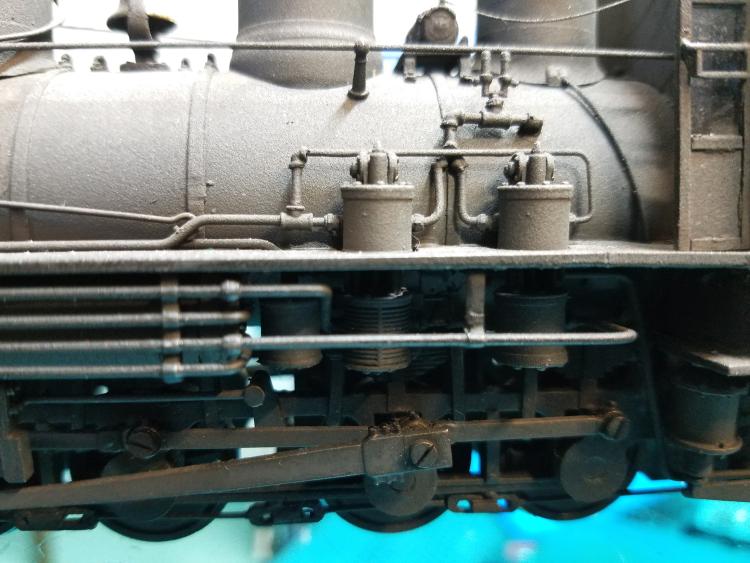 Lastly, although this doesn't have very good focus, it does show some of the piping pretty well. That equalizing pipe to the front of the air tank almost drove me to drink. It has a home made look that has to be just right to look as unbelievable as it was. Incidentally, that hook that is propped on the check valve where this sort of thing is often found has an interesting purpose, according to Hol Wagner. I think it actually has two purposes. One, according to Hol, was to pull the sand pipe down at the service facility in Denver. The other, I believe, was to hook the ring on water spouts, which may actually have had to be done from the cab roof in some if not most cases, as they could not have been reached from the water hatch. This is an example of why we don't actually have to know the why of something we see. Just to know that it was there and should be is what's important. The why may turn up later. 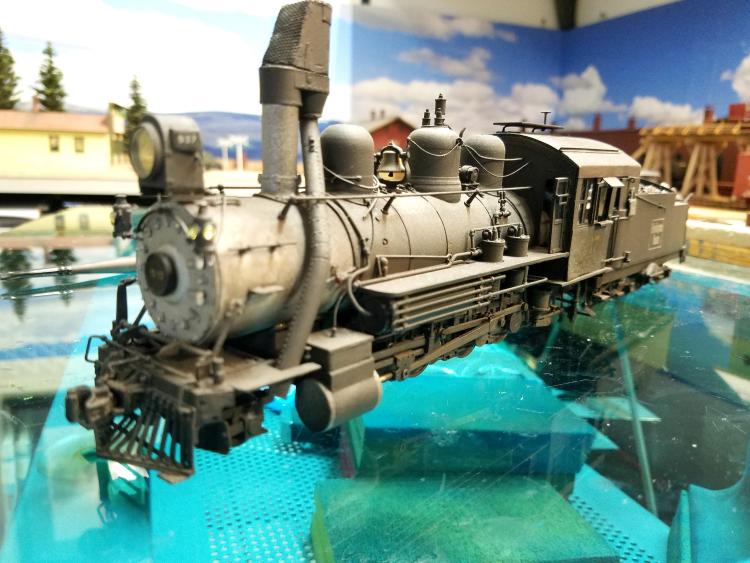 |
Re: CB&Q #537's asymmetrical Handrail.
|
What is the cylinder, under the running board, just ahead of the two air pumps?
Is it an air strainer, like on a cross-compound pump? Do you recall what paint was used for the oxidized silver smoke box?
Jim Courtney
Poulsbo, WA |
Re: CB&Q #537's asymmetrical Handrail.
|
Administrator
|
Yes, I believe that to be an air strainer. Big enough to feed both pumps, so yes, like on a cross compound pump.
The color was what I have typically preferred. Scalecoat Graphite and Oil with a bit of Floquil Engine Black to tone it down. The base color was Floquil Grimy Black, with a light overspray of (Flat) Engine Black. The two tone color on the tender was done after a light dusting of Engine Black, masked off with tape behind the bunker and on top of the bunker and then given a little heavier weathering with Engine Black. When the tape was removed it gives the appearance you sometimes see where water overflow has washed off some of the soot. This engine got heavier weathering after I got it back due to some repairs that had been made to damage from shipping and handling that occurred after I had sold it to Overland Models. Recent weathering was made using some chalks, and my old standby, Vintage Reproductions "Soot". In some lighting conditions you can hardly see lettering on it, but that's OK, because that's just how #537 looks in a lot of photos. I've thought about rebuilding the tender, widening it to George Lundberg's notes. If I do that, I'll probably repaint the whole engine, to freshen it up some. At the time I built this engine in 1984, I'd never done any serious work to a tender like that. Now, after narrowing the tenders of the B-4-F's, and rebuilding the frames from scratch, I'm up to the task. I also really need to replace that oversized air tank on the rear of the tender. That big tank was used under the engineer's side of the cabs, the PSC castings for the rear tanks, are way undersized. It should be 33" long, 12" diameter, like #74, and others. To make them I now use 1/4" tubing cut to length and plug the ends. That will happen for sure. The whole tender rebuild probably will too. That would take this engine over the goal line. |
Re: CB&Q #537's asymmetrical Handrail.
|
Beautiful loco!
Bill Uffelman
|
Re: CB&Q #537's asymmetrical Handrail.
|
Administrator
|
Thanks, Bill, I appreciate the comments! Like in other of life's endeavors, a little each day adds up.
|
Re: CB&Q #537's asymmetrical Handrail.
|
Just catching up on this thread, but great detail work, Mike!
|
|
It really is a great model of my favorite locomotive. Was walking the grade where it ran in the Black Hills the other day. Just a few miles from my house.
|
Re: CB&Q #537's asymmetrical Handrail.
|
In reply to this post by Mike Trent
You know, I thought of taking my Bachmann Connie and use it as a starting point for my first ever loco 'bash'. However, looking at all the photos has convinced me that it would be a losing effort. There's no room on that boiler for a second sand dome. But I set it up with a Ridgway stack, lettered it for the C&S and let it be. I would have love to try that conversion, but, no soap.
Fred
Superintendent
C&S Kebler pass Subdivision The Kebler Pass Route |
Re: CB&Q #537's asymmetrical Handrail.
|
In reply to this post by Chris Walker
Morning I am wondering whether the judges were aware that the smokebox doors on the prototypes were designed to open, unlike the doors on models. Wouldn't there have been a good chance that the rail on one end would be shorter to clear the smokebox door when opened fully? This isn't a standard gauge engine; a small diameter smokebox indeed. Not every roundhouse employee could navigate such a small opening- much less should the door not open fully. Kudos for modeling this feature. Stan |
Re: CB&Q #537's asymmetrical Handrail.
|
Administrator
|
Hi Stan, I assume you are referring to the "dogs", or brackets that clamp the door closed on the smokebox door?
Those are PSC castings, which were required as the original D&RGW style C-21 smokebox door casting had to be modified with a unimat to more closely resemble #537. That they were correctly formed was a bonus. You are right, these are very rarely if ever done properly on imported models. #537's smokebox front was made by the shops in the same way other flat fronts were made through the roster. #9, #71, and #74 also had, and still have, (oddly enough) flat fronts. Thanks for noticing, but I didn't have to fabricate them as Caboose Hobbies had a wonderful inventory of parts in those days. Mike |
«
Return to C&Sng Discussion Forum
|
1 view|%1 views
| Free forum by Nabble | Edit this page |

