C&S RPO / Coach 43 in C&Sn3 -- An Adventure in Resin-Printed Rolling Stock

Previous Topic Next Topic
 
classic Classic list List threaded Threaded
26 messages Options
12
Reply | Threaded
Open this post in threaded view
|

C&S RPO / Coach 43 in C&Sn3 -- An Adventure in Resin-Printed Rolling Stock

Jim Courtney
This post was updated on .
History:

In the spring of 1906, C&S management decided to rebuild three second-class coaches and create a new class of narrow gauge passenger car, the RPO / Coach. The coaches (146, 147 and 148) had originally been Pullman sleepers (Bonanza, Rambler (U&N) and Leadville.  Pullman had rebuilt the three cars as coaches in the 1890s and sold them to the UPD&G. The C&S contracted the rebuilding to Pullman, the three cars were delivered to the Pullman Car Shops in Denver in May 1906.

Pullman removed several rows of seats and windows and constructed a new RPO compartment on one end of the car. The platform and clerestory roof overhang were removed from the RPO end, beginning a new trend for C&S baggage, RPO and baggage/coach combines:


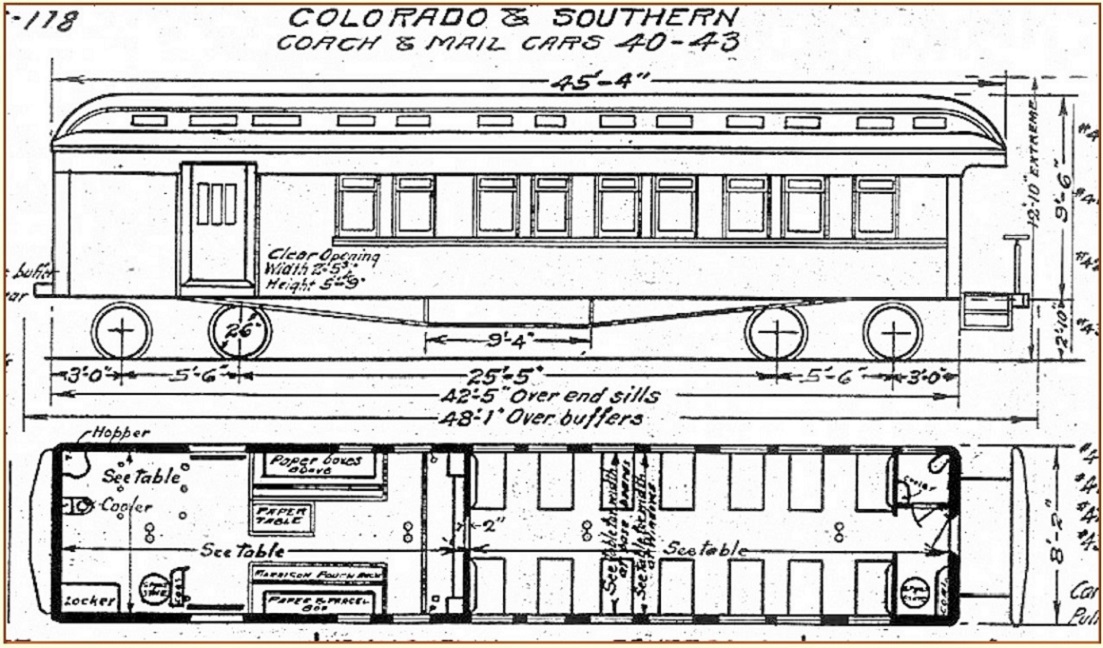
The three cars were out shopped to the C&S on July 14, 1906, with an average cost per car of about $2,300 for the conversion. They left Pullman numbered C&S 116, 117, and 118. For more info on the rebuilding see Hendrick Hayes discussion: https://www.midcontinent.org/rollingstock/CandS/dsp-passenger/coach-rpos.htm.

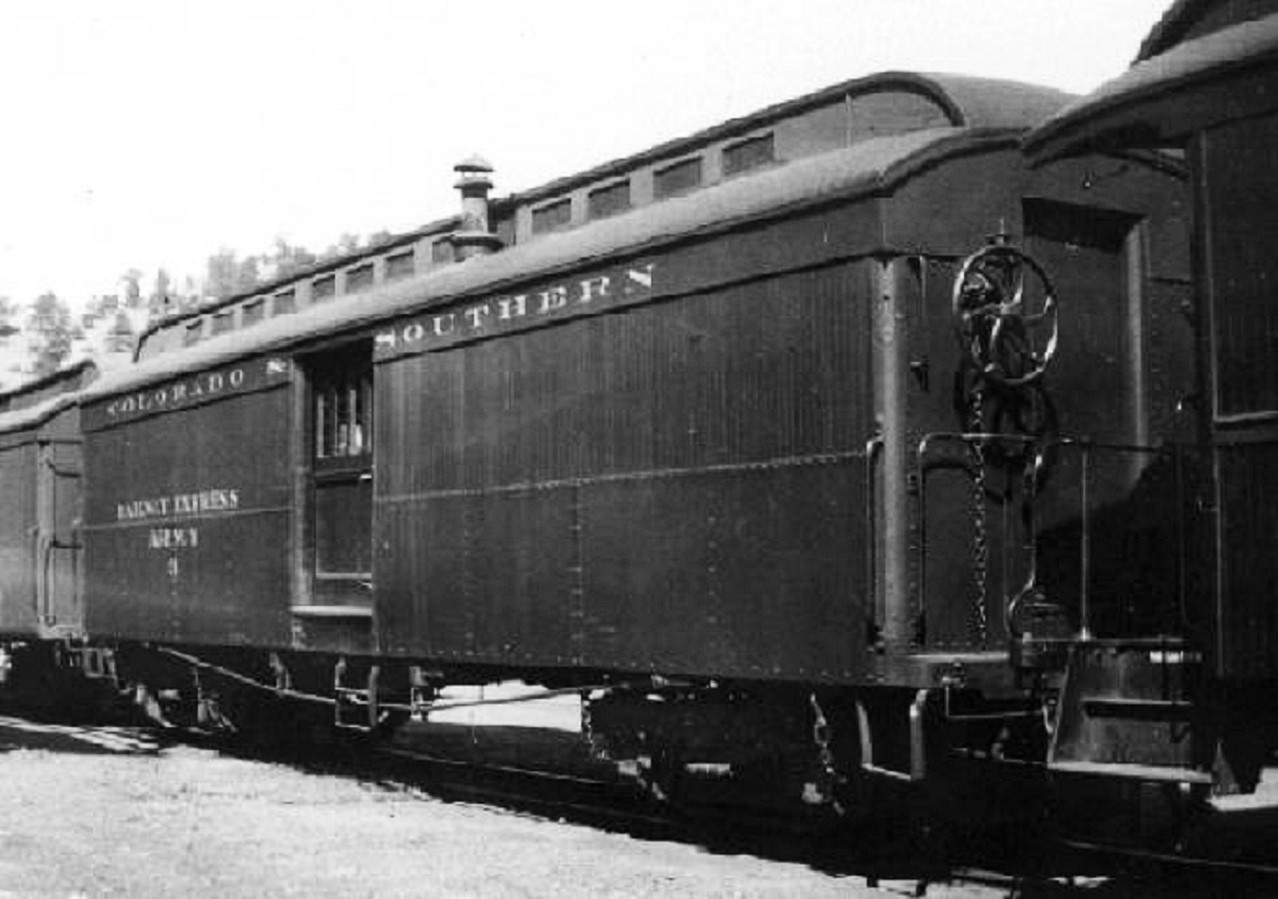
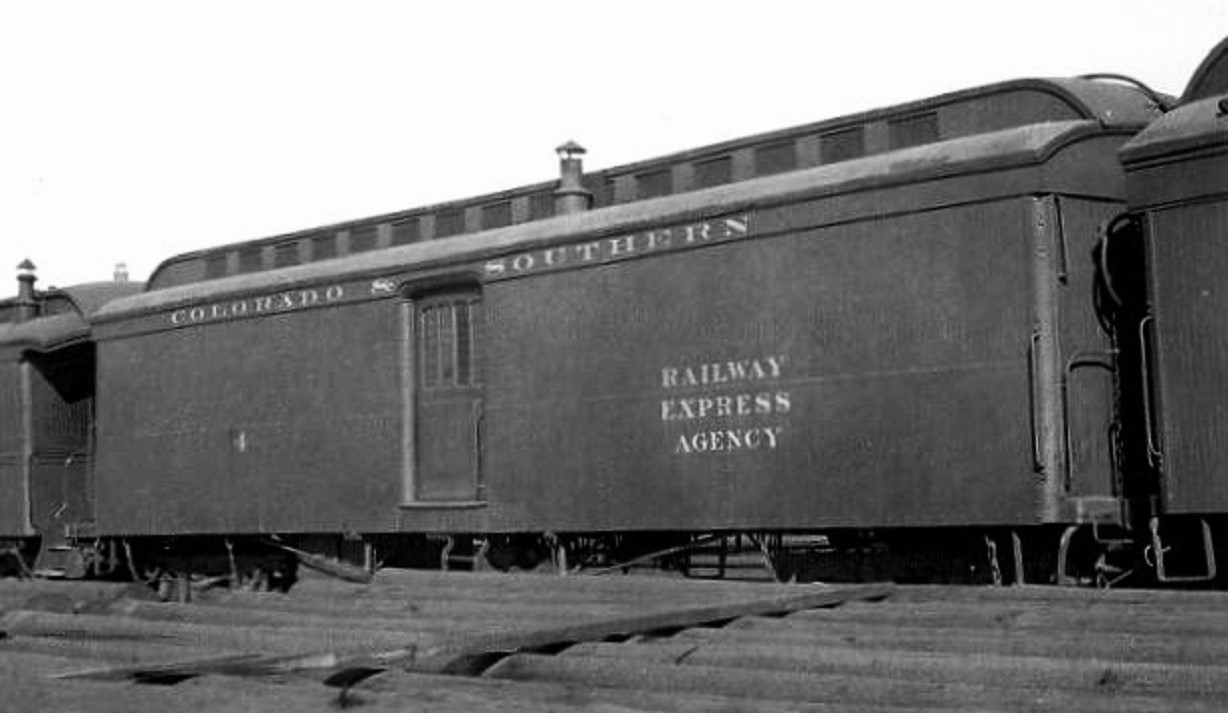
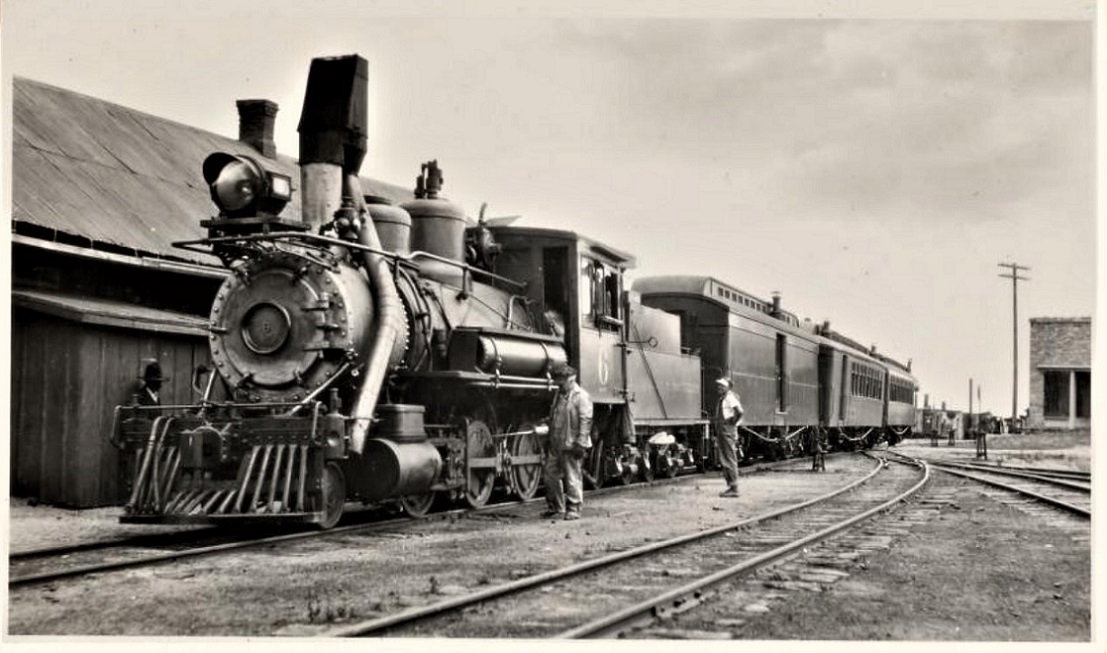
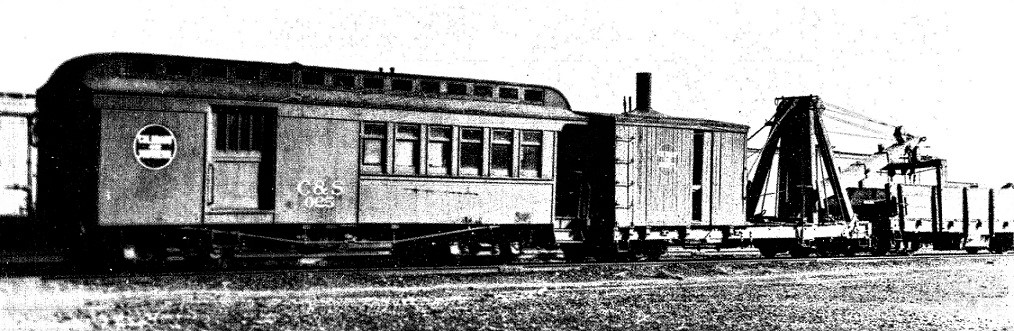
There are a couple of photos of one of the RPO/coaches as built, C&S 118:

Buffalo:


Shawnee:

McClure Photo, DPL


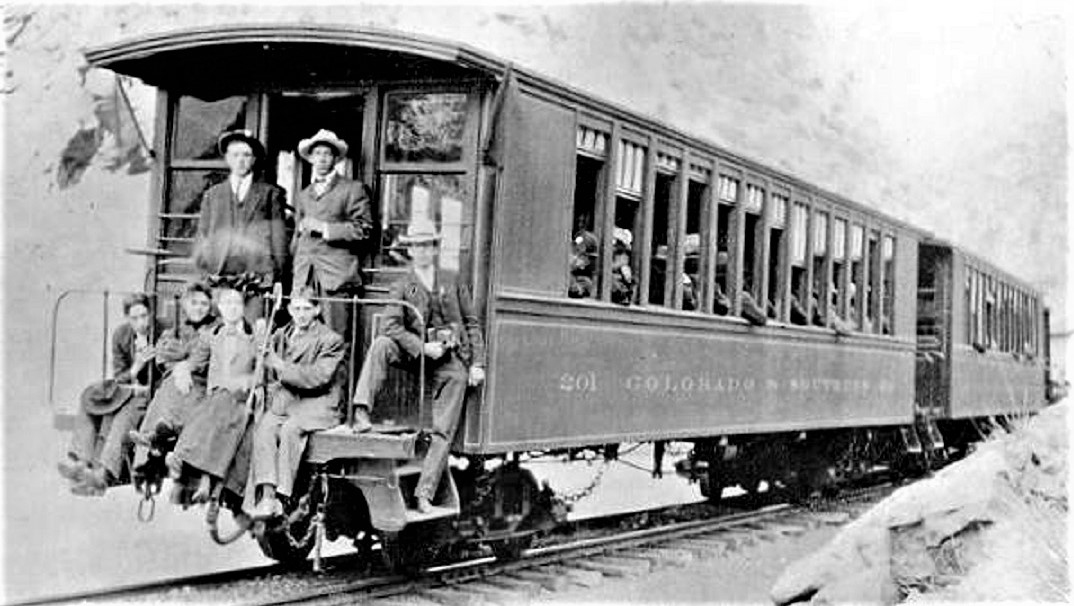
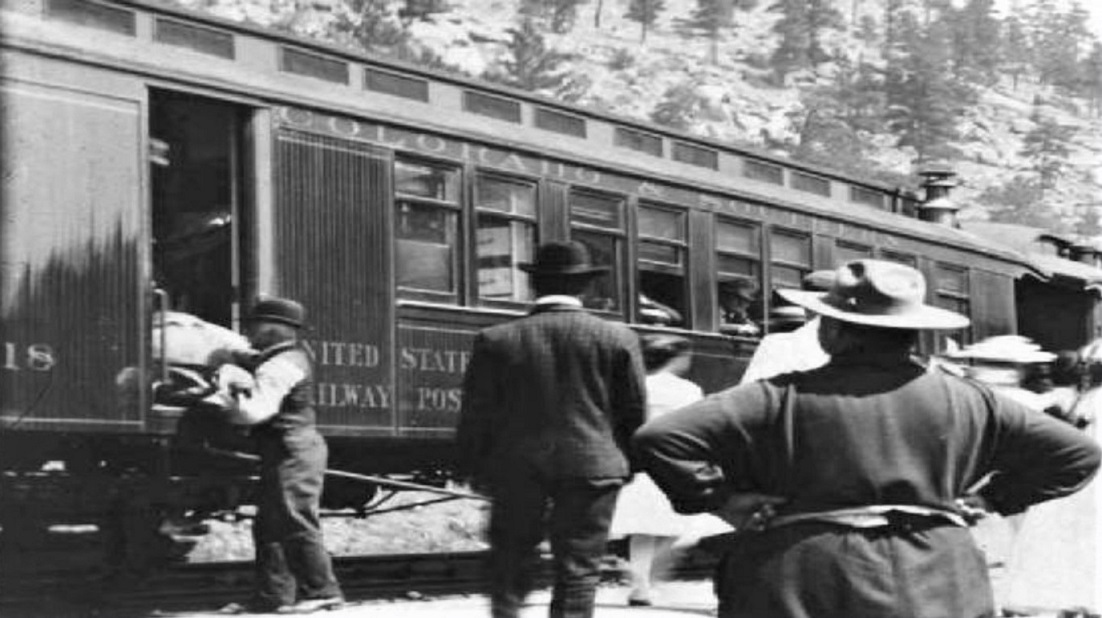
Both photos may be dated to mid to late Summer of 1906. In later 1906 the C&S undertook a complete renumbering of the passenger car fleet, with all narrow gauge cars renumbered to less than 200. The RPO coaches were repainted and renumbered 41, 42 and 43 by the end of the year. Note the absence of safety bars on the RPO compartment windows, and no rain gutters over the RPO side door. These requirements by USPO didn't come along until the new 1912 standards. Although the three cars were eventually equipped with the new Commonwealth style 5'-6" passenger trucks by the early-mid 'teens, the McClure photo shows 118 / 43 as riding on trucks with outside brake beams, possibly the original Pullman 6'-0" wheelbase trucks.

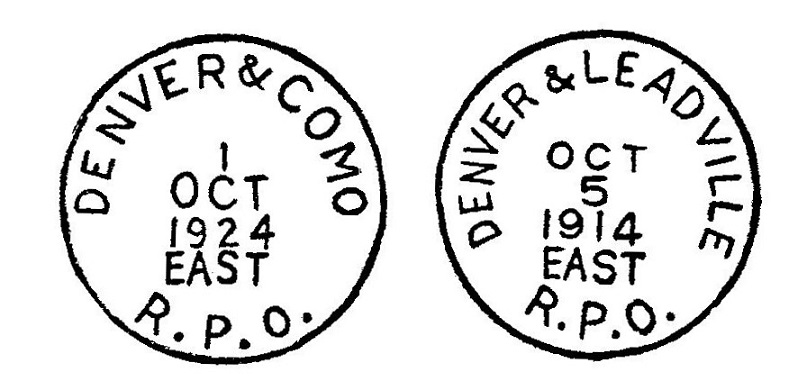
Two authors, Hendrick Hayes and Bob Stears state that when the USPO issued new standards for narrow gauge RPOs in 1912, the C&S hurriedly rebuilt RPOs 10-13 to conform. The C&S chose not to rebuild the RPO/coaches, thus they contend that the RPO/Coaches thereafter lost their railway post office status.

But the plot thickens. Chappell, et al., in Colorado Rail Annual No. 12, state that RPO service west of Como was abolished in 1917. From that year until the institution of the familiar tri-weekly passenger schedule in May, 1931, the RPO ran only Denver to Como and was so stamped by the onboard postal clerk.


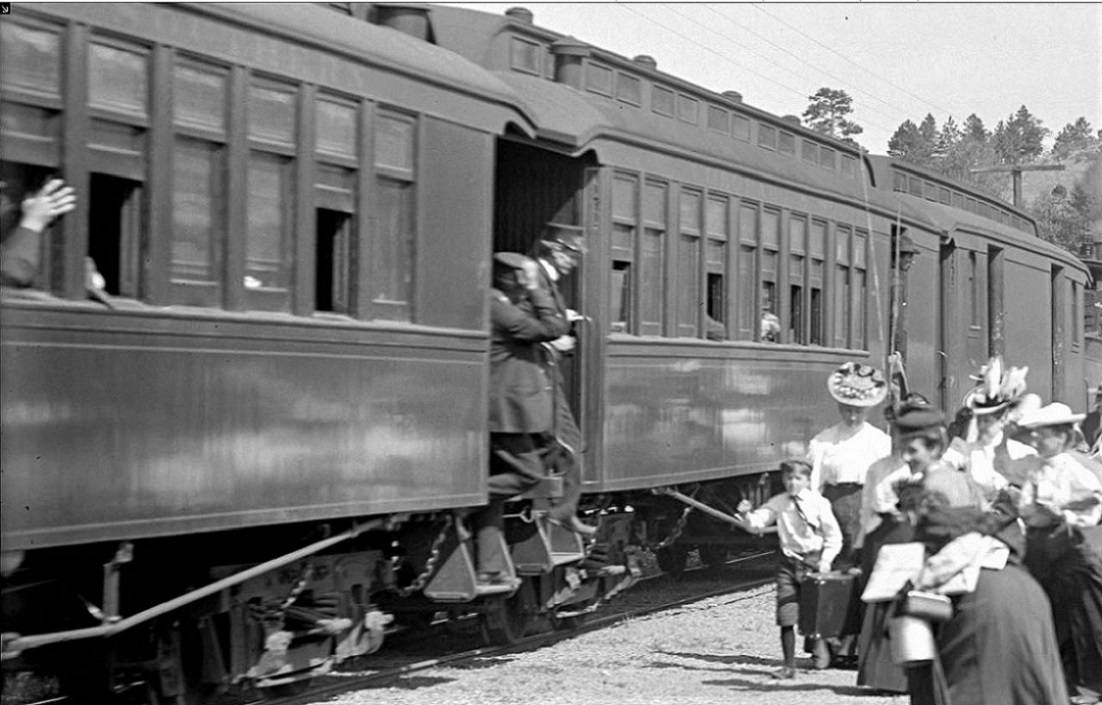
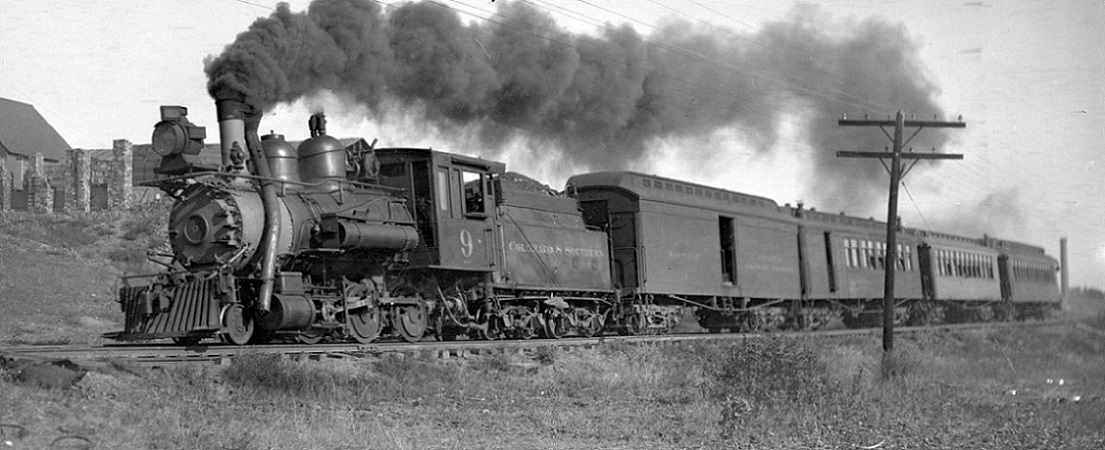
One would expect to see the use of only the regular RPOs on the Denver to Leadville run, but multiple photos from the late 'teens and 'twenties show the RPO/Coaches in use as functional RPOs:

 
1918, Otto Perry photo, DPL


1922, Otto Perry photo, DPL


Both August 1929, Richard B. Jackson photos.


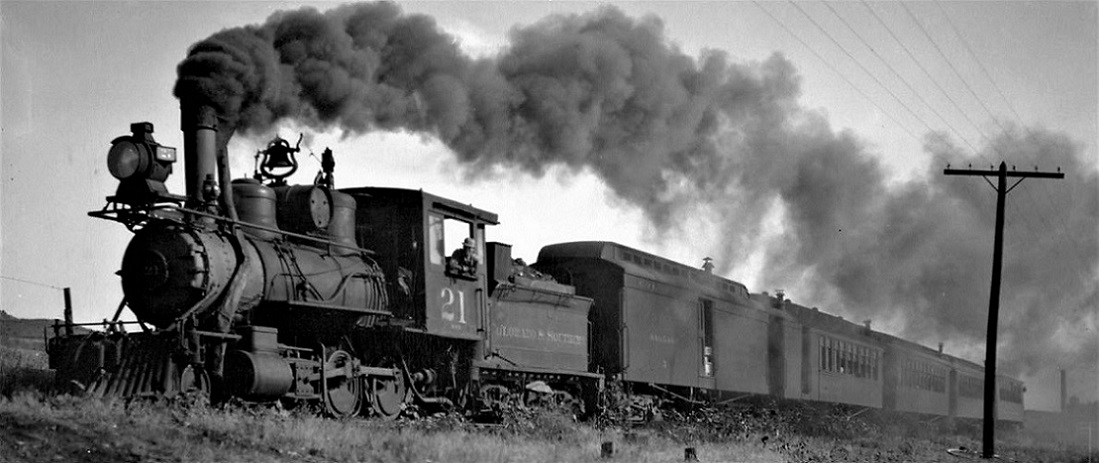
The RPO/Coach is usually the second car in the consists, following an express car. The express car ran through to Leadville, while the RPO/coach, with postal clerk aboard, was cut out at Como and returned to Denver on the eastbound afternoon passenger train.

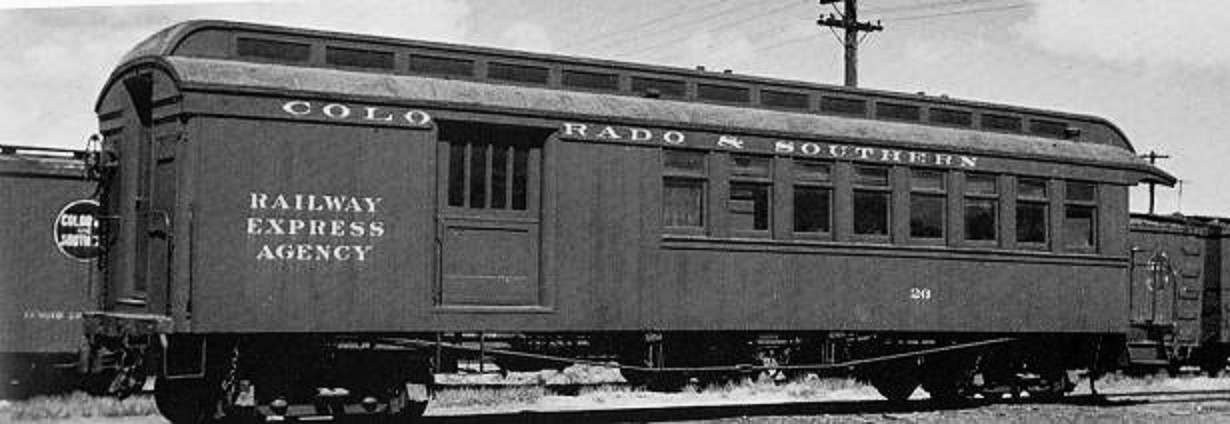
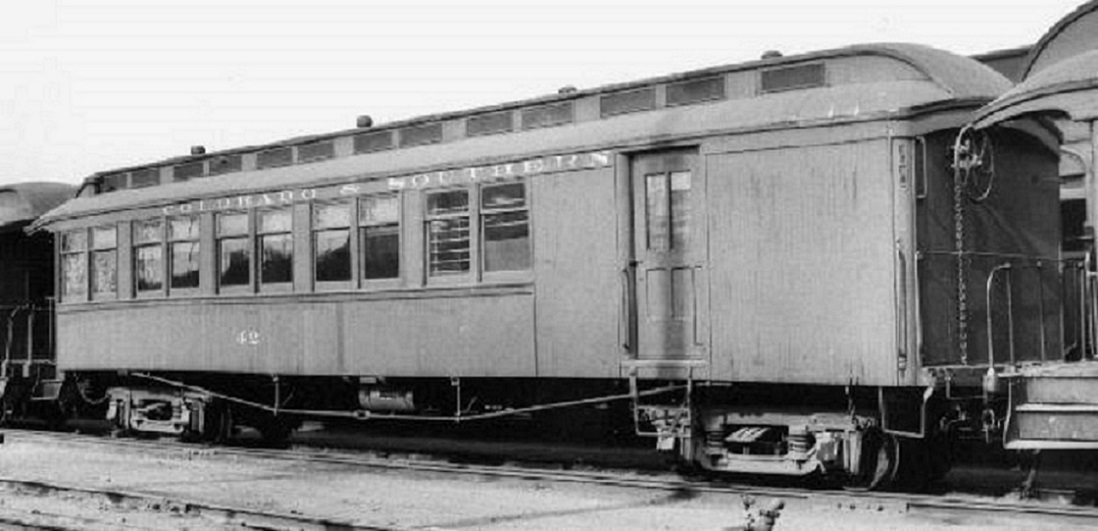
By the 1930s the RPO coaches saw little use, as sister car 42 is depicted in the Denver Coach Yard:


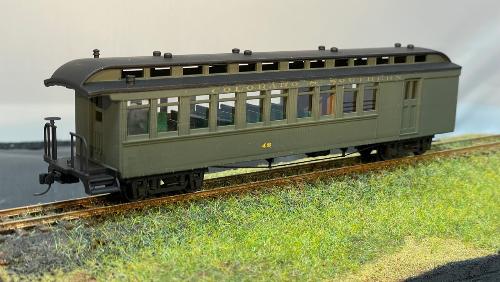
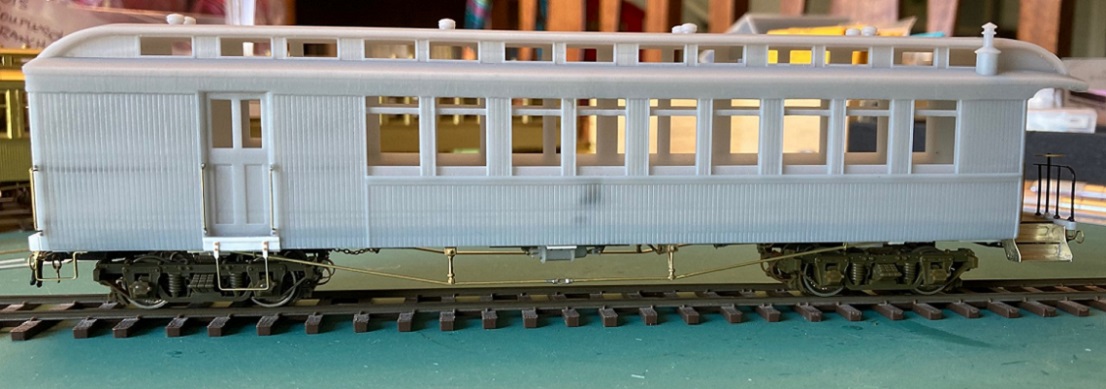
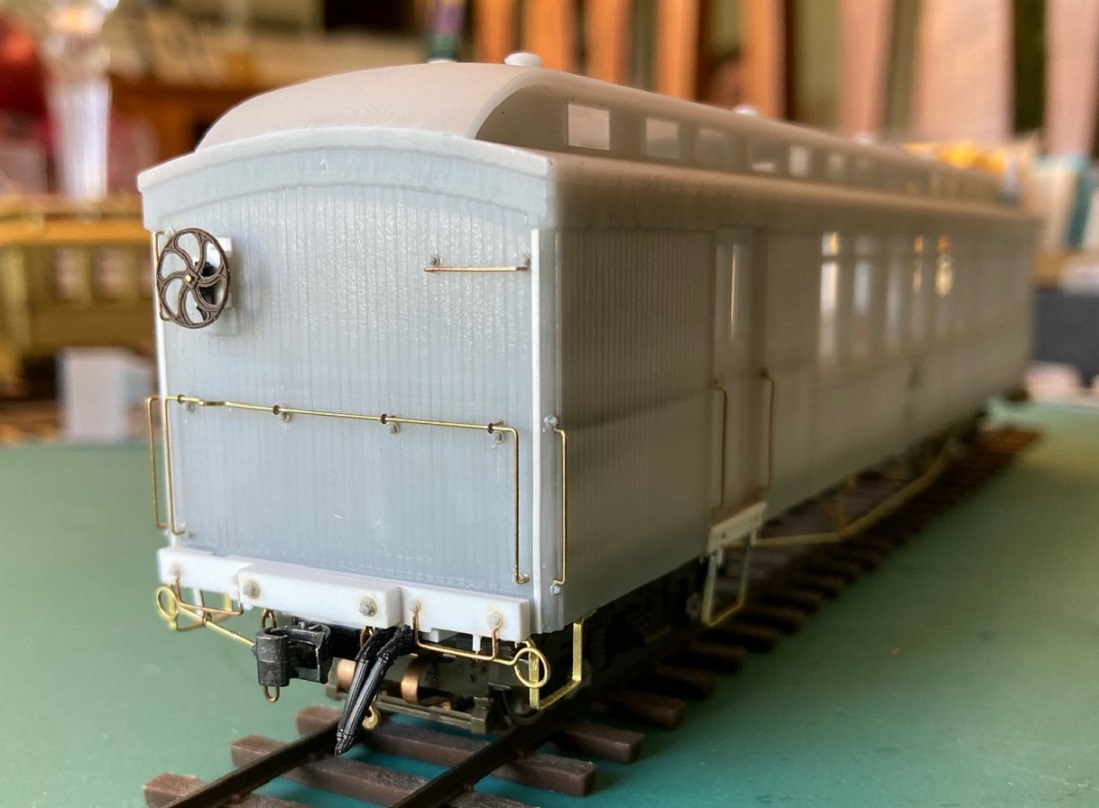
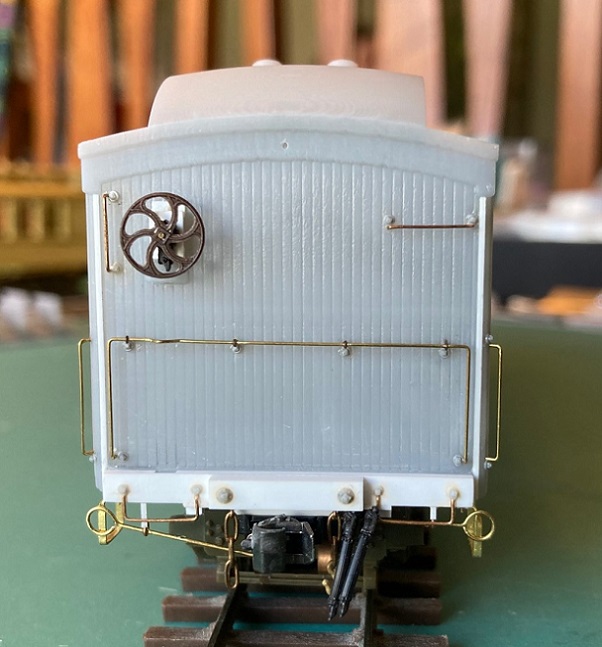
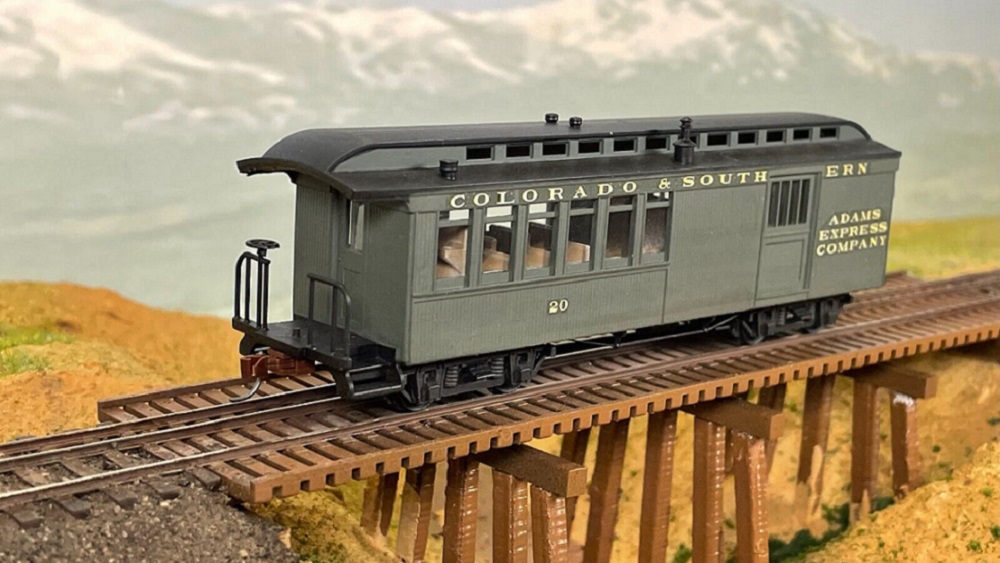
The Sn3 Model of C&S 43:

I'v long wanted a model of a C&S RPO/coach for my 1909 passenger consist. Then, back in April, Roy Stevens released an HOn3 resin print of the car. I contacted Roy, asked if he could scale it up to Sn3. He said sure -- a few days later his eBay store listed the Sn3 version, less trucks: https://www.ebay.com/itm/304892387369?hash=item46fd00a029:g:Mh4AAOSw3BtkMgA-. Out of curiosity, I bought one.

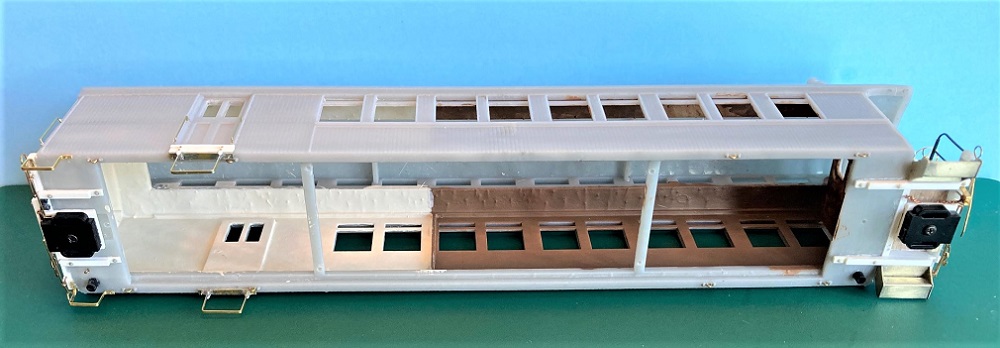
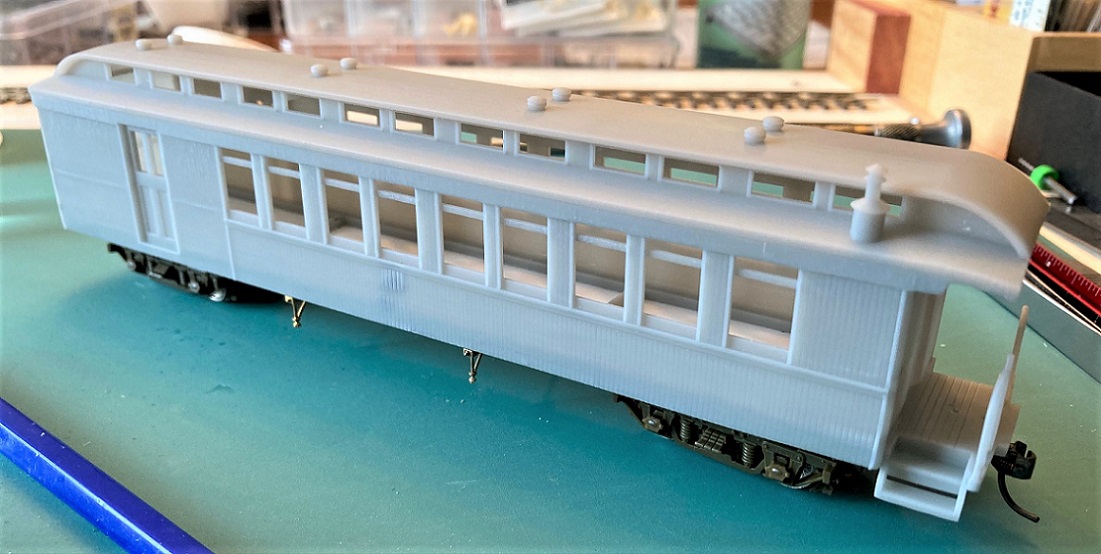
When the printed car arrived, I was pleasantly surprised.


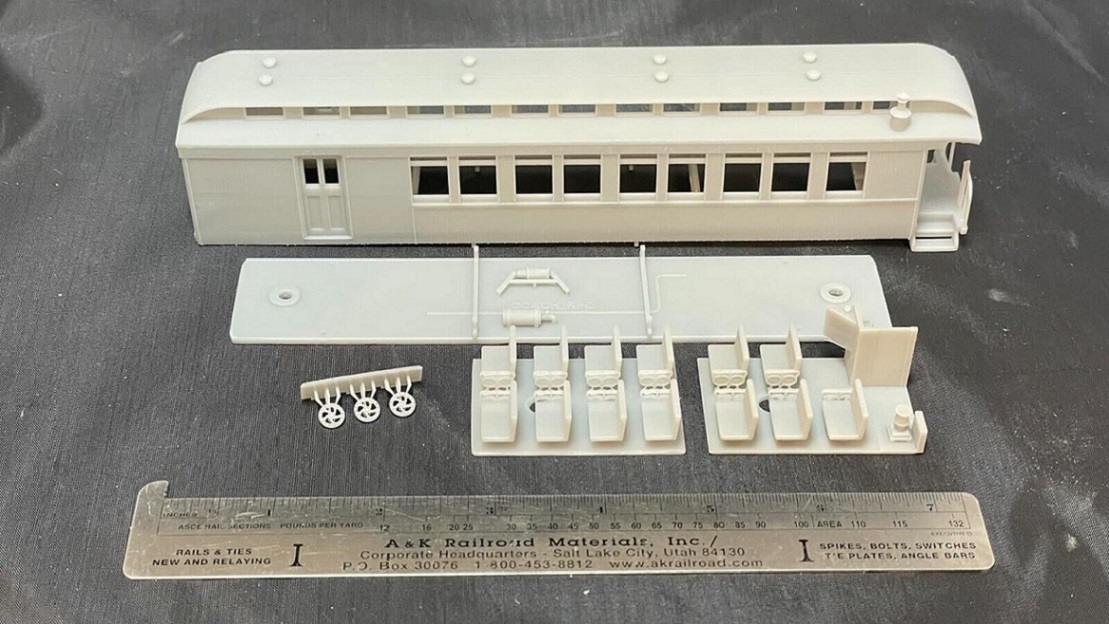
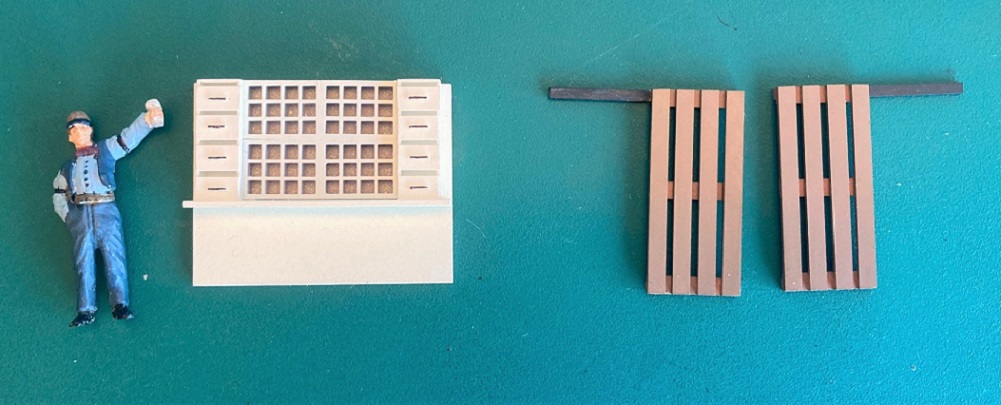
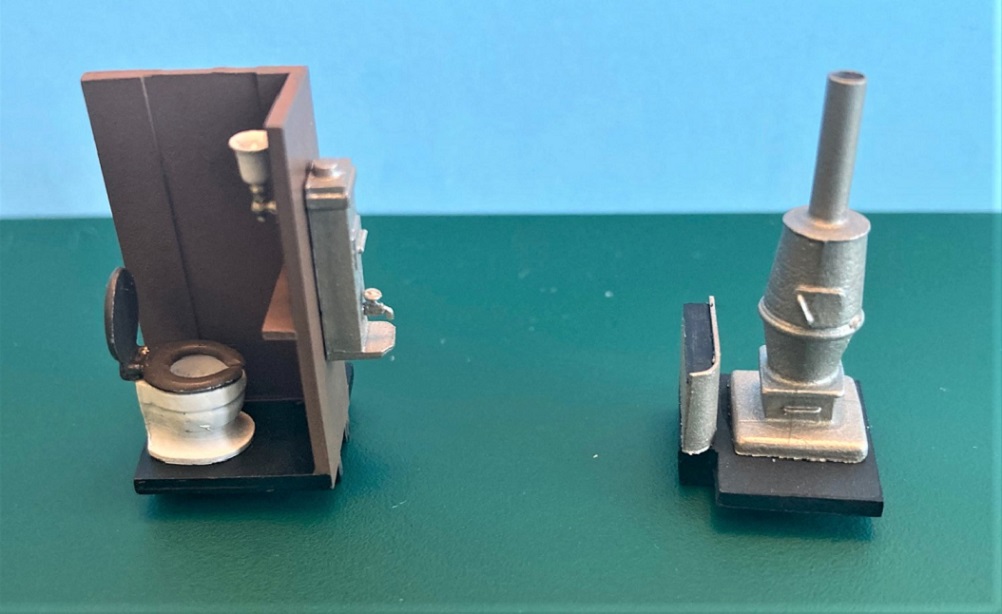
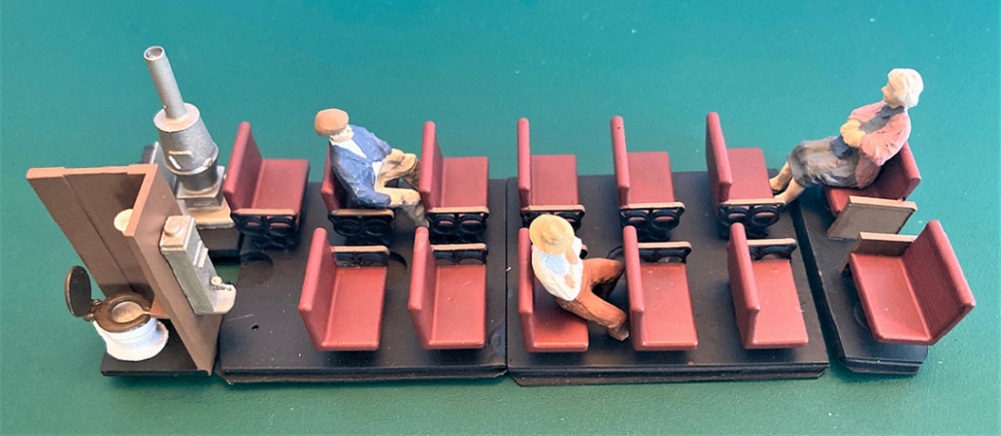
The paired Pullman windows, RPO side doors and coach end door are beautifully rendered. The best part was the clerestory roof, with the different end overhangs, the paired clerestory windows and all the roof details, the stove smoke jack, the lamp vents and the toilet vent. Printed interior seats are included. All surfaces are smooth, without the usual fuzzy artifacts of Shapeways prints.

Any downsides to the print? Yes, a few.

1.  Dimensionally, compared to the folio drawings, the print is about 4 scale inches too short in the height department, and a tad short in length, 15-16 scale inches over the roof and body. But hey . . . I can live with that!

2.  The roof, sides and ends are all printed square in relationship to each other, but due to some peculiarity in the printing process, the lower 3/16" of the ends curve gently toward the center of the car. This also effects the scribed sheathing a bit on each end of the sides. I only noticed this while working with my loops--don't know if it will be noticeable when painted.

3.  The coach end platforms and railing are overscale. I suspect that in the design for the HO version of the car these were beefed up a bit for strength. When scaled up to 1/64th scale, they look toy like.

But I finally have a well printed body of a car that I've always wanted, with all the hard work (clerestory and windows) done. Since I turned 72 last month, I figured that if I want an Sn3 model of a C&S RPO/coach in this lifetime, this is probably my best bet. So I sat about modifying and detailing the printed car.

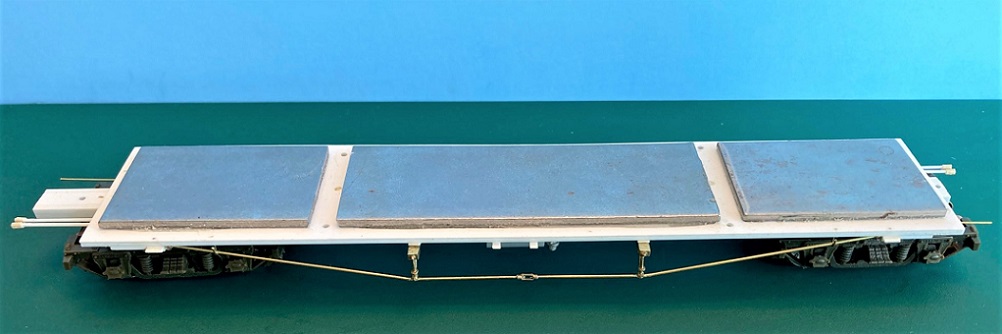
The whole project was contingent on building a new floor that could be firmly attached to the body, yet still be removable for later interior painting, window glazing and installation of the printed seats. Fortunately, there are two horizontal braces (to keep the side walls parallel) printed as part of the recessed lip for the floor. They are wide enough to drill and tap for 1.2 mm screws. I built up a new floor from styrene sheet, and used my Overland brass coaches as guides to fabricate similar bolsters for correct car height, and coupler draft gear mounting pads of a thickness that would place the Kadee couplers at the right height.


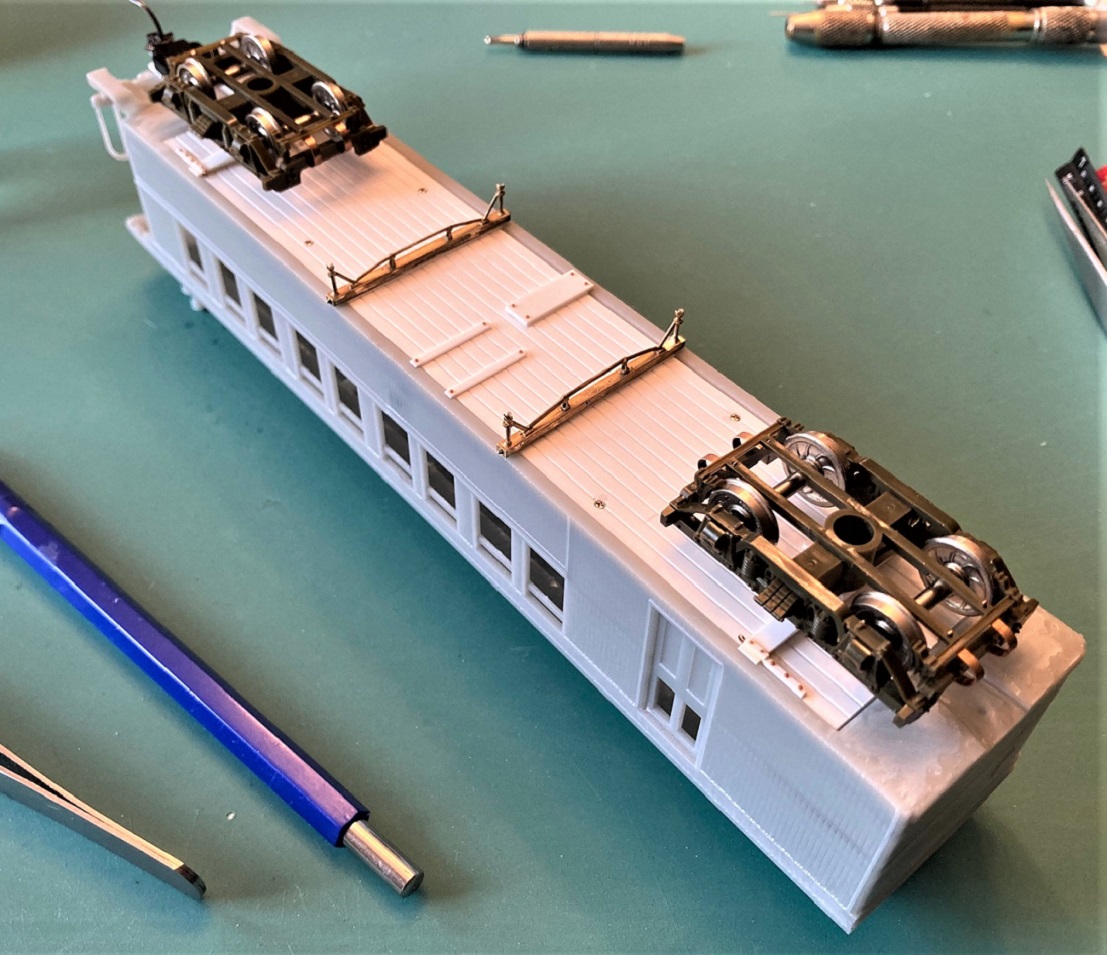
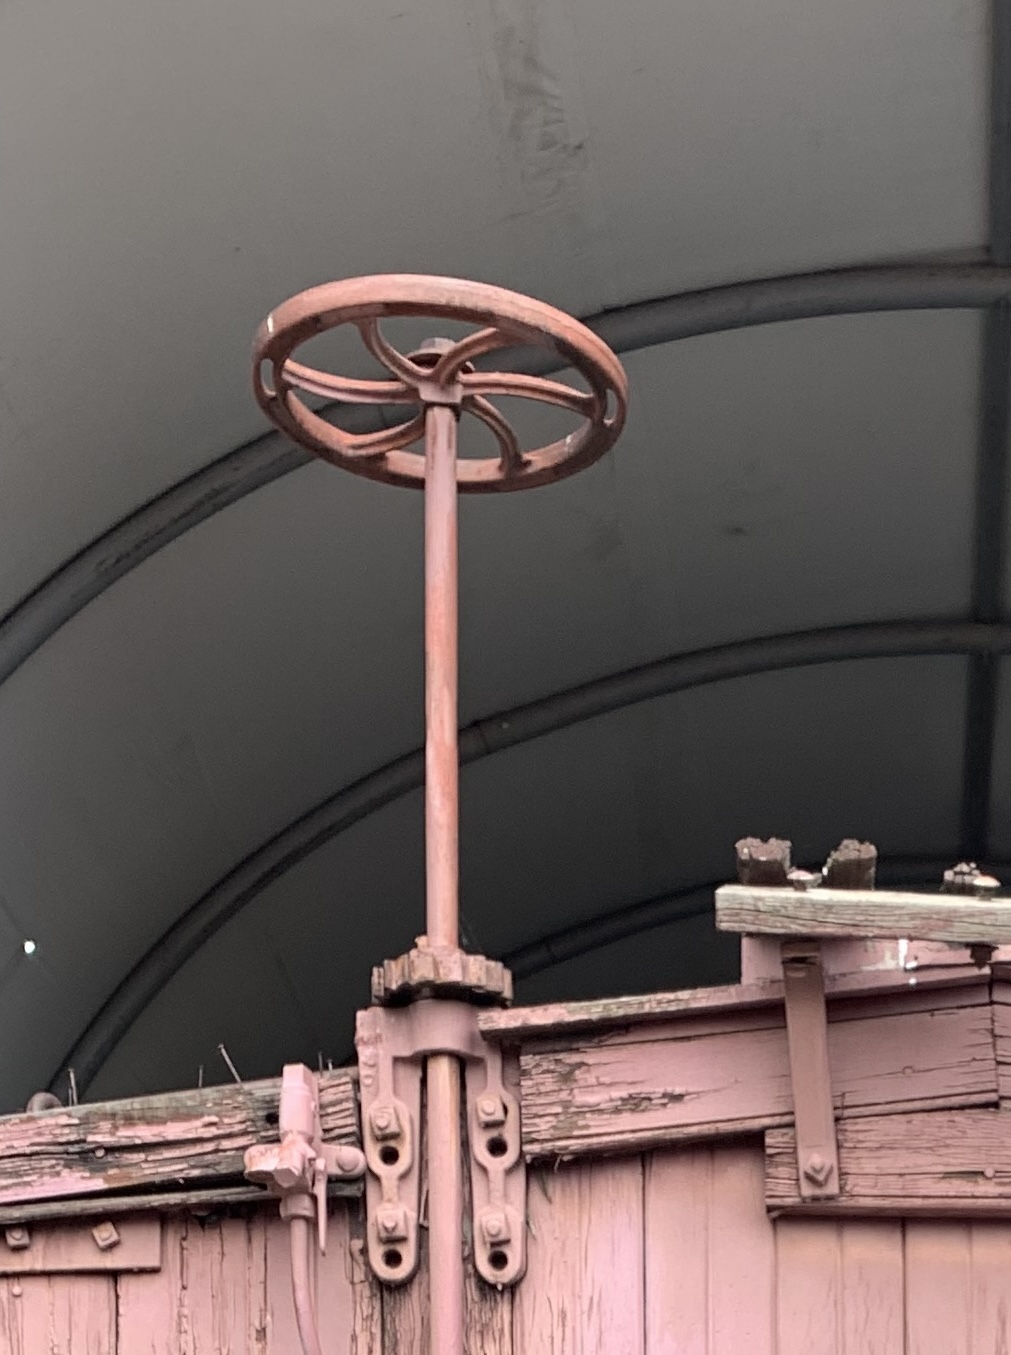
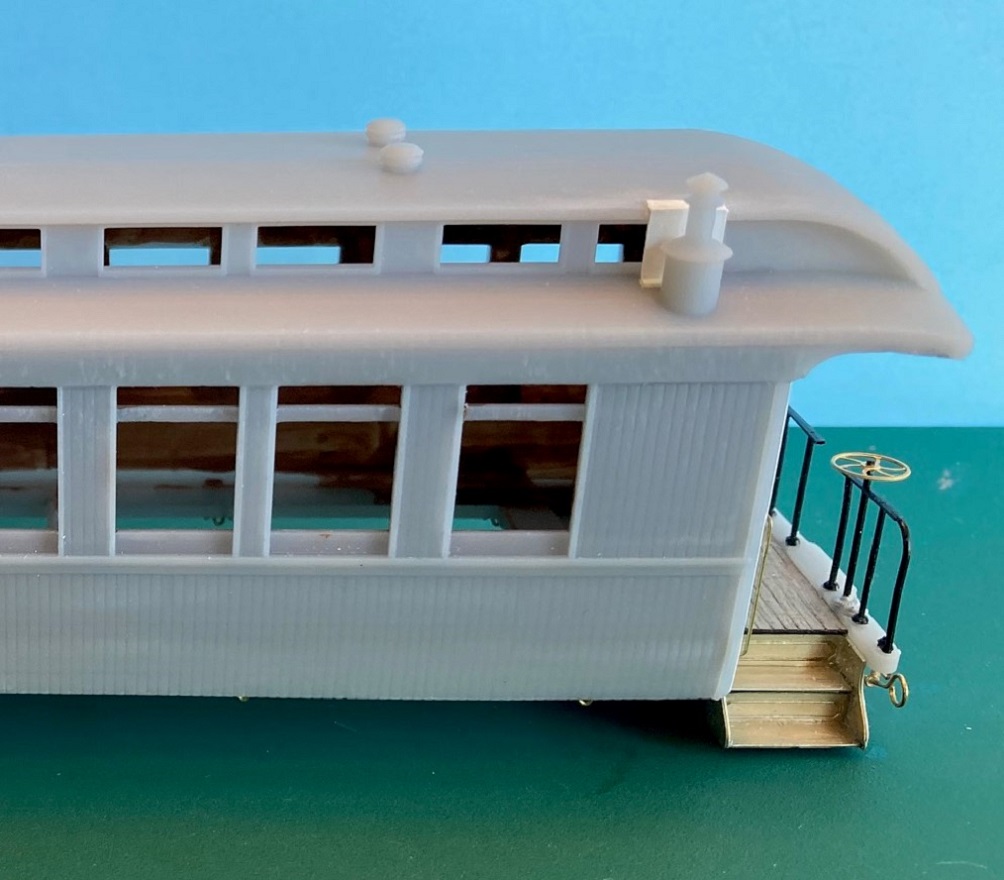
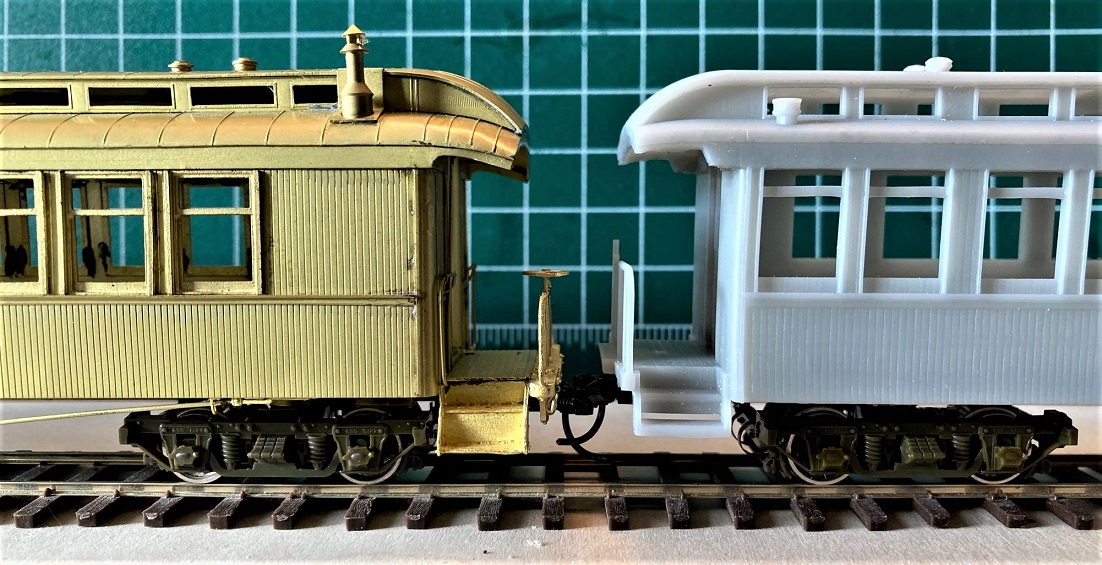
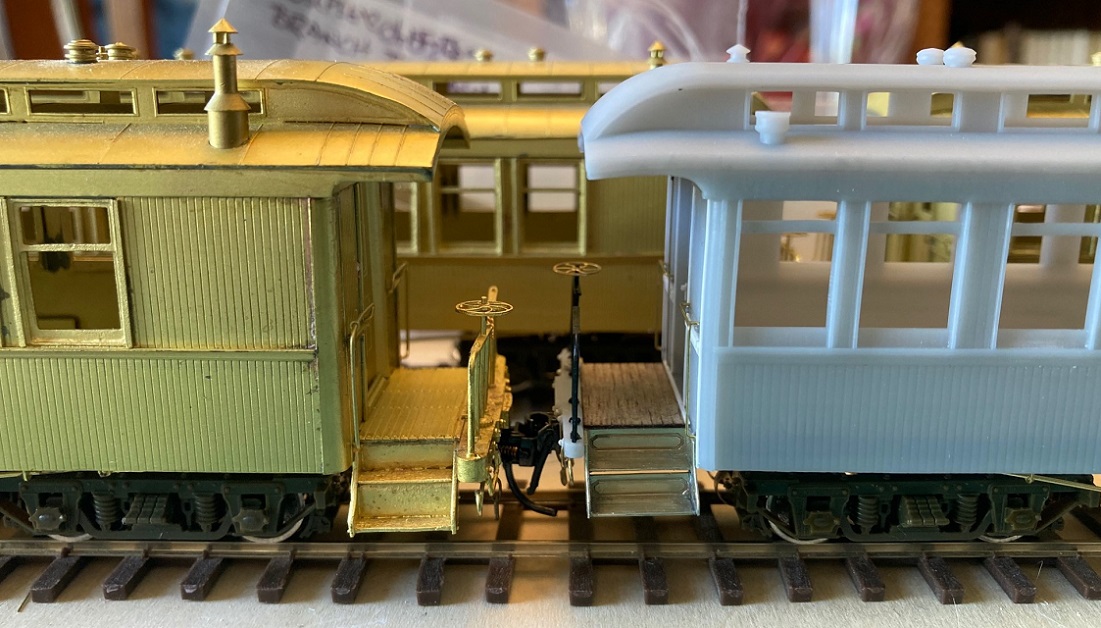
But when coupled up to Overland C&S coach 74, the overly thick steps and railing still bugged me:


About then, my Leadville Designs Pullman coach kits arrived. Bill Meredith's kits provide wonderful etched nickel-silver Pullman steps, printed end beams and brake fixtures and brass etchings for all the underframe brake rigging. A quick email to Bill confirmed I could buy extra sets of prints and etchings, enough parts for one passenger car in each set. I purchased three sets. So, I summoned my courage, cut off the printed end platform, and began rebuilding the printed car. Armed with Bob Stears' plans for the RPO/Coaches from a recent issue of the Gazette (Nov/Dec 2018), I began adding parts, grab irons and Bill's great detailing parts. Rather than describe what I've done, I think photos will suffice:


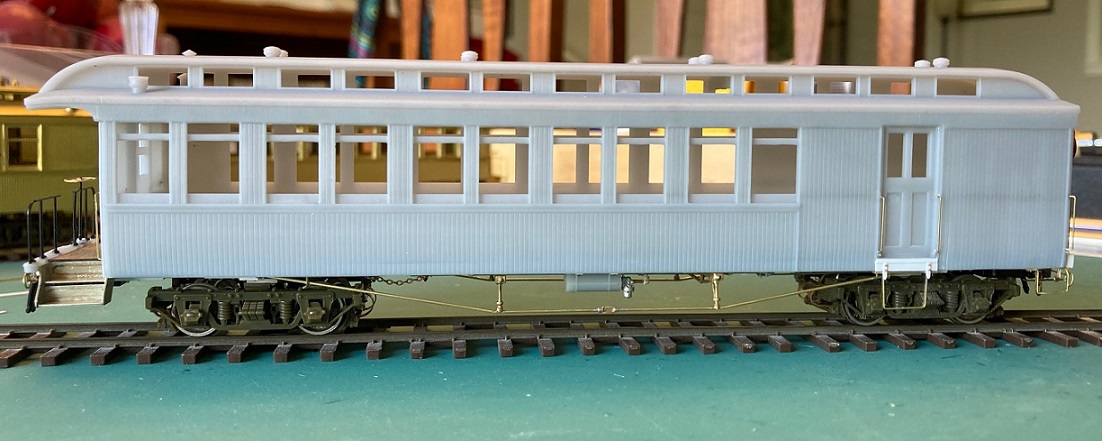
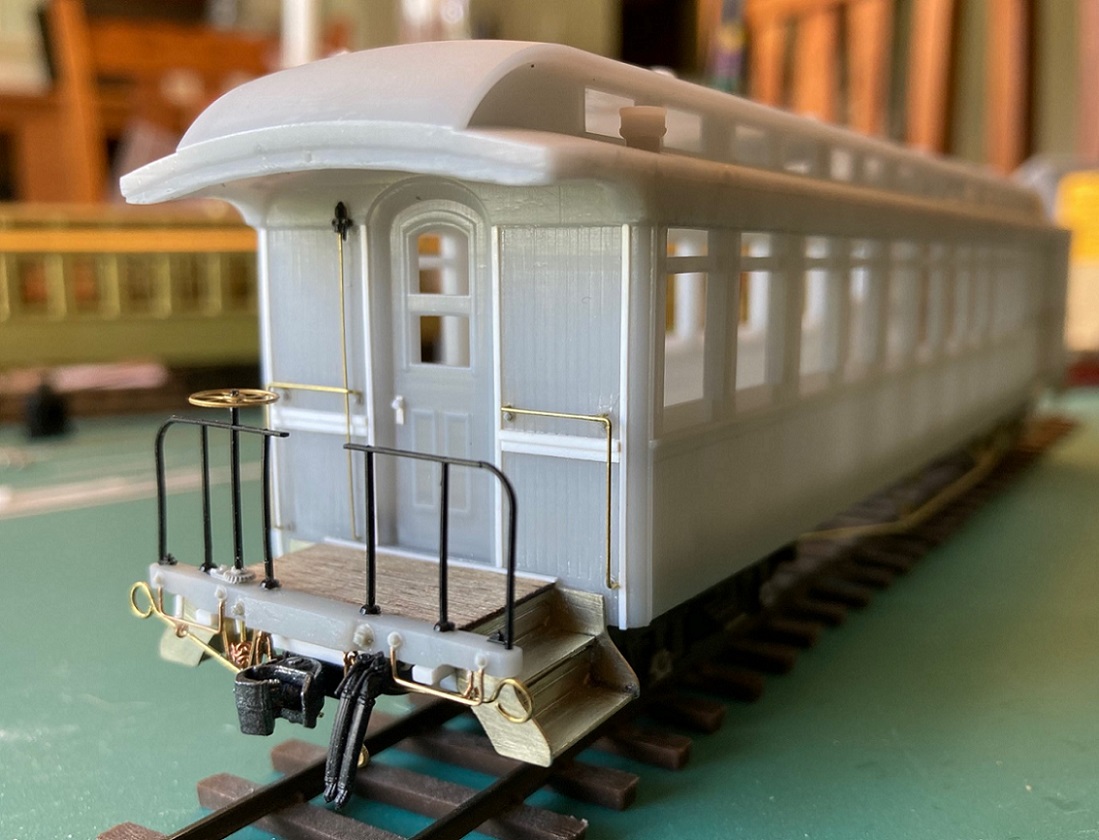
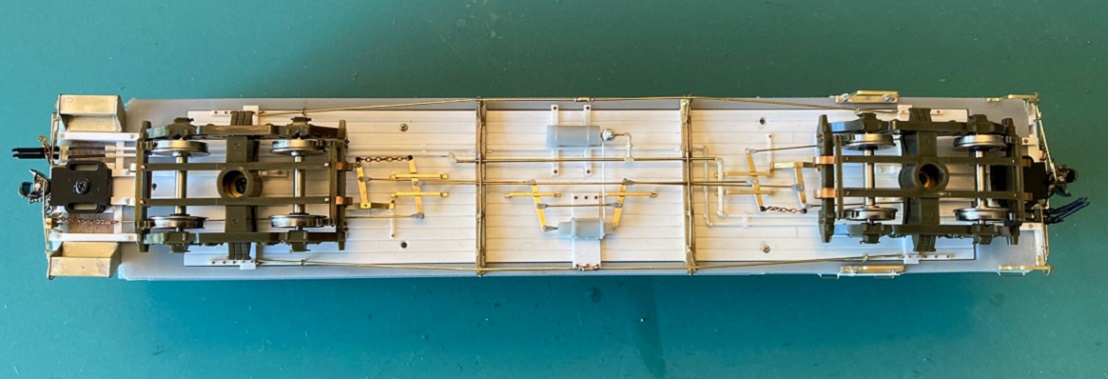
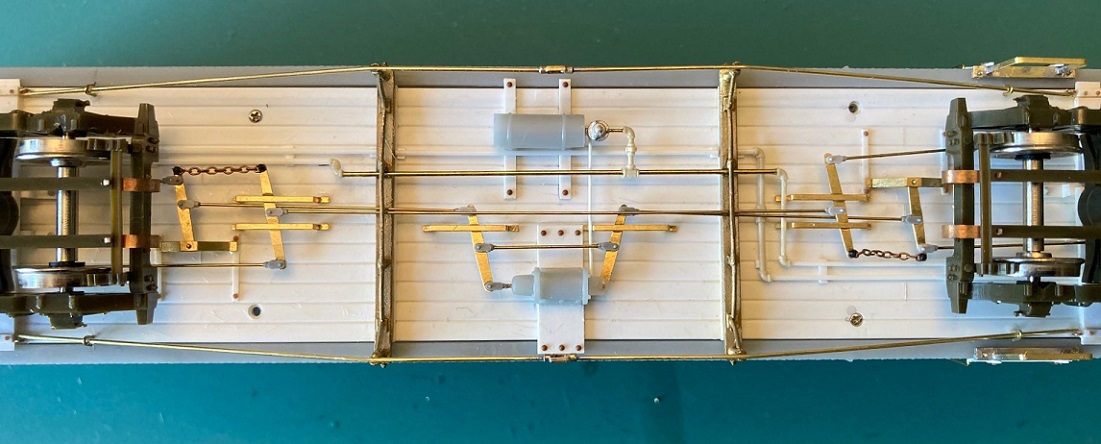
The underframe brake hardware is from Bill's printed and etched parts, with PBL clevises, 0.015 wire for brake rods and trainline/signal line of styrene rod with Grandt plumbing fixtures.

I'm pleased with how the project is turning out, the car pretty much finished and ready to paint. Here is how C&S 43 looks coupled to C&S 70 in the Denver unpainted coach yard:


I've learned a few things about working with resin prints. MEK will bond styrene to the resin but it will not weld styrene to resin, as in styrene to styrene attachments. Any joint to be handled or requiring strength needs to be reinforced with thin ACC. And the resin doesn't like to be drilled. The resin tends to "grab" the drill bit and break off the tip in the work. With lots of patience and profanity, I made it through all the grab iron holes to be drilled, but have had to replace my stash of #80 drill bits.

That's all for now, next up is the intimidating job of painting, inside and out. The folio sheet says the RPO interior was painted white, while the coach interior was finished mahogany. I'll post more photos of progress as it occurs.

I'm pretty much a freight car kind'a guy, but this has been a very enjoyable project so far! If anyone has built up the HOn3 version of the RPO/Coach, please post your photos here . . .
Jim Courtney
Poulsbo, WA
Reply | Threaded
Open this post in threaded view
|

Re: C&S RPO / Coach 43 in C&Sn3 -- An Adventure in Resin-Printed Rolling Stock

Todd A Ferguson
Very nice Jim!!!
Reply | Threaded
Open this post in threaded view
|

Re: C&S RPO / Coach 43 in C&Sn3 -- An Adventure in Resin-Printed Rolling Stock

Keith Hayes
In reply to this post by Jim Courtney
Beautiful work, Jim!
Keith Hayes
Leadville in Sn3
Reply | Threaded
Open this post in threaded view
|

Re: C&S RPO / Coach 43 in C&Sn3 -- An Adventure in Resin-Printed Rolling Stock

Lee Gustafson
In reply to this post by Jim Courtney
Jim,

Beautiful, clean work multimedia work. Seeing the model before painting provides insight into how the different materials were used. A great comparison to an all brass model thank you for sharing.

Lee Gustafson
Reply | Threaded
Open this post in threaded view
|

Re: C&S RPO / Coach 43 in C&Sn3 -- An Adventure in Resin-Printed Rolling Stock

Mike Trent
Administrator
In reply to this post by Jim Courtney
Very nice, Jim. I might suggest using an On3 brake wheel on the blind end. Those were oversized. In Sn3 you have a viable option for an oversized brake wheel. Randy Lee created one in On3 for his #20 combine and I was able to get him to send a couple for my #13. Makes a real difference.
Reply | Threaded
Open this post in threaded view
|

Re: C&S RPO / Coach 43 in C&Sn3 -- An Adventure in Resin-Printed Rolling Stock

Jim Courtney
Hey Mike,

That is an On3 brake wheel on the blind end, a Grandt Lovestead 16" diameter wheel. Foothill used to offer them as well. They are the only On3 wheels that I've found with the correct curving spokes. Even so, they are undersized in S scale, 21" in diameter, while the real thing had 24" diameter wheels.

There is a reason I haven't yet installed the chain from the brake wheel housing to end beam. The current wheel and staff are removable. Bill Meredith is hard at work preparing the kits for C&S baggage cars 1 and 2 for fall delivery. At my request, the correct 24" brake wheels will be etched in nickel-silver, and I'll grab a few extra etching sets for this car and maybe a combine 26 or 30.
Jim Courtney
Poulsbo, WA
Reply | Threaded
Open this post in threaded view
|

Re: C&S RPO / Coach 43 in C&Sn3 -- An Adventure in Resin-Printed Rolling Stock

Jeff Young
Very nice, Jim!
Reply | Threaded
Open this post in threaded view
|

Re: C&S RPO / Coach 43 in C&Sn3 -- An Adventure in Resin-Printed Rolling Stock

Jim Courtney
Gentlemen, thanks for all your kind words.

I had an email question for info that I should have included above.

Bob Stears plans were in the November/December 2018 issue of the Gazette (not so recent!).

For the underframe / brake rigging, I used very old plans by Steven Brewster for the Pullman tourist sleeper in Model Railroader.
The plans were the centerfold, and are not marked with the issue number, date, etc. Sorry.

BTW, for you HOn3 guys, Roy Stevens just released another C&S passenger car print, combine 20:  https://www.ebay.com/itm/304958536848?hash=item4700f1fc90:g:wzIAAOSw7iNkdSs~


The lettering is pre WWI. If you model the 1930s, it could be painted red for 025 in MOW service:


Would give you some inspiration to get on building that derrick . . .

Jim Courtney
Poulsbo, WA
Reply | Threaded
Open this post in threaded view
|

Re: C&S RPO / Coach 43 in C&Sn3 -- An Adventure in Resin-Printed Rolling Stock

drgwcs
Jim Courtney wrote
Gentlemen, thanks for all your kind words.

I had an email question for info that I should have included above.

Bob Stears plans were in the November/December 2018 issue of the Gazette (not so recent!).

For the underframe / brake rigging, I used very old plans by Steven Brewster for the Pullman tourist sleeper in Model Railroader.
The plans were the centerfold, and are not marked with the issue number, date, etc. Sorry.

BTW, for you HOn3 guys, Roy Stevens just released another C&S passenger car print, combine 20:  https://www.ebay.com/itm/304958536848?hash=item4700f1fc90:g:wzIAAOSw7iNkdSs~


The lettering is pre WWI. If you model the 1930s, it could be painted red for 025 in MOW service:


Would give you some inspiration to get on building that derrick . . .
That one is tempting too- I have a sorta 20 that is a slightly kitbashed Binkley- the windows aren't right and its too short. For the Derick I do have a Rio Grande models pile driver that might make a start (Hey it's a box of sticks does that count as a kitbash?? ) at least for the flat and "cab" Another project to get going..............
Jim Curran
Reply | Threaded
Open this post in threaded view
|

Re: C&S RPO / Coach 43 in C&Sn3 -- An Adventure in Resin-Printed Rolling Stock

Doug Heitkamp
In reply to this post by Jim Courtney
Jim,

Great work and excellent presentation! In fact, you motivated me enough to buy one of the kits. Based on his eBay sales, it was the last Sn3 one available! Now to get in touch with Bill M. for the other parts. It was really great seeing what could be accomplished by simply adding some additional details. Great looking model and thanks for the kick in the pants to get me moving!
Doug Heitkamp
Centennial, CO
Reply | Threaded
Open this post in threaded view
|

Re: C&S RPO / Coach 43 in C&Sn3 -- An Adventure in Resin-Printed Rolling Stock

Ride Trains
In reply to this post by Jim Courtney
Very nice work. Obviously I built up the HOn3 version to test fit everything. I was unhappy with the available decals and now need to build another one and letter it as it was in the 1920's since I had the decals custom made.HOn3
Reply | Threaded
Open this post in threaded view
|

Re: C&S RPO / Coach 43 in C&Sn3 -- An Adventure in Resin-Printed Rolling Stock

Ride Trains
In reply to this post by Mike Trent
Photos show the brakewheel on the blind end of the RPOs was standard size. It was the baggage combines that had the comically oversized brakewheel.
Reply | Threaded
Open this post in threaded view
|

Re: C&S RPO / Coach 43 in C&Sn3 -- An Adventure in Resin-Printed Rolling Stock

Jim Courtney
In reply to this post by Ride Trains
Hey Roy, welcome to the Discussion Forum!!

I want to thank you for printing the RPO/Coach in S scale for me--I'm having a grand time modifying and detailing your wonderful print. This will be the first passenger car build that I've completed in over 50 years (I suffer from clerestoryroofaphobia). The clerestory roof on your C&S RPO/Coach print is exquisite, especially the downward curving end on the coach end. The roof is better than any Shapeways printed roof that I have purchased for experimentation.

I like your concept: An accurate, basic car body, at a reasonable price, with all the hard work of a passenger car printed: Clerestory roof, windows and doors. By omitting small free standing details, you minimize the chance of printing error (he says, knowing nothing about 3-D printing) and allows each of us to add whatever level of detail that we desire. There would still be a craftsman aspect to the project, a "shake-the-box" kit if you want, but also the basis for a well detailed model.

We C&S modelers have thirsted for passenger cars for 30 or so years, since Overland's last brass offerings of the early 1990s. Bill Meredith's Leadville Designs is beginning to fill that void, first with his Pullman sleeper/coaches and now with his baggage car 1 and 2 projects for September. I would hate for you and Bill to work at cross purposes, with competing projects. I would hope that all of us here could give you direction as to what we need and would purchase.

Speaking for myself, these are C&S projects that I would love to see as printed bodies:

Baggage Cars: Consider C&S baggage cars 3 or 4. The arched roof of the side door of C&S 4 would be a natural for 3-D printing. Neither car received the lower metal side sheathing until about 1927, so I would leave them off (easier to add than remove).


RPO: There is already a Shapeways print available for RPO 10, 11, 12. RPO 13 would be a natural choice, as the Overland brass offering in HO and S scales is hard to find and very pricey. RPO 13 was used on Clear Creek in the 1920s and was the most often used RPO in the 1930s. Multiple plans are available and the QuickPic book for C&S 13 has extensive photos.

Combines: I know Bill Meredith is planning a kit for C&S 30 to follow the baggage cars, so I would suggest C&S 26. It was regularly used on Clear Creek on the stub train from Forks Creek to Blackhawk/Central City. When passenger service ceased in 1927, it was likely added to Clear Creek freights for required mixed train service until 1930 or so. It ended it's career in Leadville in the 1930s, still there in the mid-1940s when that surviving segment was standard gauged:


Coaches: I'll go out on a limb here, as I am pretty flush with brass coaches and kits. I'd love to see a print of the coaches with huge observation windows, C&S 59, 78 and 79:


The windows with curved top corners and with almost no letterboard would be difficult and fragile as a laser cut kit, but would possibly lend itself to a printed body. And, finally, there were a large group of observation cars, almost 30 in number, used both on Clear Creek and Platte Canon excursions:


Ken Martin's Passenger Car Plan Book has excellent HO scale plans for each C&S passenger car. I would urge others to opine as to their particular wants.

Finally, I would argue with you about the size of the big brake wheels on the blind ends of the C&S baggage, RPO and combine cars. The C&S 13 RPO QuickPic book has an excellent photo showing the brake wheel diameter to be 24 inches, the brake wheel actually encroaching on the baggage end door:


Best I can tell, these brake wheels were a C&S standard for the car types mentioned, just as Ken Martin and Bob Stears have drawn them in their plans.

Thanks again for making these passenger car prints available to us. It is an exciting time to be a C&S modeler!
Jim Courtney
Poulsbo, WA
Reply | Threaded
Open this post in threaded view
|

Re: C&S RPO / Coach 43 in C&Sn3 -- An Adventure in Resin-Printed Rolling Stock

Ride Trains
I plan to do a C&S baggage next (next new C&S car at least). And yes, the round door opening of #4 is very attractive. I will have to update my model of the large brakewheel based on your very nice photo and include that in the #20 kit when I get that prepped in Sn3.
Reply | Threaded
Open this post in threaded view
|

Re: C&S RPO / Coach 43 in C&Sn3 -- An Adventure in Resin-Printed Rolling Stock

SteveG
In reply to this post by Jim Courtney
So, arcane question here--why was the brake wheel not symmetric? Was there a functional value in having the one larger grip area in the 4 o'clock position in the photo at the end of the post?

Curiously,
Steve G.
Lakeway, TX
Reply | Threaded
Open this post in threaded view
|

Re: C&S RPO / Coach 43 in C&Sn3 -- An Adventure in Resin-Printed Rolling Stock

Dave Eggleston
A long shot thought. To help the crew count revolutions?
Dave Eggleston
Seattle, WA
Reply | Threaded
Open this post in threaded view
|

Re: C&S RPO / Coach 43 in C&Sn3 -- An Adventure in Resin-Printed Rolling Stock

Chris Walker
Looks like a boss for provision of fitting a Handle. Apparently left unfitted here possibly due to restricting egress, the wheel casting allowed for other applications not just this particular service/car.  I'm sure you've all seen a handwheel grip, as on a Lathe, or Milling machine?

All our NZR handbrakes wheel(not Ajax, not lever) had them, allows rotating the wheel faster.  


UpSideDownC
in New Zealand
Reply | Threaded
Open this post in threaded view
|

Re: C&S RPO / Coach 43 in C&Sn3 -- An Adventure in Resin-Printed Rolling Stock

Keith Hayes
Brilliant!
Keith Hayes
Leadville in Sn3
Reply | Threaded
Open this post in threaded view
|

Re: C&S RPO / Coach 43 in C&Sn3 -- An Adventure in Resin-Printed Rolling Stock

Doug Heitkamp
Here are some reference photos. The passenger car platform vertical brake wheel is on Business car 911. Not the best picture but you can tell that the two small brake wheels have different designs. The large brake wheel is on C&S 13. Both of these are in Silver Plume. The freight car brake wheel is on the stock car at the CO RR Museum.


Doug Heitkamp
Centennial, CO
Reply | Threaded
Open this post in threaded view
|

Re: C&S RPO / Coach 43 in C&Sn3 -- An Adventure in Resin-Printed Rolling Stock

Jim Courtney
A bit of progress to report.

First, I didn't mention how I weighted the car in the first post. The resin car body, new styrene floor, PBL trucks and all the detail parts together weight about 2.3 oz. My Overland brass coaches (riding on PBL trucks) weigh about 6.5 oz. This disparity seemed a problem in the making. I have a stash of Accurail HO freight car weights that are narrow enough to fit between the recessed lips for the floor attachment and are thin enough not to interfere with the printed interior pieces, that set atop that printed lip. So I cut three pieces to length and epoxied them to the styrene floor (before starting the underbody detailing). The car will now weight in at about 4.6 oz:


I got the interior painted. Roy says it is essential to prime the resin prior to using acrylic paints. I could find no way to spray my Tamiya primer inside the interior due to the recessed lips. So I broke out 25 year old bottles of Floquil lacquer paints from my stash and painted the RPO section "reefer white" (looks a bit off-white) and the coach section "D&RGW building brown":


I also noted some details that I overlooked: The toilet "dump pipes", that kept the weeds fertilized on the roadbed, are short lengths of those skinny straws that we sip coffee through. They're 3/32" OD and match my Overland coach details. I also installed the 8 little U-shaped fittings (to which the truck safety chains attached) to the underside of the side sills using half-loops of 0.015" wire and Grant NBW. Both are visible in the above photo if you look closely.

And I remembered Chris Walker's admonishment not to forget the flashing behind the stove smoke jack, less an S-scale fire start in the clerestory roof. I tried bending it from shim brass, couldn't get it right, so made it from 0.005" styrene:


Before painting the interior I installed two 0.030 x 0.080 strips vertically as stops for the bulkhead between the RPO and coach sections and painted both sides. As part of the RPO bulkhead is visible through the RPO windows in the 1906 photo, I tried to duplicate this from the folio floor plan and drafted an S-scale figure as a postal clerk. I also constructed two wooden door guards for the RPO side doors, as things look pretty empty up there.:


I was tempted to go ahead and glue the partition bulkhead in place -- Don't Do This!! It will prevent installing the interior later, when all painting, lettering, sealing and glazing is complete.

If you're building the car, early on you should experiment with installing the printed interior pieces. The process is less complicated than building a ship in a bottle, but does require prior study and thought. Roy designed the pieces to be inserted on edge, via the middle longer opening on the bottom of the body. When clear of the recessed lip, the piece is then "flipped" 90-degrees, to rest on the top of the recessed lip for the floor attachment. The pieces are then scooted back into place (toilet/stove/seat piece first) and glued to the top of the lip. The second piece is installed the same way, scooted back and glued. Only then can the partition be glued into place.

I made two changes to Roy's interior prints.

1) The folio shows the first row of seats faced backwards, toward the coach door. They were likely fixed, bench seats. So I cut off the first row, through the base, so the piece can be reversed.

2) To have clearance for the "flip" maneuver, Roy had to print the stove much underscale, and the toilet partitions are not printed to full height. On the HOn3 prints, at normal viewing heights, this probably isn't an issue. But my never-starting layout is designed for track level to be only 6' below eye level, so the toilet looks, from the outside, more like an office cubicle. I thought my S scale ladies would appreciate a bit more privacy. So I cut the off the rear interior print flush with the front of the toilet partition and built new toilet and stove mounting pieces that can be individually installed into the two back corners of the coach section:


The C&S-style water cooler was built up from styrene based on dimensions of the cooler in the QuikPic book of coach 76.

I primed all the printed parts, painted the now three pieces black and then brush painted the seats oxide red and highlighted the armrests with the brown interior color. This is how the rearranged interior pieces will look when installed. BTW, my S scale people have to have their feet amputated to sit in the seats . . .


I'm probably going way overboard with the interior, I have no idea how much will actually be visible through the glazed windows when complete. But I do know that if I can look inside and can see big empty spaces without some heads popping up in the seats, that it will really bug me and then it will be too late to remedy.

I got an email that my order of Tamiya Fine Primer (8 cans) will be delivered tomorrow. So now it's time to mask off the clerestory and main windows prior to priming the exterior.
Jim Courtney
Poulsbo, WA
12