C&S RPO / Coach 43 in C&Sn3 -- An Adventure in Resin-Printed Rolling Stock

12

12
Re: C&S RPO / Coach 43 in C&Sn3 -- Paint and Lettering

|
This post was updated on .
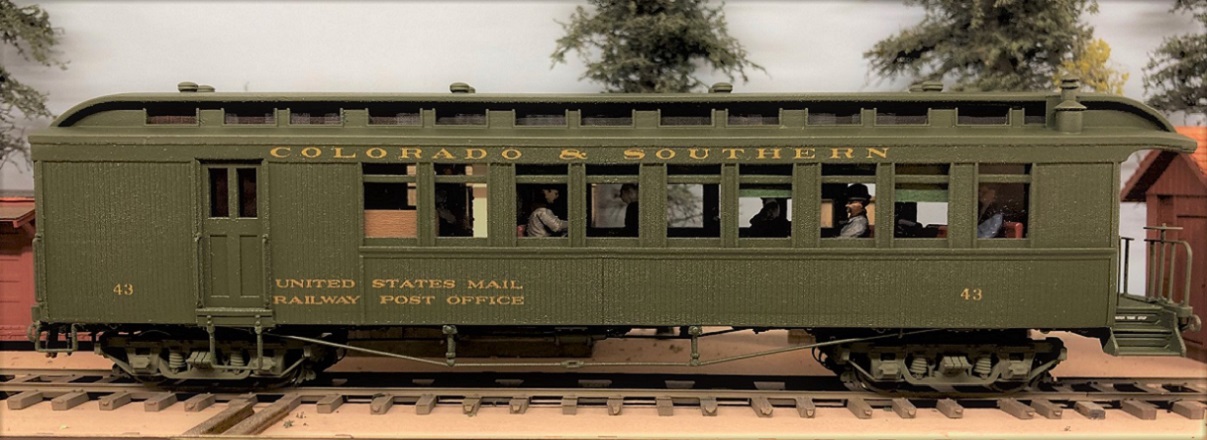
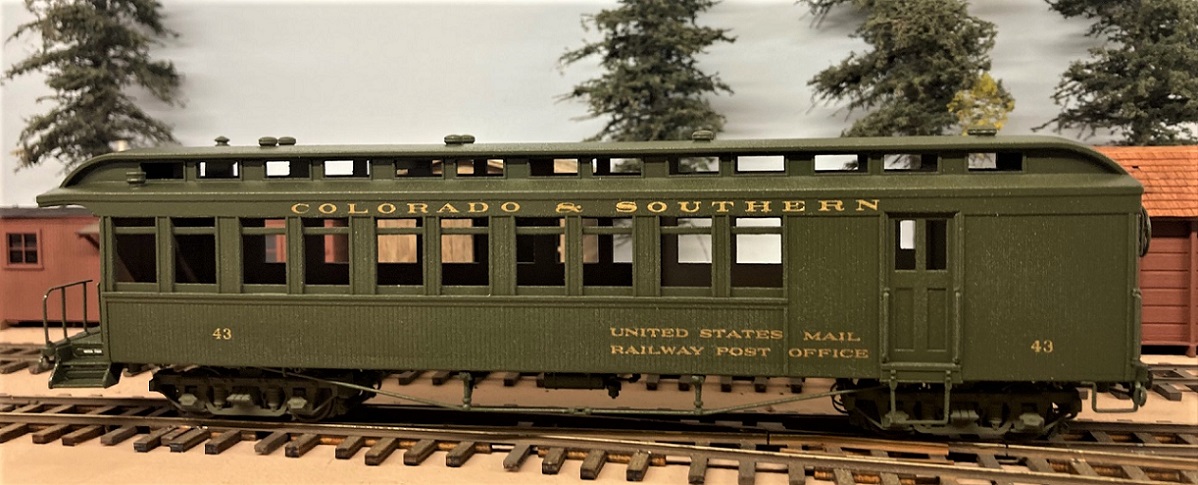 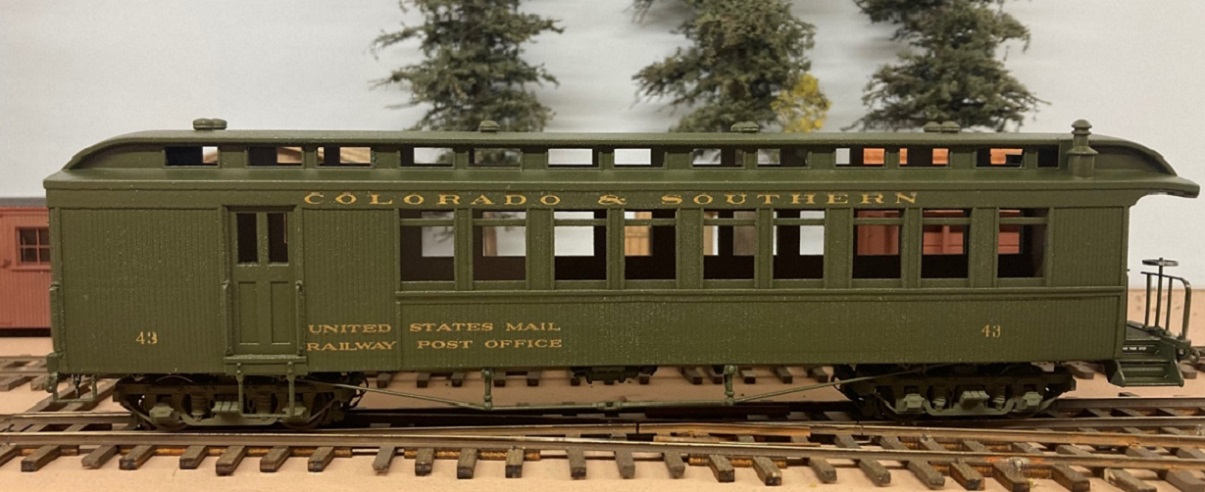 Nope, this isn't one of my projects that I set aside and never finish. Progress on the resin printed C&S RPO / coach continues, though at a snails pace. I masked off all the painted interior from the inside and reassembled the floor to the body, sealing off the interior. I applied a couple of light coats of Tamiya fine grey primer and then prepared for the color coat. In an old MR article in my files, Mary Miller described construction of her On3 C&S combine 26. She cited a gentleman named Richard Boulware who had taken samples of the paint on C&S RPO 13, before restoration, and had matched the paint to Testor's Model Master "Dark Green". Mike Trent, on other past threads here, has advocated using the same paint for the body color, and Model Master (MM) "Afrika Mustard" for the interior of the OMI brass passenger cars, to reproduce the finished oak wood work of those cars. If these two veteran C&S model builders say MM "Dark Green" is the best color match, that was good enough for me! The problem is finding the stuff. Testor's discontinued the entire Model Master line in April of 2020, and these paint colors just disappeared. I had one 1/2 ounce bottle of Dark Green in my paint stash, likely not enough for one car, much less a passenger consist of several cars. Then, one night I did an internet search for "Africa Mustard" using its Federal Standard number and stumbled onto a new paint company: True North Precision Paints: https://www.truenorthpaints.com/ True North was founded by two model builders in Bangor, Maine, to reproduce the original MM line of paints. So far, they've produced about all of the aircraft and armor colors and are working on the nautical colors. A blurb on their website says that their eventual goal is to also reproduced the entire Floquil line of railroad colors as well. In their Federal Standard section, I found the "Afrika Mustard", FS 30266: https://www.truenorthpaints.com/paintstore/flat-afrika-mustard. They also list a Dark Green with the same FS number, 34079, as the FS number on my old bottle of MM Dark Green: https://www.truenorthpaints.com/paintstore/flat-dark-green. So I ordered some of both, as well as a couple of other colors. While waiting for the True North paint to cross the continent, Bill Meredith sent me a few etched nickel-silver brake wheels from his upcoming C&S baggage 1 and 2 project. The big 24" brake wheel was installed on the blind RPO end, along with the brake chain:  The paint from True North finally arrived. The stuff is an alkyd oil enamel, it has a subtle solvent odor, but not near as strong as the old Floquil xylene based paint system. 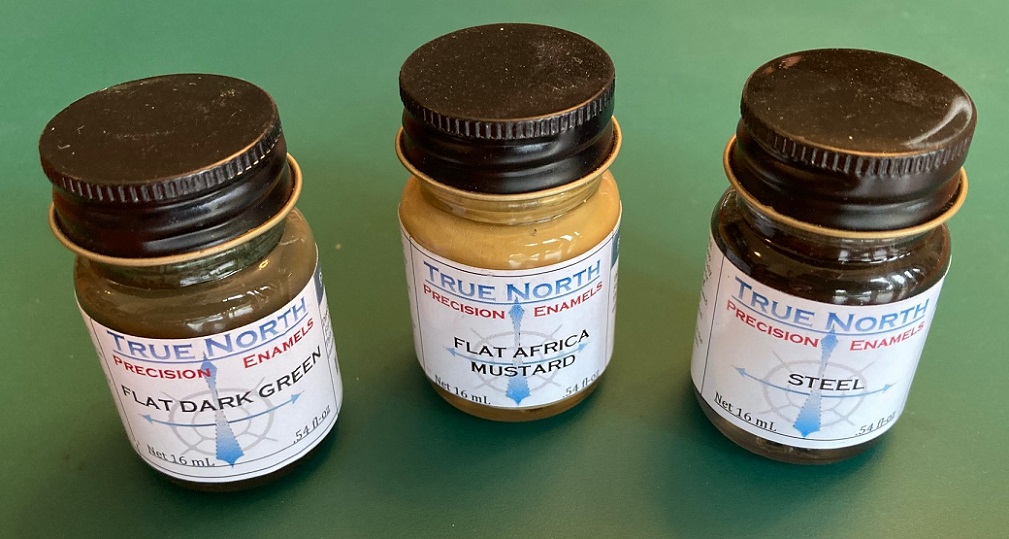 I had purchased several bottles of the True North thinner, thinned some of the Dark Green about 25% and tested the stuff with a brush. It goes on smoothly, covers well, quickly levels and dries flat without brush marks. I plan to use the Afrika Mustard and a medium brown on my OMI brass coach interiors. I've never airbrushed enamels before. The great thing about enamels is, when fully dry, they are hard, durable and don't wear off with handling. The problem with enamels is that it takes forever for them to dry, except in your airbrush (ask me how I know). On test pieces, the paint still had a solvent smell over two weeks out. I watched several videos on airbrushing enamels and followed the points presented. I thinned the green to "the consistency of skim-milk", about 50/50 with regular lacquer thinner to promote faster drying, reduced pressure to 12-15 PSI, and tried to airbrush the dark green onto the car with multiple wet, light coats. After letting the green dry (for about a week) I airbrushed on Testors "Gloss Coat" for decaling. The lettering is from the Thinfilm Sn3 decal set, Sn228, "C&S Passenger, Rich Gold". The decal sets are still available: https://thinfilmdecals.com/ Since my model is for a 1909 passenger consist, I followed the post 1906 convention of two car numbers per side, centered over the bolster when possible; for combines, centered horizontally on the sheathing in front of the side doors. For folks modeling the 1920s and 1930s the Thinfilm RPO decals can be used with the stacked "U.S. Mail / Railway / Post Office" centered on the forward sheathing. I chose to reproduce the first decade RPO lettering:  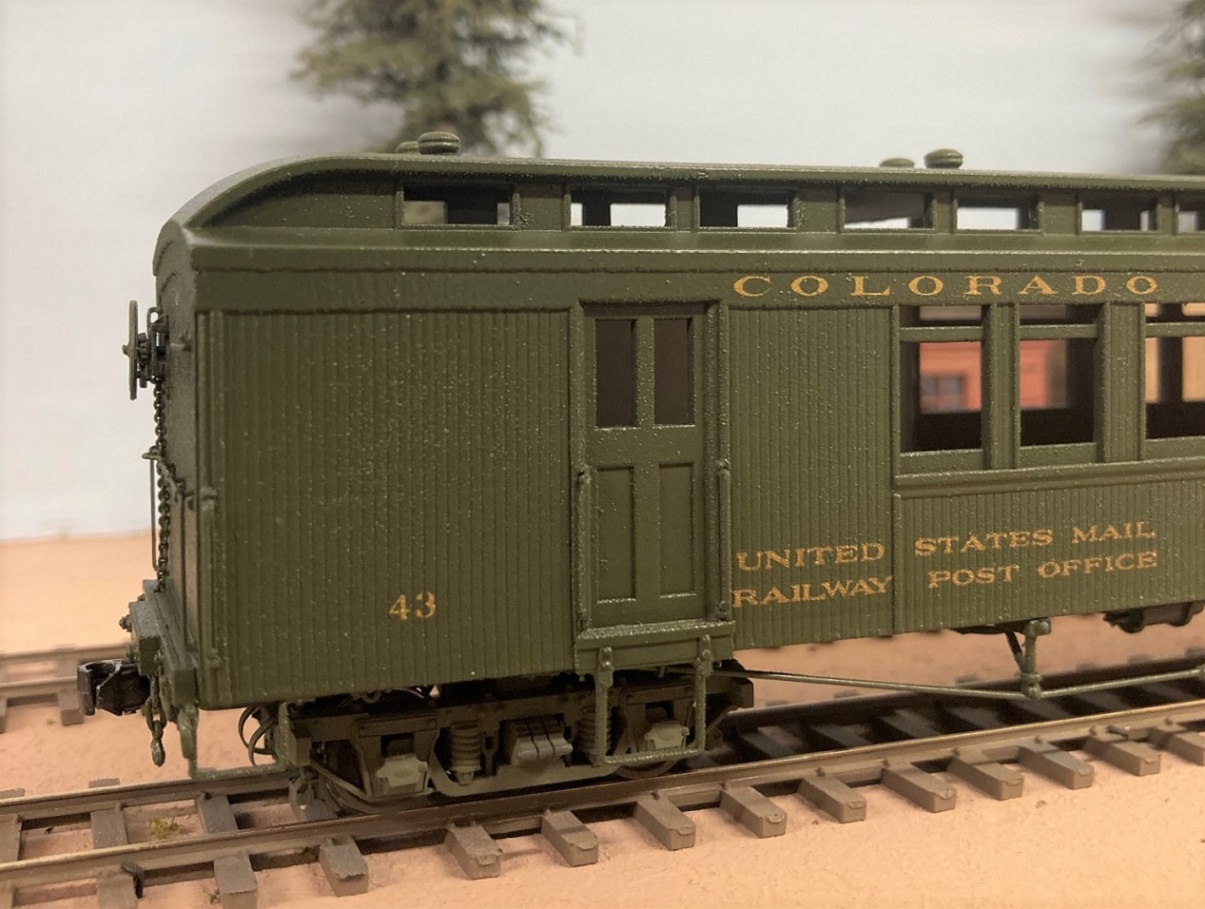 I couldn't find matching lettering in S or HO scale D&RGW Thinfilm sets, but actually used part of an old Champ Decal set for SL&SF "Frisco" heavyweight passenger lettering. I still had to piece it together to make it fit. I did not include the fine gold lining because I'm not sure it was used after the 1906 renumbering and thought it too tedious for my aging eyes and hands. Once the decals were dry from several applications of Walther's Solvaset, I airbrushed on an overcoat of Testor's "Semi-Gloss" for S scale "varnish". The underframe received a coat of Testors "Dull Coat". I followed Mike Trent's method for the PBL passenger trucks, using Rustolium Camo Line "Deep Forest Green" out of the rattle can. I tried to disassemble a pair of trucks to paint the wheel sets separately--very bad idea. The Chinese factory that produced the trucks never intended them to be taken apart--I still haven't got that set reassembled. I resorted to spraying the entire truck, then using lacquer thinner with a micro brush to clean the wheel treads. A rusty brown wash then was added to the wheel faces. As Mike described, the Rustolium paint color gives the trucks a dusty, weathered appearance. 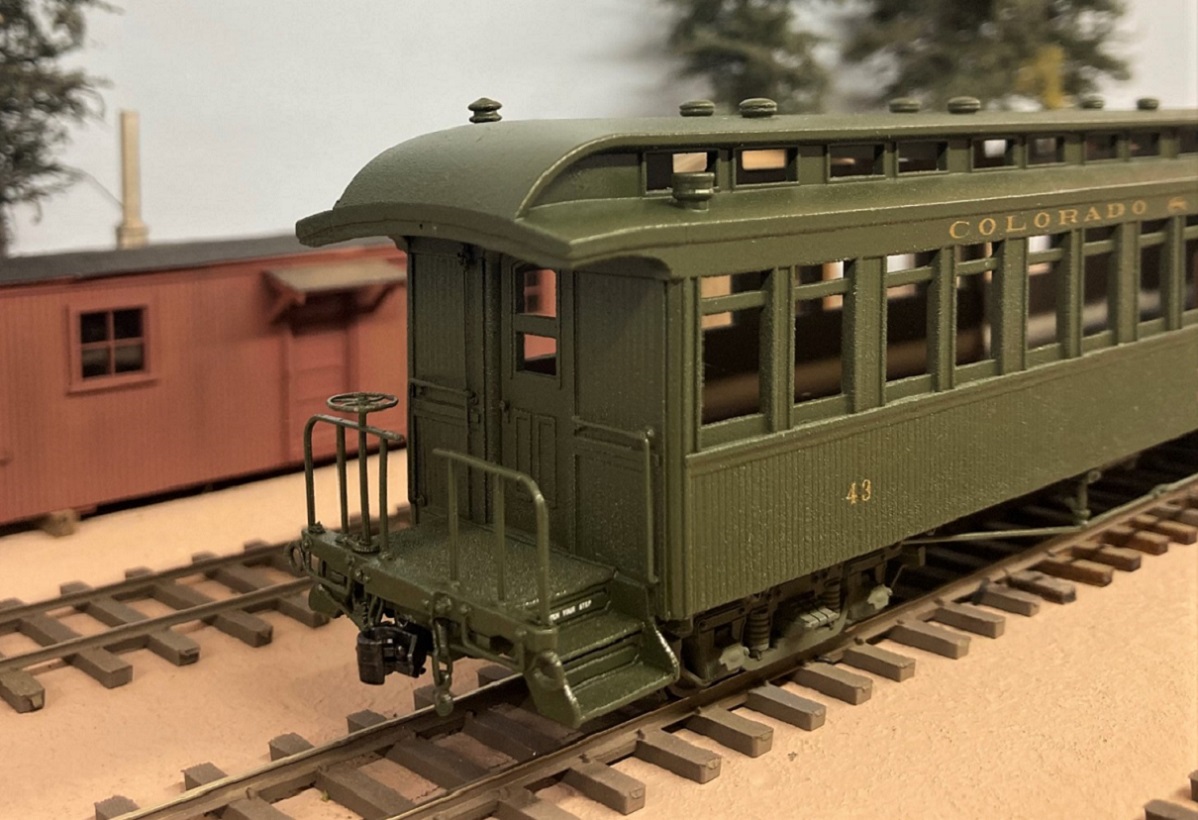 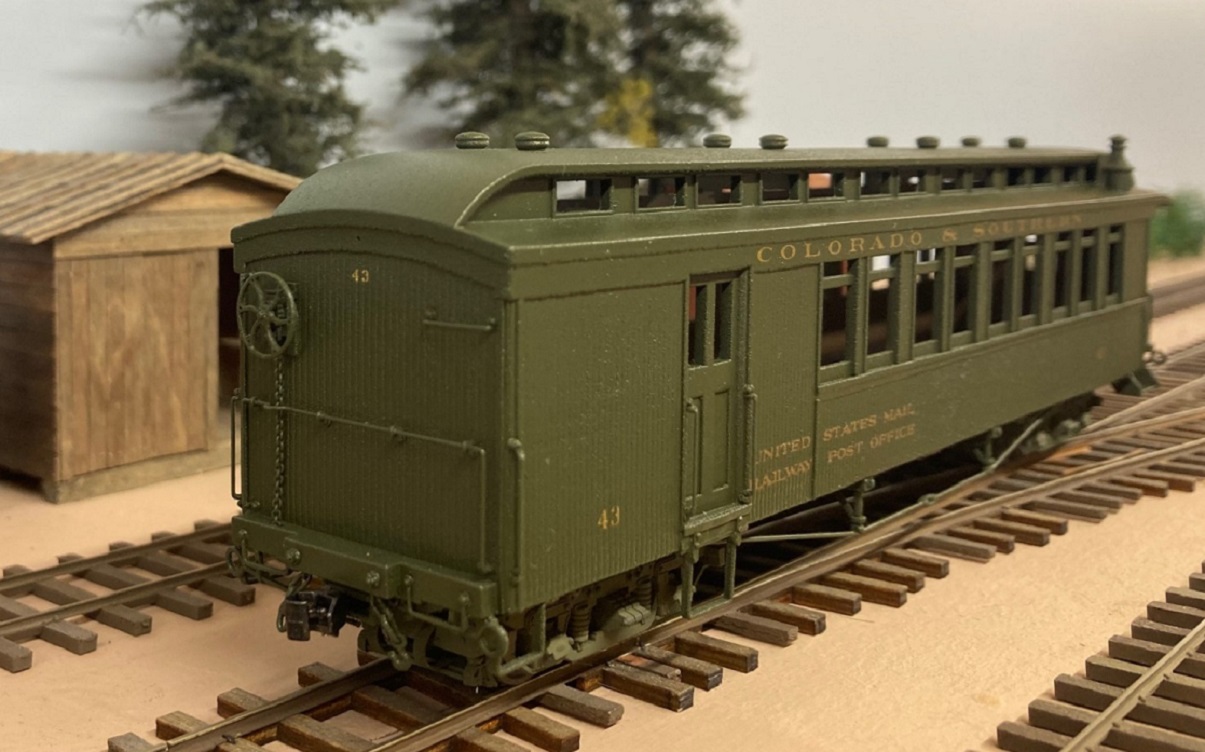 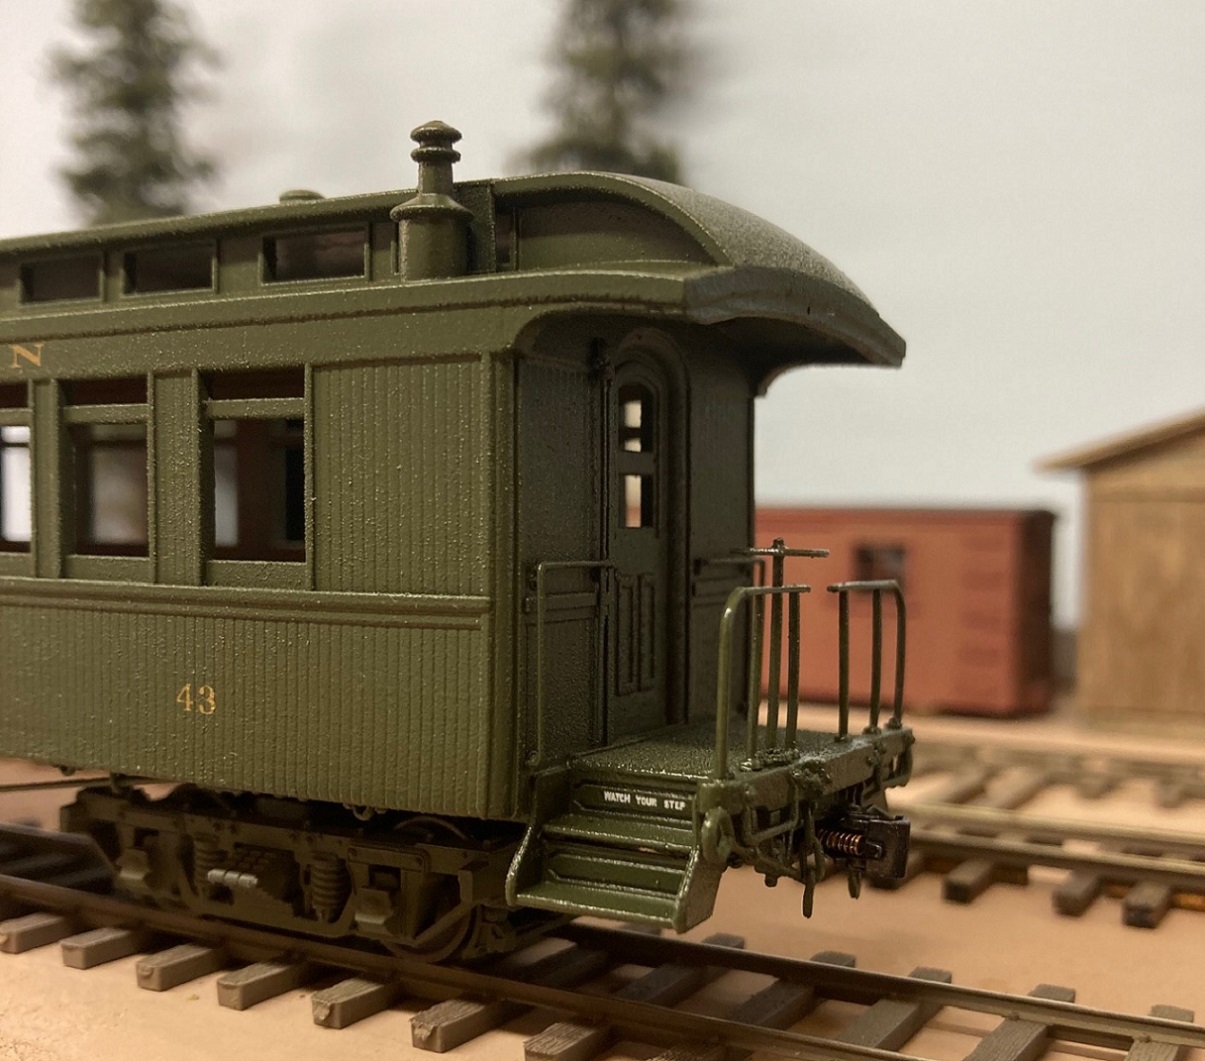 I'm very pleased at how the printed passenger car is progressing. I like the color of green for the body (thanks Mike Trent!) and the how the gold Thinfilm decals are subdued, blending in with the green--reminds me of all those McClure passenger train photos, where you can't really see the lettering on the passenger cars. But I'm not happy with the final finish. It has a fine granular texture, probably from my inexperience with airbrushing enamels. I suspect the paint coat went on just a bit too dry. Hey, you live and you learn. I've since found other sources of "Dark Green" with the same federal standard number, FS 34709, as the original MM paint. One is a TruColor product, an acrylic lacquer, similar to PBL's "Star" paint line. My friend Dale Kreutzer has used TruColor paints on several of his RGS models, uses PBL's thinner for airbrushing. And AK-Interactive has FS 34709 in both an acrylic lacquer and an acrylic for airbrushing. Samples of both are on order for further experimenting, as I have quite a few C&S passenger cars to paint. I have also ordered a can of the AK-Interactive fine grey primer, designed specifically for resin prints. I have one of Roy Stevens Sn3 C&S combine 20 kits on the way. I want to detail it like this project, then finish it in red as MOW combine 025. This project isn't complete. Next up is installing screens in the clerestory windows, glass in the windows and doors and finally the interior. Stay tuned . . . ____________________________ PS. If anyone here is proficient in airbrushing enamels, share your tips here. 
Jim Courtney
Poulsbo, WA |
Re: C&S RPO / Coach 43 in C&Sn3 -- Paint and Lettering
|
|
Looking good, Jim! Thanks for the progress photos and all the notes.
Keith Hayes
Leadville in Sn3 |
Re: C&S RPO / Coach 43 in C&Sn3 -- Paint and Lettering
|
|
Mike Trent sent me an email yesterday that I'd like to share. Evidently, since his move, Mike's only connection to the internet is by WiFi and is WiFi / bandwidth challenged:
One of the things I may have failed to mention regarding the finishing of my passenger cars is that while I love the Dark Green color, and the roof should be green, I didn't like the semi gloss finish on the roof. So what I did was use flat Dull Coat on the roof, masking off the body. The color is still Dark Green, but has a faded look, different from the semi gloss sides. I think the attached photo shows this pretty well. I hope I have caught you before you have started on the clerestory windows. I also finished the clerestory in a flat finish. Feel free, if you wish, to post this on the Forum. I still can't post larger pics. 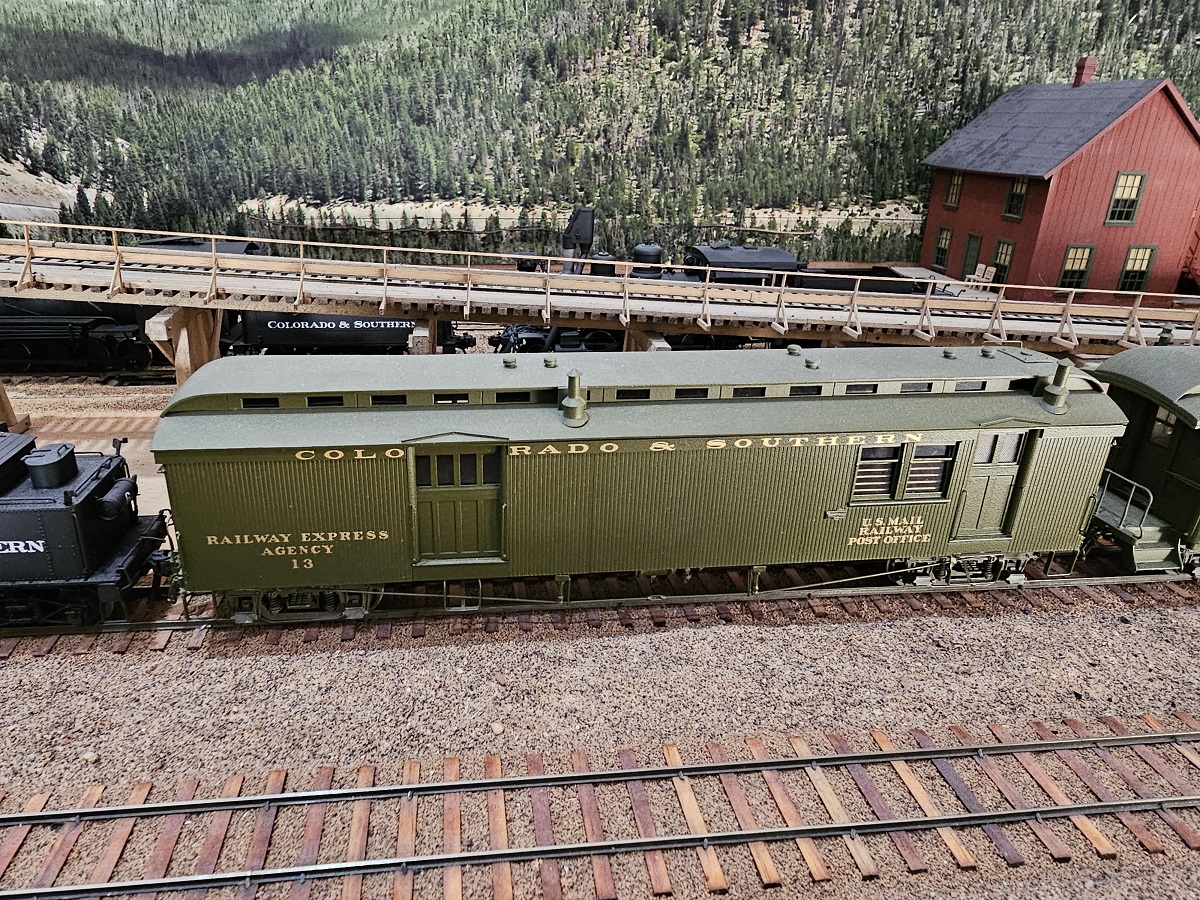 I agree, the semi-gloss clerestory roof bothers me as well. And the color of my RPO/coach is pretty much the same as Mike's beautiful scratch-built RPO 13. The lighting in my never finished test-track module makes the color look to be a lighter green. Looking at period photos, only the sides, from letterboard down, seem to be maintained with a varnished sheen, everything on the roof and clerestory seem to be flat. Notice, too, how the lettering is not very legible, perhaps film emulsions of the day had trouble picking up the gold: 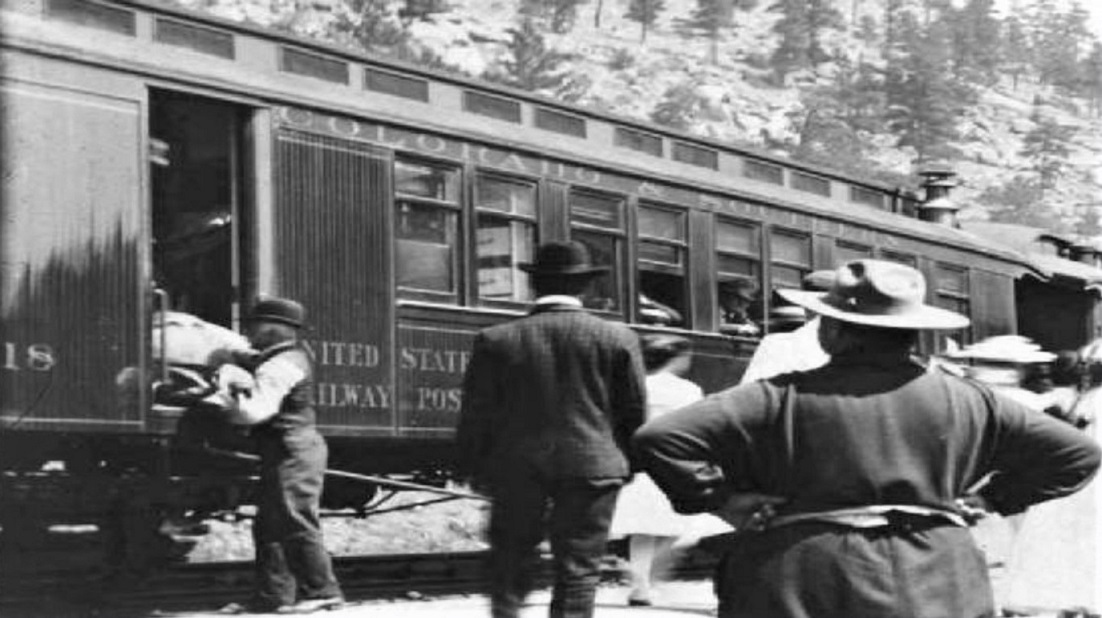  So, when work on number 43 resumes, the first order of business is to mask off the sides and ends, from letterboard down, and airbrush on some Dullcote on the entire clerestory roof, before installing screens / glass. I've also noted that the first decade roofs don't seem to have visible seams of any metal sheathing applied to the roof, as in later years. Were the first decade roofs canvas covered?? There will have to be a pause on further work on this project. Beginning Thursday we will be hosting houseguests, family from Texas, for almost 3 weeks.
Jim Courtney
Poulsbo, WA |
Re: C&S RPO / Coach 43 in C&Sn3 -- Finishing Up
|
|
This post was updated on .
  All the relatives left to return to the Texas heat last Monday, so I had a chance to finish up this project this week. Mike Trent suggested masking off the body and spraying a few light coats of Testor's Dullcote on the roof, coach platform and RPO end beam. So that was the first order of business. The result is much more realistic, thanks Mike!! Screens/Glass/Shades: Every photo of C&S passenger cars shows the clerestory windows covered with screens, and I wanted to reproduce this feature. In my box of brass shapes/sheets/stuff I found a 4" x 6" sheet of fine mesh brass screen (PSC?). I cut strips 16 scale inches wide and cut 6 strips to length, to fit between the printed braces inside the clerestory. Rather than paint the screen, I chemically blackened it with my 40 year old A-West "Blacken-It". To install the screens, I used a new product (for me), recommended by Bill Meredith: Gorilla Glue ACC Gel (https://www.amazon.com/Gorilla-Super-Glue-gram-Clear/dp/B082XGL21J/ref=sr_1_6?crid=1L4SCQ7IHRJ1O&keywords=Gorilla%2BGlue%2BACC%2Bgel&qid=1692558296&sprefix=gorilla%2Bglue%2Bacc%2Bgel%2Caps%2C189&sr=8-6&th=1). This is weird stuff. If you squeeze out a little dollop, it just sits there, doesn't harden or dry out. But a little smear between two pieces, when it is deprived of air, causes it to rapidly harden into a very strong joint. I used little dabs on the inside clerestory wall to attach the screen strips. 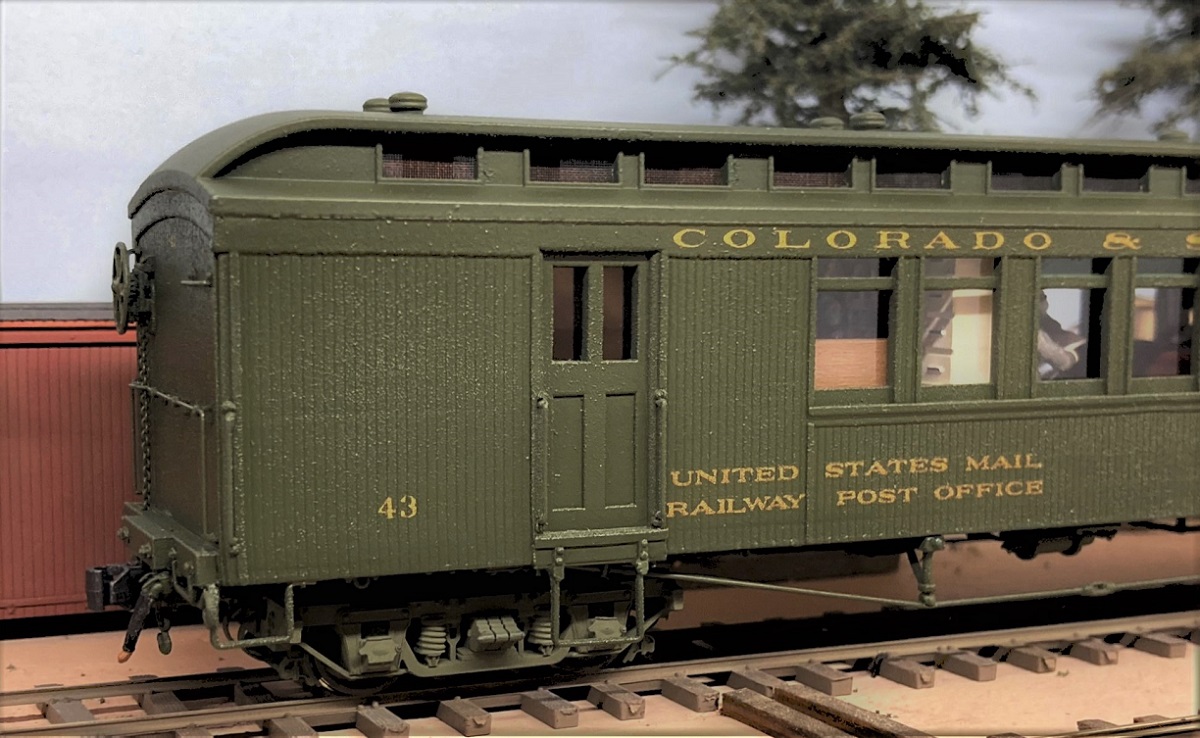 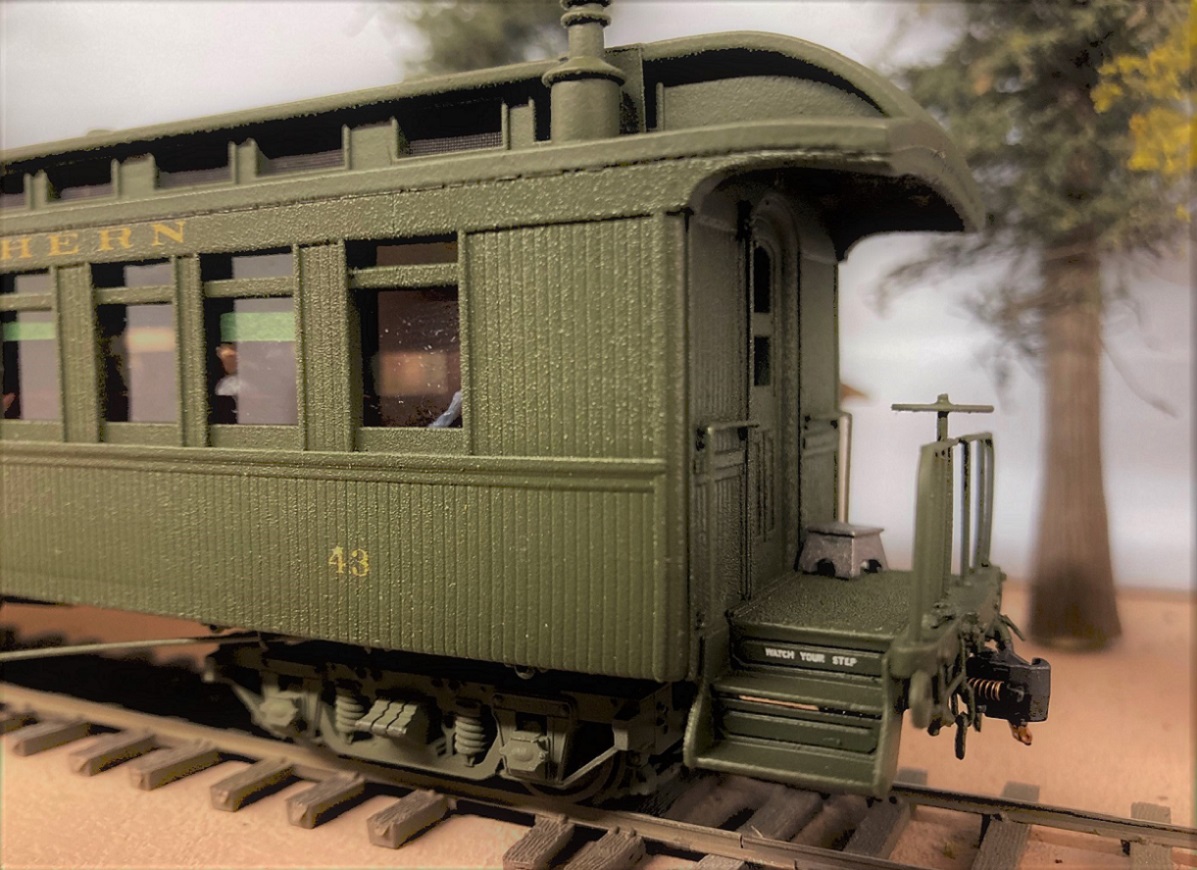 Okay . . . I know that the screens were mounted on the outside of the clerestory windows, not the inside! But I still like the visual effect. I didn't use the clear styrene included in Roy's kit for window glazing, rather I used my preferred method of using microscope cover glass, because nothing looks more like glass than, well, glass. I cut the 0.007' thick glass with a carbide scriber for each pair of windows, only breaking one out of three pieces. I used small batches of 5-minute epoxy to install each piece of class, with tiny dots of epoxy outside each inside corner. Before installing the cut glass pieces I used OptiWhipes, an eyeglass cleaner to thoroughly clean off any fingerprints from both sides of the glass: https://www.amazon.com/OptiPlus-Pre-Moistened-Cleaning-Quick-Dry-Scratch-Free/dp/B085VDQYS4/ref=sr_1_1_pp?crid=34BYYC6DS1GFT&keywords=optiwipes&qid=1692558915&sprefix=optiwipes%2Caps%2C221&sr=8-1 Sounds tedious, but I installed all the glass in one long afternoon, taking occasional sanity breaks. Mike Trent says that the window shades on C&S passengers cars were a very dark green, just a bit lighter than the car color. At Michaels, in the scrap booking department, I found a 12" x 12" sheet of 65 lb. paper dyed a dark forest green (no white center when cut). I now have a lifetime supply of C&S window shade material for 99 cents. The paper was cut to width to cover each pair of windows; most windows were cut to cover the upper part of the window, down to the lower frame of the upper double hung window pain. A couple of windows have the shades near all the way up, a few have been drawn part ways down. The shades were also installed using tiny dots of epoxy. Interior Installing the printed interior came next. The toilet and stove pieces were easily installed in their corners of the coach rear, using the Gorilla ACC gel. I painted and then glued 5 passengers to the seats before the seat sections were installed, all male (I suspect that the coach portion of this car was the designated "smoker" of the Leadville passenger train). Pro Tip: Glue passengers on only one side of each of the seating prints, otherwise there will not be clearance when the sections are installed and flipped to a horizontal positioned. The seating sections were then glued to the body print with thin ACC. With the seating sections finally in place (the ship within the bottle), I installed the white RPO bulkhead with its little coveys for letter sorting into the car, and secured it with thin ACC. The two brown finished cabinets for parcel sorting were cut of 5/8" x 1/4" inch basswood and painted the interior brown color, before being glued into position with epoxy. The postal worker was positioned on the top of the floor in a puddle of epoxy and the floor was reattached to the body for the last time, screwed securely in place. With the car reassembled, the postal worker is pretty much invisible, a waste of a figure. 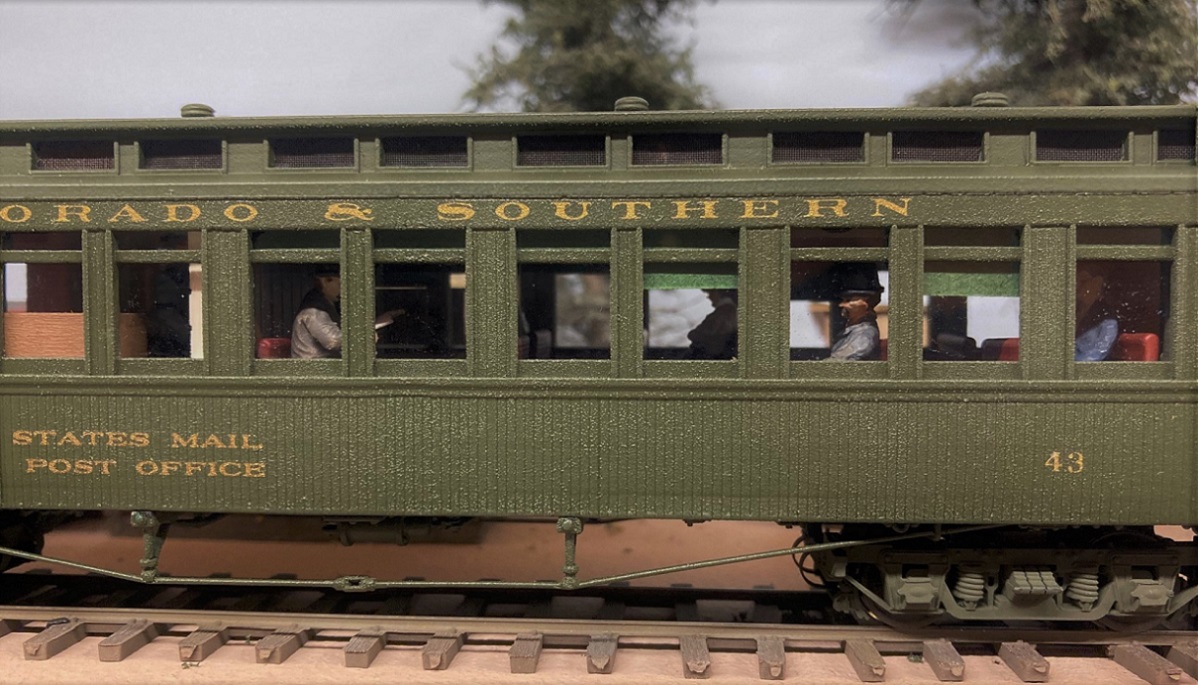 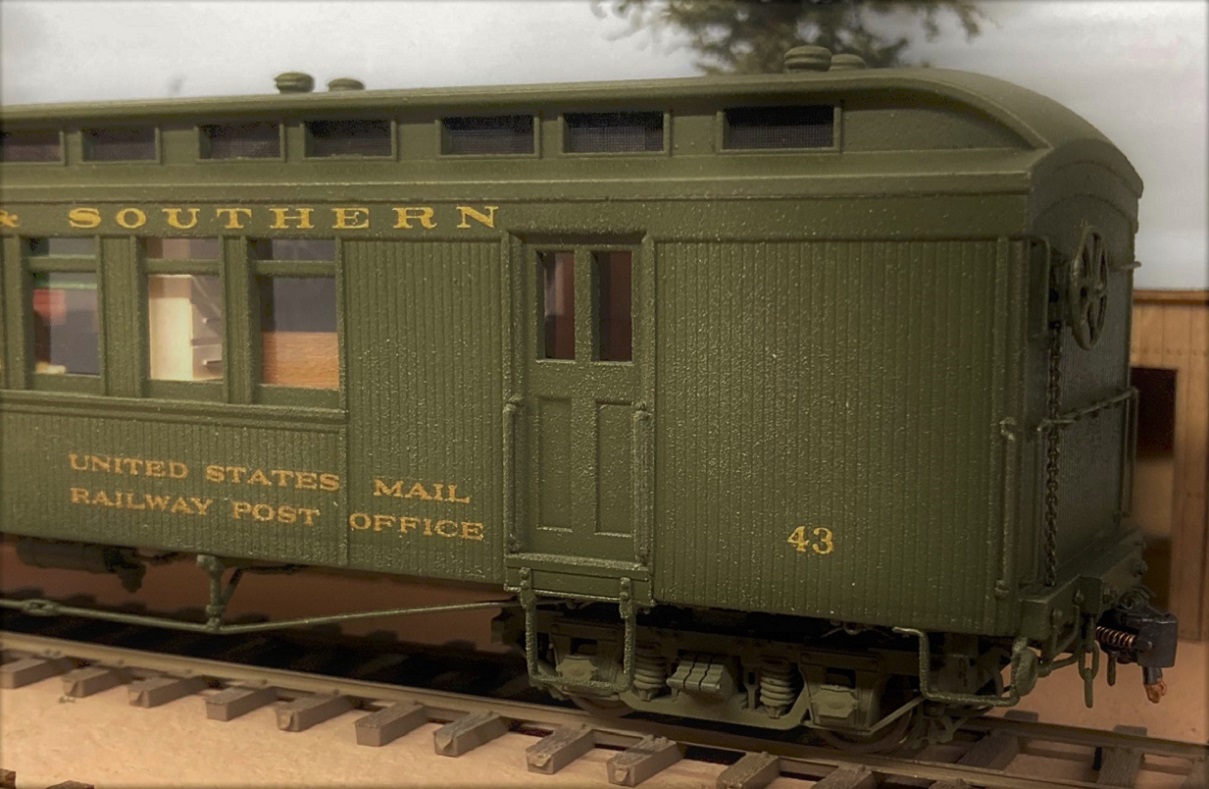 Finishing Touches After a huge sigh of relief, I touched up all the shiny screw heads with the dark green body color paint. P-B-L real rubber air hoses were painted and installed on each end for the trainline and signal lines. I have some small white metal "passenger assist steps"--I filed one smooth of all flash, painted it "steel" and installed it on the coach platform for use at the next station stop. After Thoughts The purpose of this entire project was to see if a resin printed car body could be built up to operate well, then, using aftermarket parts, detail it, paint it and finish it to compare favorably with an imported brass model of the same car (never will happen in the case of C&S 43). IMHO, the answer is yes. At normal viewing distances the car looks very nice to me. The harsh closeups with my camera illustrate my poor paint job all too well. I look forward to building up Roy's combine 20/MOW 025, and any other C&S passenger car that Roy prints and brings to market. Maybe next time my paint job will do his prints justice.
Jim Courtney
Poulsbo, WA |
Re: C&S RPO / Coach 43 in C&Sn3 -- Finishing Up
|
|
Looks terrific, Jim!
(where did you source the "watch your step" lettering?)
Keith Hayes
Leadville in Sn3 |
Re: C&S RPO / Coach 43 in C&Sn3 -- Finishing Up
|
|
Thanks, Keith.
 I found the "Watch Your Step" decals on an HO set of M-K-T "Katy" freight car and caboose decals from the Katy Railway Historic Society. I found the "Watch Your Step" decals on an HO set of M-K-T "Katy" freight car and caboose decals from the Katy Railway Historic Society.
Jim Courtney
Poulsbo, WA |
«
Return to C&Sng Discussion Forum
|
1 view|%1 views
| Free forum by Nabble | Edit this page |