C&S Passenger #72
12
12
|
One in a while I must bow and listen to Derrell say, "I told you so!" Today is the day.
I bought an Overland passenger car a few years back and sent it to 7th Street for a paint job. The Super suggested I trade out the troublesome brass trucks with some from PBL. I said no, and the car came out of the shop looking good, but with finicky brass trucks and brake shoes that like to short out. With the talk of sound cars, passenger cars are a great candidate too. But, you have to get power to the car. PBL trucks have this figured out. Jim suggested I take the dive, and I got some trucks from Keren this weekend. I checked the height, and the PBL trucks are a very close match. The issue is the outside bearing equalizer casting, which the C&S car lacks. PBL seems to have anticipated this issue. The equalizer screws to the frame and secures the wipers. Sweet! 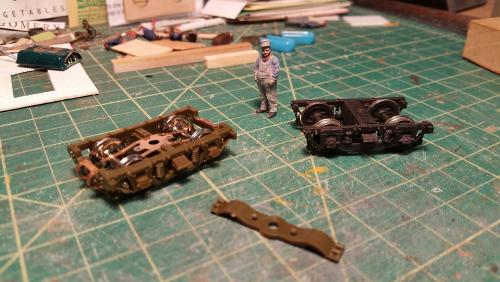 Remove the screws and flip the casting over. Even better there are centering ribs to mark where to saw the casting. 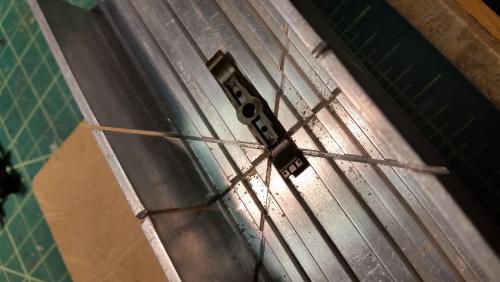 Saw at the end of the ribs, file down the top some, and clean up the works. 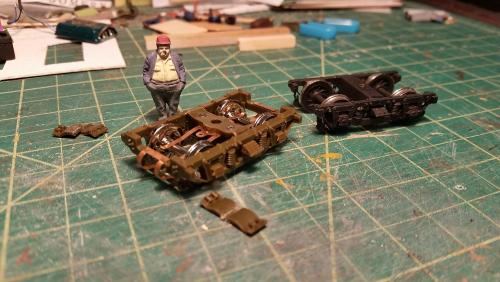 Screw the truck back together, and install the bolster screw, also a perfect fit! 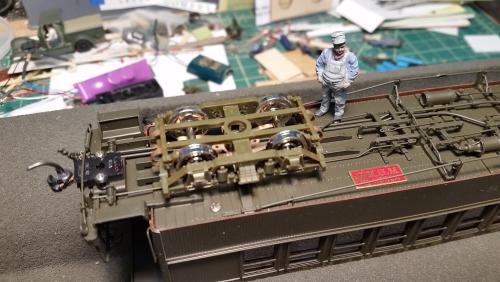 This is a great project that took less than 15 minutes and greatly improved the rolling quality of this car. I still need to add a brass strip under the lower equalizer bar on each side to more closely replicate the C&S truck, and they need to go to the paint shop for a coat of black paint. But, the car is now ready for a Sound Car install. Thanks Derrell and Jim!  All aboard!
Keith Hayes
Leadville in Sn3 |
|
Great presentation, Keith.
I'd bet it took far longer to photograph and organize the post than it did to modify the trucks. When PBL brought in their last run of passenger cars in 2010, Bill Peters had these trucks produced in China specifically for that run, to allow constant lighting and lit markers. He had the trucks cast in (kinda) Pullman green so's paint chips wouldn't show so much and to avoid any problems with shorts on brass trucks. Be sure the non-insulated wheelsets are on opposite rails when you mount the trucks to the cars. Next we need to talk about coupler mounting. I promise to post a couple of photos of how you can acheive much closer coupling, so scale people don't fall between the end beams when moving from from car to car.
Jim Courtney
Poulsbo, WA |
|
You are right, Jim, it took longer to peck out the post and insert the photos on my phone than it took to make the fix.
I look forward to your suggestions on couplers. Perhaps I should install #5s in lieu of the #26s to decrease the distance between cars? Note when I sent the car to 7th Street Shops, I consulted the folio and included a piece of styrene to be installed to subdivide the car as on the prototype. Derrell also painted the interior brown (I think) to simulate the (Ash, walnut?) wood interior. It is difficult to add seats to these cars due to the design of the car and the cross pieces that allow the floor to be unscrewed and removed: 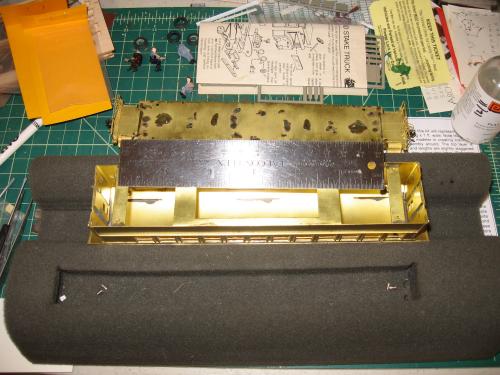 I may be able to install a seat or four with some figures when I install the Soundcar chip and speaker, just to add some life to the car. Note too, the continuous piece at the roof, which is great for structural continuity, and makes it hard to paint and glaze the clerestory. Ugh. I recently got a coach from the next larger series of cars, so will have to confront this when painting that car.
Keith Hayes
Leadville in Sn3 |
|
This post was updated on .
Keith,
The issue with closer coupling of the Overland C&S coaches is not so much the length of the coupler shank, as it is the draft gear box used and how it is mounted. Consider your coach and one of mine: 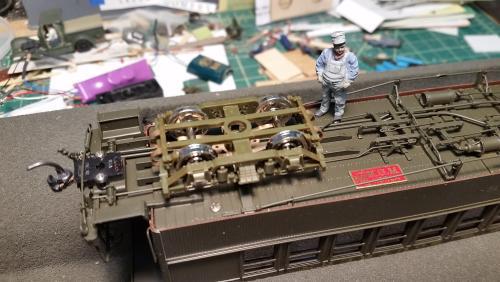 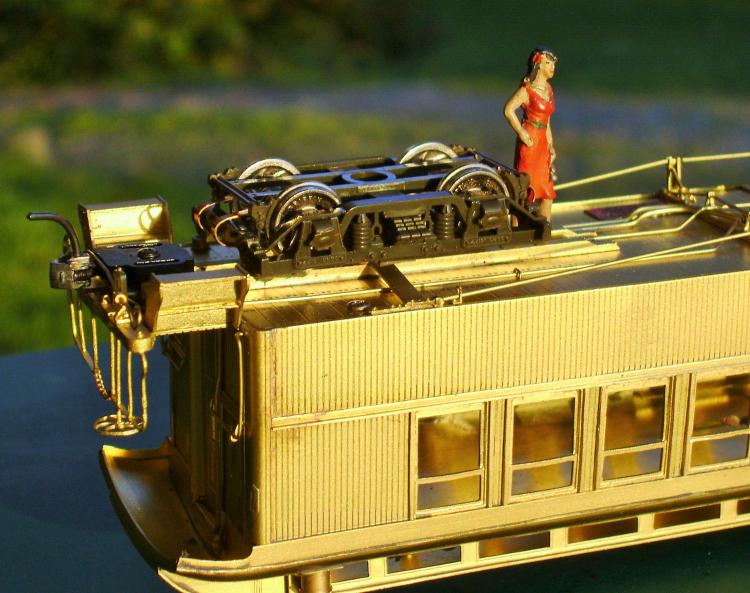 Overland has drilled and tapped 3 holes on the coupler pad below each platform. You used the two paired holes to mount the standard Kadee draft gear box, the one with two little "ears" with holes. Unfortunately Anjin located these pretty far out, next to the end beam. The result is that the end of the draft gear box protrudes well out beyond the end beam. No matter what shank length is used, close coupling isn't likely. In a fit of inspiration, I decided to try the "Darwin" universal coupler pocket, marketed by The Coach Yard at $4.95 per package of six boxes (enough for 3 cars). The Darwin is an adjustable gear box, designed for HO passenger cars with such Kadee mounting screws. Instead of 2 fixed "ears" there are two open slots, to allow the mounted coupler to be adjusted closer or further away from the end beam. Didn't work, foiled again by Anjin! The two tapped mounting holes are to allow for small diameter screws (? 0/80). The holes in the Kadee "ears" are much larger in diameter. Thus, Anjin spaced the holes a bit further apart, to allow the heads of the screw to trap the outside edge of the Kadee "ears" to secure the box to the car. The "Darwin" boxes have slots that are closer together, thus the holes on the Overland cars won't accept the "Darwin" adjustable feature. But wait, there's more! By chance, the third hole in the Overland mounting pad is perfectly located so if you mount the "Darwin" box using its center hole, the box mounts way back under the platform. A standard shank length Kadee "whisker" coupler (either standard or "scale" head) seems to mount perfectly with the back edge of the coupler head as close to the coach end beam as possible. In the photos, these are HO "scale head" couplers--I still think they look a bit small: 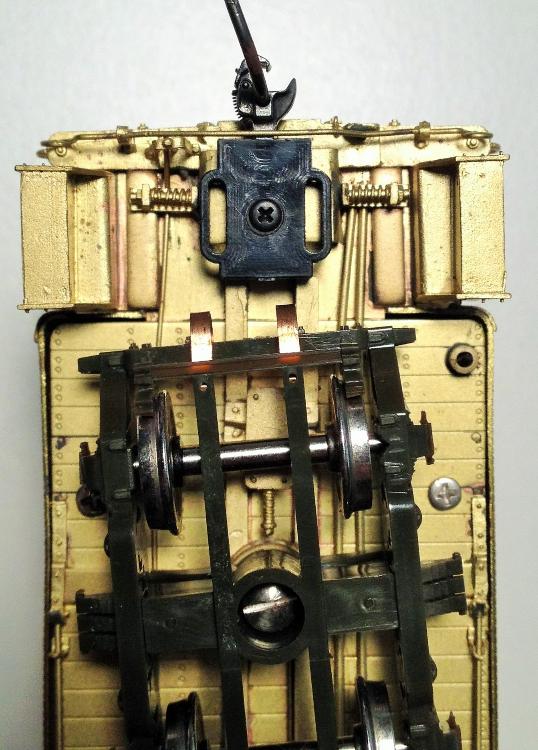
Note that the two Overland mounting holes are hidden under the top edge of the slot flange, as it rejoins the draft gear box. The Darwin box is also thinner than the Kadee draft gear, so the coupler is mounted at the correct height relative to the rail, not too low. As a result, this is the closest coupling I can come up with for the Overland cars, 19 to 23 scale inches between the outside faces of the end beams, depending on the car. Consider:  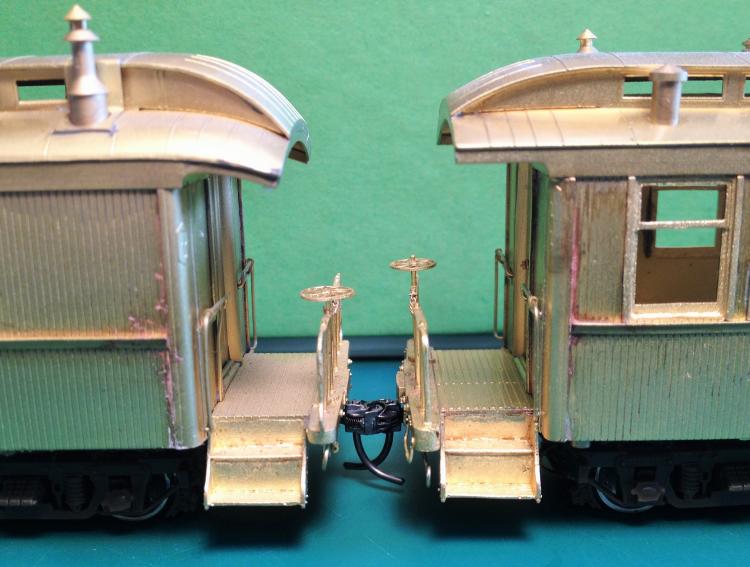 I have tested the coupled cars on 28" radius curves, both pushed and pulled, and they do not derail coupled this closely. The use of the PBL plastic trucks also prevents the possibility of shorts between the brass cars with this tight of coupling, as the car bodies are insulated from the rails. I don't know whether the couplers will center adequately on this tight of a curve to allow switching of the cars on a curve. In my operational plans, the cars will stay coupled in their respective passenger trains (the Leadville passenger and the Fish Train) anyway, so it is not an issue. I will leave the Kadee pins on to allow magnetic uncoupling in my staging yard's tracks. Also, note that I have removed the brass Overland air and signal hoses, as I'm pretty sure that they will foul on curves with the cars coupled this close together. After painting and finishing the cars, I plan to install Jimmy Booth's Sn3 rubber air hoses for flexibility. I have also removed the stock Overland safety hooks and chain and will replace them with chain of longer links and use Precision "small hooks", a brass casting. Anyways, that's how I did it. (BTW, my Car Shop Foreman is a lot better looking than yours!!)
Jim Courtney
Poulsbo, WA |
|
Administrator
|
In reply to this post by Keith Hayes
Hi Keith, interesting conversion.
I used, out of necessity, modified Grandt Line passenger trucks for my On3 #13 Baggage and Mail car. With the frame extensions for the end brake rigging removed they are unrecognizable. As I have very limited trackage, it has not been high on my list to replace the OMI trucks on my two coaches. The astonishing thing to me about C&S Passenger Cars is how high they are over the trucks, compared to D&RGW cars. Did you have to modify the bolsters, assuming the replacements are D&RGW? I had to add washers to get the body of the Mail Car up to the correct height. When I finished the cars, I followed Rob Smith's suggestion of Model Master "Dark Green" for the bodys, and used Rustoleum Camoflauge "Deep Forest Green" for the trucks. For seats I used Grandt #3016 wood framed Coach Seats, affixed to the car sides, rather than trying to raise the absent floors. I painted them Red Oxide Primer. I added partition walls for the restrooms, and also for the middle seperation partition in Coach #70, painted them "Afrika Mustard", as it was the only color I could find that looked like finished wood from the outside. For the upper window shades, I painted styrene strips using the MM "Dark Green" color, and to my eye, the cars tuned out very well. I used modified San Juan Evolution Couplers in Kadee On3 Draft Gear. One other thing I found with the OMI coaches was that the center monting screws cinched up the bottom of the floor too high which caused kinks and binds in the truss rods. They look great so far, way to go! 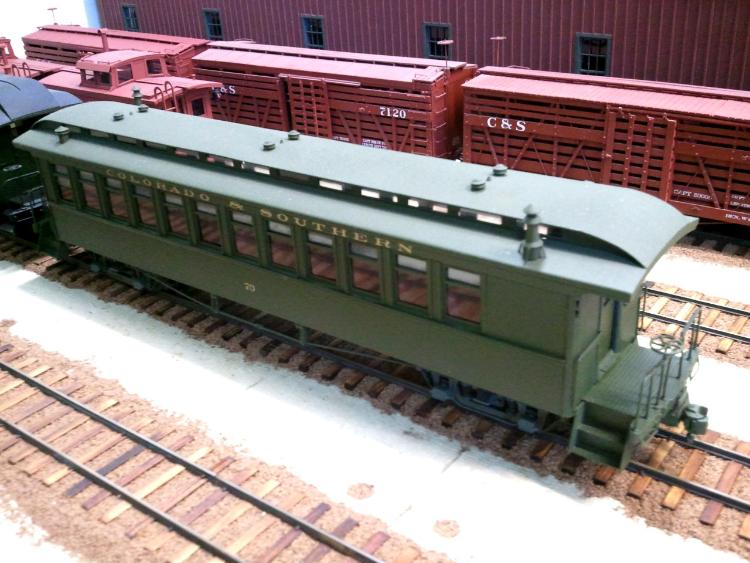
|
|
Great looking car, Mike.
I can't quite tell from the photo, is the car roof green like the body, or a grimy black? The idea of mounting the seats directly to the inside walls is a good one--Grandt makes the same seats in S scale. Did you assemble the seats, paint them and then epoxy them to the inside of car side? Are the clerestory windows on the On3 Overland cars open to the inside or are they sealed off as on Sn3 cars? I'm still trying to figure out how to add glazing or screens on my Sn3 cars, assuming I ever get them painted. Again, beautiful model!
Jim Courtney
Poulsbo, WA |
|
Administrator
|
This post was updated on .
Thanks, Jim.
Yes the roof on Coach #70 is green. I found, in the process of overspraying the "Semi Gloss" topcoat (Also Model Master) that by applying only from the side and from below, the amount of Semi Gloss on the roof was residual only, which results in a much different appearance, almost a flat finish in comparison. Even my wife thought that looked good, as though it was more faded from the sun. Having worked on the crew which repainted #70 in Idaho Springs back in the 80's, I can confirm that the car had been painted entirely green. Roof, trucks, body, hardware. Rob Smith likes the look of a slight variation in the color of the trucks, as though from dust, etc. After admiring his work, I followed suit. The car behind #70 in the photo is an old #911, which I painted with a black roof and trucks ages ago. I'm keeping it that way, so far, for sentimental reasons only. Grandt's seats #3016 come with the backs and seats as a single casting, so painting them was a snap. I painted the armrest/feet in a neutral brown color, assembled them, and then epoxied them into the body under the windows. As Overland never produced the Mail Car #13 in On3, that car was scratchbuilt in styrene using Crossing Gate Roof parts. The styrene makes a perfect match in appearance to the brass siding on the Overland Cars. Ken Martin helped with a drawing he made years ago, and some critical dimensions. Although I actually worked on this project for Overland, I never saw anything but the On3 Coaches. Yes, on the On3 models the clerestory roof is open from the inside as the prototype is. Yikes. If it is closed on your models that would be a challenge. Must have been done for economy. M.S. Models built the coaches in On3. I know Tom was peeved over their quoted cost of the #13, which is why they were never built. Someone said Ajin built the Sn3 cars as they did all the cabooses. So I'm sure they did whatever they could to keep the cost as low as possible. Thanks again, Jim. Modeling C&S mainline operations is incomplete without the passenger train! |
|
Beautiful work Mike. Very inspiring.
I agree. At least one South Park/C&S passenger car is essential. If only a combine or a converted work car like #089 (see my attached On3 model). 1880's Pullman Sleeping cars to Leadville, The Leadville (mail) train, the Platte Canon Fish Train, The Alma mixed, The business car #911 and #910 Denver Water Board Special up Platte Canyon.....  |
|
Administrator
|
Thanks, Robert, and a beautiful job indeed on that 089!
|
|
Indeed. A gorgeous model of 089!
Keith Hayes
Leadville in Sn3 |
|
In reply to this post by Jim Courtney
Jim:
Thanks for this tip. I have some of the Darwin Universal Coupler Pockets on order from a hobby shop in PA. Caboose does not list these, and though Walthers apparently deals them, they are not on their website, either. I had not heard of these, and I bet they will work on many models. Mike, the clerestory is sealed off. You can see this in the photo Jim posted with the young lady reviewing the truck install. Except your eye is no doubt distracted by the young lady. All these cars have an Ajin plate on them. I got some C&S passenger car decals from Keren in Seattle, and picked up some brass for the equalizer bar, along with the last set of caboose decals I need from Caboose today. I will start in on the equalizer bar mod tomorrow. I was studying the models today and noted there are two air hoses on these cars. Checking out the photos in the Grandt book, I noticed that most all the C&S NG passenger fleet did indeed have two air hoses. And, most curiously, one hose ALWAYS has the glad hand hooked in the hook of the right safety chain (as you face the car). Questions: 1. Why two air hoses? Is one straight air, and the second modulated? 2. Why do most of the cars have the hose hooked up? Is this the hose not to use? After working on D&RGW 053, I am somewhat particular about the detail on the end of passenger cars (as long as it does not prevent operation). There are a couple coupler lift levers, two chains and the air (and sometimes steam) lines. I enjoyed modelling these on the Cimarron duckbill coach: 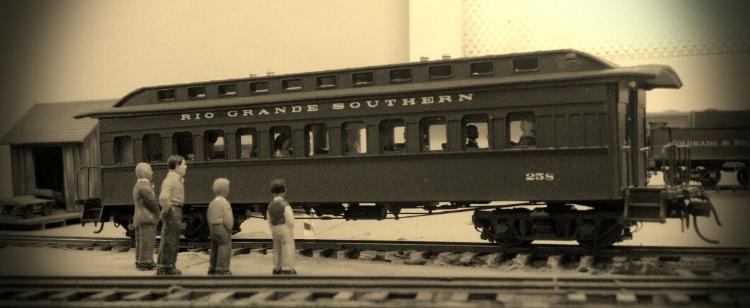 (-->Warning Rio Grande Southern content<--) Also, note that the coupler knuckle is closer to the end beam on this car--a more prototypical location as Jim is seeking. Anyway, I have been using PBL's really rubber air hoses. I added these to one of the caboose models, and I suppose I could install some on the passenger cars in lieu of the brass castings. Be sure to touch the ends of the rubber with a silver sharpie, though. Mike, I think you also mentioned the height of the car. Studying photos, the C&S cars do sit up high. To my eye, the modified PBL bolster places the top of the truck beam almost even with the top step--just right. Also, the knuckles are the same height as the latest run PBL coaches. I guess tall folks lived along the Platte River and Clear Creek.
Keith Hayes
Leadville in Sn3 |
|
Keith,
I think (not sure) that the 2nd hose was for a separate signal line. The cars (at least the later coaches, not sure about 70) had a neat stove/heater/water reservoir in each corner opposite the restroom. A pipe carrying heated water circulated down each side of the car (next to the floor, all the way into the same side bathroom at the far end of the car) to provide heat for the car. I do not believe the cars were heated with steam. Perhaps the second air hose (signal?) was turned off at the end of the train and the hose hooked up out of the way (can you see which way the angle cock on this hose is turned in the photos??). Does anyone know for sure?? If you don't have a copy, The Quick Pic Book series http://quickpicbooks.homestead.com has a photo essay of coach number 76, with detailed shots of the end beams and interior. The few color photos of the interior show a light oak wood interior, suggesting Mike's "Afrika Mustard" color would likely be close. Be sure to share photos of the truck equalizer bar install!!
Jim Courtney
Poulsbo, WA |
|
In reply to this post by Keith Hayes
Keith,
my air-brake knowledge is only with Diesels and the #4, 6SL and 26L schedules, none of our trains have had signal lines in the manner that you are presenting here. For what it's worth, I've never read of anywhere outer than the West Side Lumber logging line having straight air and automatic air in use on the train, and also when not in use the Air-Hose shall be secured with the dummy coupling provided; this was an instruction in our RuleBook and was to keep dust and dirt out. So what you are seeing is the uncoupled end of the car with the dummies attached, bit difficult in those NGPict pictures to see the coupling between cars and to Locomotives directly showing the air connections. Just how to model something in a static form that is transient in nature I don't know. The #60 was used on the last passenger to Leadville, with a boxcar on the headend, I guess in that case the signal lines were dummied up at the boxcar coupling end and the rear while that train was in motion. Was the #60 even fitted with a signal line on the rear? Number 8 was as good as an example to show here. http://digital.denverlibrary.org/cdm/fullbrowser/collection/p15330coll21/id/3660/rv/singleitem/rec/137 It is noted that the Moguls had the two airlines over the pilot, not so many with the Consol's, and these lines were not always present on Passenger stock. Perhaps that old fashioned bell rope was supplanted by this airline at some ICC Safety Appliances designated time? 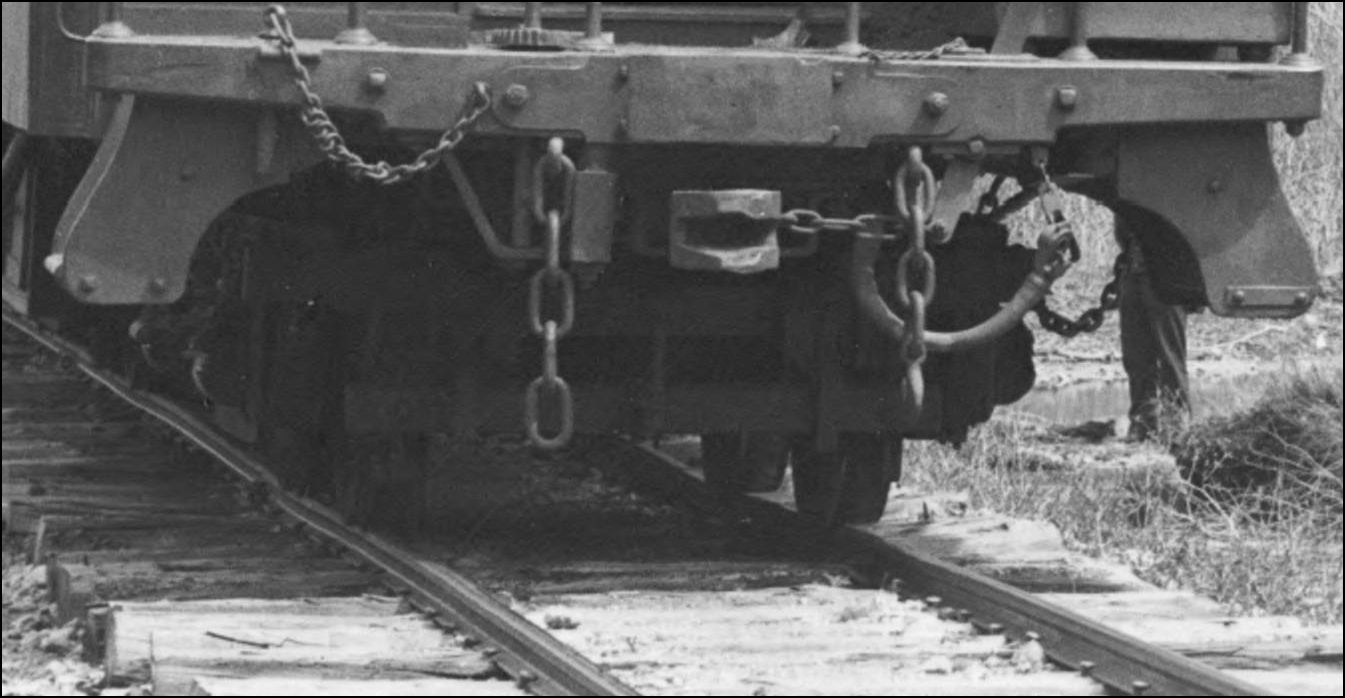 http://digital.denverlibrary.org/cdm/fullbrowser/collection/p15330coll21/id/4619/rv/singleitem/rec/5
UpSideDownC
in New Zealand |
|
Hey Chris,check out the odd looking rail joiner a couple of feet behind the car in the Devils Slide photo.
|
|
In reply to this post by Jim Courtney
D'OH! Of course it is a signal line.
Keith Hayes
Leadville in Sn3 |
|
Here is a photo of the end of 258:
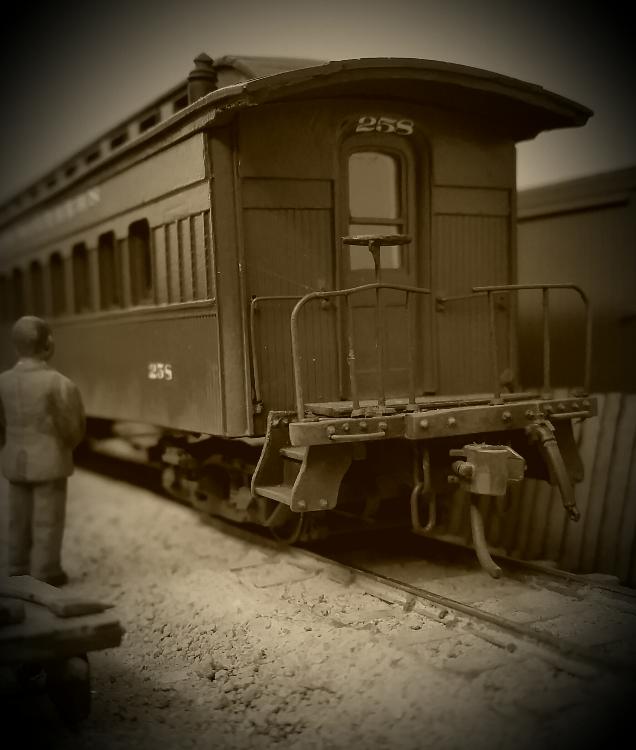 It better shows the safety chains. I see I need to add the coupler lift bars.
Keith Hayes
Leadville in Sn3 |
|
In reply to this post by Robert McFarland
Hey Robert, so just what is odd about the Fisher Railjoint ? 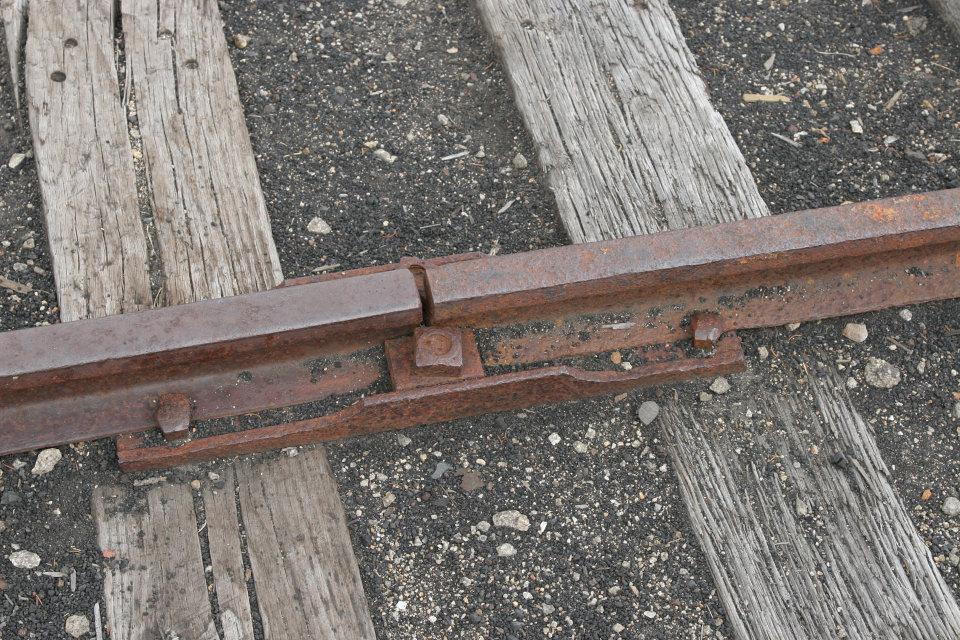
UpSideDownC
in New Zealand |
|
In the color picture its obviously a Fisher joint.The camera angle in the Devil's Slide photo make it look smaller and shorter-I had to take a second look to see that it IS a Fisher joint.
|
|
This post was updated on .
They are all Fisher jointed and square, just to clarify. Note too that the sidechains differ in number of links.
 http://digital.denverlibrary.org/cdm/fullbrowser/collection/p15330coll21/id/3743/rv/singleitem/rec/878
UpSideDownC
in New Zealand |
|
Where are there any Fisher joints in this picture? I have seen one in the group picture taken at the Palisades near the split rock and one in a photo of the East Portal of Alpine Tunnel during the reopening.
|
«
Return to C&Sng Discussion Forum
|
1 view|%1 views
| Free forum by Nabble | Edit this page |

