Modeling Early C&S Refrigerator Cars
1 ...
3456


1 ...
3456
Re: Modeling Early C&S Refrigerator Cars--More Progress on the St. Chrles Car
|
Robert,
That is great news ! You are coming to the rescue at precisely the right time !! Just sent you an email. Konrad |
Re: Modeling Early C&S Refrigerator Cars--More Progress on the St. Chrles Car
|
So now for the next intriguing detail for your consideration - painted roof walk or bare wood?
CM Auditor, who occasionally posts on the Forum, shared Colorado Midland TOC paint practices with us once. He reports that the CM painted the top of the roof walks on house cars the same color as the roofs, but with fine sand added to the paint, for grit--so brakemen's feet didn't slip on the roof walks in wet weather. So I'd go with the same boxcar red as the roof, with O scale sand added! 
Jim Courtney
Poulsbo, WA |
Re: Modeling Early C&S Refrigerator Cars--Construction Finished on the St. Chrles Car
|
Since the last post I have received Bob Stears fantastic new decals for the St. Charles refrigerator cars - Thank You Bob!!! - and finished detailing out the carbody on my St. Charles car (with the exception of a few castings to be added after painting). Here are some images of the finished model:
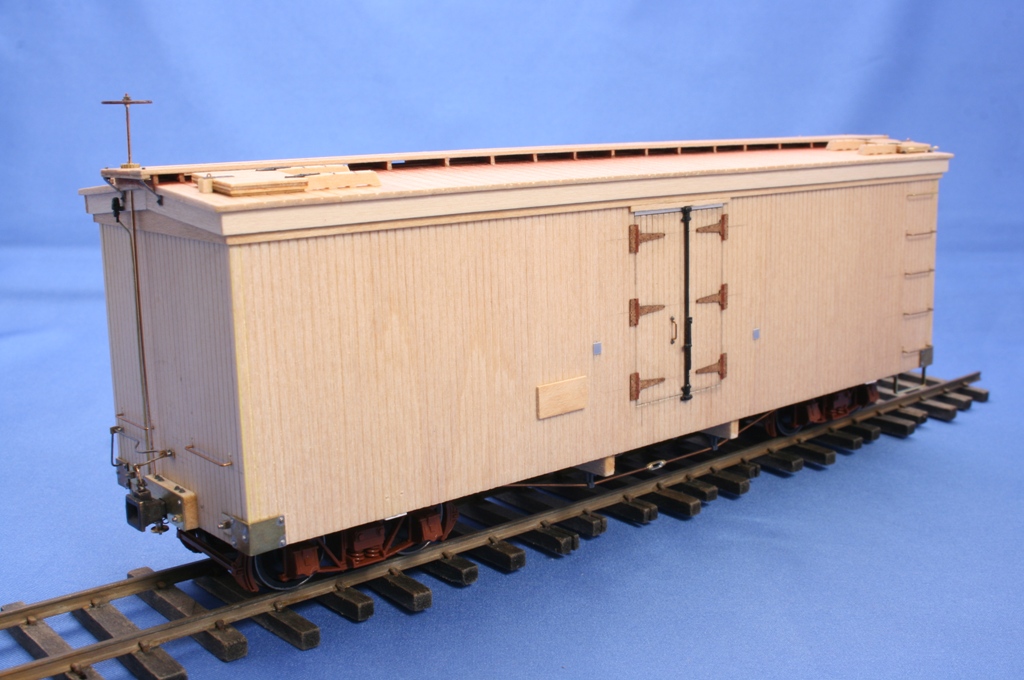 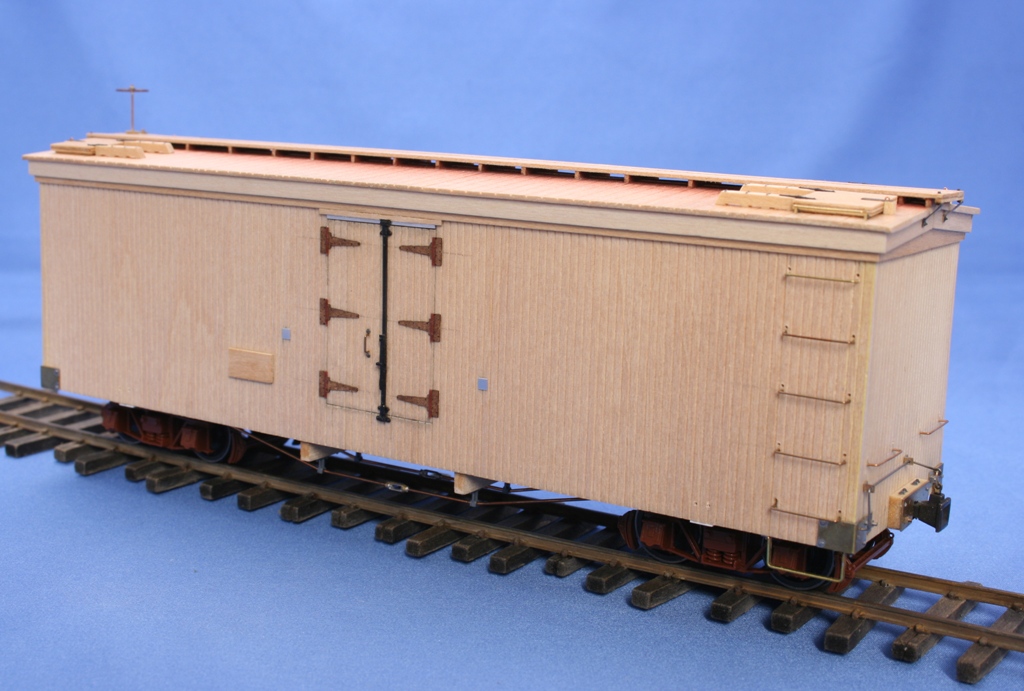 Scratch hand brake gear: 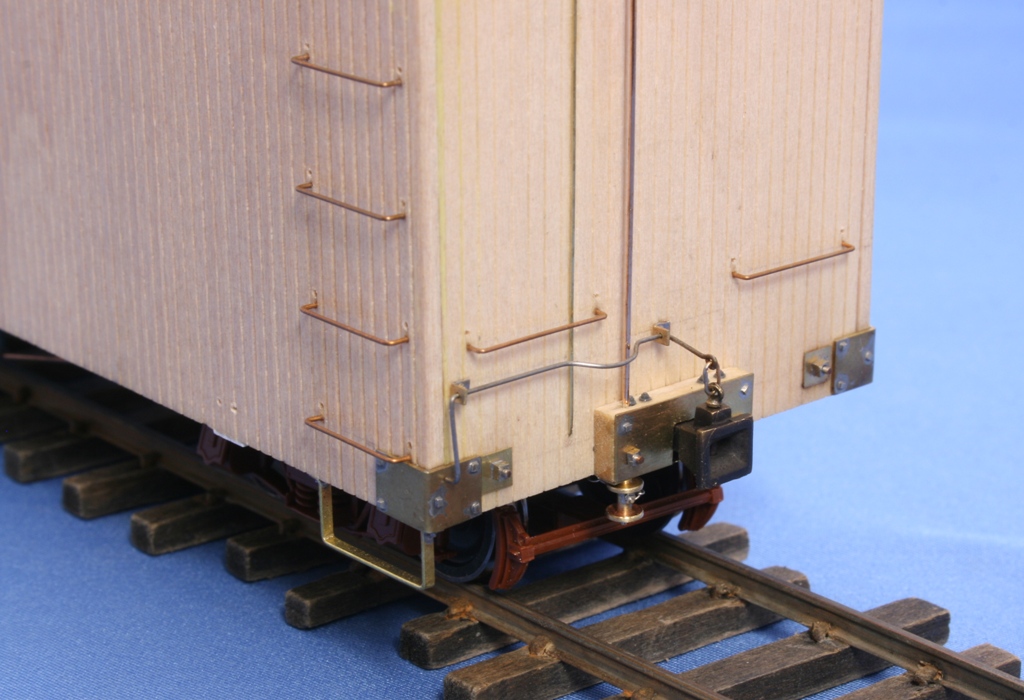 Ice hatch detail" 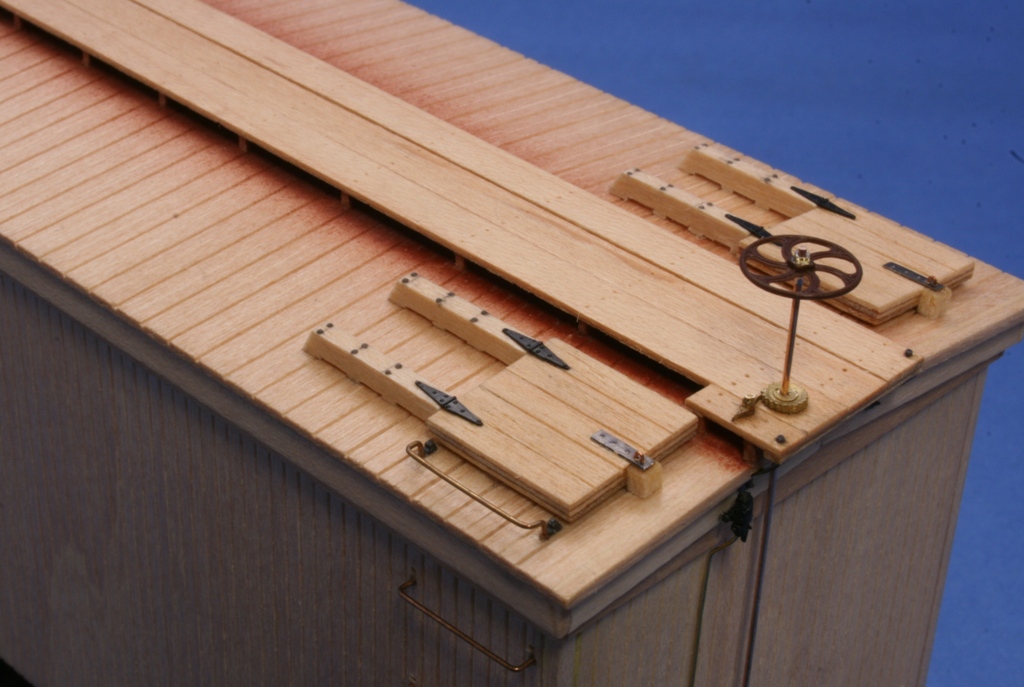 Door detail with laser cut hinges: 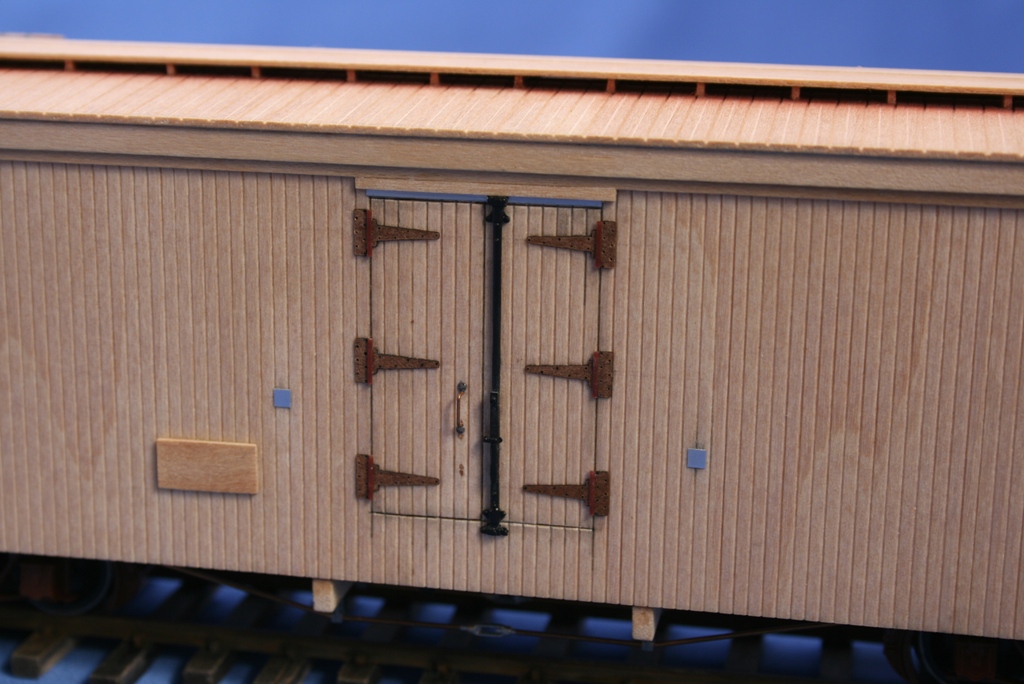 Underbody detail with scratch handbrake bits: 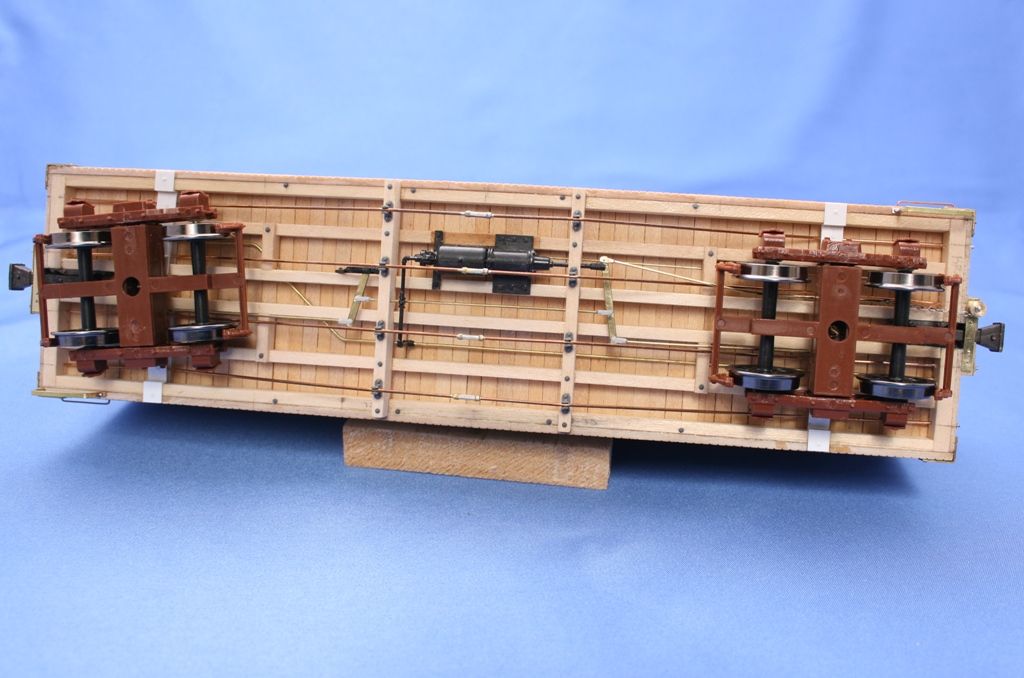 This project took a little longer than I expected, but it came out pretty decent if I say so myself. Hope all find the images interesting - unfortunately Yea Old Huff & Puff has ceased operations, so duplicating this car will require scratch building along the lines of this part of my thread. Not too hard, but harder than a conversion. Now its off to the paint shop for some Canary Yellow and Mineral Brown. Konrad |
Re: Modeling Early C&S Refrigerator Cars--Construction Finished on the St. Chrles Car
|
That's one fine reefer you've got there, Konrad!
Jim Courtney
Poulsbo, WA |
|
In reply to this post by Konrad Schreier
Konrad,
That car is just too good! Paul R. |
Re: Modeling Early C&S Refrigerator Cars--Construction Finished on the St. Chrles Car
|
Thanks guys,
Jim, it has the Sams link and pin couplers you suggested - its looking like the next one will be L&P too. I went with actual Westinghouse brake gear per the folio notation, and the decals Bob Stears was generous enough to share with me have a "Westinghouse air brake equipped" decal - as discussed earlier, the builders photo looks hokey, I wonder if there are any earl images of these cars on the line that might show more extensive decoration. Wonder if the in service cars carried that big "built by the St. Charles Car Co." mark in service as well. Paul, thanks, but you may be right about that. Everything works (it even has bearings added to the trucks), but with scale brake rod clearances, it will not run on tight layout curves, broad tangents required. Looks like I need a bigger house. Konrad |
Re: Modeling Early C&S Refrigerator Cars--Working on Markings for the St. Chrles Car
|
Here is a work in progress shot, showing the completed paintwork with the basic lettering added from Bob Stears decal sheet. I can see that I need to work on removing some of the decal solvent still in some areas. The canary yellow is a mix of Vallejo acrylics, Flat Yellow (70%) and Lemon Yellow (30%).
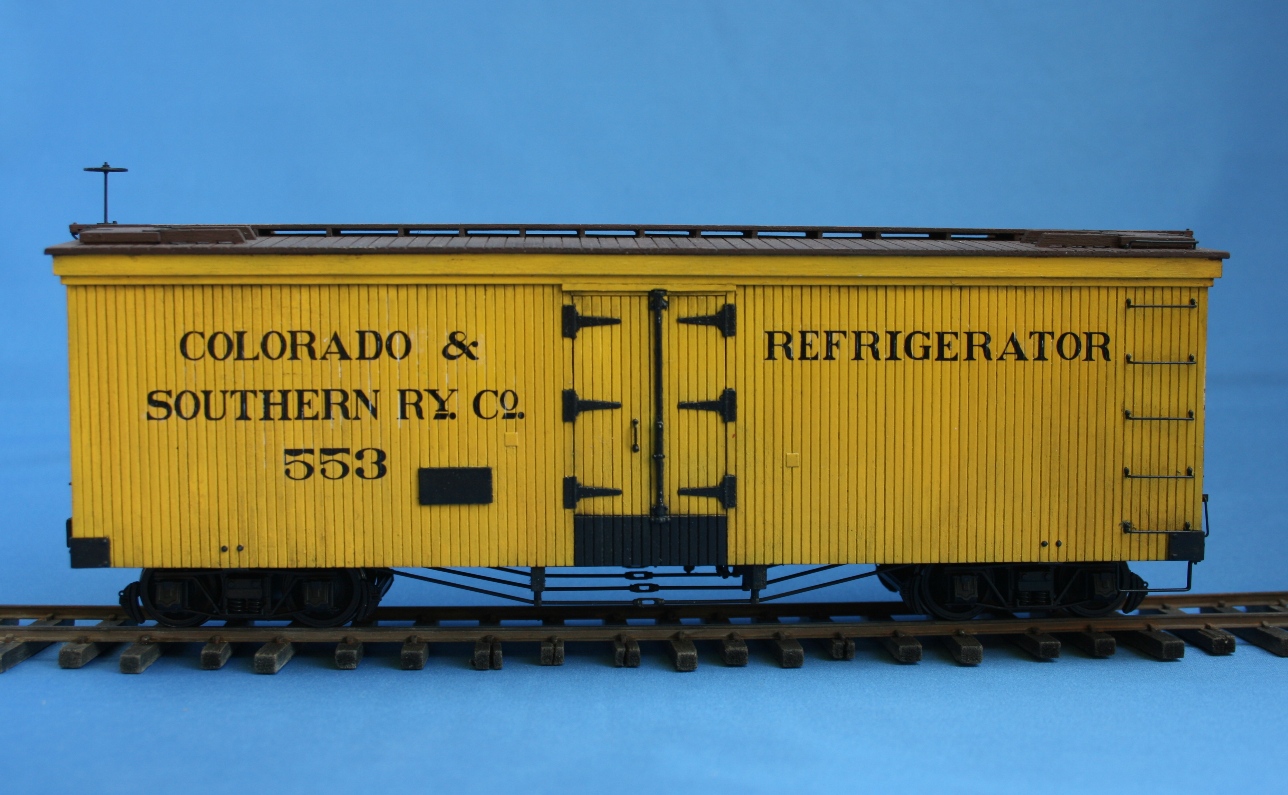 So far so good - but what about stenciling? Bob included a variety of early font stenciling, but I am not sure what to use and where to put it. Since Bob's sheet did not include the builder's makings as they appear in the builder's photo, that decision is made, but what about dimensional data (just length and lt. weight or length, lt. weight and capacity), build date and WABco markings? Any thoughts you all may have on that would be much appreciated. Konrad |
Re: Modeling Early C&S Refrigerator Cars--Working on Markings for the St. Chrles Car
|
Stears has had several articles in Bogies&Loop and NG&SL Gazette with published plans showing how cars like these were lettered.
|
Re: Modeling Early C&S Refrigerator Cars--Working on Markings for the St. Chrles Car
|
Thanks Robert, would you happen to know the issue of the NG&SL they are in (I have most of those going back a ways).
Konrad |
Re: Modeling Early C&S Refrigerator Cars--Working on Markings for the St. Chrles Car
|
Years ago I purchased Derrell P's reefer models from caboose hobbies in Denver. These are the two reefers that were featured in the NG&SL Gazette.
Attached is a photograph of Derrell's model showing how Derrell did the lettering. Since no good photographs are available of the reefer in service I think Derrell's choices of what and were to place the reporting markings follows C&S practice of the time and seems believable. I hope this helps you complete your beautiful model. Regards, Bob IMG_0120.JPGIMG_0120.JPGIMG_0122.JPGIMG_0123.JPG |
Re: Modeling Early C&S Refrigerator Cars-- the St. Charles Car is Finally Complete
|
This post was updated on .
Thanks Bob, very helpful.
Looking at those images and the marking diagrams used for the rebuilt 27 footer, I came up with a set of plausible markings for my St. Charles 30 foot car. Here are the final images of this one, showing the completed markings and weathering. An interesting revelation for the color aspects of this thread was the effect of the 'coal soot' wash of charcoal grey I applied over the finish before adding the decals (I put the wash on before decaling to avoid ghost lines at the edges of the decals) . It darkened the brightness of the canary yellow a bit as would be expected , but even more interestingly causes the color to shift markedly darker on the side of the car 'in shade' than before the black wash. The lower edges of the car and running gear are weathered with Tamiya Earth and a bit of Vallejo Smoke for the oil stains on the journal boxes and wheels. 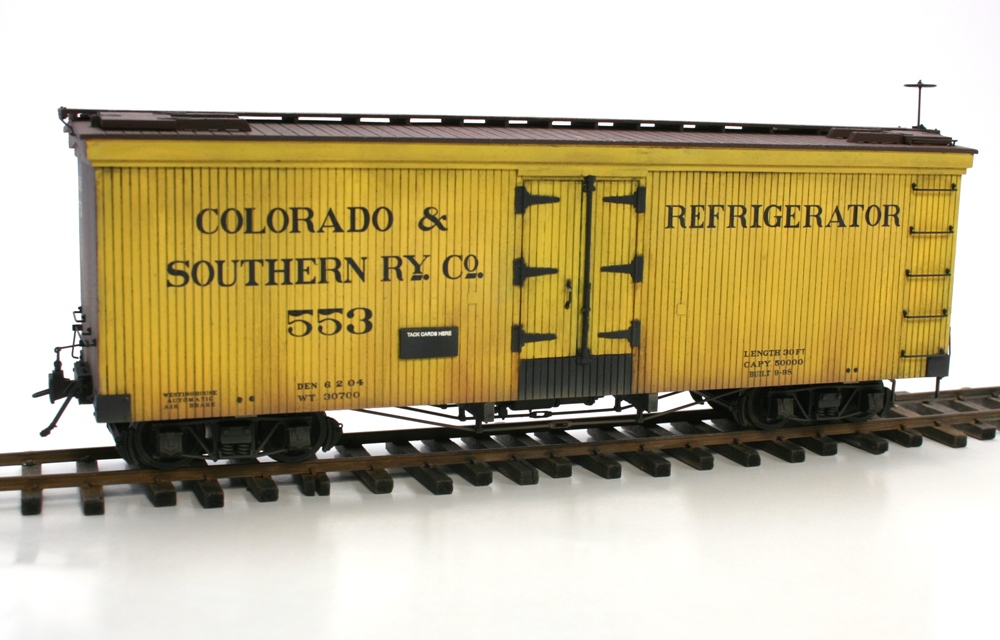 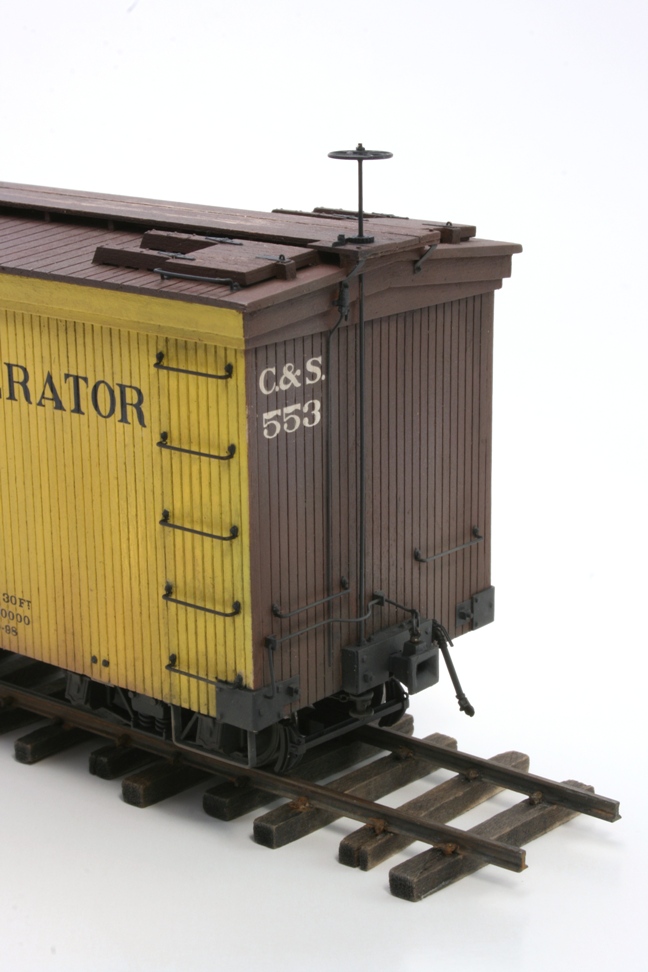 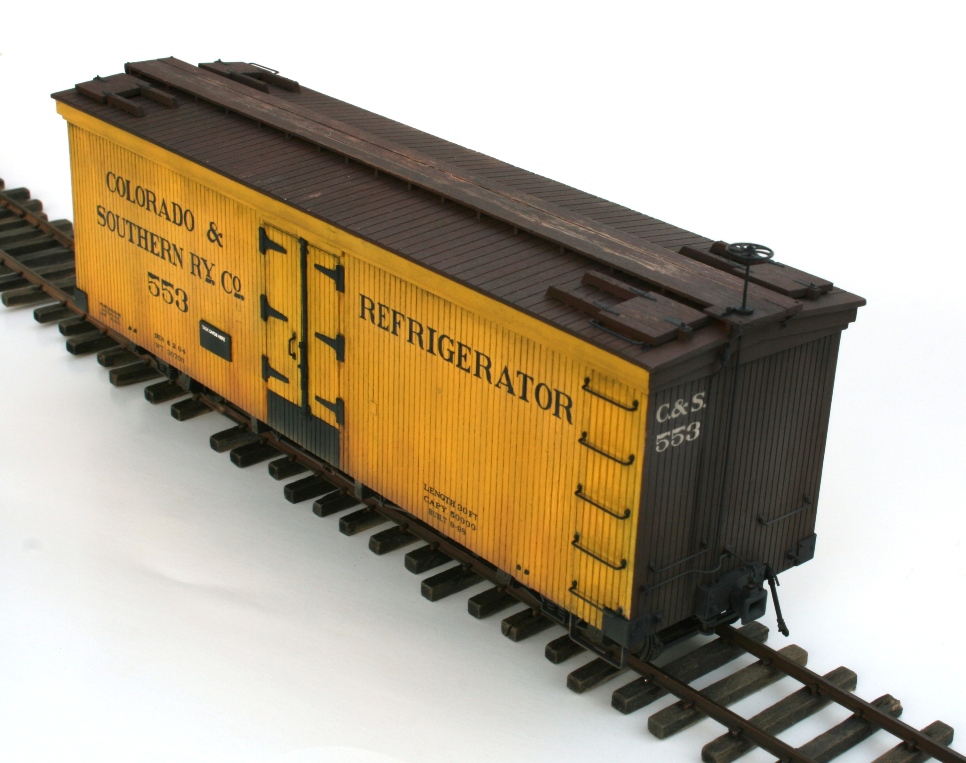 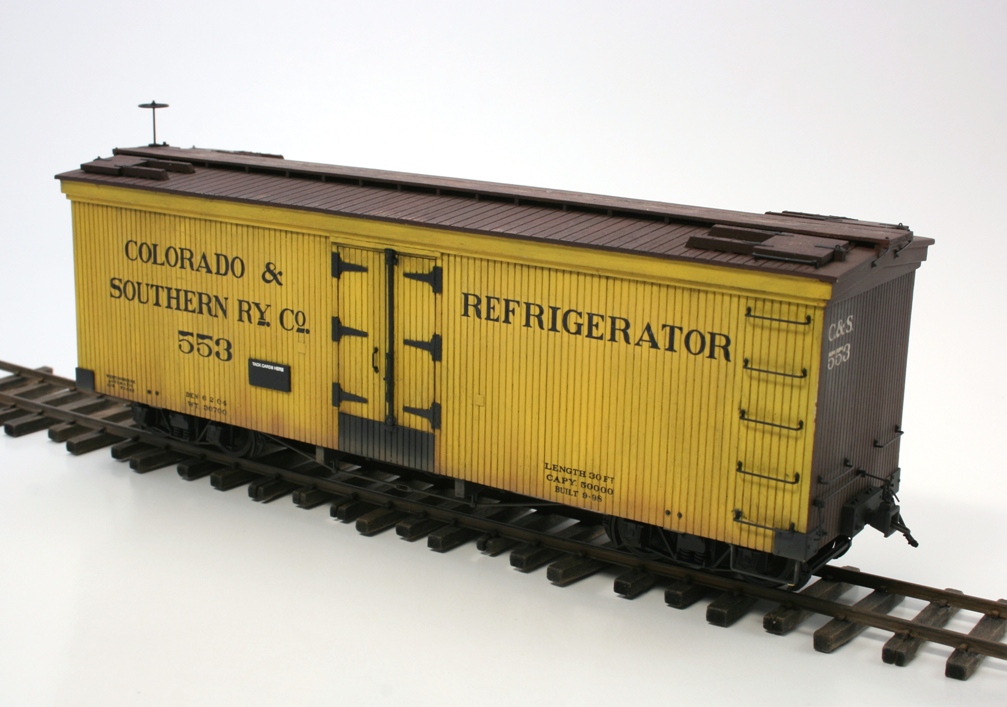 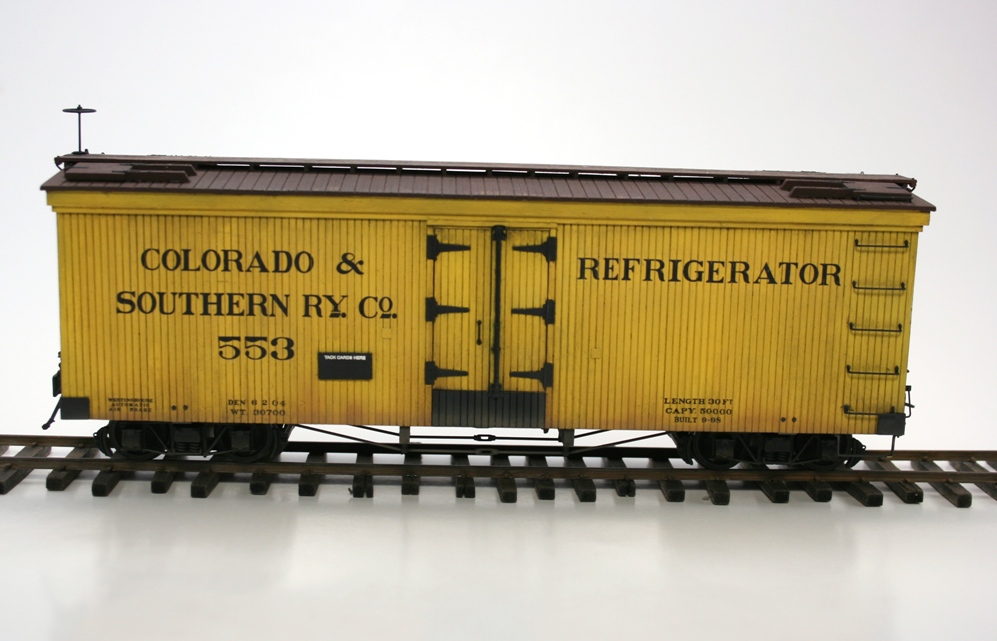 And for those wondering how the St. Charles car looks coupled to the rebuilt 27 footer, here are a couple of shots of that. 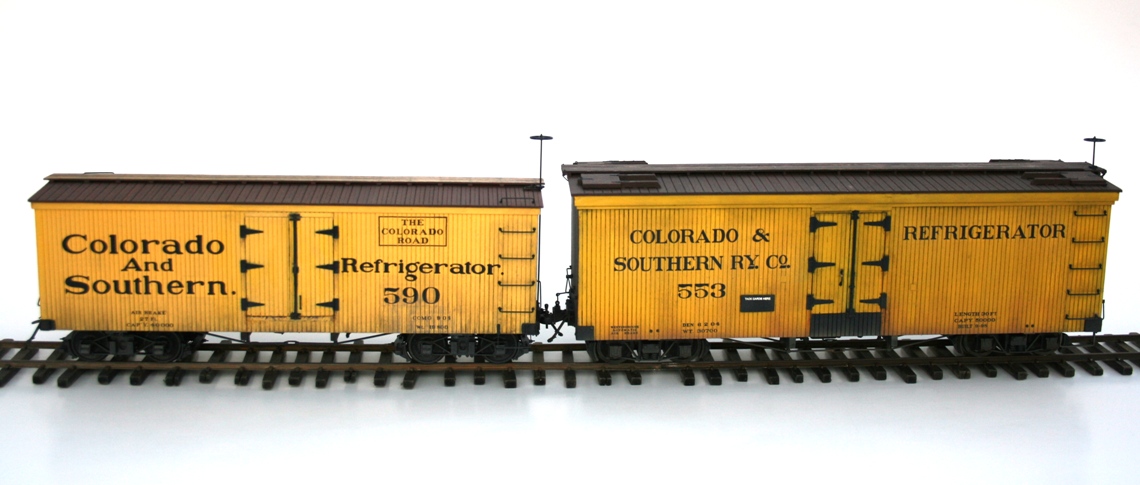 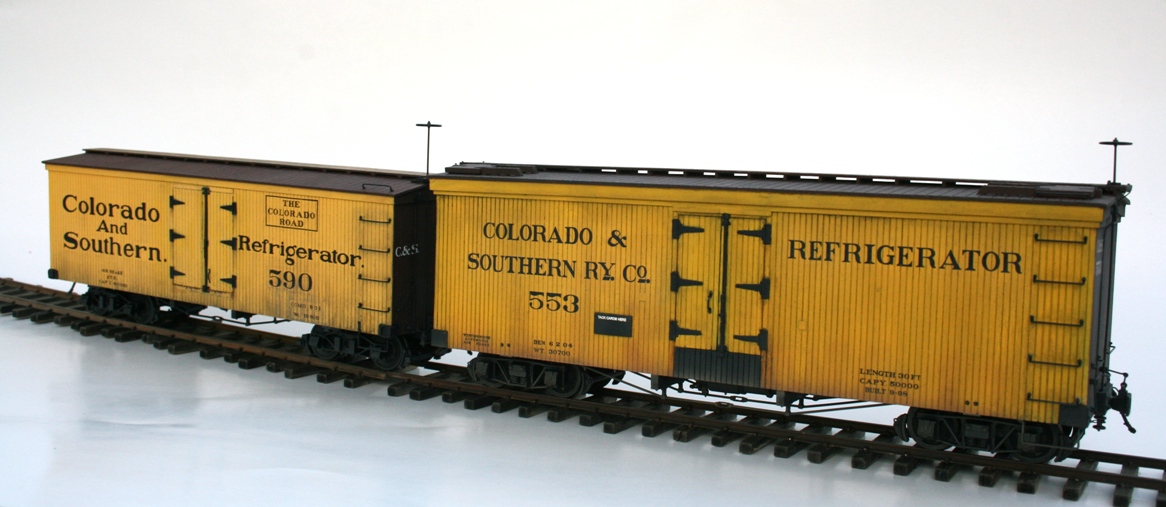 Well that closes out this chapter. On to another early car, though I have been collecting parts for several, so what gets finished first will be a mystery for a little bit. Thanks for looking in and following along with this project. Konrad |
Re: Modeling Early C&S Refrigerator Cars-- the St. Charles Car is Finally Complete
|
Konrad,
I've been following your work with great admiration. This car turned out wonderfully, thanks for sharing the process! John
John Greenly
Lansing, NY |
Re: Modeling Early C&S Refrigerator Cars-- the St. Charles Car is Finally Complete
|
In reply to this post by Konrad Schreier
Konrad,
Thank you for sharing your model work. Your research, techniques and the resulting accurate finished models are most impressive and inspirational. I will refer back to your posts as I build my own models. I also appreciate the comparison of the St. Charles car and the 27' car. Again, thank you and best wishes. Lee Gustafson |
Re: Modeling Early C&S Refrigerator Cars-- the St. Charles Car is Finally Complete
|
This post was updated on .
Thanks guys, glad you like the car - BTW, I decided to re-shoot a few of the images, I didn't like the first two car comparative image. I have added the new images in the earlier post, replacing a couple with new ones.
Interestingly the second set of images were shot late in the day in natural light, and color corrected using a white balance photo editor - the corrections really added to the intensity of the yellow color as compared to the the first set. The first set, shot in artificial light and color corrected, look closer to the actual color of the car. This shows how yellow can change hue based on the lighting (pinkish late day sun) and photographic settings used. Konrad |
Re: Modeling Early C&S Refrigerator Cars-- the St. Charles Car is Finally Complete
|
I am inspired by these, Konrad.
So much so that I might have to build some O-scale models just to display on a shelf..... Cheers, Jeff. |
Re: Modeling Early C&S Refrigerator Cars
|
In reply to this post by Konrad Schreier
Well after a bit of a yearend hiatus, I am pleased to announce the next chapter in this topic. Robert Stears was kind enough to supply me with a couple prototype examples of his laser cut DSP&P / UPD&G Tiffany Refrigerator carbody kits, one assembled test shot (cut) and another as unassembled parts.
A huge thank you to Bob for those, they will move this project along quite a bit. 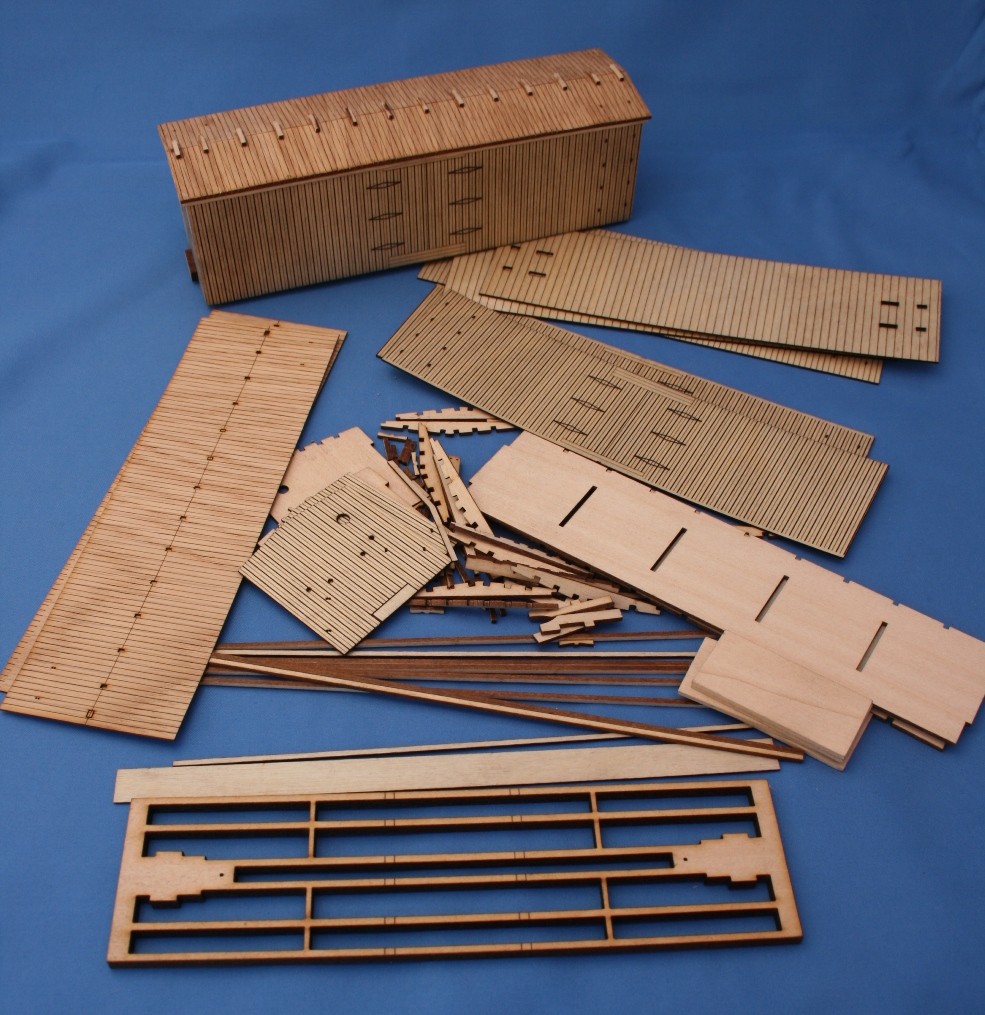 As you can see, the Stears carbody design is a very straightforward design, making basic construction much less work than the first two project cars that were built from classic Mainline Models designs. This should allow for a couple of more completed cars in this series in a lot less time than the first two took. Of course, these are carbody kits, so a number of additions are needed to complete them. Bob was kind enough to send along a set of Coronado door hardware, and the rest was purchased directly from Coronado. 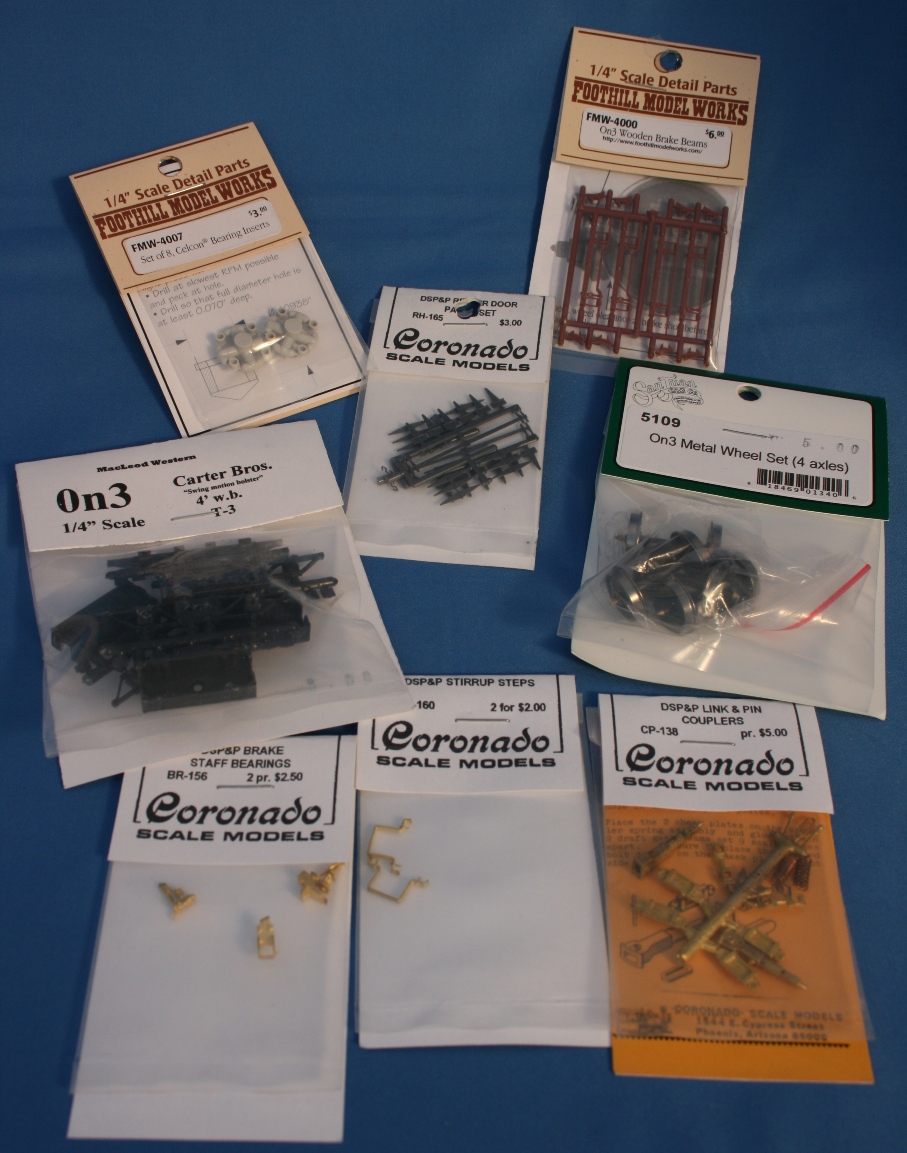 Still needed are the corner irons, nbw's, truss rod chairs, brake gear, bolster parts and assorted other bits. I may have some of those lurking in the stash, so I will have to go out and rummage around. In terms of decoration, the choice of a White, as built DSP&P car and a second UPD&G car repainted in the much discussed "UP Refer Green" seem obvious, but comments welcome. As far as brake gear, my research suggests that these cars appeared with vacuum brakes but got Westinghouse patent air brakes within in a year or so. I am sure many know more about that than I so further insight would be much appreciated. That's all for now, its time to see if I can make some early DSP&P trucks out of those Carter parts. Konrad |
Re: Modeling Early C&S Refrigerator Cars
|
The elliptical end NBW castings are available in O Scale from Foothill Model Works as part #N-26.
I was going to use some etched brass corner irons for these 26 ft. reefers until took a closer look at the wreck photos of the car end. As you can see in the attached zoomed image form the famous wreck photographs, the corner irons for these reefers are actually pretty interesting (see attached image). I am working on designing the corner iron master for high resolution 3D printing and casting. 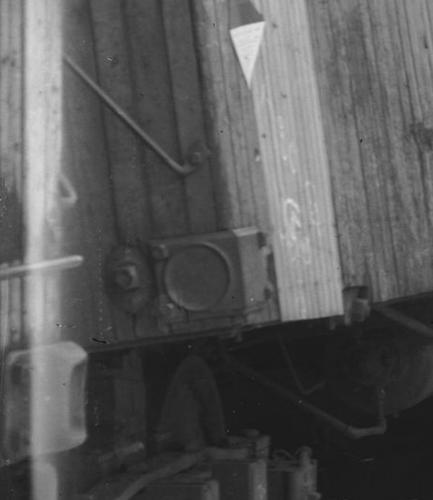 |
Re: Modeling Early C&S Refrigerator Cars
|
<quote author="Robert Stears">
I was going to use some etched brass corner irons for these 26 ft. reefers until took a closer look at the wreck photos of the car end. As you can see in the attached zoomed image form the famous wreck photographs, the corner irons for these reefers are actually pretty interesting (see attached image). I am working on designing the corner iron master for high resolution 3D printing and casting. Thanks for the info on the NBWs - you are right, the corner irons are surprisingly complex. Fabricating them would be possible - I made up a set for the St. Charles car - but these are a lot more complicated. Seems using a couple layers of brass sheet soldered together to get the filleted edge and a ring of brass soldered on for the pocket, with square bits for nuts sweated on last might work but would be tricky. Your CAD design sounds like a better idea. Konrad |
RE: Modeling Early C&S Refrigerator Cars--L&P vs Knuckle Couplers
|
In reply to this post by Jim Courtney
If the C&S car was interchanged to the Rio Grande in theory it would be possible for the car to cross over into New Mexico, thus interstate. Probably not very likely but not impossible I guess.
Best, Todd |
«
Return to C&Sng Discussion Forum
|
1 view|%1 views
| Free forum by Nabble | Edit this page |

