Jefferson water tank
123


123
Re: Jefferson water tank Rick's Reply (2)
|
Check the Selley castings now owned by Bowser. Bill Uffelman
|
Re: Jefferson water tank Rick's Reply (2)
|
Thanks, Bill, I had never heard of Selley. Sadly they're no more (it appears Bowser pulled the plug on them in 2009), although I did find their last catalog archived here:
http://www.modelrailroader.net/pdf/selleycastings_ho.pdf |
Re: Jefferson water tank Rick's Reply (2)
|
Could Weisman have them?
|
Re: Jefferson water tank Rick's Reply (2)
|
No, nothing that quite fits from Wiseman.
|
Re: Jefferson water tank Rick's Reply (2)
|
Jeff
Did you check Wiseman's O scale parts or what about SS Ltd John |
|
In reply to this post by Jeff Young
Jeff,
Just drill the fish out of those guys? ;o) http://modeltechstudios.com/hoscalefishbucketpileswithfishinbucketspreaged-1.aspx (Heavy Duty) tin foil dragged over a shape to get the corrugations and then a lot of patience when assembling it? By the way, I'm currently working on the same tank kit and try to turn it into something like Como's old tank. http://c-sng-discussion-forum.41377.n7.nabble.com/Como-water-tanks-td7549.html#a7553 Your work for sure sets a standard, I especially like your weathered legs. Did you work them with a wire brush or steel wool? Alex |
Re: Jefferson water tank Rick's Reply (2)
|
Should be easy to do with 3D printing...
Sent from my iPhone
|
Re: Jefferson water tank Rick's Reply (2)
|
Hi John,
SS Ltd (and B.E.S.T.) are my normal go-to sources for this sort of stuff, so I definitely checked them. I had thought about an O-scale gold panning pan, but the sides are too shallow. Hi Alex, I was thinking about the tin-foil (or brass shim stock). It's the patience part I worry about. ;) The legs of the water tank got a bit of a go-over with a wire brush and then Micromark's Bridge and Tie Stain. One other recommendation: when you're etching the tank bands, hold them up in the air with tweezers till they "go off" (you'll know when; it's not subtle). I laid them on paper towels which wicked a bit of the etchant away before they went off and might have been responsible for the edges not getting etched as much. Hi Todd, 3D printing will indeed be my fallback. My daughter knows SketchUp (although she hates it -- says Revit is far better), so I just need to wait till she's home for Thanksgiving.... Cheers, Jeff. |
Re: Jefferson water tank -- galvanized wash tubs
|
Too bad you don't model in S scale, I could mail you a couple.
The only HO scale galvanized wash tub I've found comes with this figure set: https://www.sceneryexpress.com/HO-HILLBILLY-JUG-BAND/productinfo/WD1902/ . . . you'd have to amputate the human. You might try Model Tech Studios, they have lots of detail parts, maybe I overlooked a wash tub. http://modeltechstudios.com/hoscaledetailaccessories.aspx Their skunks in the garbage cans might look good behind the houses in Jefferson . . .
Jim Courtney
Poulsbo, WA |
Re: Jefferson water tank -- galvanized wash tubs
|
Hi Jim,
Yeah, I also found a Prieser figure putting out washing standing on a tub. My fear, though, is that they're not hollow. I've been talking to Brian at B.E.S.T. and the plan is to get my daughter to help me make a couple of shapeways masters in brass and then Brian is going to get a mold made and cast some up for me. I'll let you guys know how it goes.... Cheers, Jeff. |
Re: Jefferson water tank -- galvanized wash tubs
|
... dang, though, I'm going to have to start modelling the ET&WNC just so I can get a hillbilly bluegrass band....
|
|
In our "divine scale" of HOn3 Durango Press used to have them but they were cast very shallow.
Looked great hanging on the side of an out fit car or laying upside down but not great for what you want unless you drill them out. The guys in WA that bought PSC carry a lot of Selly items, Don't know if they carry the entire line. JPrantle on ebay or call PSC. Jeff, Shoot me an email, I might have something that would work for you. tonyk375@ aol.com tonyk375 at aol dot com |
Re: Jefferson water tank -- galvanized wash tubs
|
I always thought that one of the issues with the Selley parts was that they were over sized for HO scale and some claimed closer to S scale, which is about a third larger...
Sent from my iPhone
|
Re: Jefferson water tank -- galvanized wash tubs
|
This post was updated on .
In reply to this post by Jeff Young
Hi Jeff,
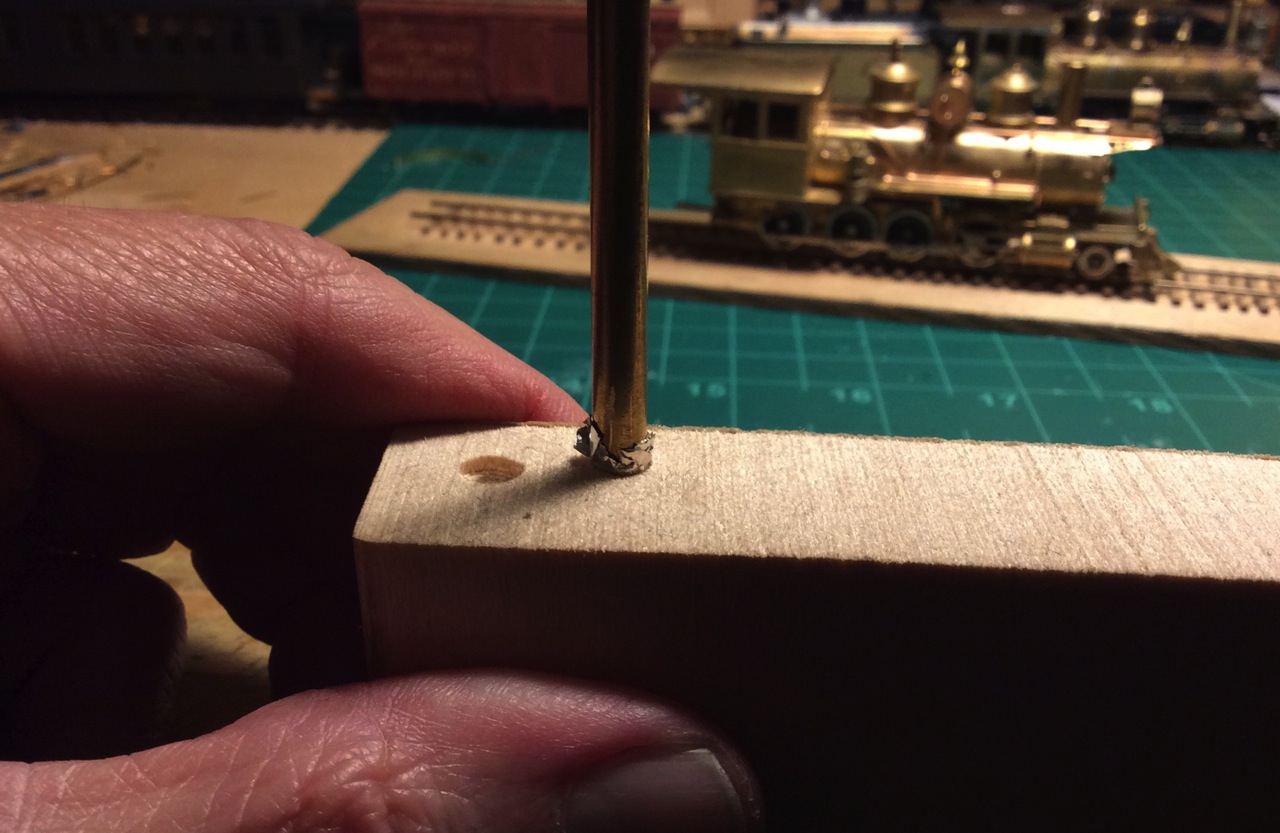
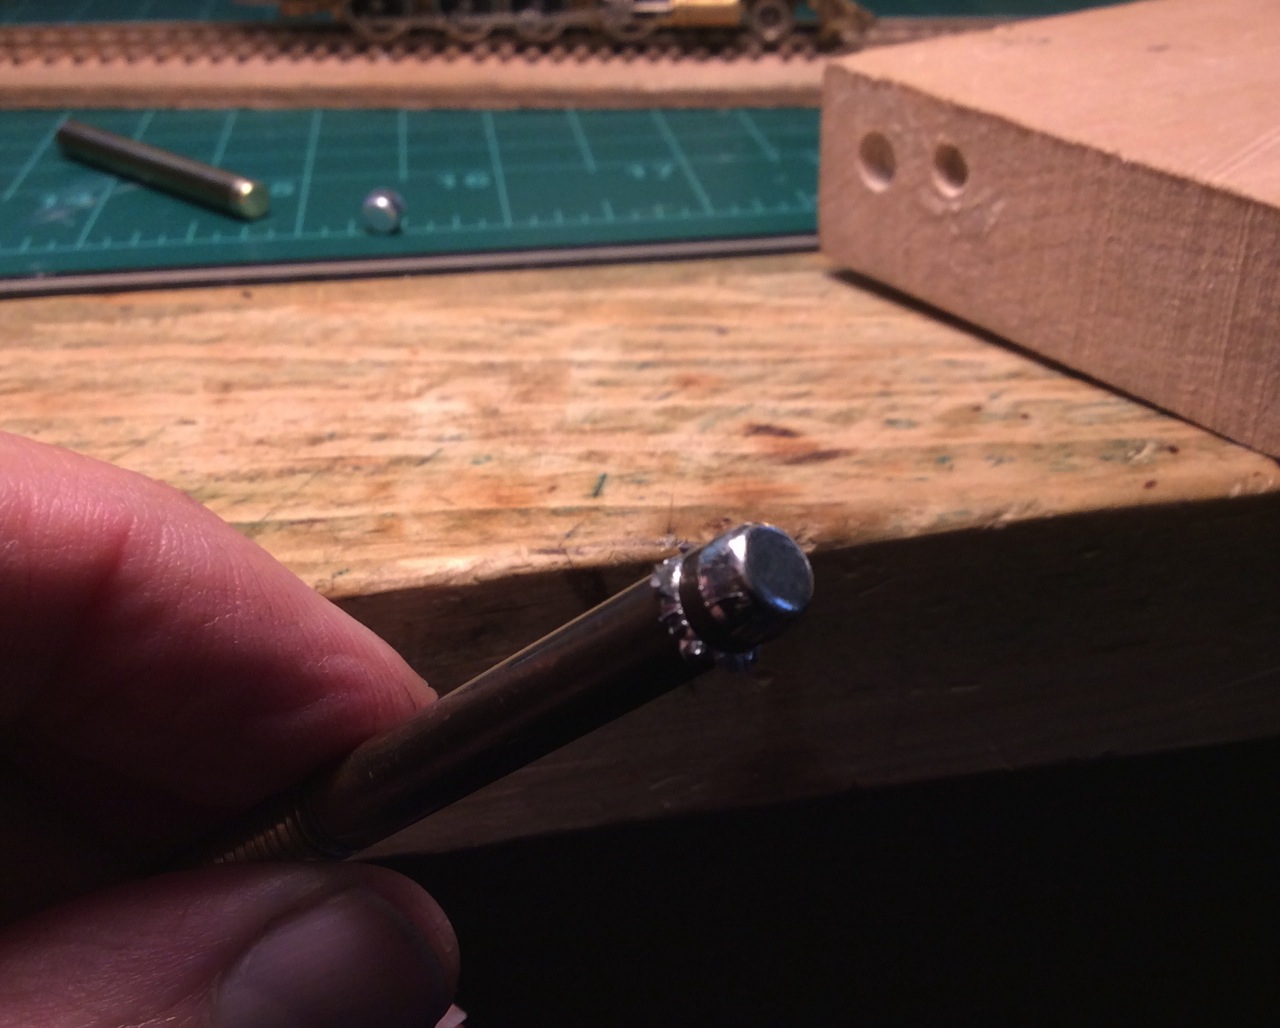
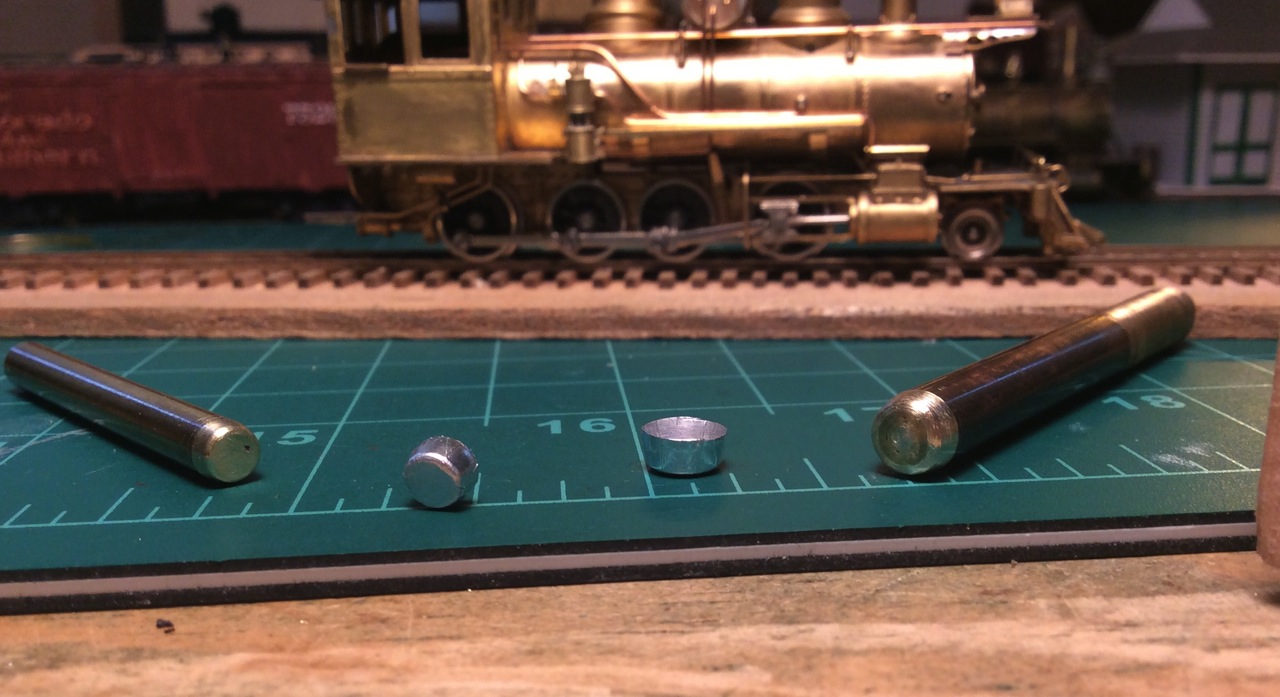
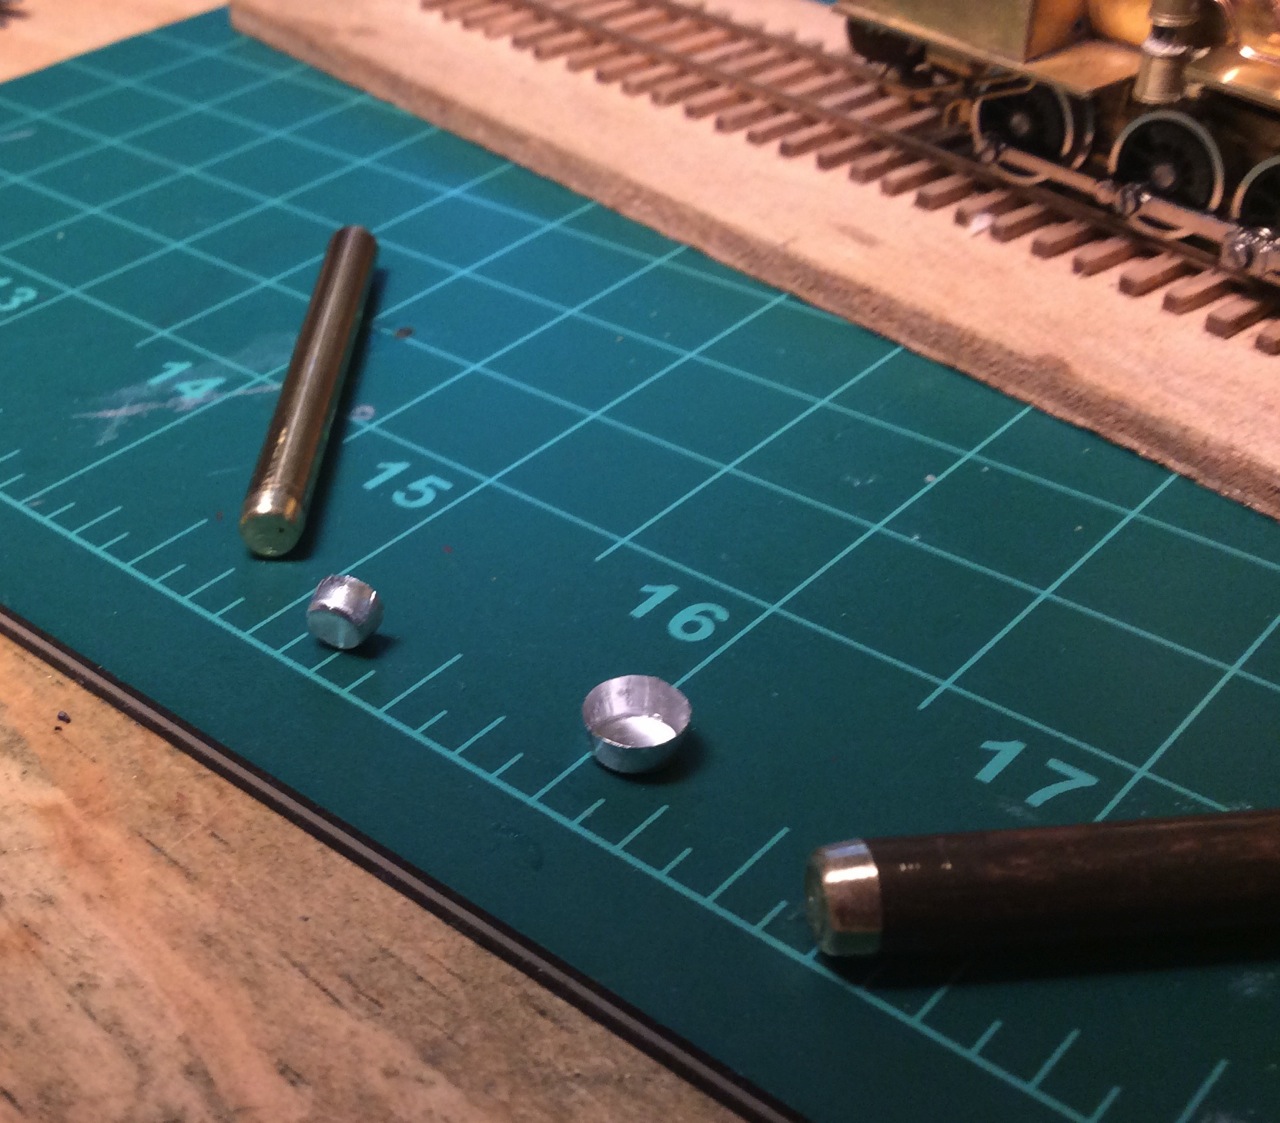
here's one way to make fairly decent washtubs, buckets, and suchlike shapes. Make a punch and die. First chuck a brass rod in a drill and file the shape you want while it rotates. A lathe would be great, of course, but this is quick and works fine. Drill a hole slightly smaller in diameter than the punch, in the end grain, not side grain, of a piece of wood. I used a piece of basswood, but pine or other close-grained softwood would be fine too. I drilled 1/64th inch smaller than the punch. Tap the punch into the hole with a hammer to form the hole to the shape of the punch. it's not necessary to totally flatten out the bottom of the hole, but you want to get the side and the bottom corner of the hole nice and smooth and conforming to the punch. Put a piece of aluminum foil over the hole and push it in with the punch. Just push it in very firmly, hammering is not helpful. When you pull the punch out, the foil will come with it as long as you haven't made the punch too smoothly polished. Cut off the upper edge of the tub with a sharp blade before you take it off the rod. Here are a couple of pics to illustrate. 
  As you can see I tried out two sizes, one on 3/16" rod and the other on 1/4" rod. They have wrinkles in their sides of course, but the bigger one is better because for the same height side it's compressed less. You can smooth down the wrinkles a bit more with the back of your fingernail, after you take it out of the hole but while it's still on the punch. The first photo is of the first, smaller one I made, and it's messier than the larger one, for which I used a neater, roughly circular piece of foil not much bigger than the final shape. The second photo is of that one with the excess cut off and ready to come off the punch. These are delicate, you can't pick them up with fingers. Just slide something flat underneath one to pick it up and move it! I wonder whether heavy-duty aluminum oven foil would work better or worse, I don't have any handy to try. It would certainly be a bit less delicate. This is quicker to do than to explain, and you can make lots of them. If the wood gets compressed too much and loosens up, put a drop of water in the hole and it'll expand back, then re-tap the punch in to form it up again. Cheers, John Jeff, I'd very happily just send you a couple of tubs, but I don't know how I could pack them to survive the journey! John 
John Greenly
Lansing, NY |
Re: Jefferson water tank -- galvanized wash tubs
|
John, what about the foil on a wine bottle? Is that too thick?
Keith Hayes
Leadville in Sn3 |
Re: Jefferson water tank -- galvanized wash tubs
|
Hi Keith,
yes, I had the same thought, wine bottle seal foil was the first thing I tried. I couldn't make it work. If I made the die and punch a nice close fit so that the sides would get formed well, the bottom got punched out- the metal wasn't strong enough. And if I made the fit looser to cure that problem, then the sides developed bad folds that wouldn't flatten out and made big lumps. So that soft metal, whatever it is, doesn't seem to work well with a simple punch and die for a shape this deeply dished. Possibly if one made a series of punch-die sets to do the forming progressively in several stages it could work, but that seems awfully complicated. I bet spinning would be a great way to do it. I've never done metal spinning, but it would be interesting to try sometime. John
John Greenly
Lansing, NY |
Re: Jefferson water tank -- galvanized wash tubs
|
Possibly paper or card stock could be used as it could be softened with some water or better isopropyl alcohol.
As to the shipping John, I think just drill some slightly larger holes in a piece of wood or styrofoam and pack in a padded envelope...
Sent from my iPhone
|
Re: Jefferson water tank -- galvanized wash tubs
|
Those came out nice -- I would have thought there would be more of an issue with the overlaps on the sides.
I'm definitely going to have to try this out.... Cheers, Jeff. |
Re: Jefferson water tank -- galvanized wash tubs
|
I need to make a cattle trough thing. I might try out the wash basin idea.
|
«
Return to C&Sng Discussion Forum
|
1 view|%1 views
| Free forum by Nabble | Edit this page |


