Dickey Doin's

Previous Topic Next Topic
 
classic Classic list List threaded Threaded
12 messages Options
Reply | Threaded
Open this post in threaded view
|

Dickey Doin's

Mike Trent
Administrator
Greetings to all, hope you are doing well.

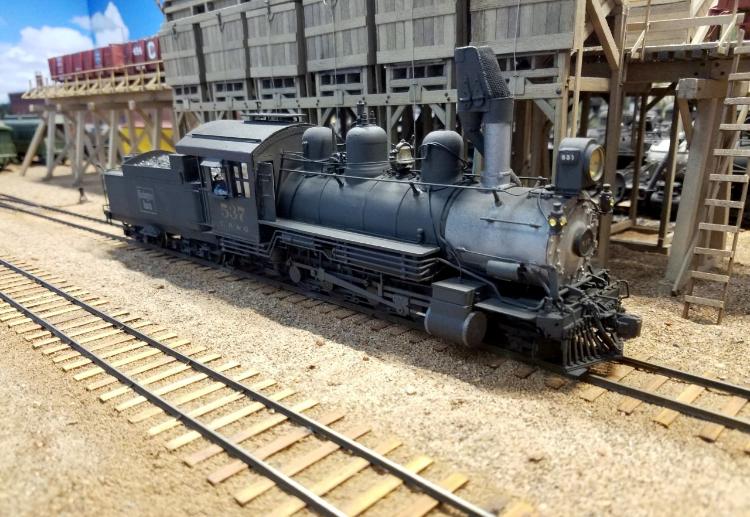
As crazy as it may sound, the last few months have been extremely work-busy for me, with virtually no time left for model building. But I have managed to be able to continue operations on my 10X7 diorama/layout. Even with a small operation like mine, daily, or rather 6 "times a week" service takes a toll on things. Like, for instance, the little machines we call locomotives. On 5/31, #537 went down with what could only have been a broken wire from the drawbar to the tender where it was hardwired, to the motor itself. It took until yesterday to find time and opportunity to lift the boiler to confirm the problem, and repair it. Given the fact that this engine was built 36 years ago in 1984, I certainly can't complain that the movement from the hardwired drawbar connection to the motor finally caused the wire at the solder joint to give up the ghost. So, another opportunity to lubricate all the vital parts and give everything a look to see if any other bears in the woods might be lurking. Now, the old girl is now back on the active roster. A shakedown run to Dickey today, and she'll be back again on the Eastbound Extra tomorrow. A photo below, of the rejuvenated and dusted #537 at the Coal Dock. Excuse the crooked looking cinder catcher, that's a flaw in the lens of my camera. It does the same thing with the McConnell stack on #7.

I'd like also to take a couple of minutes to again encourage all of you to keep chipping away at the stone in this hobby, not only to occupy your time in it's various facets for today, but also for the future, which awaits. I can't tell you enough how great it is to sit here in my allocated part of our home with the closest thing I'll ever have to a completed layout over my shoulder. Structures, rolling stock, locomotives, dreams and imagination of over 40 years have led to this, and the pleasure and satisfaction it provides me with every day.  Things learned, things discovered, things forgotten. I no longer have a vast empty basement like the one I had 40 years ago in Dickey's first incarnation, but that doesn't matter to me at all. It's a very patient mistress, and  

So, stick with it. Do that little something every day, even if it's five minutes just thinking about how you might be able to fabricate a pipe connection or a chain roller or what color to paint the interior of a coach, everything, every little thing, matters in the end, and there is no such thing as failure. There will be a time later you will appreciate everything you've done, and all the great relationships you've had over the years.

By the way, does anyone know Donald Rose, whose large scale #537 was featured in the Gazette a couple months ago? What a great model.  


Reply | Threaded
Open this post in threaded view
|

Re: Dickey Doin's

pizlinard72
Thank you Mike for your thoughts. I could not agree more. I am grateful to have these moments everyday that take me away from day to day tasks. Model railroading is so different from what I do for a living, it is like a mini vacation. Promise: I will keep „chipping away“ at it every day. I do see the shape already forming.
Take care
Christian
Reply | Threaded
Open this post in threaded view
|

Re: Dickey Doin's

Tim Schreiner
Looks amazing as always!
Reply | Threaded
Open this post in threaded view
|

Re: Dickey Doin's

Will Cheshire
In reply to this post by Mike Trent
Mike I would like to thank you for your very encouraging narrative.  Although I have been retired now for 7 years and have been able to allocate most of my time to “model railroading” the past 6 months have created a very unique opportunity.  

If we want to get anything done we must just do it.  I call to mind a quote from Churchill:  "While waiting to do everything, start by doing something".  There is another word of advise that a business associate said about 25 years ago:  "Be happy with what you have and not unhappy with what you do not have".  You have made your available space work and you have used the space wisely.

I have been able to put the past six mouths to the fullest.  In January I had a total hip replacement and the doctor told me I could not sit at my work table for at lest 1 months.  So I placed a 16" X 16" X 16" cardboard box on top of my work table and did modeling work standing up for a month.   During that time frame I was able to assemble about 250 aspen trees.  The picture below is just a few of these trees.


 The next picture is 9 fir trees mounted on a sheet of Styrofoam base in preparation for shipping.


Also during this time I tried my hand a making a crippled ponderosa pine that had been hit by lighting.


When the forest quits growing my plan is to finish my "O" scale Rico Depot.


Mike, when you can find the time please send more pictures of your amazing work.

Will Cheshire


Reply | Threaded
Open this post in threaded view
|

Re: Dickey Doin's

Don Gustavson II
Great looking trees Will!
What are the aspen trees made from ?
HOn3 is the path I have chosen.
The Nearly Historical Railroad.
http://www.nhrailroad.com/
Reply | Threaded
Open this post in threaded view
|

Re: Dickey Doin's

Will Cheshire
Don thanks for asking about the aspen trees.   The aspen trees are made limb by limb using preserved Scenic Express "SuperTree" clipping for the limbs and preserved Rabbit Brush for the trunks and the leaves are Scenic Express "Super Leaf" aspen yellow.  The picture of the aspens that I posted last night is actually not a very  good picture of the trees I made so I am posting some different pictures.

The three smaller trees on the left are actually very small  "SuperTree" pieces super glued to the top of panel nail as a mounting pin.  Each box of "SuperTree" material has a lots of these little small trees that are so small that individual limb clipping are not usable.  The three taller trees on the right are made with individual limb clipping attached to a "Rabbit Brush" trunk.


Below is a 12" aspen tree that I made for an Sn3 layout in California.


The picture below is a very small section of a tree showing the detail that is possible using "Rabbit Brush".


If you are interested I can post to this site or email you the complete instructions on how I assembly my aspen trees.  It will take me about a day to write the narrative.  Also I do sell these trees.

Will
Reply | Threaded
Open this post in threaded view
|

Re: Dickey Doin's

South Park
  I am a tree guy.  From traveling to places like where the South Park ran,
my favorite trees are Ponderosa and Lodgepole Pine, Quaking Aspen, and
Western Larch.  I grow them and sell them, and dedicate a lot of time to
the preservation of the old forest stuff.  The branch and crown structure of
your Ponderosa is like no Ponderosa I am familiar with, but those aspens
are good enough to fool me that they aren't the real real !  Very impressive !
I am blown away.  👍
"Duty above all else except Honor"
Reply | Threaded
Open this post in threaded view
|

Re: Dickey Doin's

Will Cheshire
South Park if you are referring the picture of the tall conifers  those are fir trees I made for a friend in CA.  The area he is modeling is the Sierra Mountains.  I am currently making two ponderosa pines and I will post pictures of those when they are finished in a couple of days.

Thank you for the very kind comments about the aspen trees.  Aspen are fun  to make as they can take on a variety of shapes depending on the environment where they are growing.

The picture below is a 26" triple trunk ponderosa pine.  One of the trunks was hit by lightning.


Another ponderosa pine that I make in 2012.


More later.

Will


Reply | Threaded
Open this post in threaded view
|

Re: Dickey Doin's

South Park
  Will,

  I was into modeling 40 years ago.  Scratchbuilders and kitbashers were a rare breed
and the off-the-shelf materials were in the Stone Age, compared to today.  I was never
one to go for bottle brush trees or cast plastic buildings, but getting realistic end product
was a #@!!!!  I remember hand-cutting ties, staining them in small batches, varying the
stain darkness, and then mixing the finished bits in a bag for realistic random color
variation.  Hand set rails, scratchbuilt buildings, and the landscape was the hardest of
all, especially the trees !  Your work looks AWESOME !  I was only picking nits about
the Ponderosa Pine because they are a BIG part of my life and being the somewhat anal
retentive detail nut that I am, I was only suggesting the crown and needle tufting could
use a little tweaking.  But I gotta say, even as much work as I put into doing "great" trees
back when I modeled, yours are SO much better !  Cut yerself an extra slice of raisin pie,
my friend !  👍


"Duty above all else except Honor"
Reply | Threaded
Open this post in threaded view
|

Re: Dickey Doin's

Randy Rieck
In reply to this post by Will Cheshire
Will, your trees are truly an inspiration to all of us who try to make our own. I am looking forward to reading how you do it.
Reply | Threaded
Open this post in threaded view
|

Re: Dickey Doin's

Jim Courtney
I agree,Will.

Start a new thread on model tree construction and show us how you build various species of trees!
Jim Courtney
Poulsbo, WA
Reply | Threaded
Open this post in threaded view
|

Re: Dickey Doin's

Will Cheshire
Let me thank all of you for the very supportive comments.  Especially I would like to thank Randy who introduced me to using Rabbit Brush for trunks back in about 1991.  It took me almost 19 years to put his suggestions to good use.  I started making trees in 2010 and hopefully my techniques have improved since then.  In those 10 years I suspect that I have made well over 1,000 trees mostly just for a small group of people.  

I will start a new thread very soon describing how I make aspen trees.  Then maybe conifers will follow.  

Anyone modeling DSP&P or C&S in the Chalk Creek canyon certainly will need lots of aspen trees.  Starting in 1964 I have probably been to St Elmo, Romley and Handcock  well over 200 times.  In 1967 I seem to recall finding a vertical mine shaft in the vicinity of Handcock.  The ladder leading down to the bottom seemed to be in good order so there I went.  Reaching a horizontal shaft some distance down there was water flowing down toward the Handcock Wye.  Also there was track in this shaft.  The water was about 6" deep so back up the ladder I went.

Also I have been to the up to the Mary Murphy mine complex at least three times and then on up to the top of the ridge where there was a view looking out over a chain of lakes.

Will