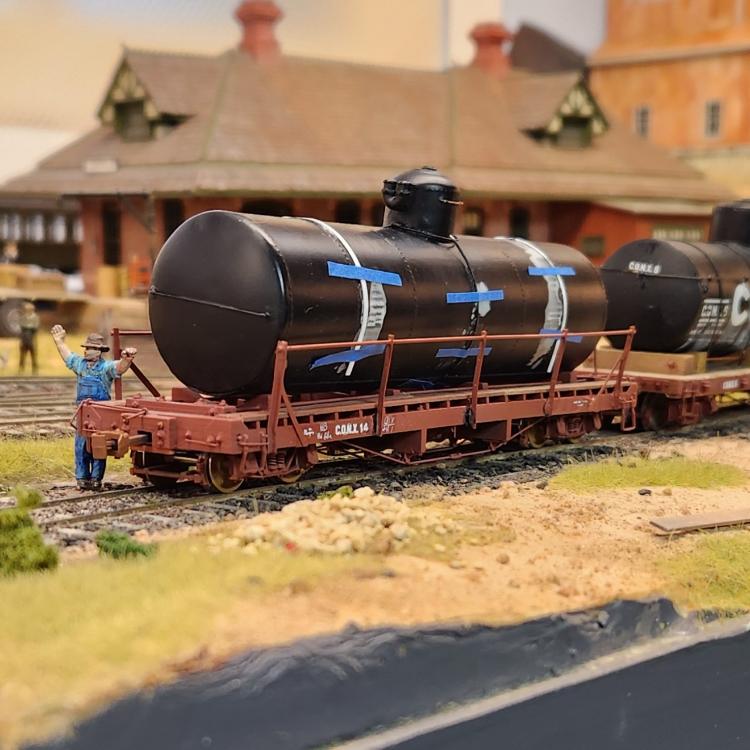
CONX 14

Previous Topic Next Topic
 
classic Classic list List threaded Threaded
46 messages Options
123
Reply | Threaded
Open this post in threaded view
|

Re: Measure Twice, Cut Once.

Keith Hayes
I think...the underframe...is, at last...complete.

If, by chance you choose to model this car, I suggest you wait to glue the handrails to the frame until last. They are fussy and more fragile than I thought. They also catch on EVERYTHING.

Now, on to the tank.
Keith Hayes
Leadville in Sn3
Reply | Threaded
Open this post in threaded view
|

Re: Measure Twice, Cut Once.

Jim Courtney
Looking great, Keith!

A very, very intricate underframe.

When you build the other CONX tank cars, you can remember to put the side railings on last . . .
Jim Courtney
Poulsbo, WA
Reply | Threaded
Open this post in threaded view
|

Re: Measure Twice, Cut Once.

Keith Hayes
Committing to paint!
Keith Hayes
Leadville in Sn3
Reply | Threaded
Open this post in threaded view
|

Re: Measure Twice, Cut Once.

Mike Trent
Administrator
What color red are you using, Keith?
Reply | Threaded
Open this post in threaded view
|

Re: Measure Twice, Cut Once.

Keith Hayes
This post was updated on .
In reply to this post by Keith Hayes
When I encounter an issue,  I ponder it for a while and practice the technique in my head some before I attack the actual problem. I cannot say that I followed through with that idea this time.

CONX 14 has a rod loop that holds the tank to the frame at the center of the car. Unlike most other tank cars that have 4 or moe straps that hold the tank in place. The rod in question has a loop that circumnavigates the dome with two rods extending from the loop to the frame. The dome loop takes the form of the edge of a potato chip or cowboy hat brim.

After some thought,  it occurred to me to use solder to measure the intersection of the tank and dome to determine the length of wire for the loop. This was rolled and soldered.  Sort of.

Now, how to solder the other rods on? I started casting about the bench for rolling candidates and tried solvent and paint bottles, and finally thought of a good old wine cork. But, you know what? Cork takes spikes well! Now ew have a jig!!

Viola! Now soldering is easy.The finished piece.

We will work on installing this next week.

Mike, I use your trusty boxcar red/ Tuscan blend. I create this with Vallejo Brown and Rust.
Keith Hayes
Leadville in Sn3
Reply | Threaded
Open this post in threaded view
|

Re: Measure Twice, Cut Once.

Chris Walker
Keith,
did you enlarge this picture for your restraining rod?
https://digital.denverlibrary.org/digital/collection/p15330coll22/id/43086
UpSideDownC
in New Zealand
Reply | Threaded
Open this post in threaded view
|

Re: Measure Twice, Cut Once.

Keith Hayes
That is the one I was looking at.  What did I miss,  aside from the T fitting?
Keith Hayes
Leadville in Sn3
Reply | Threaded
Open this post in threaded view
|

Re: Measure Twice, Cut Once.

Chris Walker
Just asking Keith, that's all.  I hadn't noticed the CONX5 had the hoop tight on one side only: the CONX14 seems snug: there aren't too many views available for this level of detail observance.
I see three rods on the #14, vs 5 on the #5.
UpSideDownC
in New Zealand
Reply | Threaded
Open this post in threaded view
|

Re: Measure Twice, Cut Once.

Mike Trent
Administrator
In reply to this post by Chris Walker
Looks great!
Reply | Threaded
Open this post in threaded view
|

Re: Measure Twice, Cut Once.

Jim Courtney
In reply to this post by Keith Hayes
Excellent model building, Keith!

Between spiked wine cork soldering and whiskey bottle sanding, lots of new C&S modeling techniques being developed on this site!

Next thing ya know, Chris will be building 1/4" scale Best crawlers from beer can aluminum . . .
Jim Courtney
Poulsbo, WA
Reply | Threaded
Open this post in threaded view
|

Re: Measure Twice, Cut Once.

Keith Hayes
This post was updated on .
In reply to this post by Keith Hayes
Mr. Student asked me for an update. I have been working on the tank, adding some detail to the dome and adding the bands which hold the tank to the frame.

The bands on this car differ from others in that the ends appear to be strap steel and the center hold down is made of rod. I started with the center and it was a booger to glue in place due to the small surface area

The bands did not go much better and I ultimately resorted to my gap-filling CA. After some sanding another coat of Primer has been added.  I a debating if I will use this as the finish coat, or apply some Vallejo black followed by a coat of VMS gloss. I love the VMS gloss!

The frame got the walks applied. These are individual boards that were textured, cut to length and stained. Today I dry brushed the boards with several different reds and glued the boards in place.

Couplers and carrier irons have been instand need some paint. Trucks are on the workbench and need some paint.
Keith Hayes
Leadville in Sn3
Reply | Threaded
Open this post in threaded view
|

Take Two.

Keith Hayes
The tank straps have been giving me FITS. I fabbed them from brass sttip, because,  well, I don't know why. I could not get the things to adhere to the tank. I  tried CA and Rapid Fuse, and was starting to contemplate epoxy. The brass is just too springy, and the CA was breaking away from the Primer layers

I mentioned my dilemma at an ops session today and my friend, Mark Shifter,  suggested styrene.  What have I been thinking?!? So I came home, easily peeled off the brass parts, carefully sanded the goo down and applied styrene with CA. So far so good. The center rod is glued now with some epoxy.

I think these straps are among the hardest parts on tank car models. You want to wait until the end to install them, but they need to be painted and lettered. Plus I need to figure out what they tie to.

I also got some lettering on the frame.
Keith Hayes
Leadville in Sn3
Reply | Threaded
Open this post in threaded view
|

Re: Take Two.

Pat Student
Kieth

These are tank bands.  The ends would have approximately 1" rods welded to them that would extend down to go through a plate below the center sills and secured by double nuts. refer to the photo of CYCX for detail.

Reply | Threaded
Open this post in threaded view
|

Re: Take Two.

Chris Walker
Dunno if this helps..... or torments...
UpSideDownC
in New Zealand
Reply | Threaded
Open this post in threaded view
|

Re: Take Two.

Keith Hayes
In reply to this post by Keith Hayes
Time for decals, or as some seem to say "deck-alls."

For CONX 14, I am using a Thin-film set, and these seem to soften and work well, aside from being apt to chip. My older Foothills decals are a booger to work with and I found a coat of Micro Scale Liquid Decal Film helps hold older decals together.  Just brush it on and wait 20 minutes and you are ready to go! Because it is dry here in Denver,  I am storing my decals in zip lock bags. This also makes them easier to find.

I always used to have a large glass of water handy. A tip from the military modelers is to use warm tap water. I now let the faucet run and fill a shot glass. If you have water with lots of crud, you may want to use distilled. As our water is from Breckenridge and Webster, I feel it is more realistic to use it straight from the tap.

Here is my setup. Military guys also have a small piece of plastic that they place the decals upon after dipping them in water. Another good tip. If I am inclined,  I will brush some Micro Set on them here as they loosen. Now they are much easier to chase down to place on the model.

Next I place the decal in the model and dab it with more Micro Set and position the decal. Once the surface is dry--between 10 and 20 minutes here, I apply some Micro Sol to help the decals snuggle around set.

I don't know how I made it the last 50 years without these tips: they make decaling so much easier!
Keith Hayes
Leadville in Sn3
Reply | Threaded
Open this post in threaded view
|

Re: Take Two.

Keith Hayes
In reply to this post by Chris Walker
Chris,  Sloan says this is ex CONX 17, a bit larger car. I believe 0459 was used to provide potable water for Taos Junction. Images of it inspired me long ago to want a model of one of these cars.

Yes the bands transition to threaded rod at the end. On the steel UTKX cars, the threaded part extends in front of the side channels as Pat's image of the CYCX car shows.

For the wood cars like CONX 12-17, the rod disappeares behind the walkway. It seems to run in front of the outside tank support rod. I can only assume that it extends to a steel plate that spans between the center and intermediate sills. This seems to me to both allow some flexibility and provides a very strong clamping connection to secure the tank.

I cannot imagine drilling a diagonal 1"+ hole through a sill and then feeding the rod attached to the strap through said hole. Ask me how I know.

With the plate, the threaded rod will dangle where it wants, and the Carman can slide the plate back and forth to get it to seat in the right spot. Plus the nut has a better surface in the plate to seat.
Keith Hayes
Leadville in Sn3
Reply | Threaded
Open this post in threaded view
|

Re: Take Two.

Pat Student
In reply to this post by Keith Hayes
Kieth

Thanks for the update without asking. Looking for the finished model.

A few more thoughts on decaling.

1. I completely support your use of Micro Scale Decal Film.

2. I have used distilled water at room temperature for decades. This was recommended to me by several professional locomotive painters. As a chemist this makes sense as we want the decal to adapt to the 3-dimensionality of our models. Distilled water allows the decal film to be pliable whereas tap water tends to make the decal ridged. Remember when we used to develop film; we wanted the various solutions to contain minerals/salts to maintain the dimensional stability of the film. And it leaves no residue.

3. I use Walthers Solvaset that I find stronger than Micro Scales Micro Sol.  This typically requires only one application on the model.

4. If a decal is particularly stubborn in adopting the profile of the model surface, I've use 91% isopropyl alcohol with success.  Don't use on PBL Star brand paints as it can remove the paint.

5. When applying a decal to a model, I put a drop of distilled water to the model where the deal is to be placed. This allows sufficient time to position the decal, especially where there are features that interfere with positioning it. Additional distilled water can be applied, if needed Also, it allows me to remove and correctly place a decal. Once the decal is in place, I soak up excess water with a Q-tip and apply Solvaset.

6. I spray the model with Glosscote before and after deals are placed.  With the decals being in one medium , edges are invisible. Jimmy Booth tip.

7. If white lettering is hard to see, try working with a black light; it turns to lettering purple while under the light.


8.  Warning.  Use Micro Scale Decal Set on brass models with care.  It is dilute acetic acid, vinegar, and if gets to any unpainted solder, it will form salts, acetates, of lead and tin and potentially ruin the paint job, let alone the decaling. Ask me how I know.

Pat
Reply | Threaded
Open this post in threaded view
|

Re: Take Two.

Keith Hayes
In reply to this post by Keith Hayes
Yeah! lettering!

Things were moving along swimmingly,  except the Micro Set collected on the bubble wrap and crazed the paint on the opposite side. I sanded the finish,  repainted and glossed it. I also added some bolster lifts to adjust the coupler height to standard.

Stears shows the coupler shank data on both ends of the car, however CONX cars only have this on the B end. I am thinking I will just include this stencil on the B end.

I also spy some wood placard holders that have been fabrabd are ready to install.  Anyone have a period IMFLAMMABLE placard? I need a bunch!
Keith Hayes
Leadville in Sn3
Reply | Threaded
Open this post in threaded view
|

Re: Take Two.

Chris Walker
Nicely Done Keith....

Placards?   SEE: http://c-sng-discussion-forum.254.s1.nabble.com/C-S-7111-tp806p17414.html  for this.  Maybe not correct for Colorado but as I said in my first post on the matter......
"Inflammable placards first appeared down here(NZ) in the mid-twenties on Gasoline Can Boxes imported from the westcoast of the USA, I have always wondered when they first came into general use on the N.G. The lettering being far more "antique" in font and prose than that of today, more research on this is welcomed. "
UpSideDownC
in New Zealand
Reply | Threaded
Open this post in threaded view
|

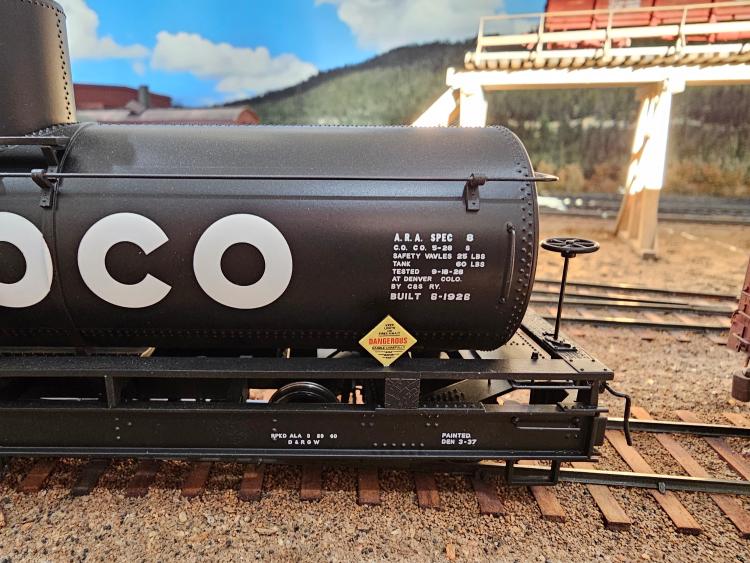
Re: Take Two. Placards

Mike Trent
Administrator
In reply to this post by Keith Hayes
The High Dome CONX based on Bob Stears' drawings have placards on sides and ends. I'll try to send a photo. If this doesn't work I'll email it to you.

123