C&Sn3 Kitbash of the UP built 27 foot boxcar + Outfit Car Info
C&Sn3 Kitbash of the UP built 27 foot boxcar + Outfit Car Info
|
This post was updated on .
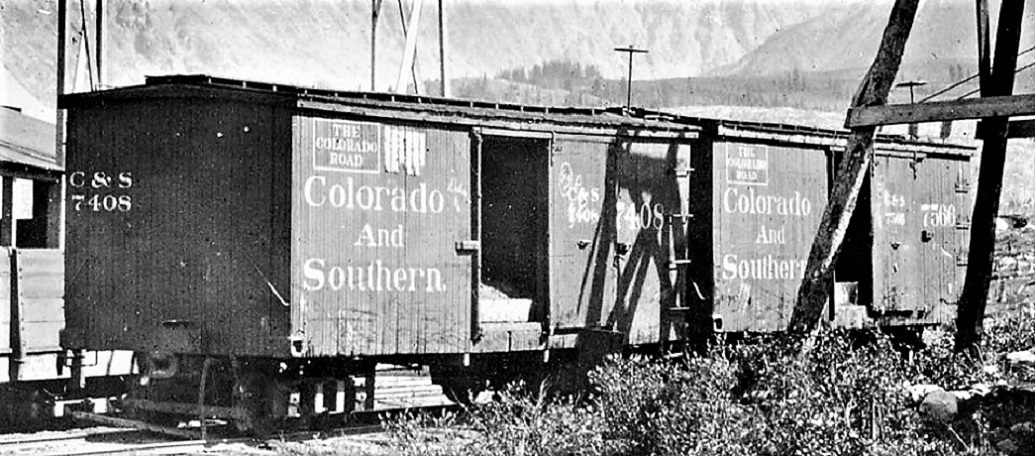 http://digital.denverlibrary.org/cdm/singleitem/collection/p15330coll22/id/38704/rec/367 One of my favorite classes of early C&S freight cars are the inherited 27 foot boxcars. In 1882-1883 the UP's Omaha shops built several batches of near identical cars for the DSP&P and over 100 for the narrow gauge Kansas Central in 1883. The Kansas Central cars migrated to Colorado in the early 1890s, some assigned UPD&G numbers, some DL&G numbers. Eventually the cars were all inherited by the new C&S. The cars built for the South Park seem to have be renumbered to the 74xx series, while the cars built for the KC ended up in the 75xx series. About 10 years ago I acquired several cast resin kits as one of the Cimarron Works first Sn3 kit offerings. I had in mind modifying them into MOW bunk cars, as my C&S interest then was the mid-1920s. As my interest shifted to the first decade of the C&S, I thought I might build them as they appeared in revenue service, c1909. I occasionally piddled with the kits, cleaning up flash, filling casting imperfections with putty, experimenting with different truck and coupler mountings. I rationalized this decade of dawdling by telling myself that I didn't yet have enough solid information to complete an accurate model of that era. And when I acquired a couple of Leadville Shops 27 foot Tiffany reefer kits about a year ago, I almost abandoned the project altogether. The beautiful laser cut sides and roof of the Tiffany, made the cast resin boxcar body look crude. Anyways, information on this forum and excellent photos of the boxcars have been posted: Doug Heitkamp posted a photo of boxcars in Idaho Springs with a good end view of the 27 foot car:http://c-sng-discussion-forum.41377.n7.nabble.com/Case-of-the-Missing-Truss-Rods-Revisited-td6387.html Todd Hacket posted amazing hi-res photos of a 27 foot Tiffany at the Washington Spur wreck, which made the under frame details less mysterious:http://c-sng-discussion-forum.41377.n7.nabble.com/Caboose-numbers-quickly-diverged-to-Tiffany-Reefers-td6376.html Chris Walker posted a great DPL photo of one of the KC cars that was re-assigned to the UPD&G, providing a lot of car body detail: http://c-sng-discussion-forum.41377.n7.nabble.com/Freight-Car-Chalk-Markings-td928.html And a thread that I started, and the helpful comments of others here, helped me imagine how to model the backwards brake arrangement (cylinder relative to brake staff): http://c-sng-discussion-forum.41377.n7.nabble.com/Brake-staff-cylinder-confusion-and-mismatched-trucks-td3464i20.html#a7738 So, about a month ago, I decided to see if I could upgrade one of the CW cast resin bodies into a model that would compare reasonably well with the TLS laser cut Tiffanys, now under construction. This is what I came up with (pardon the depth of field problems with my iphone camera):     I began by scraping off all the cast resin details for the corner irons and and lower door guides. To better represent the 5 1/2" milled sheathing with center groove, I used a scribing tool to deepen every-other groove on the cast resin body. I opened up an end door on the "A" end of the car and constructed a new end door from Evergreen styrene, including the little awning found on the ex-KC cars. The cast side doors were beautifully rendered, but seemed too thick, so I replaced them with new V-groove Evergreen siding doors. This if the first resin kit I've built, the material hard for me to square, thin and fit. I had trouble with the roof casting, so I figured this particular car had been shopped about 1904 and the original double board roof replaced with a simple single board roof, as on some bunk cars from this car series. The new roof was again formed from Evergreen V-groove siding, with Simpson roof walk supports and 1x12 scale roof walk boards. The cut out by the brake staff shows up in a number of photos. The hardware applied to the car are TLS brass etchings. Doug Junda sold me a number of extra frets:  There was a learning curve to consistently bend the etchings at a true, square 90 degree corner. I found that Tamaya makes bending pliers, with long flat jaws that close flat along the entire distance of the jaw, which made this easier. I now agree with Doug that the 27 foot boxcars and reefers had needle beams but not truss rods. I simmulated the long tension rods that ran nestled up against the center sills with 0.020" Plastistruct rod. Can you even see them?:  I chose to fabricate my own brake gear rather than use the etched brass levers. I used HO 1x4 styrene for the levers, PBL clevises and the Grandt NY brake cylinder, with a lot of Tichey rivets:  It took three tries to get the branch air line correct. I found the various photos confusing, until I realized that the 26 foot Litchfield cars, the 27 foot UP cars and the 30 foot Peninsular cars all had different arrangements. Todd's Tiffany photos were a great help here. I made a drilling jig for the end grab irons that are on an angle, from Bob Stears plans for the 26 foot Tiffany car. The odd brake staff on the "A" end of the cars, retainer line placement and coupler lift bars was modeled from Doug's Idaho Springs boxcar photo. The car body itself is complete, ready for the paint shop. It will be numbered 7566, as in the photo at the top of the post. I'll post more photos after painting and lettering. The current trucks are place holders. The 14 ton type "C" trucks are not available in S (or any) scale. I took Ron Rudnick's On3 advice and acquired some Rio Grande Models S scale 4-foot wheel base Carter Brother's side frames and bolsters. They are no longer available on the firm's website, but an e-mail to Eric yielded 10 pair of side frames and bolsters at a very reasonable price. The wheel sets are PBL's code 88 wheel sets. The trucks aren't quite right: the transoms a bit too tall, too thin and too close together. I am experimenting with the side frames. I'll try to drill out the axle holes and add Tichey nylon bushings to improve rolling qualities and fabricate new center plates with the circular cut-out. Eventually, TLS brass outside brake beams/shoes will be installed. Is the near finished model completely accurate? Gosh no. The resin body represents the cars as originally built for the DSP&P, with the upper side door runners notched into the fascia. Later photos from the 1890s and 1900s show the door runners lowered below the fascia. Still I think it is a reasonable facsimile there-of, and hopefully it won't look too shabby next to the laser cut models. Will I kit bash another? Don't know . . . if Bob Stears and Bill Meredith can provide laser cut basic bodies for the 27 foot boxcars, I'll probably go that route. The June, 1909 C&S equipment inventory indicates that only 13 of the 27 foot boxcars remained in revenue service, so I probably won't need but one. I might modify a couple of the remaining kits to bunk cars, as I originally intended: 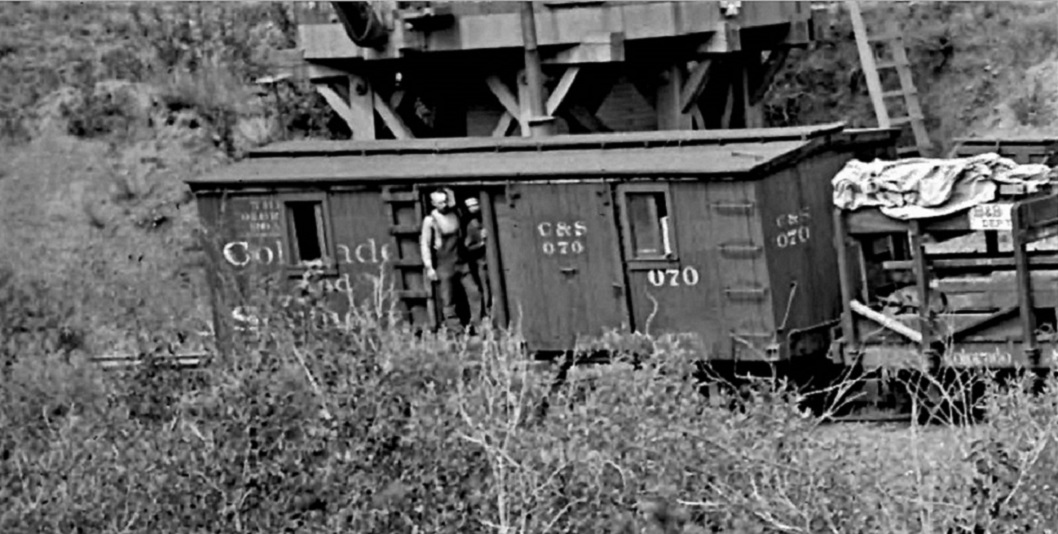 http://digital.denverlibrary.org/cdm/singleitem/collection/p15330coll22/id/78391/rec/787 Thanks to all who contribute here, I couldn't have gotten this far with this project without you're photos and thoughts. As Jeff once pointed out, your contributions and comments never disappear into a black hole! 
Jim Courtney
Poulsbo, WA |
Re: C&Sn3 Kitbash of the UP built 27 foot boxcar (so far)
|
Jim,
Nice looking model. At the end you talk about doing some as bunk cars then show a picture of 070. Avoid the trap I was in for a long time thinking that 070 was 27'. Car 070 was made from 7251 which is a 24' car. I finally built a model of 070 in HOn3 using a Clear Creek 24' styrene kit. Here is a photo on the Sacramento club. Ken Martin 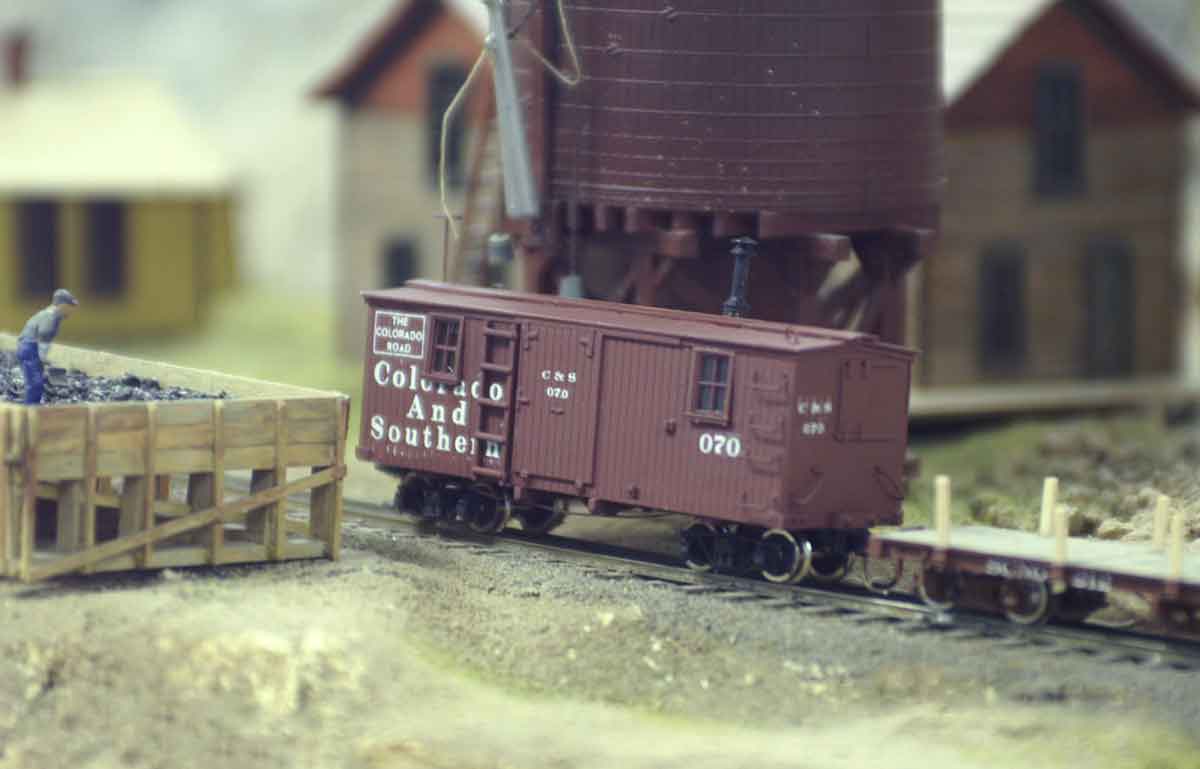
|
Re: C&Sn3 Kitbash of the UP built 27 foot boxcar (so far)
|
This post was updated on .
Wow Ken,
I just keep on learning things here! Beautiful little outfit car you got there, still think I need one in S scale. I had just assumed that C&S 070 was a 27 foot car due to its number . . . 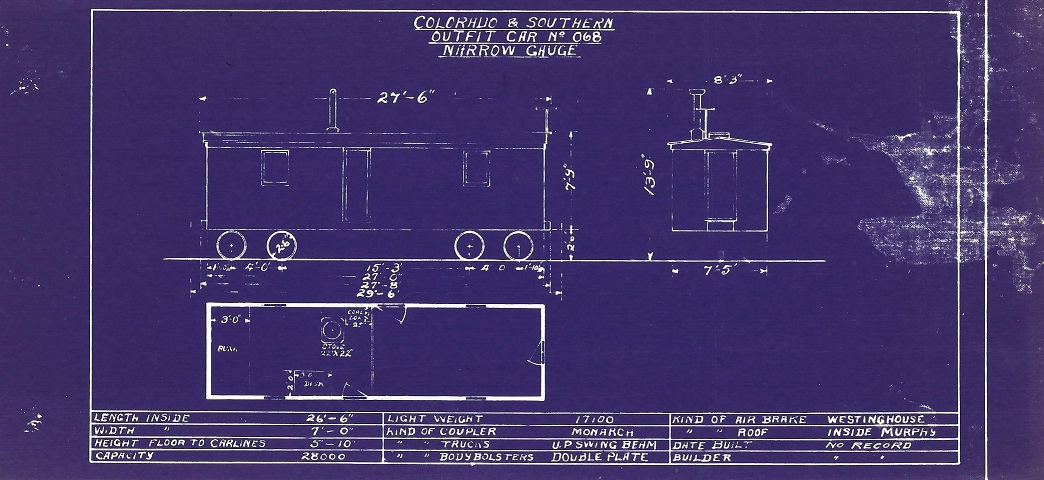 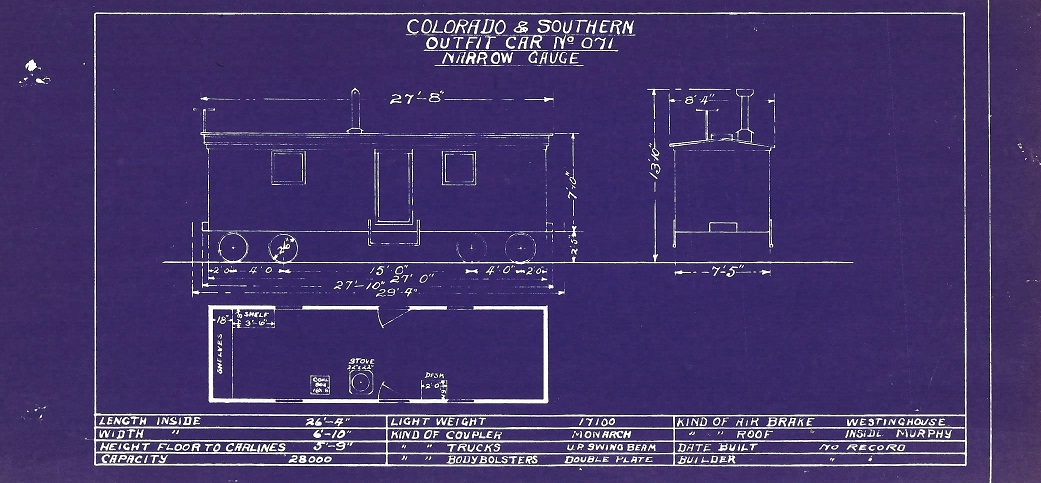 . . . since both 068 and 071 were shown as 27 foot cars. Folio 27 shows them as 14 ton (28,000 lb capacity) cars with UP swing beam trucks. But then again, a couple of guys named Poole and Martin, in Narrow Gauge Pictorial VIII, list 068 as former 7376 and 071 as former 7399. I've come to think that the 73xx series were Litchfield 26 foot box cars. So are 068 and 071 actually 26 foot cars? Sneaky C&S narrow gauge. 
Jim Courtney
Poulsbo, WA |
RE: C&Sn3 Kitbash of the UP built 27 foot boxcar (so far)
|
In reply to this post by Ken Martin
Beautiful model Ken. From: Ken Martin [via C&Sng Discussion Forum] [mailto:[hidden email]] Jim, If you reply to this email, your message will be added to the discussion below: To start a new topic under C&Sng Discussion Forum, email [hidden email] |
Re: C&Sn3 Kitbash of the UP built 27 foot boxcar (so far)
|
In reply to this post by Jim Courtney
Jim,
Looking at the folio sheets they show 7200-7226 as 24' cars 7273-7348 as 26' cars 7353-7815 as 27' cars So 068 and 071 would be 27'. Sneaky indeed splitting the number series. Derrell did the freight car and m/w part of the book and he shows 070 out by 1916 so it is out of my era but I still like it. I need to do more 27' cars. I did 068 but not having a picture I lettered it following picture 051. Ken Martin 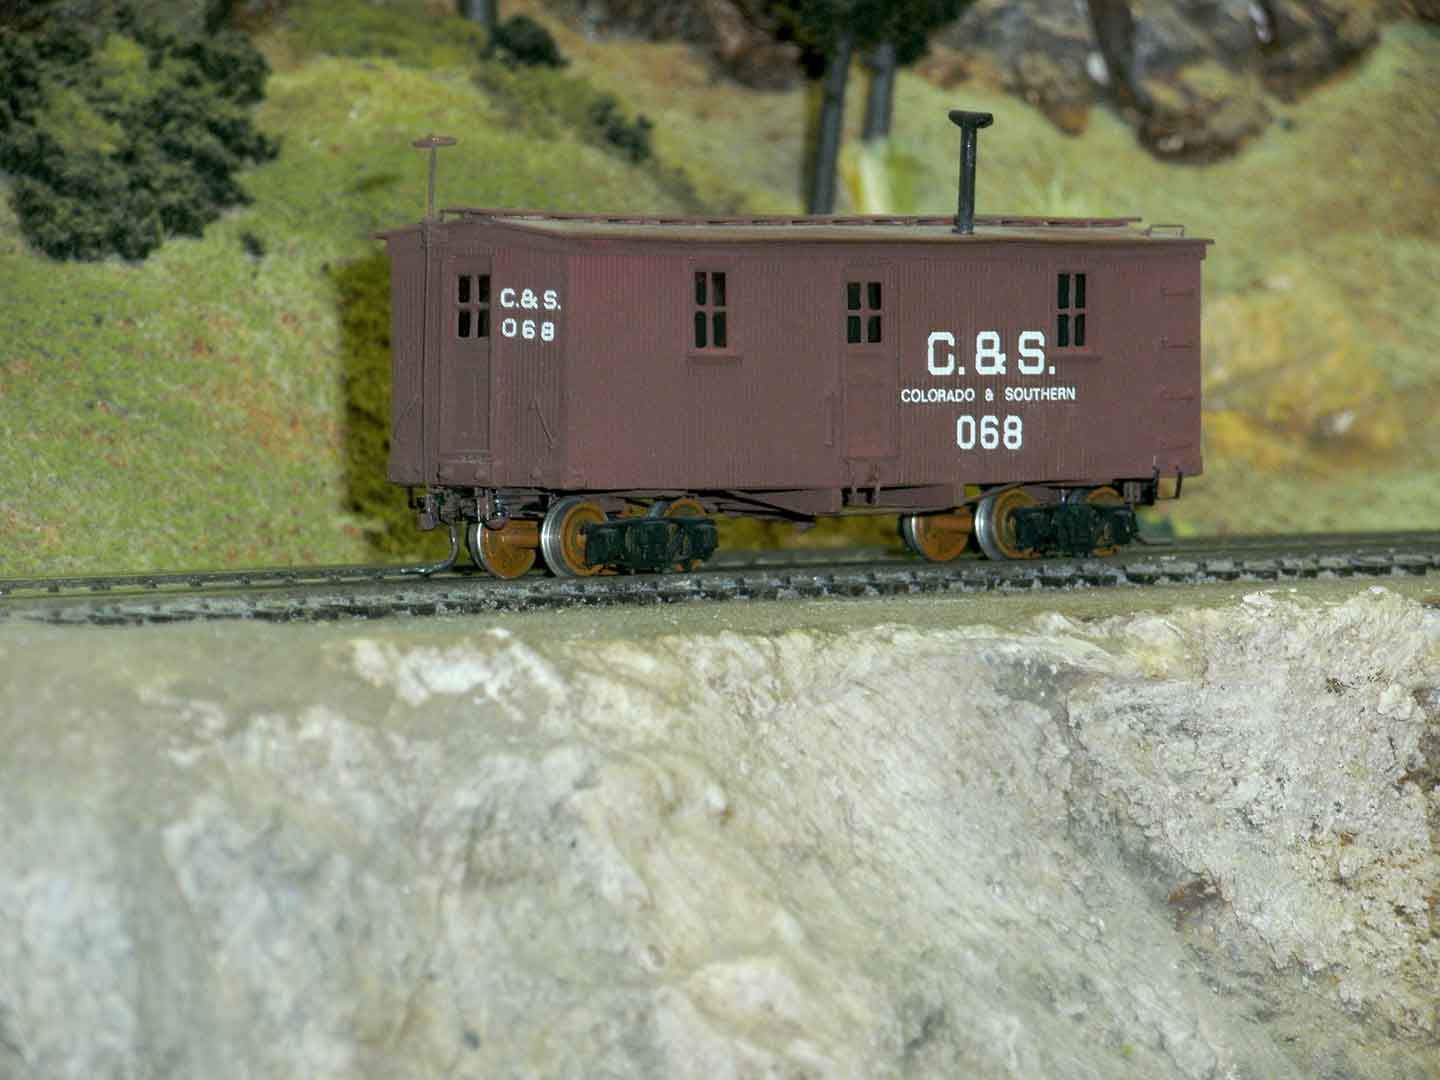 |
Re: C&Sn3 Kitbash of the UP built 27 foot boxcar (so far)
|
In reply to this post by Jim Courtney
Jim:
Your conversion is looking super. Look forward to seeing it painted. Not sure what you are planning to paint it with, but with a resin kit you really want a good primer coat. Tamiya makes some great primers; my go to is the fine grain grey primer for metal and plastic in the aresol (rattle) can. It is a synthetic lacquer based material, but is safe for styrene and resin. From the can apply in light coats. If you are airbrushing you can actually decant this and apply it with the AB for more control - it thins with Tamiya (yellow cap) lacquer thinner. The big advantage of this primer is that it sands very nicely (you can sand it with wet or dry sanding sticks - I sand with water for a smoother finish) and let's you find any bubbles or other issues with the model before you paint. This let's you correct them and touch up the primer (see comment on decanting) as many times as needed to get a good surface. I have found the best filler for minor imperfections in resin is gap filling ACC, put it in the hole or gap with a pin, and sand back with sanding sticks as soon as it sets (before it gets rock hard). Tamiya primer is very flexible- works with solvent or water based top coats. Konrad |
Re: C&Sn3 Kitbash of the UP built 27 foot boxcar (so far)
|
Thanks for the tips, Konrad.
It has been said that the camera is one of our most important modeling tools. Staring at the enlarged photos of my little 5" long model, all I see are flaws that need to be fixed before painting. I'm not all that keen on resin kits so far. I generally do much cleaner work in styrene. I've used the Tamaya fine white primer--I'll try the grey after I fix some of the obvious problems. By "decanting" I suspect you mean spraying into a cup, collecting the wet primer and re-thinning it . . . correct?
Jim Courtney
Poulsbo, WA |
Re: C&Sn3 Kitbash of the UP built 27 foot boxcar (so far)
Jim, I have built a lot of resin kits (many military, but the techniques don't change) and agree it has its issues. Primer is really your friend with resin. It smooths the surfaces (filling lots of micro imperfections) and highlights the bigger stuff which fixing will really improve the model. On decanting- yes, exactly. Cut a v into a card, place it on a small cup and spray into the cup through the "v" - I use a cheap stainless shot measure. With practice you can dispense with the card. Add a little lacquer thinner and stir the paint (to de-gas it and reduce it for the airbrush), and pour it into the AB cup. I use an Iwata HP-CS but any competent AB will work. You can store the decanted paint in a bottle, but leave the cap loose overnight to allow any residual propellant to gas off. I thought your model looked pretty good to go to the paint shop for priming as it was, but of course you can fix any really bad stuff you are seeing before priming. The primer will level out some if not most of the littler stuff (like scribing depth) and uncover some stuff you can't see in the unprimed resin. Fix and apply another light coat of primer. Oh, if you don't have one, a fiberglass eraser is the bomb for fine clean up. As a closing thought, looking at the image you posted the prototype was pretty rough itself, so some of the flaws will actually be happy accidents. To take advantage try some chipping fluid over a weathered wood undercoat along the lower edges before you paint the car sides to create the failing paint look. Konrad Konrad |
Re: C&Sn3 Kitbash of the UP built 27 foot boxcar (so far)
|
This post was updated on .
Thanks for the encouragement and tips, Konrad.
You're right, the side sheathing on the prototype got pretty ragged with time, the gaps between the individual boards varied a lot. And the lower edges of the sheathing seemed to get beat up the most, especially under the doors. 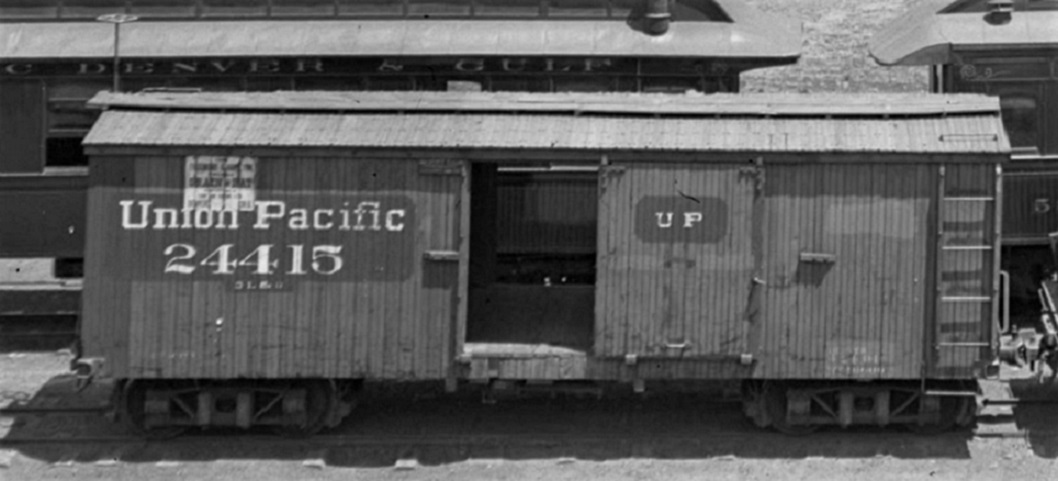 http://cdm16079.contentdm.oclc.org/cdm/fullbrowser/collection/p15330coll21/id/3681/rv/singleitem Yes, the fiberglass eraser is also one of my favorite tools. By "chipping fluid" do you mean a liquid mask?
Jim Courtney
Poulsbo, WA |
Re: C&Sn3 Kitbash of the UP built 27 foot boxcar (so far)
|
Just catching up on this thread. EXCELLENT work, gentlemen!
Cheers, Jeff. |
Re: C&Sn3 Kitbash of the UP built 27 foot boxcar (so far)
|
Ken, Here are photographs of my On3 versions of #070 and #023. These were kit bashed from TLS 24 ft. Boxcars. I found a postcard showing #023 in Leadville which I will post separately. Regards, Bob
|
Re: C&Sn3 Kitbash of the UP built 27 foot boxcar (so far)
|
Those are fine looking cars! Bill Uffelman On Monday, April 17, 2017, 8:25:11 PM EDT, Robert Stears [via C&Sng Discussion Forum] <[hidden email]> wrote: Ken, Here are photographs of my On3 versions of #070 and #023. These were kit bashed from TLS 24 ft. Boxcars. I found a postcard showing #023 in Leadville which I will post separately. Regards, Bob
If you reply to this email, your message will be added to the discussion below:
http://c-sng-discussion-forum.41377.n7.nabble.com/C-Sn3-Kitbash-of-the-UP-built-27-foot-boxcar-so-far-tp8100p8123.html
To start a new topic under C&Sng Discussion Forum, email [hidden email] To unsubscribe from C&Sng Discussion Forum, click here. NAML |
Re: C&Sn3 Kitbash of the UP built 27 foot boxcar (so far)
|
In reply to this post by Robert Stears
Bob,
Absolutely beautiful outfit cars! Now that I know these cars were former Colorado Central 24 footers, I went to The Leadville Shops website to order a couple of S scale kits as a basis for my own work cars. Alas, that kit is sold out. Any chance that you and Bill could do a run of the 24 footers as wood parts in a zip lock bag as well? If that's not possible do you have any drawings for these cars? I'd try to build them in styrene of there are no more laser kits in the future.
Jim Courtney
Poulsbo, WA |
Re: C&Sn3 Kitbash of the UP built 27 foot boxcar (so far)
|
Get the Sn3 TLS shops kit of CC #026552 MOW car. The window arrangement is the same (probably because the positions of the internal construction beams limited window position options on the prototype). You just need to scratch build the new door in the side door opening and a smoke stack. I think we can cut a couple of SN3 boxcars but it won't be right away. I need to re-visit the project and I am now focused on the 27 ft. And 26 ft. House car laser cutting tests. I had pans for these cars in a B&L magazine several years ago and my drawing of CC #026552 was printed in the NG&SL Gazette last year. Sent from my iPhone
|
RE: C&Sn3 Kitbash of the UP built 27 foot boxcar (so far)
|
In reply to this post by Jim Courtney
C&S MOW #023. Sorry, this is a pretty rough post card photograph of C&S #023. Bob From: Jim Courtney [via C&Sng Discussion Forum] [mailto:[hidden email]] Bob, Jim Courtney If you reply to this email, your message will be added to the discussion below: To start a new topic under C&Sng Discussion Forum, email [hidden email] |
RE: C&Sn3 Kitbash of the UP built 27 foot boxcar (so far)
|
Robert - those are super conversions - tons of character.
TLS should really run off more of its sold out kits 🙂 Hope you will offer some of the South Park house car bodies you have in development - I certainly would buy a couple. Konrad |
RE: C&Sn3 Kitbash of the UP built 27 foot boxcar (so far)
|
If they're 26' DSP&P Litchfield boxcars I would too.
|
Re: C&Sn3 Kitbash of the UP built 27 foot boxcar (so far)
|
This post was updated on .
In reply to this post by Robert Stears
Well . . . this thread sure took a sharp but informative turn.
Thanks to Ken and Bob for educating me as to the origins of the early C&S outfit cars. I found Bob Stears beautiful drawings of the CC 24 foot boxcar and converted "baggage car" in the Sept/Oct 2015 issue of The Gazette. (FWIW, Bob's drawings are drawn to 1/4 inch scale, but somehow the Gazette folks managed to print them under scaled). I now understand my confusion of the origins of work box 070, as pictured at Crossons Tank: http://digital.denverlibrary.org/cdm/singleitem/collection/p15330coll22/id/78391/rec/787 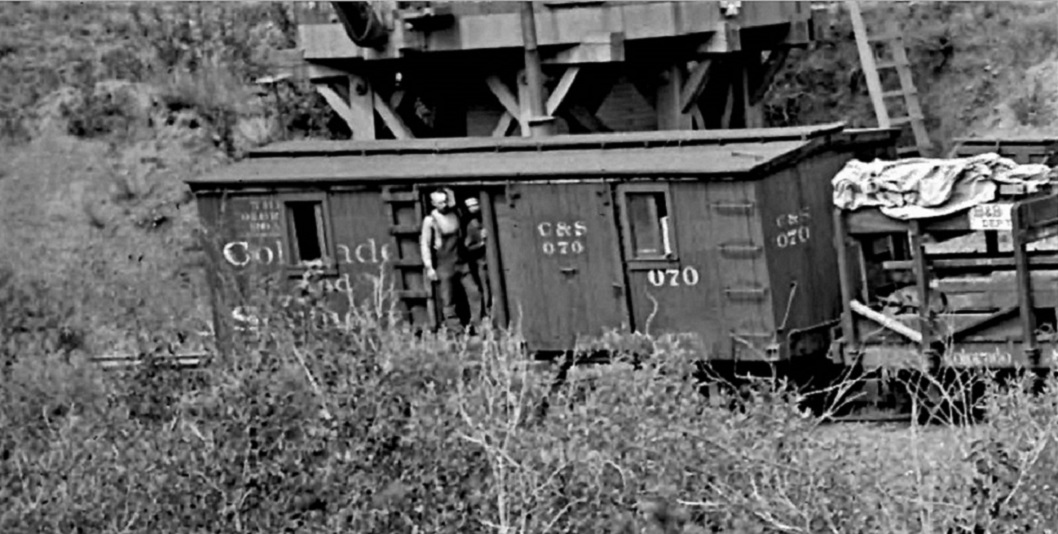 Not just the number sandwiched between two 27 foot cars, the car didn't look like a 26 foot Litchfield car, rather it had a lot of UP build features, hence my assumption that it was a 27 footer. I'm not much up on Colorado Central freight car history, always oriented toward the South Park. The information in Bob's article taught me that the last batch of 24 foot boxcars acquired by the Central, showed up after the UP took control of the Clear Creek narrow gauge. This batch of 80 boxcars was built by the Omaha shops in 1880, hence all the UP building features. http://digital.denverlibrary.org/cdm/singleitem/collection/p15330coll22/id/71842/rec/13 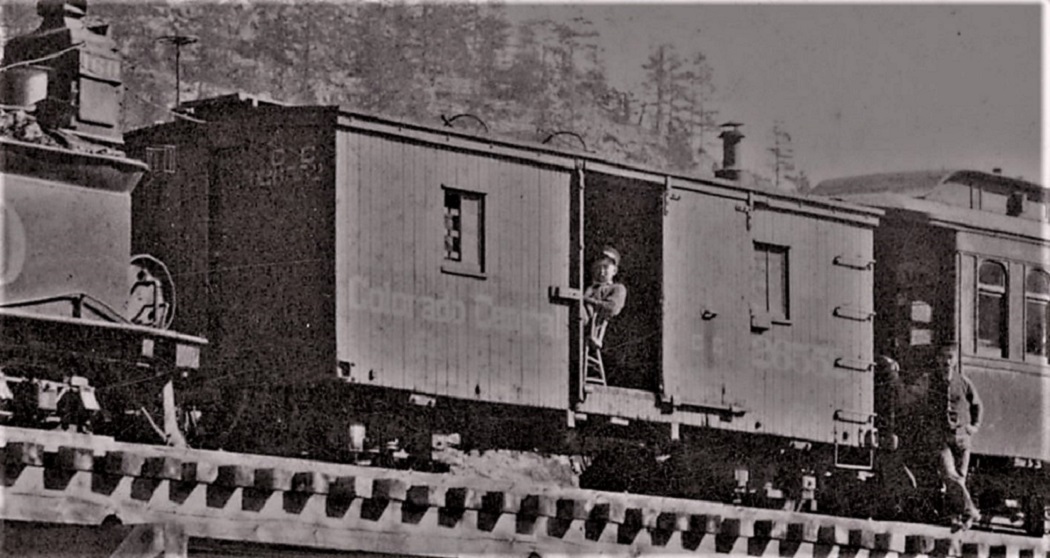 The converted 24 foot "baggage car" used on the UP's Sunset branch clearly shows the same spotting features as the later UP built 27 foot boxcars of the South Park, built in batches in 1882 and 1883. It has the UP-style arched end fascia, the peculiar corner irons with the squarish poling pocket on the side and the wide but very short end step on the right end of the car side. http://digital.denverlibrary.org/cdm/singleitem/collection/p15330coll22/id/49554/rec/191 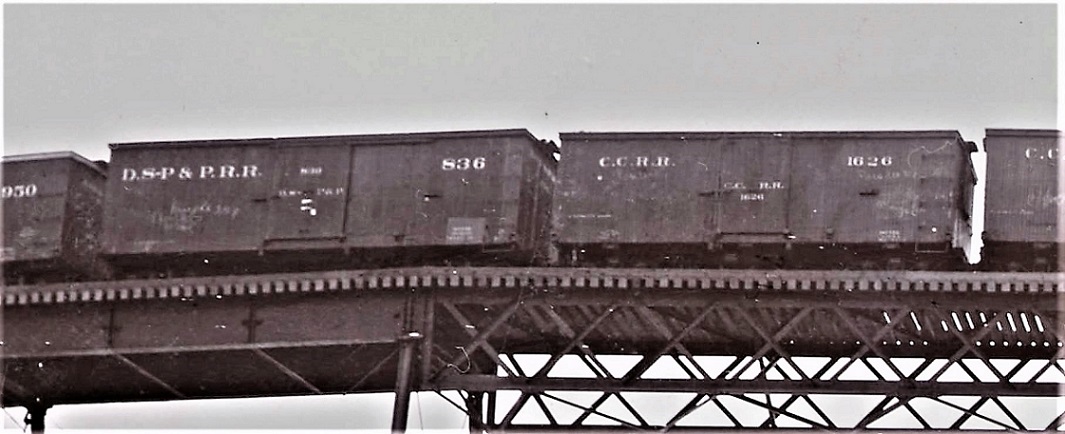 And the famous Jackson photo of the double headed freight on the High Bridge at the Loop has a 27 foot South Park car next to a 24 foot Central boxcar. Other than the length, the two cars could be twins, given the near identical fittings. DSP&P 836 was from the first batch of 27 foot UP cars (summer of 1882 per Ron Rudnick). Even though built two years later than CC 1626, the cars have the same corner irons, door stops, lower door guides and the CC car even has the ass-backward brake staff/cylinder arrangement. They only differ in length and the type of trucks. (There's also a lot of chalk marks on both cars for Robert to decipher--I don't think it's all negative lint). This info may be old hat to many of you, but it's "new" news to me. Man . . . I wish I'd understood this a couple of years ago! I would have picked up several of The Leadville Shops Sn3 kits of the 24 footers, unfortunately now sold out.
Jim Courtney
Poulsbo, WA |
RE: C&Sn3 Kitbash of the UP built 27 foot boxcar (so far)
|
In reply to this post by Konrad Schreier
I checked the TLS website and all the kits are now sold out. I would buy 1-2 kits though I need them like I need a hole in the head. And I never got around to getting one of the 4000 kits, either.
Keith Hayes
Leadville in Sn3 |
Re: C&Sn3 Kitbash of the UP built 27 foot boxcar (so far)
|
In reply to this post by Jim Courtney
Jim - chipping fluid is more like a distemper that actually lets you chip the paint. Works well on plastic, I have even been successful with it on wood. It's an armor modeling product, but works on any kind of model. Take a look at this link, I use this product, but there are other brands. http://ak-interactive.com/v2/product-category/ak-weathering-products/chipping-fluids/ The effect is kind of like the old rubber cement technique, but more controllable. It can even be done in layers to show different paint schemes weathering - paint, put on chipping fluid, paint an overcoat, chip, and repeat. This would be ideal for the raggedy edges you see in the picture. Konrad |
| Free forum by Nabble | Edit this page |


