Along The Gilpin Tramway - A Closer Look

1234

1234
Re: Along The Gilpin Tramway - A Closer Look

|
First, I want to provide a correction. I had previously said on the December 19th post that I didn’t think that the Castle Rock Mine was a Gilpin Tram shipper – well, it turns out that they did at least twice. The Gilpin Railroad Company “Report of Business for the Month April 1914” shows that the Castle Rock Mine shipped 10 cars of ore that month – 5 each to the Iron City Mill and to the Polar Star Mill. The mine was high up on the hillside above the the track, and there is no record of a spur here. Perhaps ore cars were temporarily parked on the main line or Tucker Mill branch, and ore loads teamed by horse and wagon down to the waiting ore cars. There is also a record of some cars shipped in April 1913, too.
Before heading up the Gilpin Tram main line, we’ll take a short side trip up the Tucker Mill branch. This short branch, a bit over 3,700 feet long, was built in stages. Tucker Mill Branch The branch originally began as a short 213 foot long spur off of the main line, built in May 1907. This was extended in September 1907. Dan Abbott wrote in the Gilpin Railroad Historical Society Newsletter, Issue #2, that: “Soon after this initial construction, the Tucker Mill – which was owned by F.W. Hearne and company – requested an additional 3,000 foot extension to their mill, and while negotiations were under way the Tucker Mill people constructed 87’ of this spur themselves in order to take care of their ore business which they were then shipping by wagon.” The total length of the branch was eventually 3,790 feet. The 3,000 foot branch extension was built by the Gilpin Tramway, on grading, ties and right-of-way provided by the F.W. Hearne and Company. Apparently this track didn’t quite go far enough, as the Hearne Company requested it be extended another 245’. 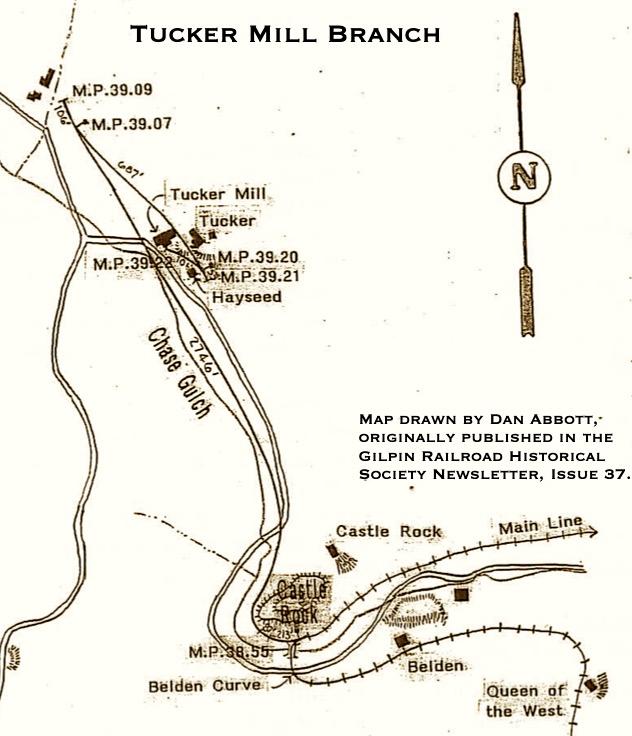 Map showing the Tucker Mill Branch trackage. So, this first branch construction had one turnout included. Dan Abbott goes on to write in the Gilpin Railroad Historical Society Newsletter, Issue #2, “The cost to the Gilpin Railroad Company for this 3,000 foot extension of Tucker Mill spur was $1,440 – which included 6,000 lineal feet of forty-pound steel rail; 200 pair angle bars; 600-pounds track bolts; 3400 -pounds spikes; one switch stand and connecting rod; two head chairs (single throw); one head rod; two bridle rods; one #8 ½ rigid frog; and the labor for laying and surfacing.” Lots of interesting details here – for example the spur was laid with the “heavy” 40-pound rail instead of 30-pound rail. And the turnout was a 8 ½ point frog. 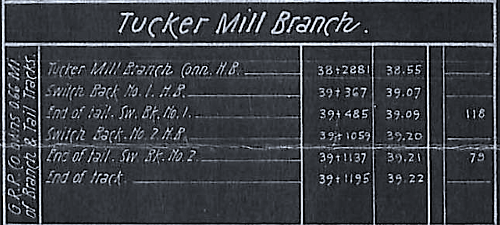 Tucker Mill branch trackage from C&S track chart. The F. W. Hearne thought that they owned 332’ of the branch. However, the C&S initially disputed this, and several items of correspondence ensued. Dan Abbott discovered some interesting tidbits. The C&S’ General Auditor, J. H. Bradbury, dated April 6, 1909, stated, “it appears from the record that the Tucker Mill Company constructed 332 feet of the spur to their mill…” The auditor was questioning whether this was on C&S property (it was not) and where the Hearne company got the track material? The manager of the Hearne Company coyly declined to enlighten the C&S about where they had gotten their track material. Dan Abbott goes on to write about C&S Superintendent Sol Morris, who replied in a later letter to the Auditor on April 28th, that, “As close as I can find from parties now there the material for this track was taken off the Pease-Kansas Branch by our former foreman Charles Mathas, and I am inclined to think, although I cannot confirm it, that H.W. Kane (Hearne Company’s manager) paid Mathas for this track, at least they paid him for doing this work and Mathas furnished the material…’ Superintendent Morris went on to say,”…It is a very easy matter for a foreman, who is inclined to be on the graft, to do work for this mine people and it would not be detected for some time to come.” So, the C&S decided to avoid controversy, and recognize that the Hearne and Company owned the 332’ of track. And, it sounds like the former Gilpin Tram foreman got away with “borrowing” some track material. The Gilpin Tram didn’t hesitate to take up track from unused mine spurs, and there are several records doing this themselves. 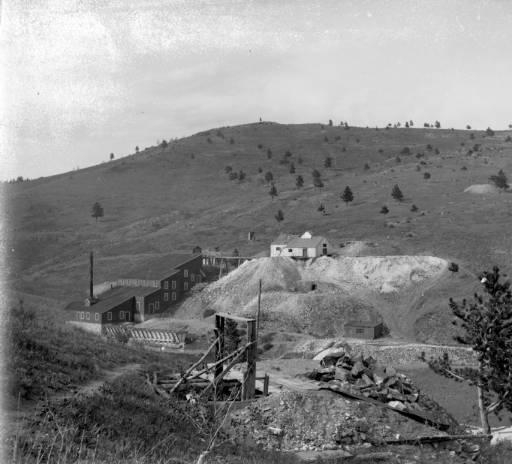 Photo of the Tucker Mill and Mine at the end of the branch - from the Denver Public Library. The Tucker Mill was apparently built and started up in 1903, as reported by the Gilpin Observer on February 12m 1903. The ore came from the adjacent Tucker Mine at the time. The mill had two water storage tanks for ore operations, and the water came from a spring inside the nearby Gundy Mine, which the Tucker Mill had purchased to secure this source. The Tucker Mill was very busy by 1909. This mill was reported to have one jaw crusher, three sets of rolls, three trammels, five Hartz jigs, ten stamps and three Wilfley tables. This mill could process 50 tons in a day. On March 6 1909, the Mining & Scientific Press reported that the Hearne Gold & Copper Mining Company operated the mill, and it had been upgraded to 10 stamps and could now process 75 tons per day. They were handling ore from the Anchor Mine at the time. By August 17, 1911, the situation had changed some, and the Tucker Mill was leased to J.A. Lind and C.A. Jackson of Black Hawk, and processing ore from the Hazeltine mine (which was also on the Anchor Mine branch). 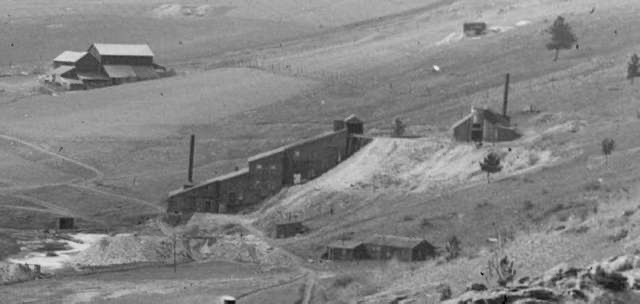 This shot shows the Tucker Mill and Mine. This is from the Denver Public Library Western History Collection, and is an enlargement of the background of a photo showing Castle Rock. A second switchback was added at some time – this was very short, just long enough for a locomotive and one car. Dan Abbott wrote about how the Tucker Mill branch could have been operated. His musings were in the Gilpin Railroad Historical Society Newsletter, Issue 37: “Assuming that each of the Shays were backed into the engine house each night, we now take Shay No.4 from the engine house up the Fullerton Mill Branch (686 feet) to the Clear Creek Wye where our Shay is turned and then proceeds down to the Warming House siding to pick up our four ore cars. At this point we have a train consisting of an engine - average length of 28 feet - and four ore cars - average length at 17 feet each - which gives our train a total length of 96 feet. After hooking on to the four ore cars the train then backs up the track to the mainline switch near the engine house and proceeds to the Tucker Mill Branch switch which was located near Belden Curve. Remember our engine is pushing the cars ahead of it at this point. Proceeding up this branch to the first switchback - whose tail track was 106 feet long - our train crew will spot three ore cars here, uncoupling the ore car nearest the engine and then back up the branch to the second switchback - whose tail track was only 56 feet long, only enough room for one car and the engine. From this point our engine will push its ore car down grade to the Tucker Mill and uncouple. While this ore car was being unloaded at the Tucker Mill our Shay would then proceed with switching tasks on other portions of the Gilpin line. Once unloaded the engine would then hook onto the ore car again and stage ti on the mainline near Belden Curve, then proceed back to the first switchback - where three loaded ore cars remained, hook onto another one and repeat the same switching maneuver until all the cars were unloaded at the mill, which probably took the better part of the day.” 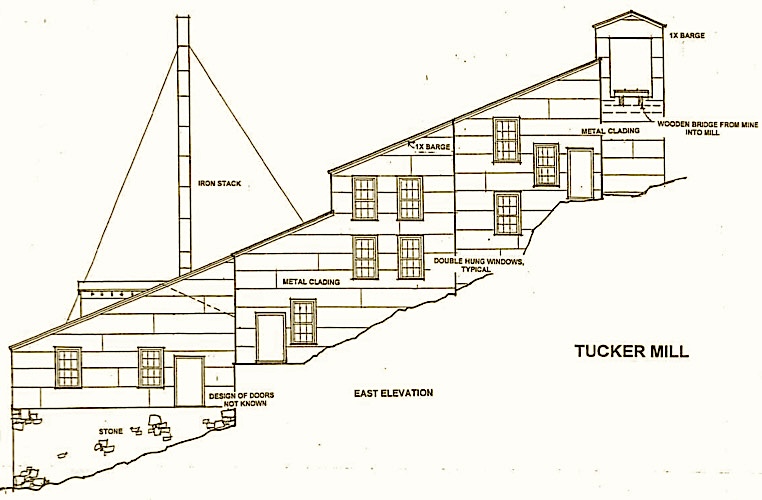 Mike Blazek drew plans for the Tucker Mill – here is the east elevation.
Keith Pashina
Narrow-minded in Arizona |
Re: Along The Gilpin Tramway - A Closer Look
|
|
 Immediately after leaving the Gilpin Tram mainline the grade curves around Castle Rock.  The grade at this point is gently graded in a forested area. 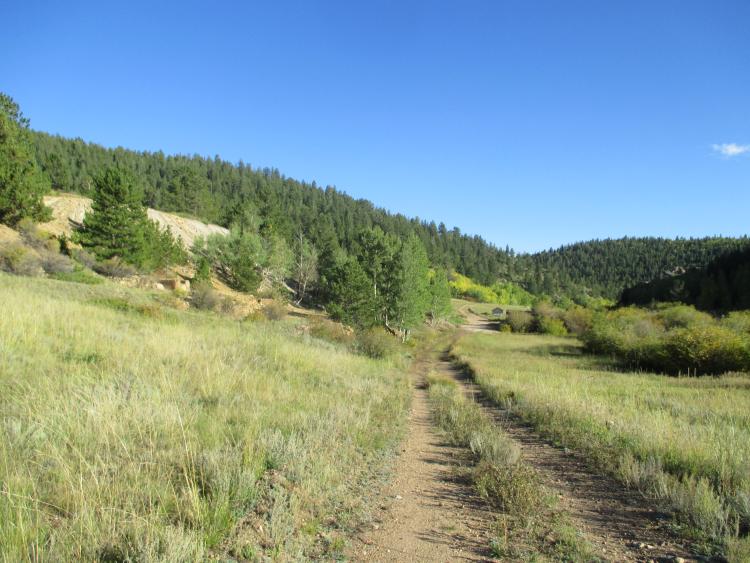 Entering Quartz Valley, the branch grade cuts across a wide grassy area, so unlike rugged Chase Gulch. 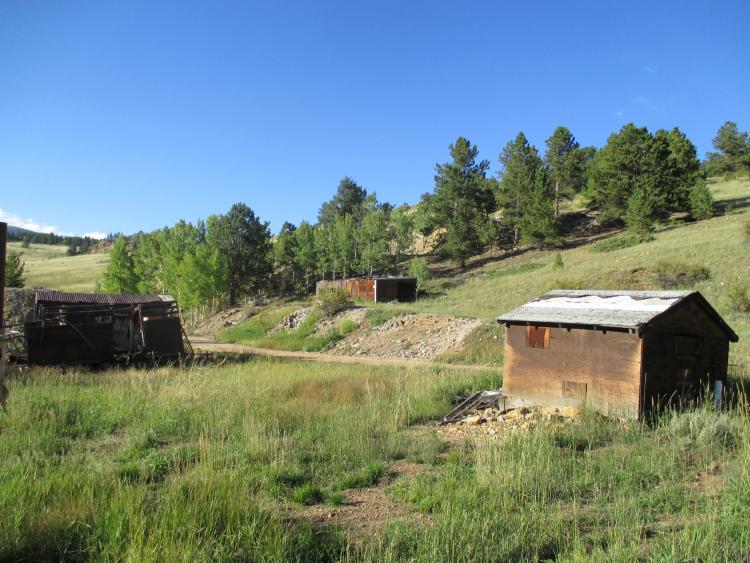 There used to be these 3 old sheds alongside the branch grade, but they have since been removed. I doubt these date from Gilpin Tram days – they seemed to be of much newer construction. 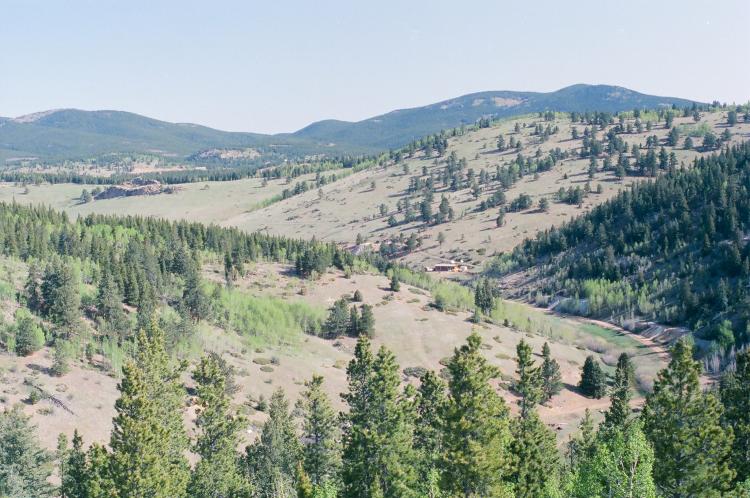 Here’s a broader view of Quartz Valley. The Tucker Mill was located at the waste rock dump that can be seen just to the left of the modern home.  Today, no buildings remain, and there are just waste rock dumps and some dry laid stone walls at the mill site. I think this land is now owned by Gilpin County, and open to the public off the Tramway trail.
Keith Pashina
Narrow-minded in Arizona |
Re: Along The Gilpin Tramway - A Closer Look
|
|
In reply to this post by Darel Leedy
Ha! Got to throw Roper a bone every now and then.
 The Boodle was not your ordinary Central City gold mine, more akin to Leadville properties. They extracted Galena, 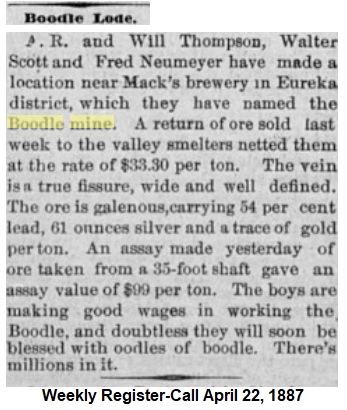 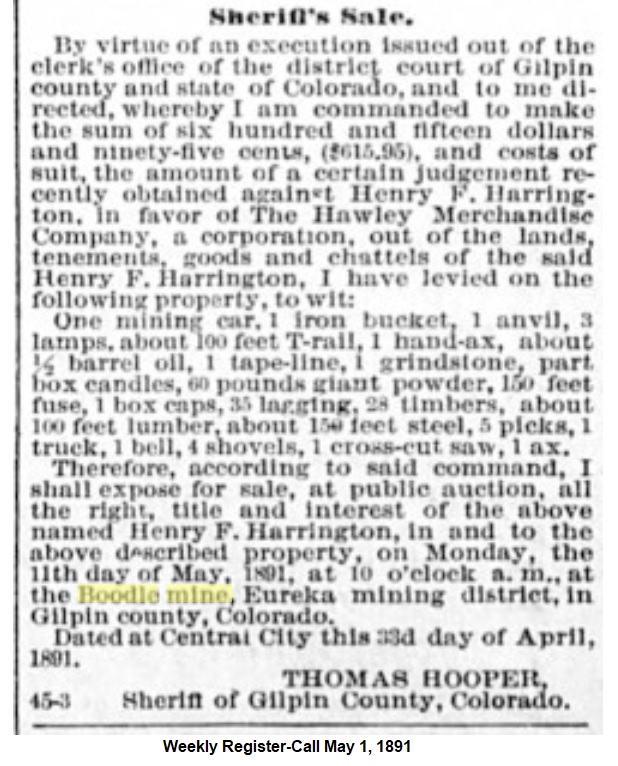 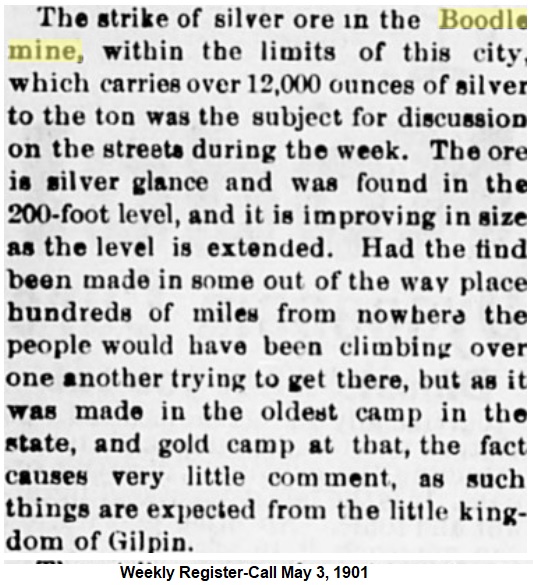 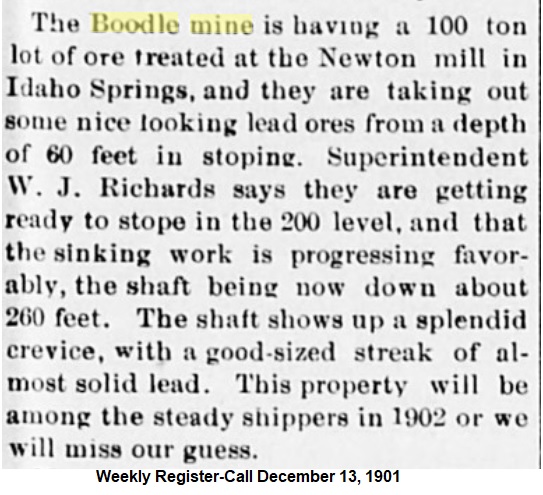 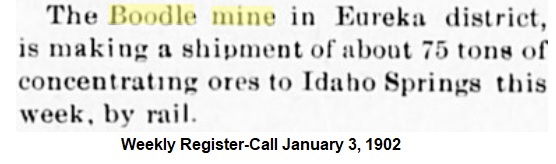 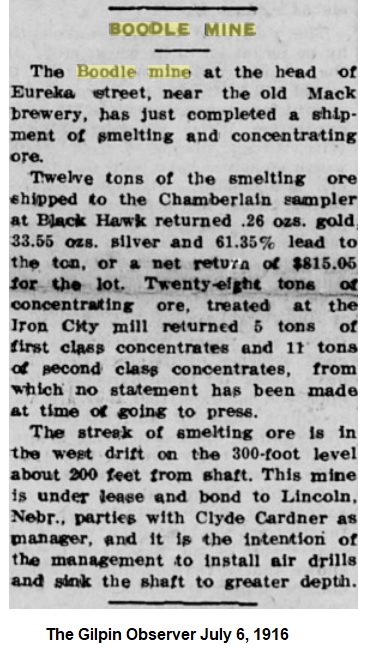 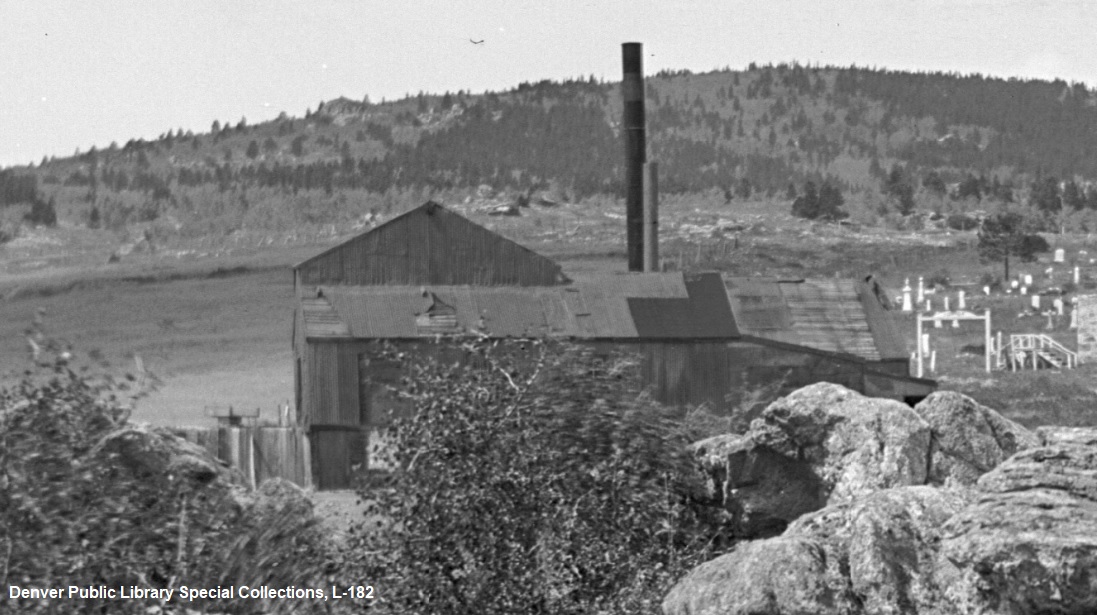 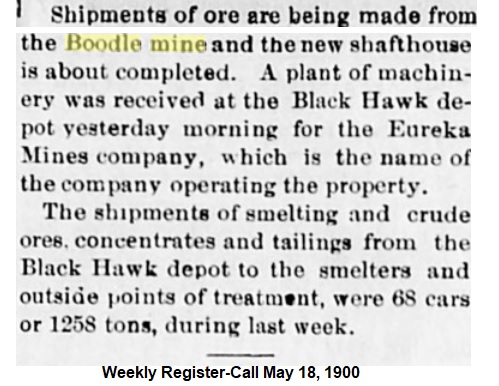 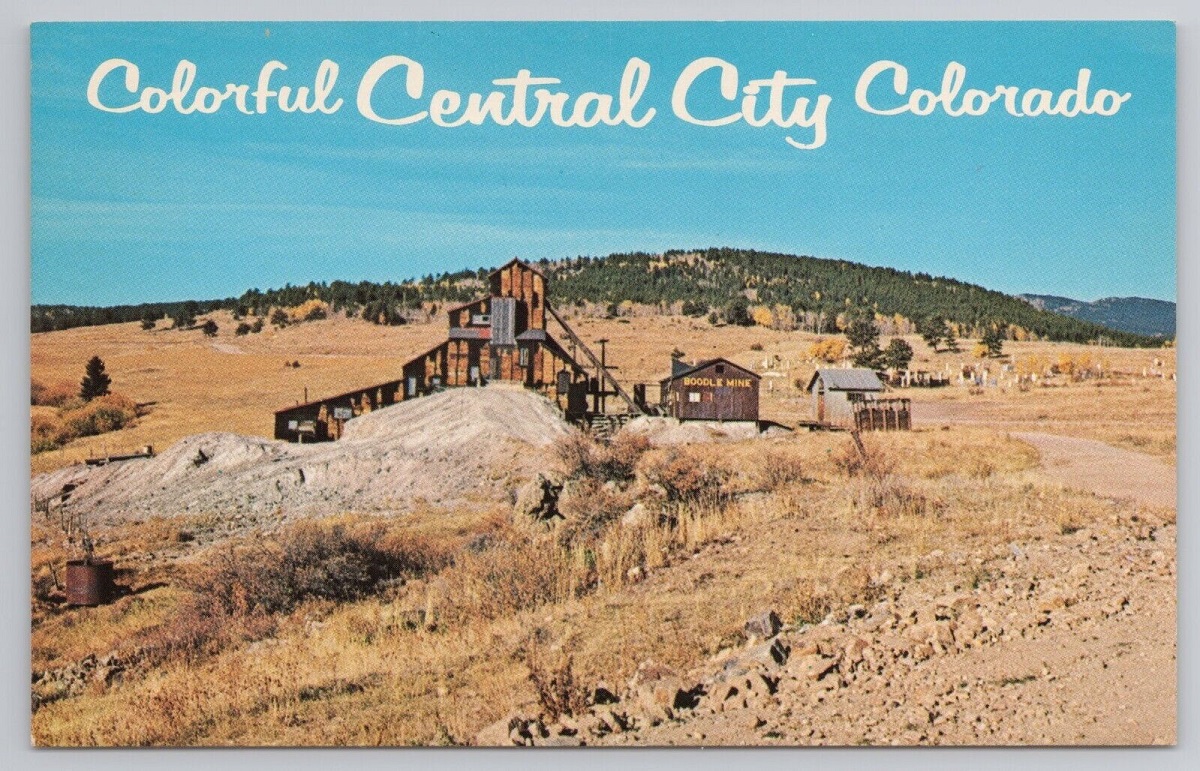
UpSideDownC
in New Zealand |
Re: Along The Gilpin Tramway - A Closer Look
|
|
Chris - good information on the Boodle Mine. Thanks for posting it. This operation was a lot more extensive than I had realized. I am also glad the building has been saved - it's easily seen from a public road.
 This map shows the location of Winnebago Hill, and the sections of the Gilpin Tramway covered in previous posts. WINNEBAGO HILL Back at Tucker Mill Junction, which is at the head of Chase Gulch, the Gilpin Tram main line crossed the Chase Gulch stream bed over a dry laid stone retaining wall and short bridge, and began its climb up Winnebago Hill. Winnebago Hill is a long narrow hill running generally east-west. The Gilpin Tram needed to climb around the north, east and south sides to reach Eureka Gulch. To do so, the grade climbs about 300’.  The grade was supported on dry laid stone walls as it crossed Chase Gulch. The small waterfall at this location can be seen. View is looking north. The main line curved around nearly 180 degrees, and began its assault on the north slope of Winnebago Hill. Inside this curve was the Belden Tunnel. This mine had high hopes, and at one point began construction of a stamp mill nearby – the stone wall ruins can be seen today. To the best of my knowledge, this mining operation was not a shipper on the Gilpin Tram. 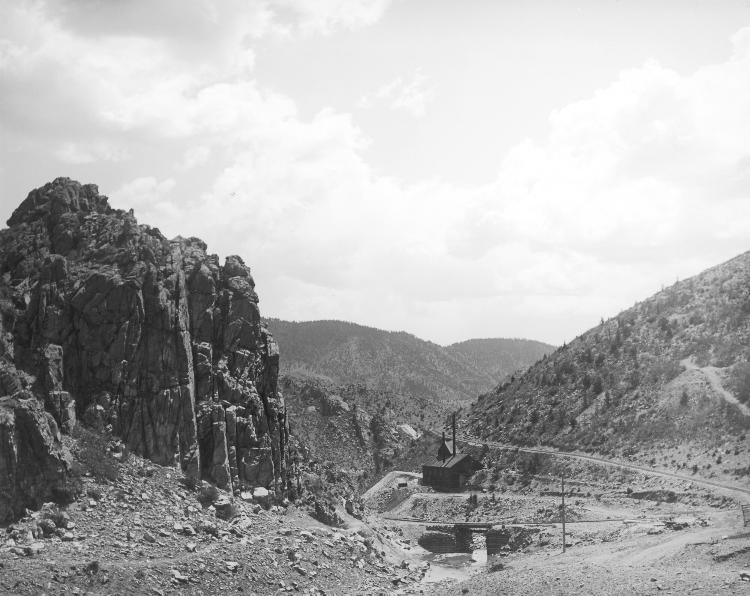 The tramway grade makes mule-shoe-like curve here, and the steepness of the grade as it climbs Winnebago Hill is easily seen. Castle Rock is at the left, Chase Gulch and the bridge in the center, and the Belden Tunnel is just above it. The branch to Tucker Mill had not be constructed at the time this photograph was made. This view taken by H.H. Lake is from the Denver Public Library, Western History Collection, Image Z-6877. 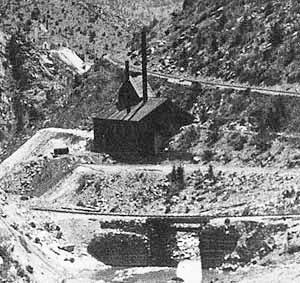 An enlargement of the previous photo shows the Belden Tunnel. The mine is tucked inside the mule-shoe curve. This would make a great scene on a model railroad! Today, the mine and railroad bridge have vanished from this site. 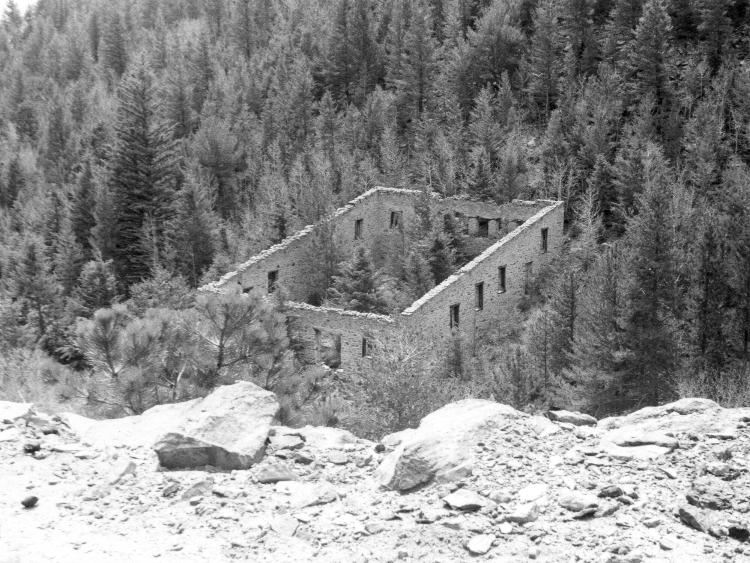 The Belden Tunnel company had ambitious plans, and had begun a stamp mill nearby in Chase Gulch. This structure was never completed, however. This image is from the grade near Castle Rock, and looking south across Chase Gulch. This is from the Denver Public Library, Western History Collection, Image X -2077. The ruins are still there today. 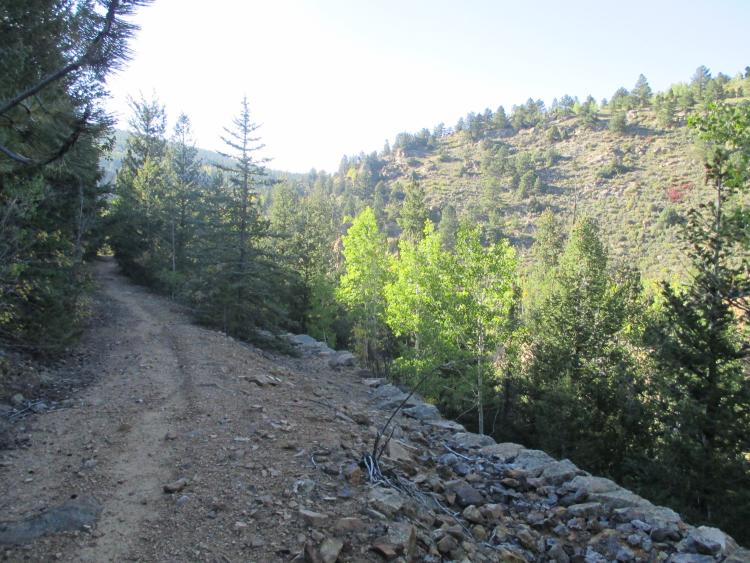 Climbing further, a very substantial and wide roadbed was constructed above a dry laid stone wall. View looking west.
Keith Pashina
Narrow-minded in Arizona |
Re: Along The Gilpin Tramway - A Closer Look
|
|
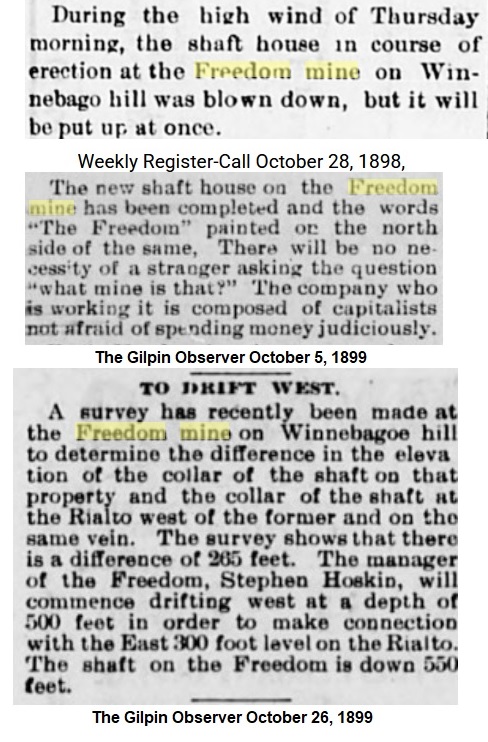
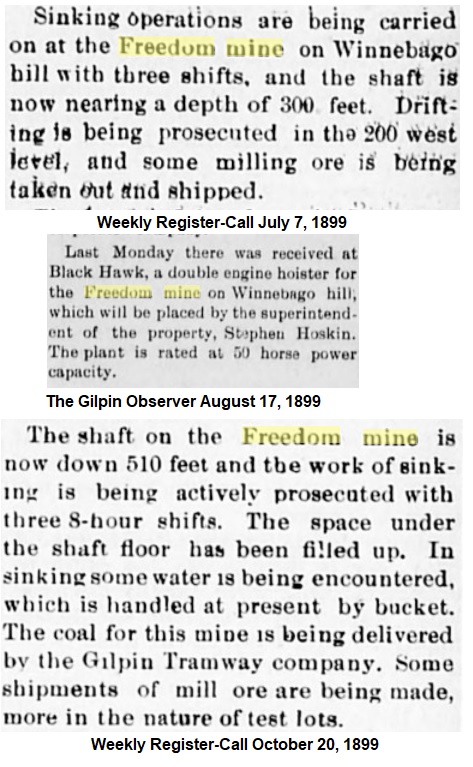
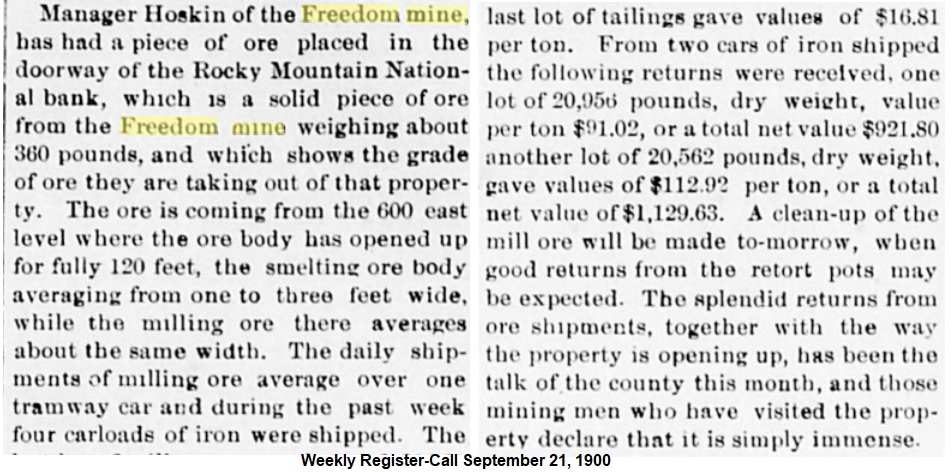
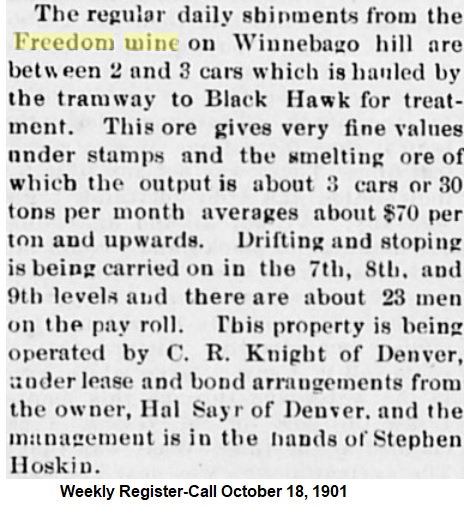
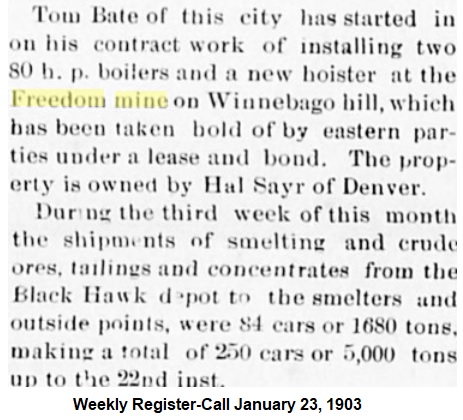
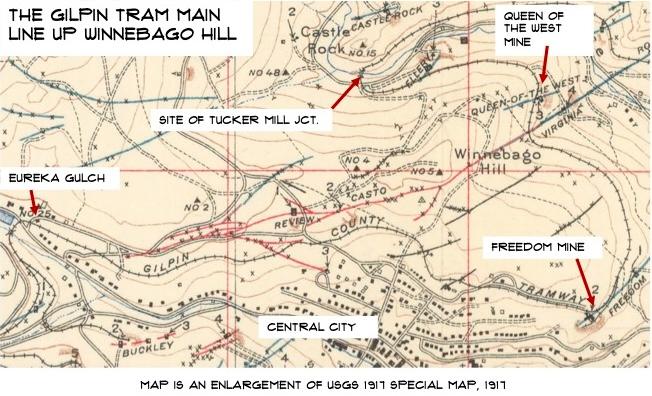 Map of the Gilpin Tram’s trackage on Winnebago Hill. This is an enlargement of the USGS 1917 special map (it is referred to as a “Special” because the mines and mills are referenced by name and location – a very handy map to have in your library!) Roadbed construction methods were similar to those used in Chase Gulch – the right of way used a combination of shallow cuts, fills, and dry laid stone retaining walls. As the grade neared the east end of Winnebago Hill, it was typically supported on a large dry laid stone wall constructed of large stones and very wide – I don’t know why the builders did this. Curving around to the east side of Winnebago Hill, the grade passed by the Queen of the West Mine, and immediately below the Virginia Mine. The Queen of the West shipped ore on the Gilpin Tram, although it appears that there wasn’t a spur there. Cars were apparently left spotted on the main line, loaded while the train worked further up the line and picked up on the return trip. This practice was documented in newspaper articles for other mines, such as the Columbia (on Quartz Hill). There are records of ore shipments from the Queen of the West in 1898 to 1900. 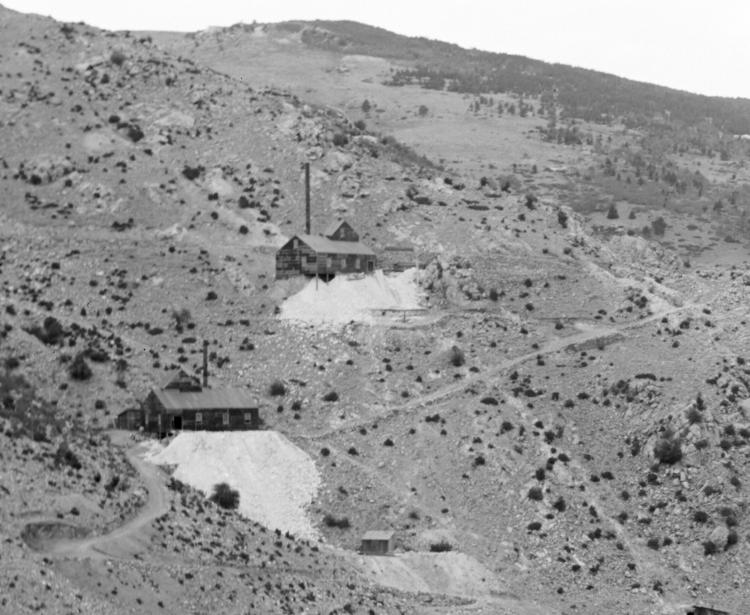 We have seen this view before. The Queen of the West Mine is at upper center, and the Gilpin Tram grade crosses right to left immediately behind it. The Virginia Mine is immediately below. This view was taken by H. H. Lake and part of the Denver Public Library collection, and looking west. 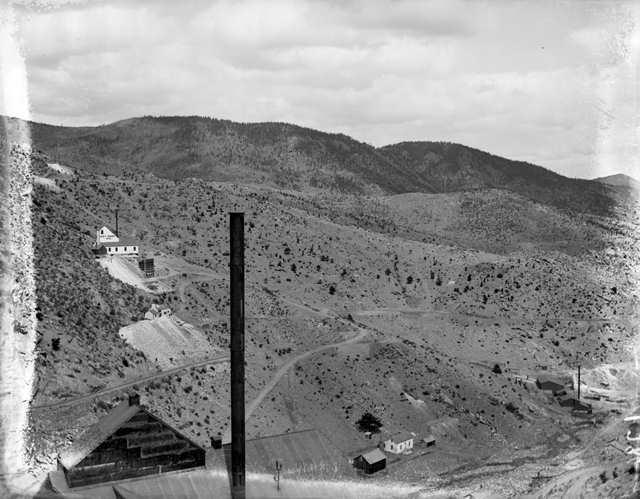 An enlargement of a photo of the Robert Emmet Mine shows some detail on the roof of the Queen of the West Mine. There are two square-shaped ventilators on the peak of the roofs, and the mine’s 3-chime whistle can be seen to the right of the smokestack. 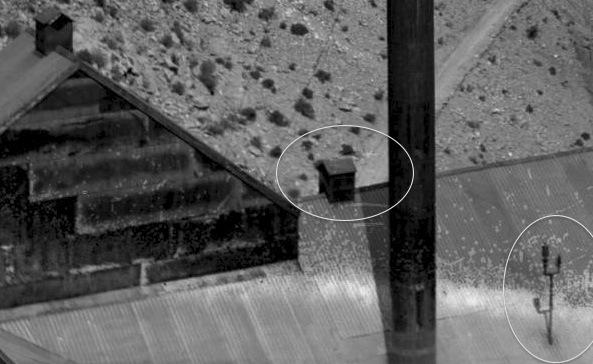 Details of the Queen of the West Mine roof. This little details would look great on a model. 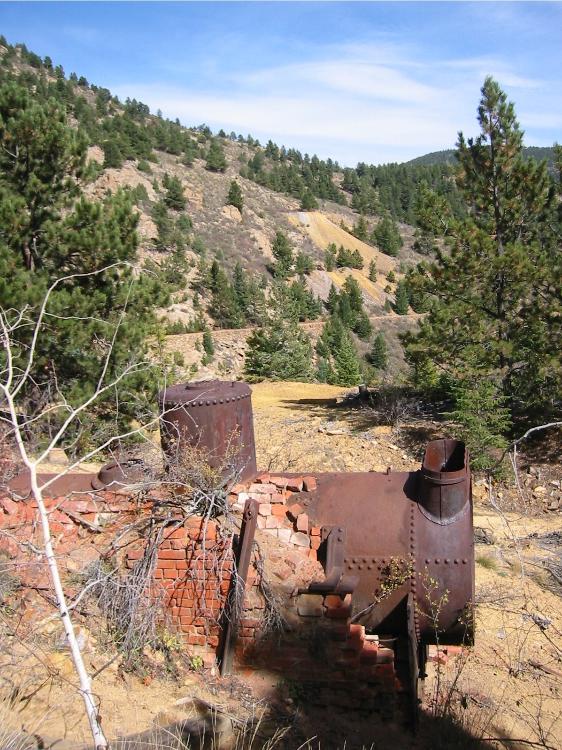 Today, nothing remains of the Queen of the West or Virginia Mines except the Virginia Mine’s boiler. The main line continued up the east face of Winnebago Hill, still on a steep grade, and curved around to the south slope, where the Freedom Mine was soon reached. The Gilpin Tram had a spur here to serve the mine, and this mine was an active shipper, with ore shipment records beginning in 1899, and ending by 1912, maybe earlier ( things get murky here, because traffic records are incomplete – there are random monthly records here and there, and a few annual summaries, but a complete, continuous record). Referring back to my December 29, 2024 post on this thread, the Freedom Mine had a short daily haul of three ore cars between the mine and the Oliver mill. 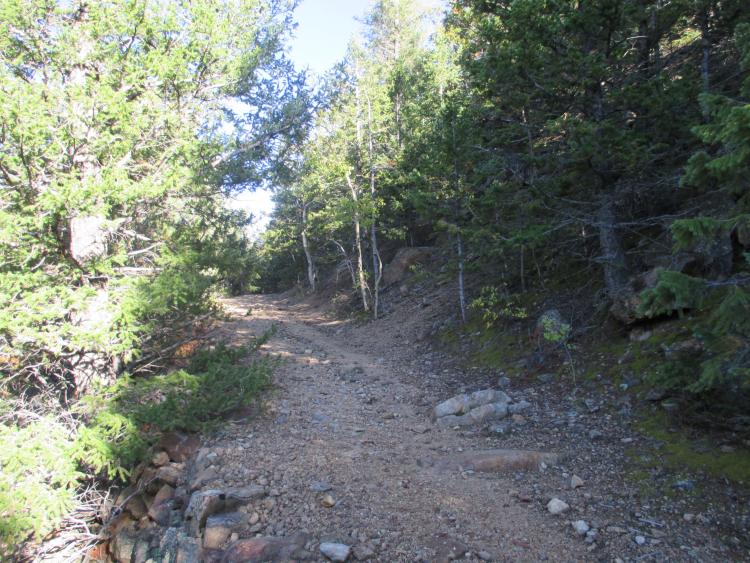 Much of the grade on the east slope is gently graded into the hillside. View looking south. 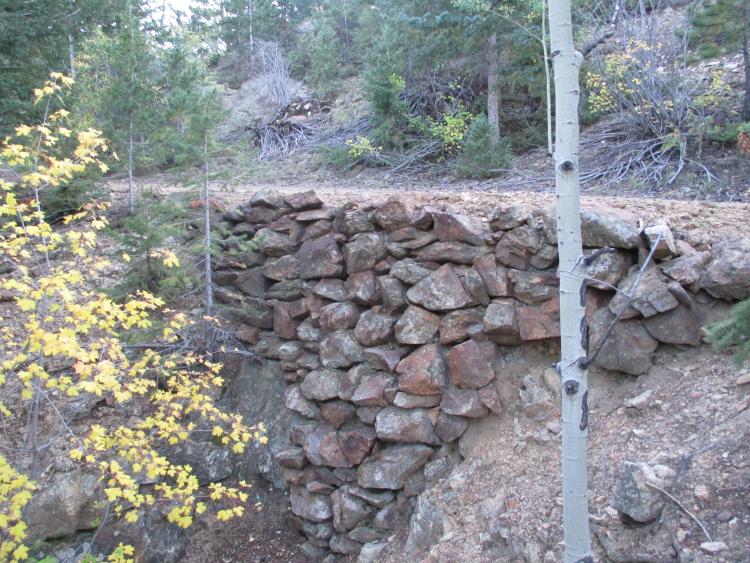 One of the small dry laid stone walls on the east slope of Winnebago Hill. 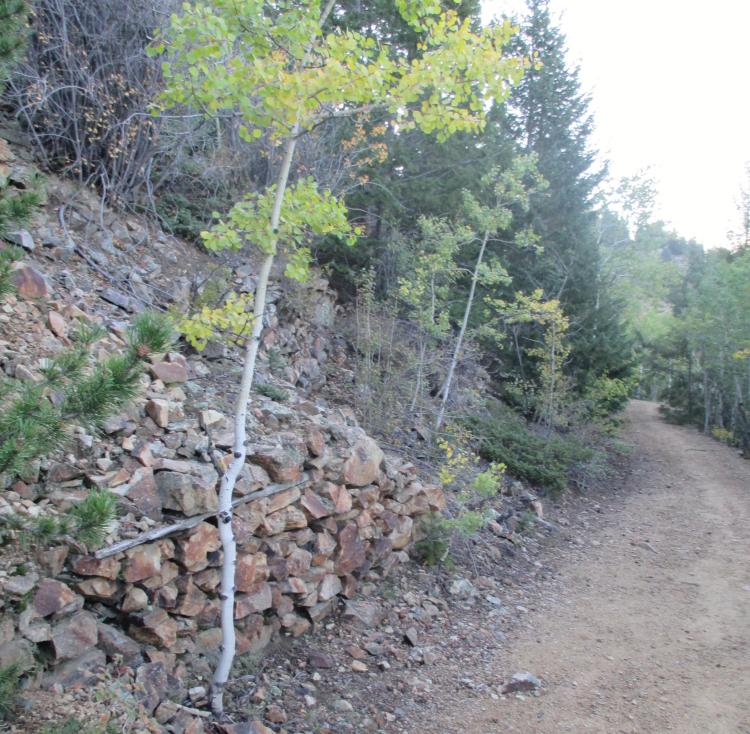 Although less common, stone retaining walls were sometimes constructed on the uphill side of the right of way. 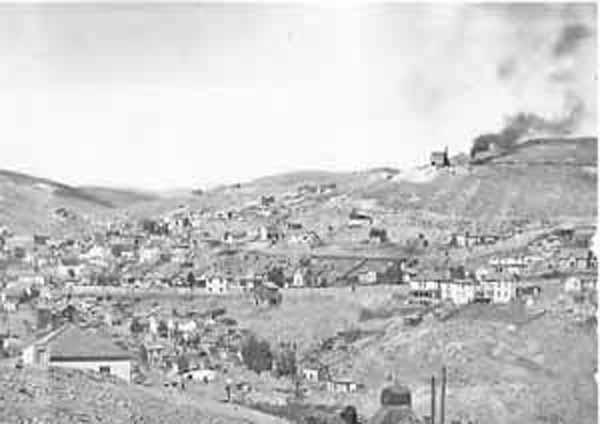 A familiar view from the Denver Public Library. View is looking northwest over parts of Central City. A Gilpin Tram train is smoking it up as it climbs Winnebago Hill, and is about to pass by the Freedom Mine. 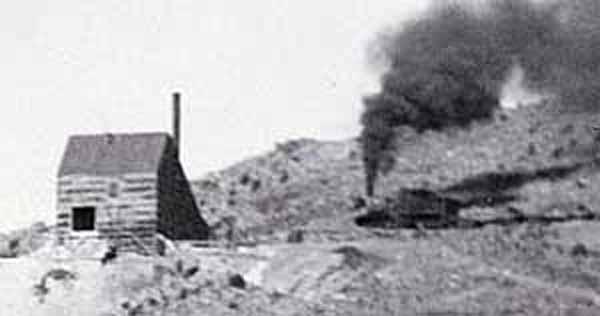 Enlargement of the previous photo shows the south side Freedom Mine. The spur branched off where the train is, and went alongside the south wall. 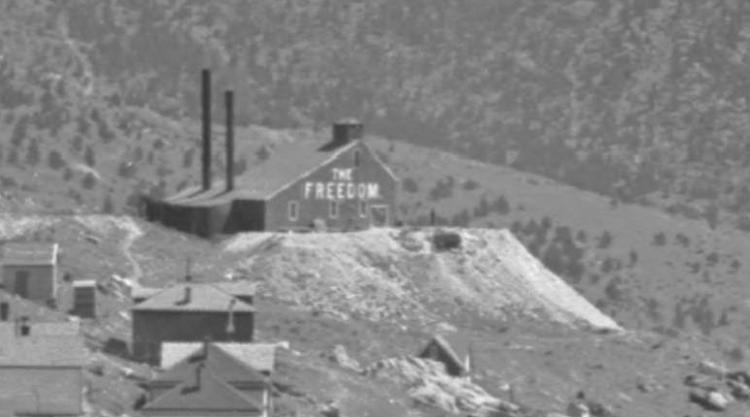 Enlargement of another photo from the Denver Public Library Western History Collection shows the Freedom Mine. The mine’s name is prominently painted on the wall. 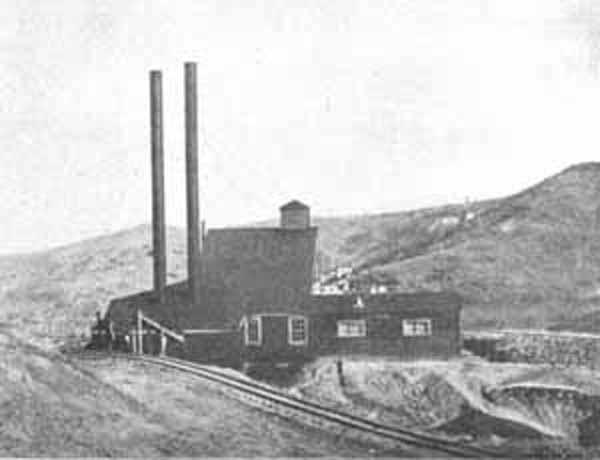 A closer view of the Freedom Mine’s west side, taken from the Mining Investor Magazine, about 1907. The Gilpin Tram main line is visible in front.  The south slope of Winnebago Hill, looking east. The grade is easily scene just below the dirt road – note the typical stone retaining walls. The waste rock dump of the Freedom Mine is visible at about the center of the photo. The hillside looks very different today, as many homes constructed in the 1880s here were subsequently demolished and salvaged for their lumber in the 1920s and later.  Shay #5 is hauling a train of ore cars loaded with coal and empties on Winnebago Hill. Photo courtesy of the Denver Public Library collection. 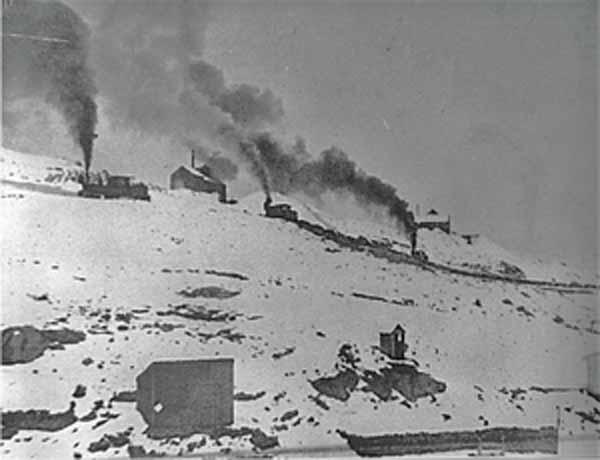 Since the tram grade was just above a residential area of Central City, it was easy for photographers to catch an occasional photo of trains. A triple header (actually, the entire active roster) is hauling a lengthy train up Winnebago Hill. Photo courtesy of the Denver Public Library collection. 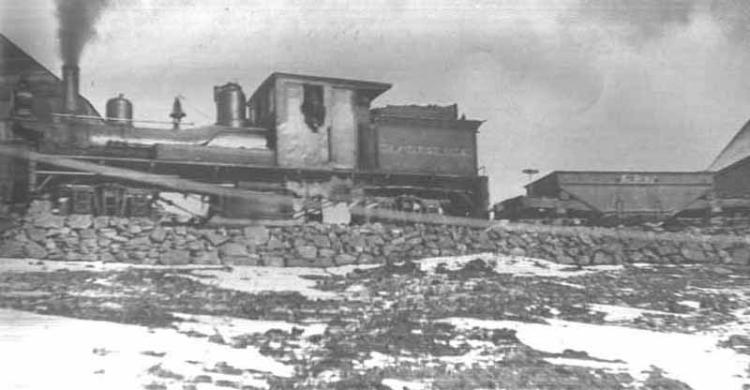 On yet another day, a photographer caught a train of empty ore cars climbing Winnebago Hill. Photo courtesy of the Denver Public Library collection. 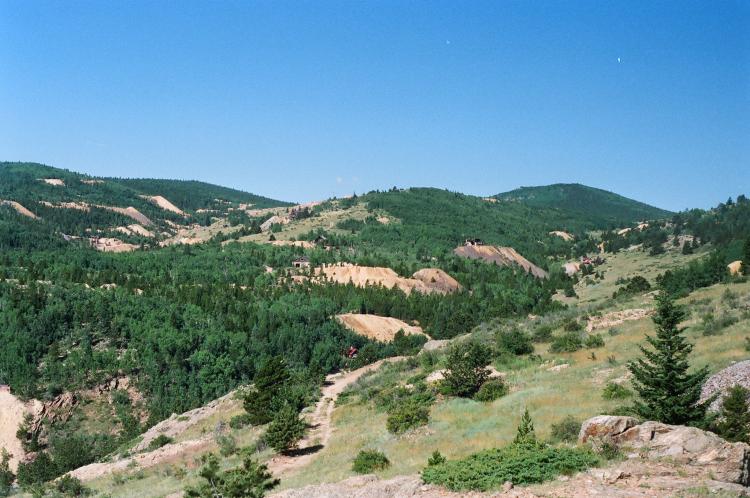 View looking westward from near the top of Winnebago Hill. The tram grade can be seen snaking its way towards Eureka Gulch. The mine waste rock dumps at center are on Gunnell Hill. 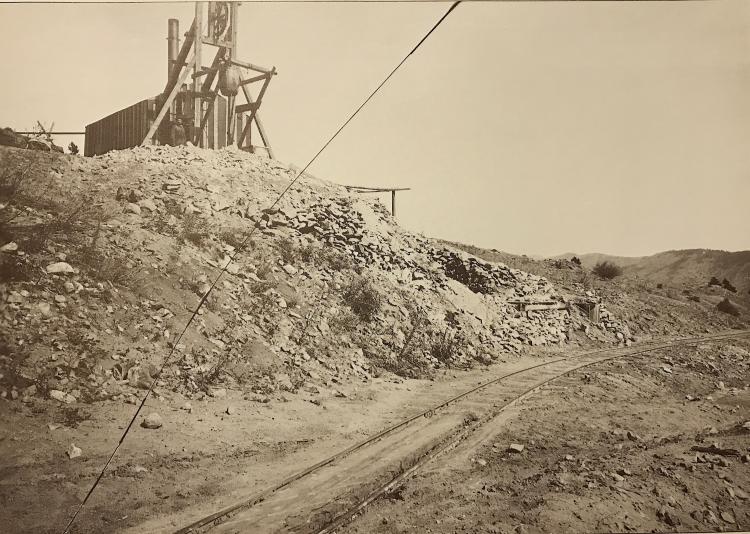 This image by Lachlan Maclean shows the main line in the foreground, and a small mine operation above it. Mud and water runoff have partially buried the tracks, and trains have cut flangeways through the debris. Photo courtesy of the Denver Public Library collection. 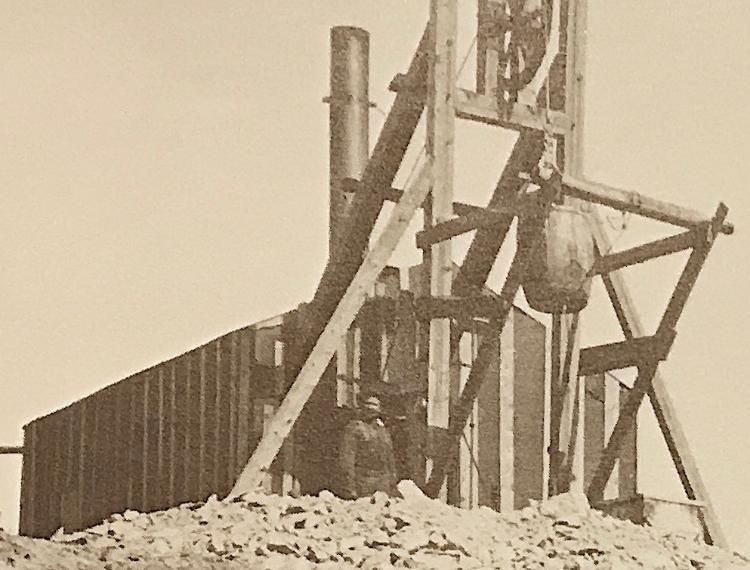 A closer view of the small mine shown in the previous photo. 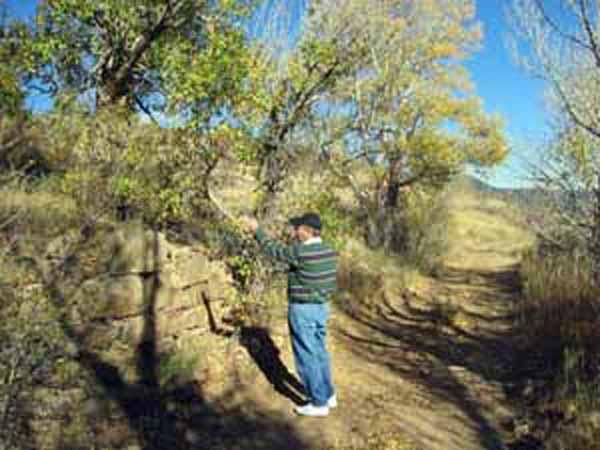 Joe Crea and I hiked the grade one day, and Joe identified the location of the mine shown in the previous photo. Joe is standing on the grade. Leaving the Freedom Mine, the main line snaked its way across the south slope of Winnebago Hill. This section was a combination of light grading and dry laid stone walls. This part of the line was immediately above a residential section of Central City. A few small mine operations were passed by, and I have seen no record that any of these were Gilpin Tram shippers. Continuing our journey, the tram soon crosses Eureka Street, which is in Eureka Gulch. There is a lot to look at here, and that will be the subject of the next posts.  A train of 7 loaded ore cars and either a gondola or the water car, and a caboose, are descending Winnebago Hill. Eureka street and a residential area are in the foreground. The two towers are identified as "wireless towers" on page 33 in Frank Hollenback's "The Gilpin Tram", published in 1958. This seems plausible - if the photo were taken in 1900-1917, radio had been invented by then, so someone must have been experimenting.
Keith Pashina
Narrow-minded in Arizona |
Re: Along The Gilpin Tramway - A Closer Look
|
|
I'm getting behind a little here
 The Tucker Branch was "off limits" on my visit there.  This tirade of signs caught my attention due to never seeing stuff like that in my country. 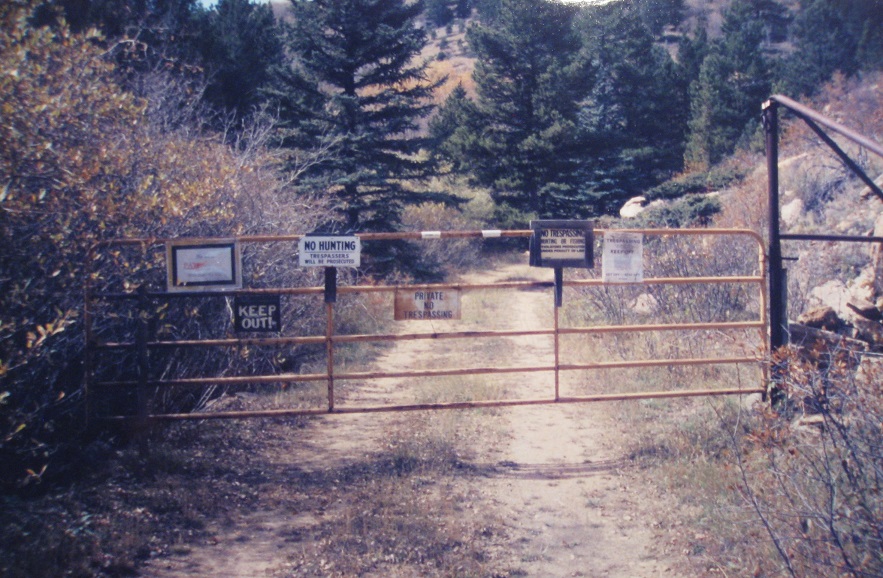 And I came across this Feller at the Virginia, a real friendly bloke he was.  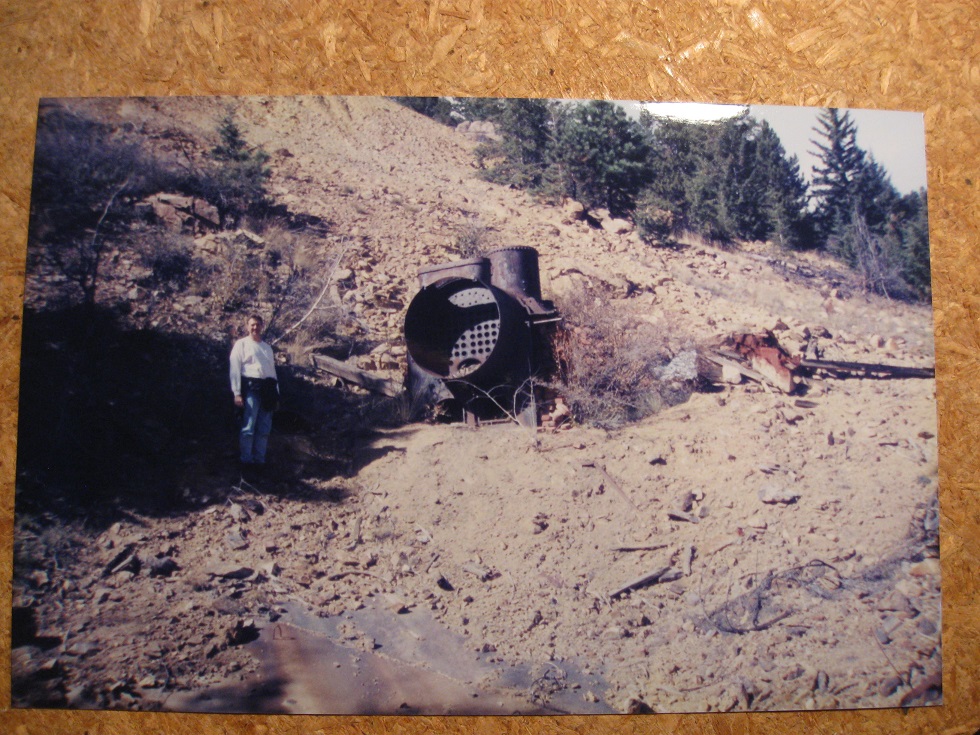
UpSideDownC
in New Zealand |
Re: Along The Gilpin Tramway - Freedom Mine Appended.
|
|
            USGS 1917 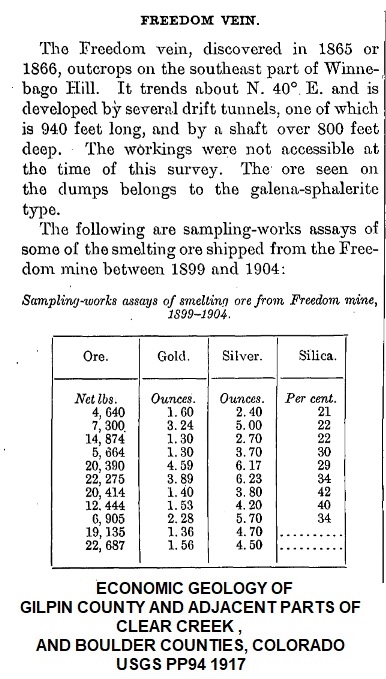 USGS 1963 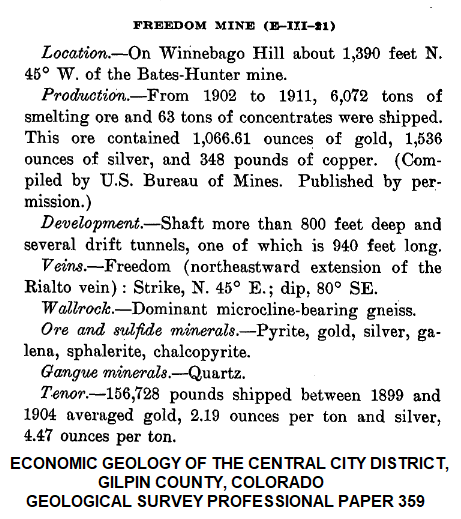
UpSideDownC
in New Zealand |
Re: Along The Gilpin Tramway - A Closer Look
|
|
In reply to this post by Chris Walker
Chris - a very interesting post!
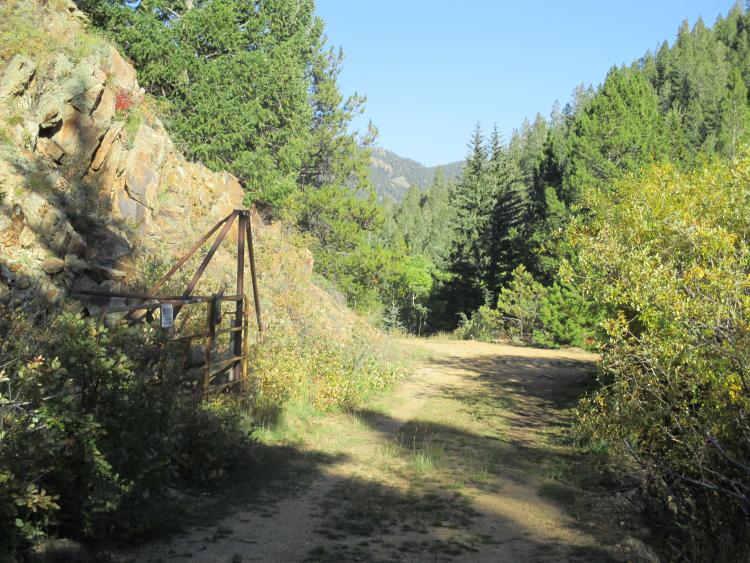
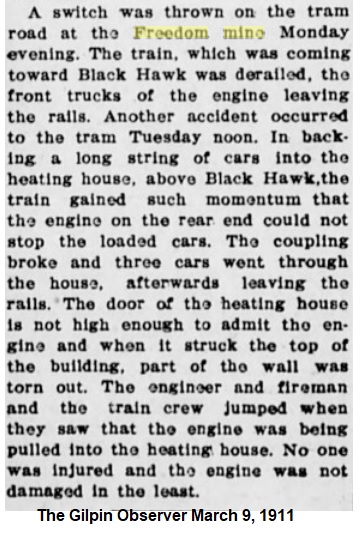
You posted the picture of the gate across the Gilpin Tram grade, near Tucker Mill Junction. When first I started exploring the Gilpin Tram grade, about 1986, the fence and gate were in place and so for many years, the Tucker Mill branch was off limits to me. Some government agency, perhaps the county, purchased parts of Quartz Valley maybe 15 or so years ago. About that time, the fence came down, and the old grade was now the Gilpin Tram trail. The newspaper accounts were interesting, too. First, there is one article describing 13 cars of ore for the Tucker Mill, but all of the spur hadn't been built yet. I wonder how they got the ore to the mill? Even if all of the track to the mill had been laid, the switchbacks were short, so the tram would have had to gradually bring the ore cars down in small cuts for unloading. Second, I had never heard of the accident where a train ran away and the locomotive crashed into the door of the warming house. That must have been quite a mess to clean up. This is the only newspaper mention of the warming house I have seen, except for mention of it when it was first constructed - a good find!
Keith Pashina
Narrow-minded in Arizona |
Re: Along The Gilpin Tramway - A Closer Look
|
|
 This view, from the Denver Public Library, Western History Collection, shows a loaded ore train pausing at the second water tank at Eureka Gulch. In the background is the City water reservoir and the Eureka Gulch bridge. Eureka Gulch, at Milepost 40.08 Eureka Gulch was crossed by the Gilpin Tram grade on a broad curve. These locomotives worked hard to climb out of the Clear Creek canyon, winding around the rugged rocky hillsides of Chase Gulch. The grade never really relented until the prime Quartz Hill mining district was reached, 4 miles uphill from Black Hawk. The little shay locomotives had fairly small water tanks in their tenders, and worked up quite a thirst climbing up the long grade up Chase Gulch. The mining country around Central City has always had problems with a good water supply. Water pumped out of the local mountainsides tended to be heavily laden with minerals, which caused scale, foaming and other problems with boilers. In fact, water quality was so poor, several mines had to have their boiler water hauled in to them on the Gilpin Tram’s specially built water tank car. When the Gilpin Tram crossed Eureka Street in Central City, they saw a golden opportunity for a clean, reliable water supply. The two-footer crossed Eureka Street about a half mile uphill from downtown Central City, at milepost 40.08. The city had built a water storage reservoir, for storing the water piped in from ranches several miles away. The Tram’s Eureka Street crossing was also 4 miles uphill from the Black Hawk engine house, and the shay tanks were probably pretty well drained after laboring their way upgrade with loaded coal cars and a long strings of empty ore cars. Central City had built a network of 3 reservoirs strategically set around town. The tram took water directly from the reservoir, paying for the water supply. 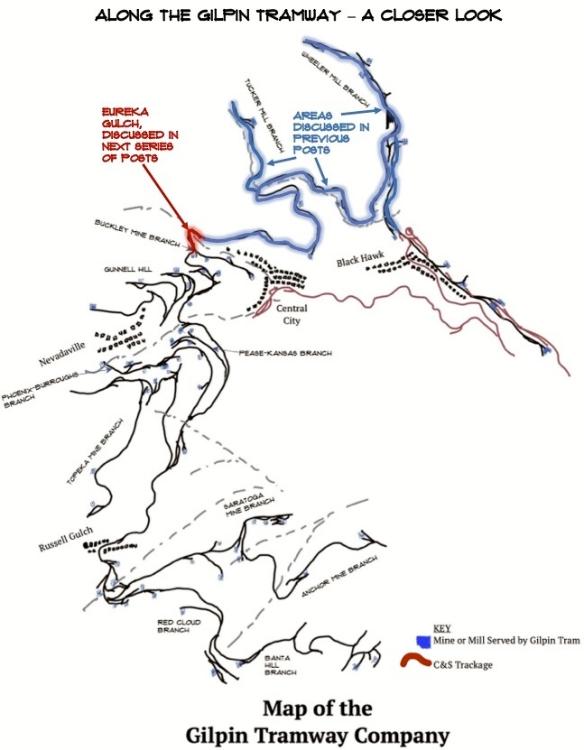 This map shows the location of Eureka Gulch, in relation to the portions of the Gilpin Tram we have covered in previous posts.  This nice view is looking towards Eureka Gulch. The photographer was standing on Winnebago Hill, looking west. Gunnell Hill dominates the center of this seen. I borrowed this image from another post on this C&Sng blog, and bot I cannot find the original post. My apologies to the original poster, for not being able to give you proper credit. The Gilpin Tram actually built two different water tanks at Eureka Street. The first was an enclosed tiny affair, constructed in 1887. It was later replaced by a larger tank that was built in about 1900, due to the increased traffic and larger shay locomotives being used at the time. The original shays #1 and #2 were being sold at about this time to the Silver City, Pinos Altos and Mogollon line in New Mexico. The Gilpin Tram purchased the larger shays #4 and #5 in 1900 and 1902, respectively. These locomotives were not only more powerful than the first shays, but consumed more water, too. The first tank was located on the south side of the tracks, and had an enclosed base. In the photograph, you can see how tiny the whole structure really was. This is the only close up photograph I have ever seen of this tank. 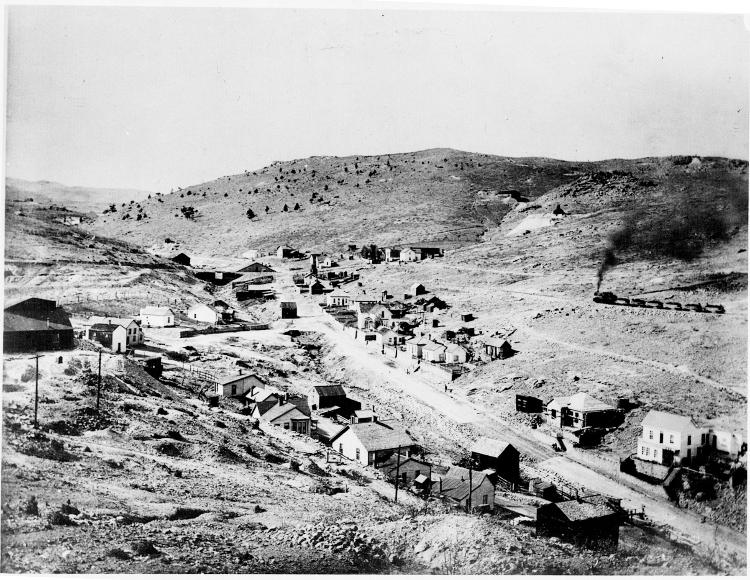 A Gilpin Tram shay with what appear to be 6 ore cars loaded with coal is approaching Eureka Gulch. At the gulch, the first water tank can be seen. Photo courtesy of the Mark Baldwin collection.  Another view of Eureka Street, looking west. The gulch is to the left of the street. The Gilpin Tram grade can be seen at right center, where is will cross the gulch on a broad curve. Photo courtesy of the Mark Baldwin collection. 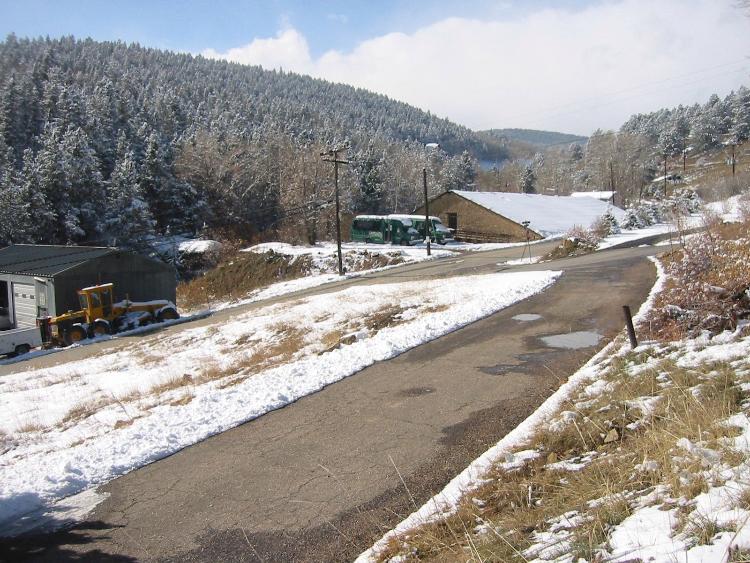 This is Eureka Gulch in modern times – photo was taken about 15 years ago. The paved road in the foreground is the former tram grade. The pipe sticking up on the right side marks the standpipe location of the second water tank. The water reservoir and bridge site can be seen in the background. 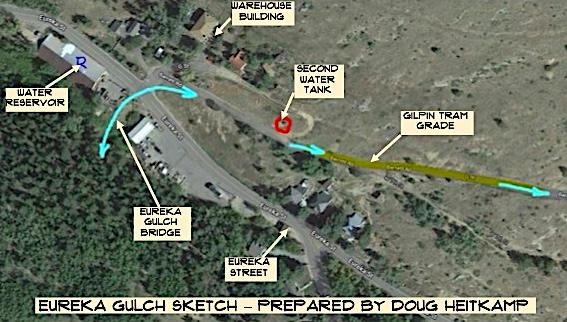 This overhead view of Eureka Gulch was prepared by Doug Heitkamp several years ago. All the key locations are marked.  Shay #1 has halted at the first water tank. Although adequate for small shays #1 and #2, as traffic increased and 3rd shay was purchased, the tank was soon undersized and replaced. Image from the Denver Public Library, Western History Collection. 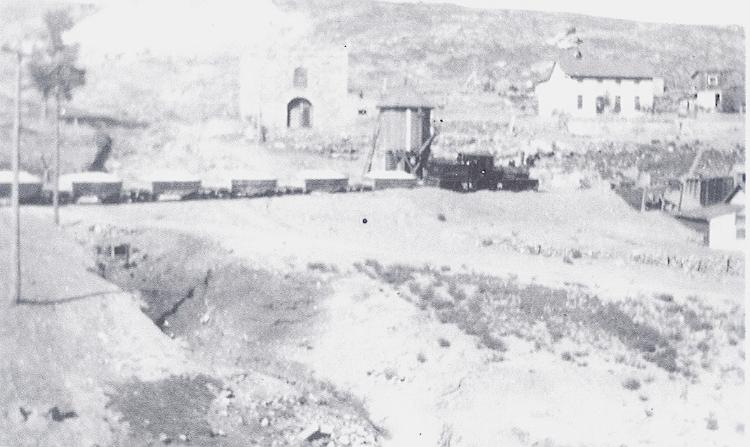 This image was provided by Dan Abbott, and shows Shay #3 headed downgrade with a train of loaded ore cars, and has paused at the 2nd water tank, perhaps for the photographer. Note the building just to the left of the water tank – it is still there today. 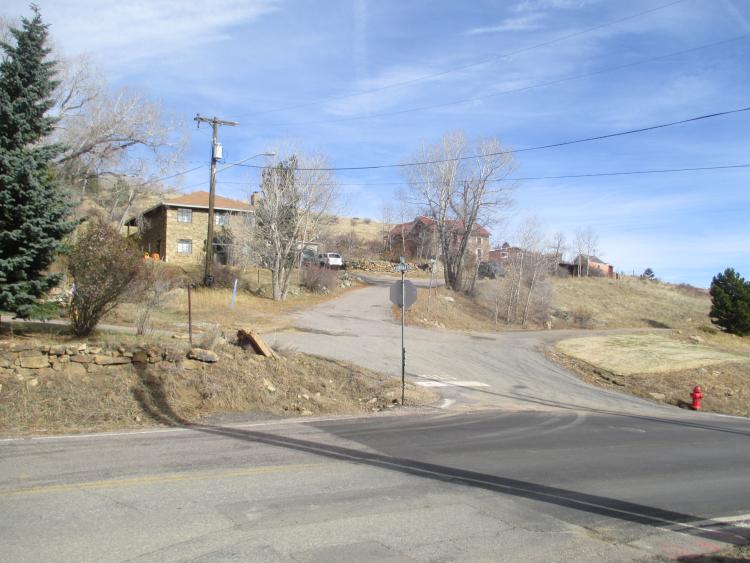 Another recent view of Eureka Gulch – the grade is the curving as it crosses Eureka Gulch. The same stone building is at left center.
Keith Pashina
Narrow-minded in Arizona |
Re: Along The Gilpin Tramway - A Closer Look
|
|
 Central City had 3 water reservoirs at one time, and this reservoir was located adjacent to the tram grade (the reservoir was constructed first). 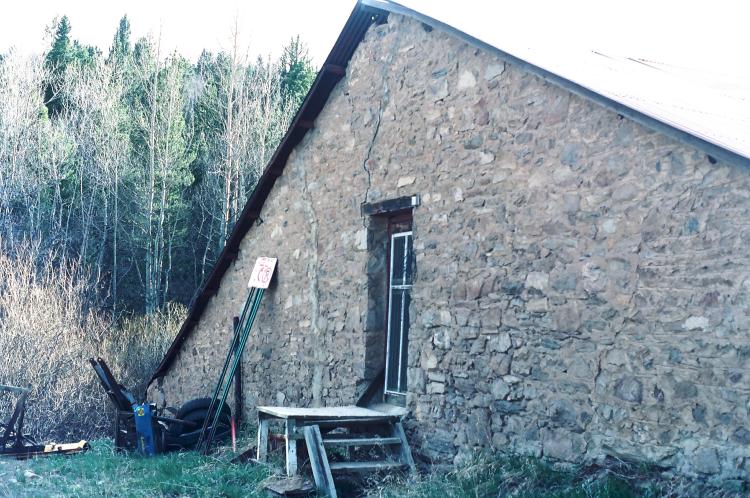 As with so many structures in Central City, the end walls of the reservoir were constructed of mortared stone masonry. 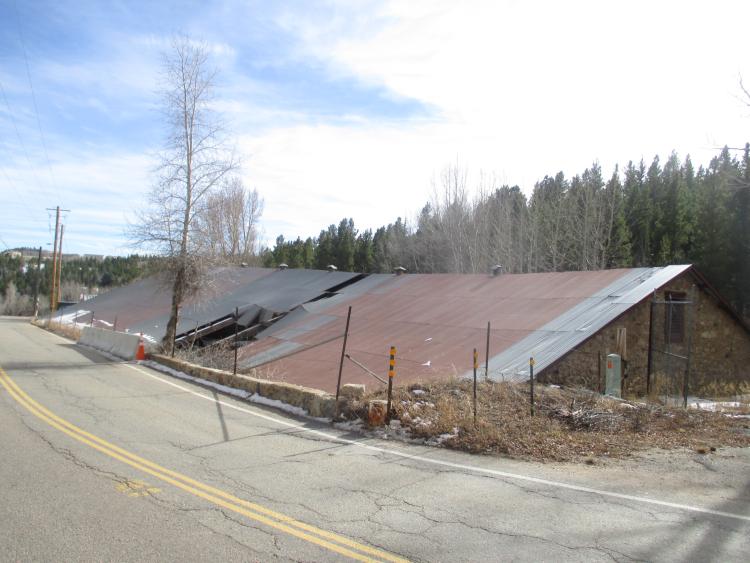 This view shows the west end of the city reservoir, and gives you an idea about how large these structures were. These structures are no longer in service. The second water tank was built around 1900, and was relocated on the north side of the tracks. At about the same time, the Gilpin Tram did some minor track work to realign the sharp curve it made as it wrapped around Eureka Gulch. The second water tank was of a more conventional style, and served the Tram until it was abandoned. For many years, a section of 4” diameter iron standpipe sat next to the road going up Winnebago Hill, marking the site of the second water tank. This pipe was removed in the last 10 years or so, and nothing else remains today. The Central City water reservoir was about 50’ wide and 125’ long, and mostly constructed into the ground, so only the only exposed portion was the large, peaked corrugated iron roof, and the triangular-shaped stone masonry ends. There was a small lineside shed between the reservoir and Gilpin Tram track, and I wonder if this may have housed a valve or pump. Eureka Gulch has a small, intermittently flowing stream running through it, and this required the tram to construct one of their characteristic simple bridges. The abutments were log cribbing filled with stone, and a simple wood beam span across the streambed. The period photographs show the grade was several feet above the stream bed, and it apparently silted in over the years to the shallow crossing remaining today. 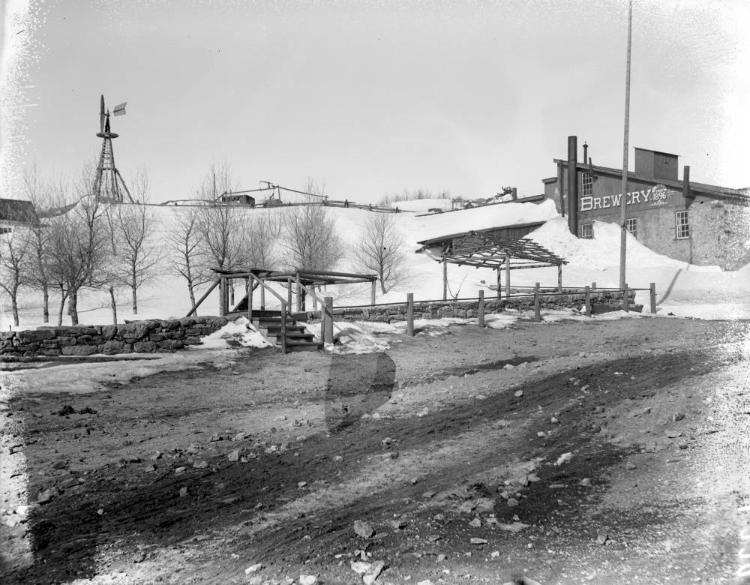 The Mack Brewery, located on Eureka Street, about ¼ mile above the tram grade. It was a very popular spot in its day. This brewery shut down around 1899, due to outside competition. This image is from the Denver Public Library, Western History Collection, call number L-229.  Stone walls of the brewery ruins remain today. The ruins were recently stabilized by the developer of an adjacent townhome development.  Across the street from the Mack Brewery are these ruins. Part of this structure formerly was a saloon, associated with the brewery, and another part appeared to be used for stables. This is a very interesting building – be sure to take a closer look next time you pass by! 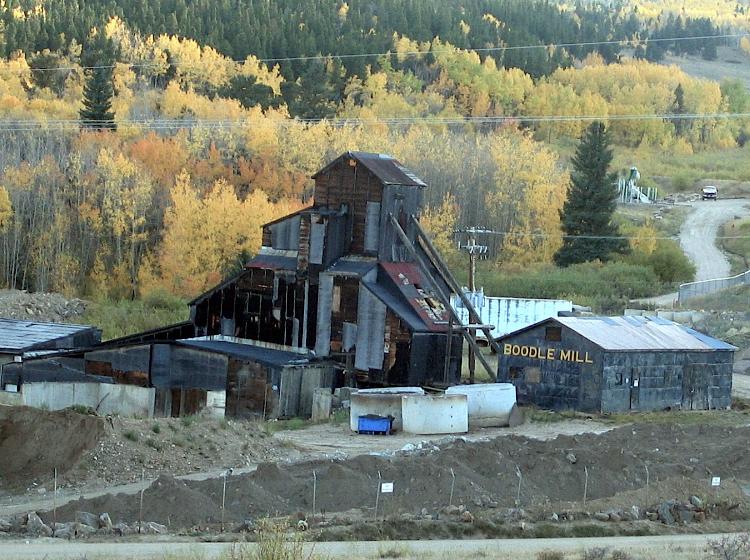 At the top of the hill, and next to Eureka Street, is the Boodle Mill. This photo was taken several years ago, before it was renovated with new exterior cladding. Although located some distance from the tram grade, Eureka Gulch also was home to a brewery, located perhaps ¼ mile further up the gulch. At the top of the hill, there were at least three different Central City cemeteries, as well as the Boodle Mine. Ruins of the brewery remain, as does the recently re-clad Boodle Mine. 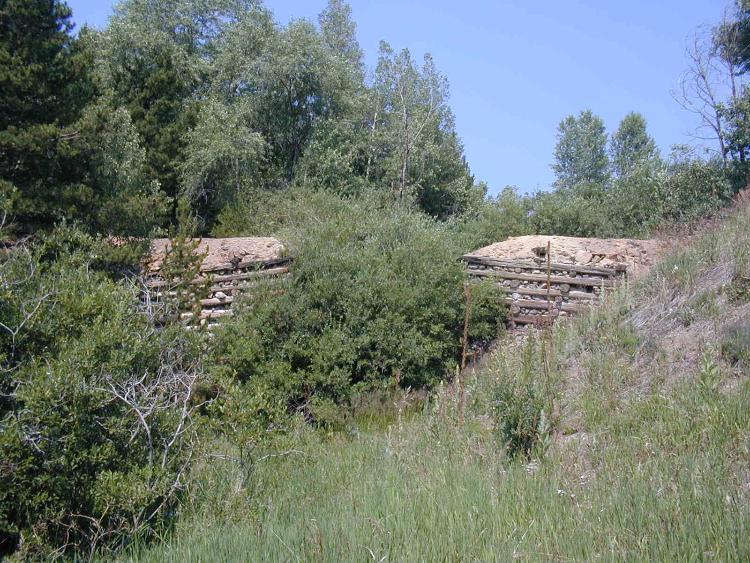 At the Gilpin Tram bridge crossing over the gulch, the two log cribbing abutments still remain. 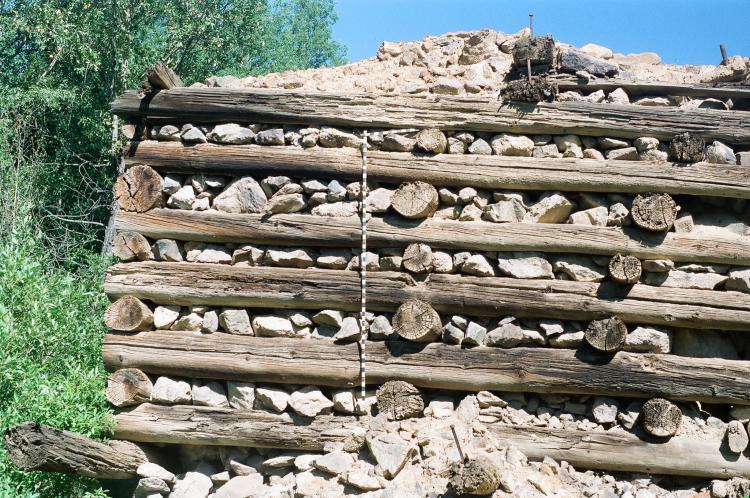 A closer view of the north abutment shows details of how the abutment was constructed. The tilt of the abutment towards the left is actually there, not just the camera angle. The abutments tilt back from the bridge span over the gulch.
Keith Pashina
Narrow-minded in Arizona |
Re: Along The Gilpin Tramway - A Closer Look
|
|
 This image was taken by H. H. Lake, and a part of the Denver Public Library, Western History Collection. The view is looking southward towards Gunnell Hill and in the background, Quartz Hill. Most of the mine waste rock dumps that can be seen were served by Gilpin Tram trackage. We will be taking a closer look at these locations in future posts. 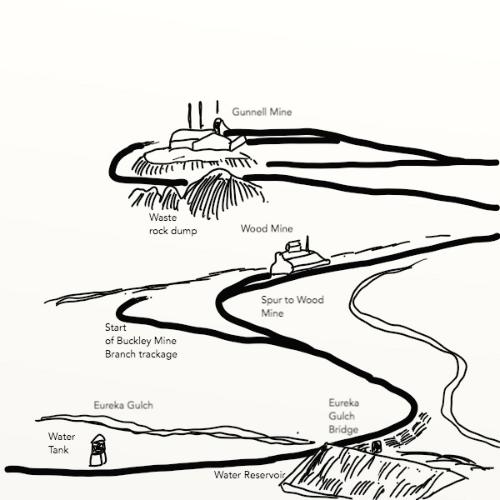 This sketch explains what is shown in the preceding photo. Although at the edge of the glass plate negative, the slightly blurred first Gilpin Tram water tank can be seen at lower left, along with the reservoir, and gulch bridge crossing. 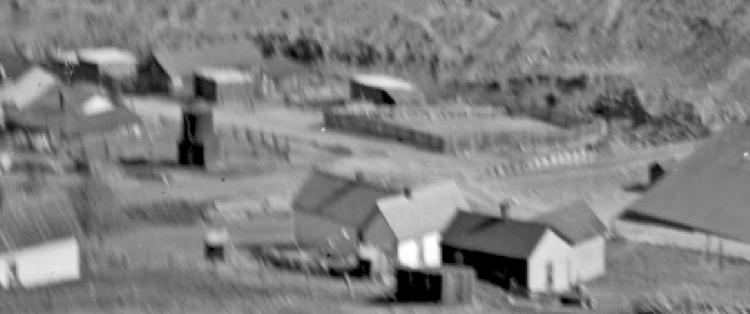 This image is an enlargement of the preceding HH Lake photo, and shows the first water tank. The reservoir can be seen at the right edge. 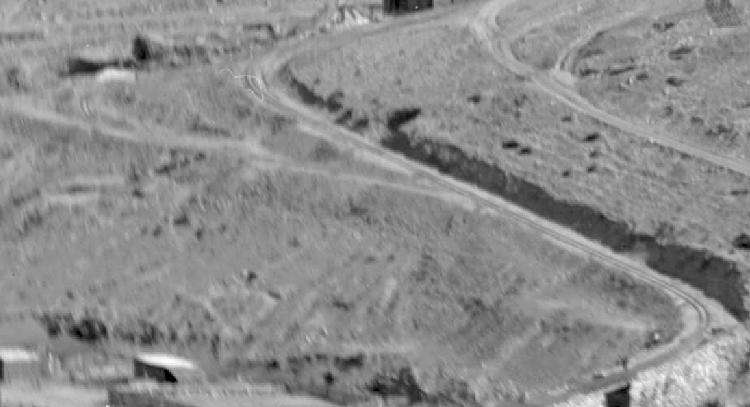 From the same preceding H H Lake photo, we seen the main line as it crossing Eureka Gulch (at lower right corner) and the junction switch where the Buckley Mine Branch diverges to the right. This is a preview of where we are going nest – looking at the four mines along this branch. So, the next stop is... the Buckley Mine Branch. Stay tuned,
Keith Pashina
Narrow-minded in Arizona |
Re: Along The Gilpin Tramway - A Closer Look-Warming House.
|
|
This post was updated on .
In reply to this post by Keith Pashina
Yeah Keith, the reporters descriptive abilities were tested with that structure.
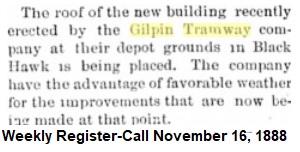 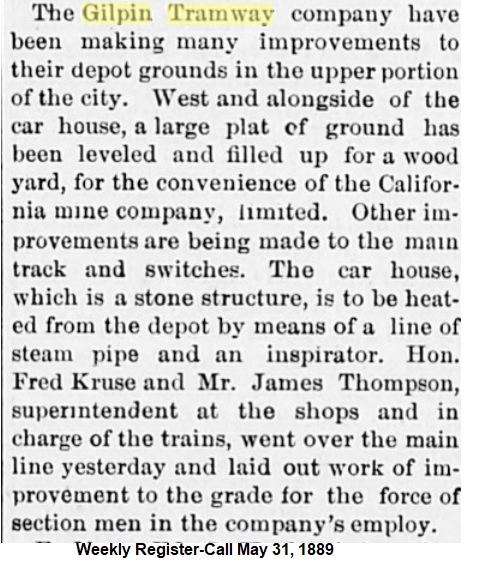 EDIT: I should have put these in as well... DPL Image Crop 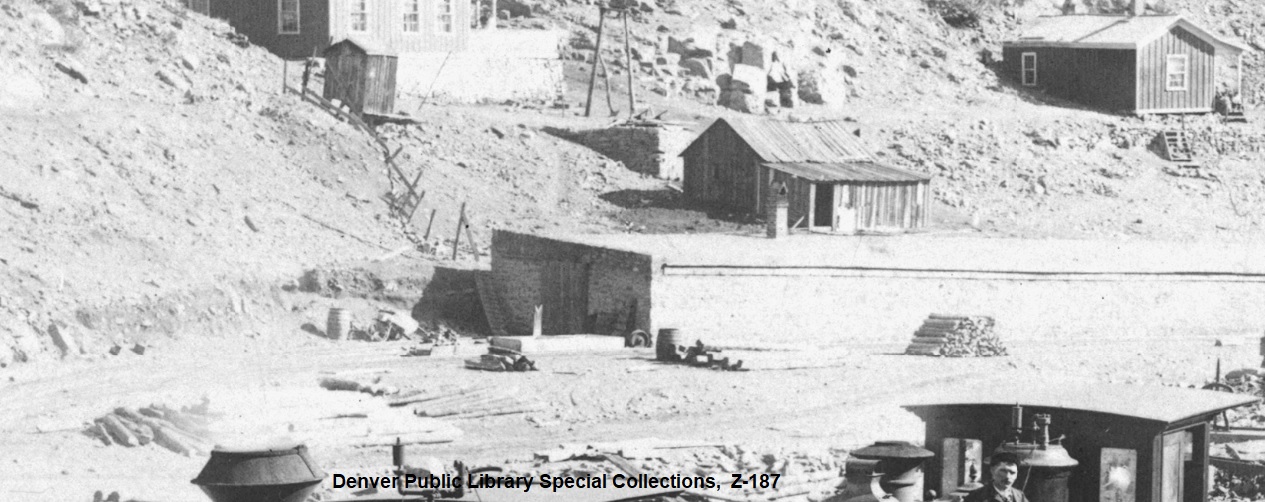 DPL Image Crop 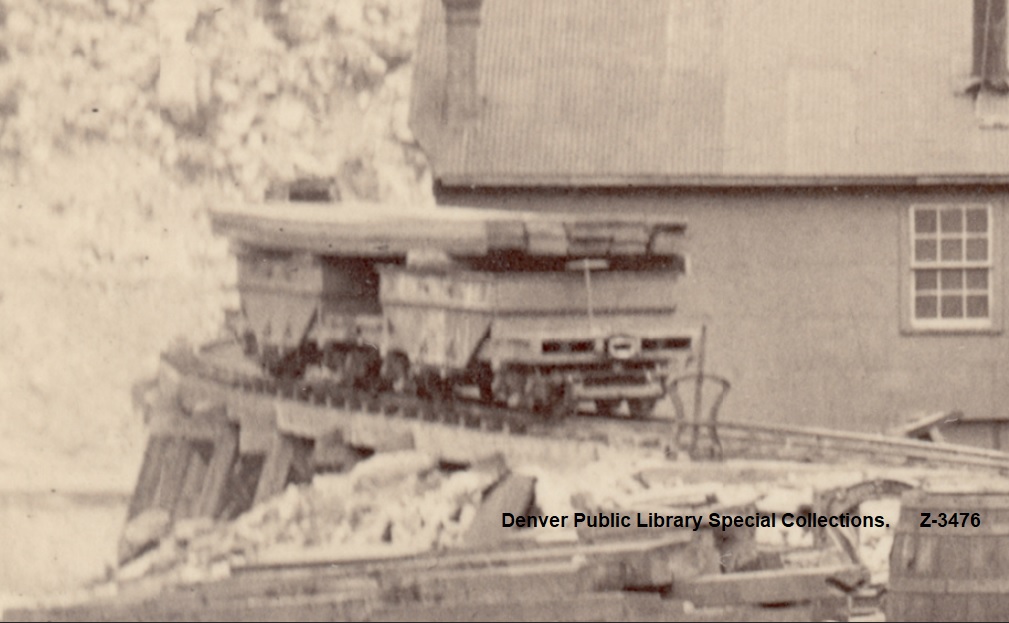
UpSideDownC
in New Zealand |
Re: Along The Gilpin Tramway - A Closer Look-Warming House.
|
|
Thanks for posting the newspaper clippings, Chris. I find it interesting that the article mentions the area down by the engine house be laid out as a wood yard for the California Mine. I assume that this was for either wood fuel for boilers, or wood mine props. Since this was next to the Gilpin Tram track, then I assume it was hauled by the tram. It would be interesting to find a photo of wood loads on a tramway train.
Keith Pashina
Narrow-minded in Arizona |
Re: Along The Gilpin Tramway - A Closer Look-Warming House.
|
|
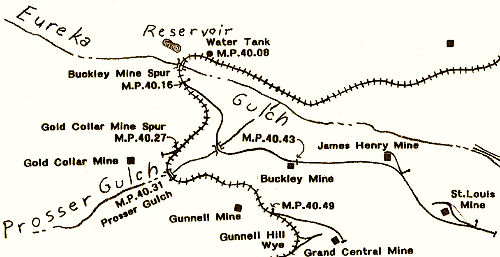
THE BUCKLEY MINE BRANCH
 We saw this picture in the previous post on this thread. The mainline curves to the right, and passes on the west side of the Wood Mine. The Buckley Mine Branch switch is at bottom foreground, and steeply drops downgrade.  This image from the Denver Public Library, Western History Collection, shows start of the Buckley Mine Branch. Gunnell Hill is at upper right, and in the far left distance, Quartz Hill. 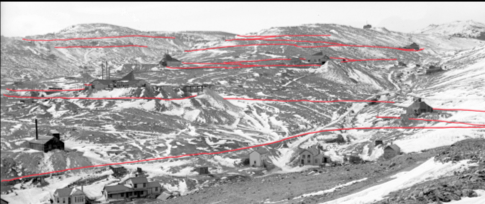 The red lines show Gilpin Tram grades visible in the previous photo. The Buckley Mine Branch can be seen as the bottom red line. Starting at milepost 40.16, the Buckley Mine branch diverged from the main line shortly after crossing Eureka Street and Eureka Gulch. This short branch served four mines, and was located just a short distance above Eureka Street, on the north slope of Gunnell Hill. The initial goal was to reach the Buckley Mine, and Dan Abbott reports that the “the Gilpin Tramway reached the Buckley Mine before the end of May in 1892. The length of this spur was 1,425.6 feet (0.27 mile) at end of track at the Buckley Mine - M.P.40.43." A spur was also built to the Woods (or Wood) Mine, just a few hundred feet from the branch switch off of the main line. The shaft house was built in 1892, and in 1893, the spur was constructed. The Weekly Register Call newspaper reported on September 29, 1893, “The main line of the Gilpin tramway runs close to the building on the west, and a branch has been put in on the east side of the building, where the tramway cars are loaded through a chute from the building, thus securing a low rate of transportation of the mill dirt to the stamp mills of Black Hawk.” Later on, the branch was extended to reach the James Henry and St. Louis Mines by 1893. We know this because the Weekly Register-Call reported on February 5, 1892, that “the Gilpin Tramway Company have received a large lot of ties and iron to tie and track the switch-back from the main line on Gunnell Hill to the James Henry and St. Louis-Gunnell Mines. 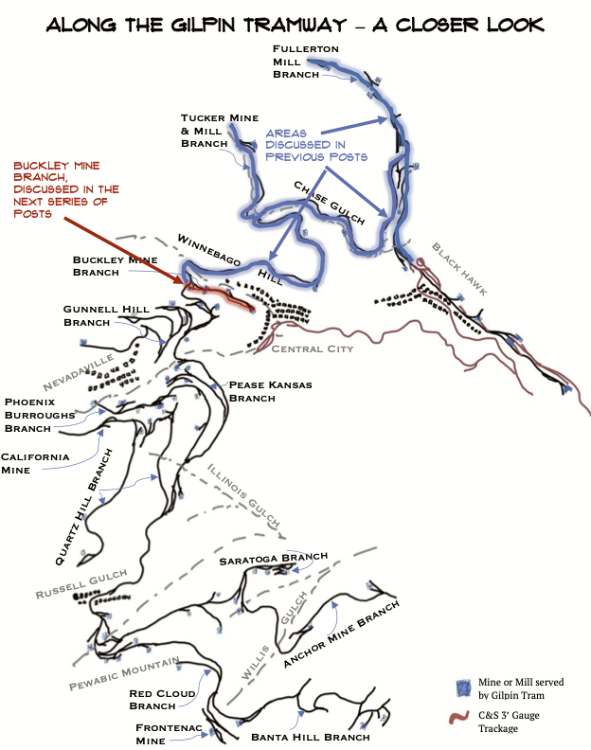 The above map shows the location of the short-lived Buckley Mine branch, the subject of this series of posts. And on June 2, 1893, the Weekly Register-Call reported that ”A number of lads in the city are in the habit of shoving an idle tramway car that has been standing on the switchback from the main tramway line to the St Louis-Gunnell mine, up a very steep grade, and then piling into the car and riding to that property and back to the switch and up to the James Henry mine. They manage to control the brake by a long piece of scantling. While it affords amusement and exercise to the las it is dangerous.” That must have been a fun ride! 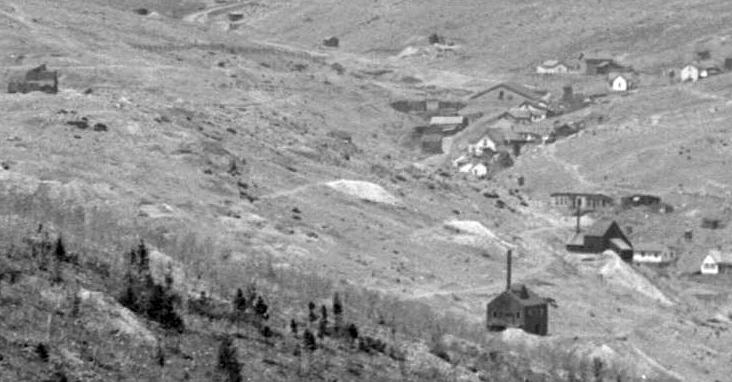 This image is from the Denver Public Library, Western History Collection, image L-237, and an enlargement shows the entire extent of the Branch. The mines visible, from foreground to back, are the St. Louis-Gunnell, James Henry, Buckley, and Woods. The Central City reservoir at Eureka Street is visible at right center (triangle shaped building end), along with the Eureka Gulch bridge and cribbing. 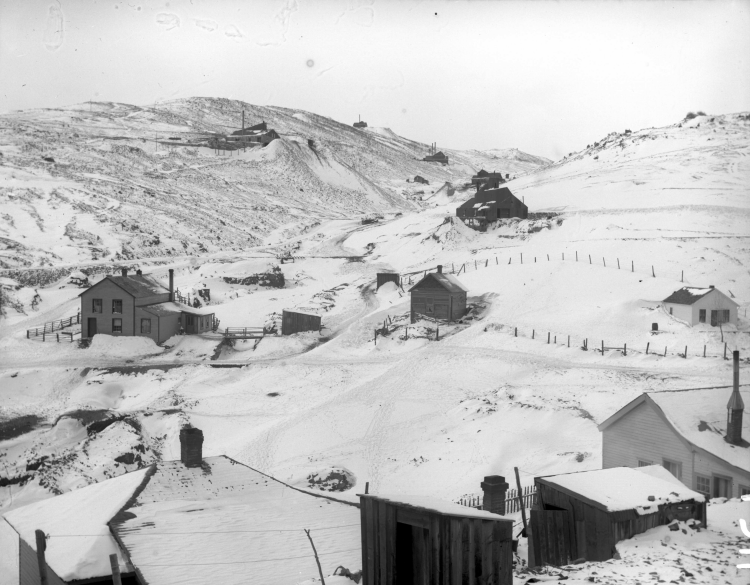 Another Denver Public Library Western History Collection (DPL) image, showing the first part of the branch. The Wood Mine is the building closest in the foreground. Just below and to the left, the small branch bridge crossing Prosser Gulch can be seen. The other three mines are on the Gunnell Hill and Prosser Gulch spurs and branch, and are the Gunnell, Concrete, and Gold Collar mines. 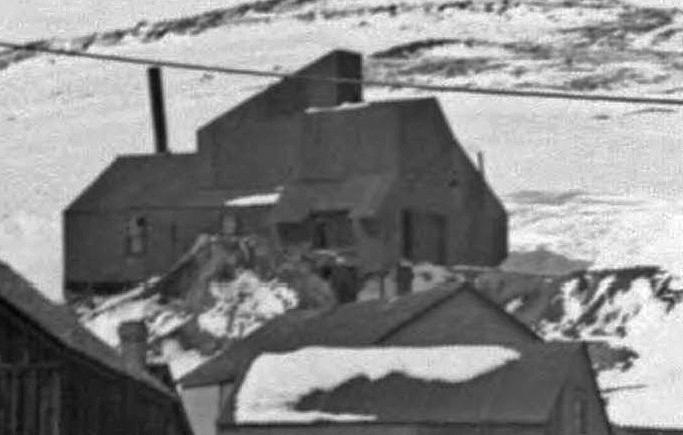 An enlargement of DPL image L-225 shows the Wood (or Woods) Mine. 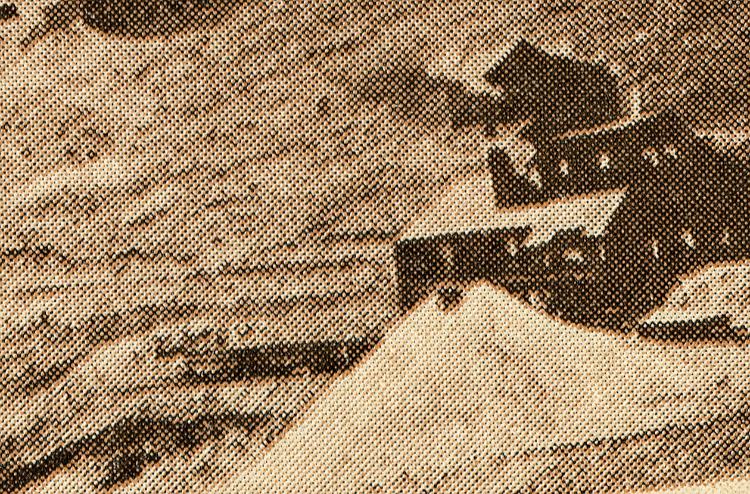 This is the only image of the Buckley Mine Branch where I have seen rolling stock. At least three ore cars are on the spur to the Wood Mine. This image was enlarged from a 1908 promotional brochure, Golden Glimpses of Gilpin County. 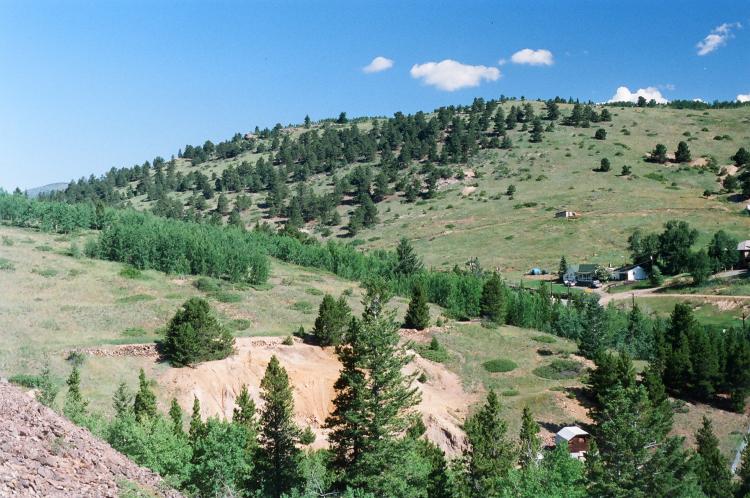 Only the waste rock dump remains at the Wood Mine today. This view is looking north, towards Eureka Street. The Gilpin Tram main line can be seen above the waste rock dump, supported on a dry laid stone rock retaining wall. 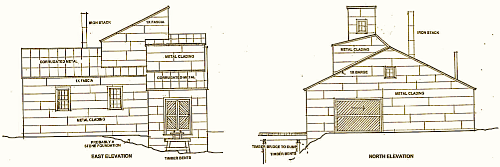 Mike Blazek prepared drawings of the Wood Mine. Note the unusual roof line. If you’re not aware, Mike Blazek prepared 5 workbooks covering the Gilpin Tram area of operations: Gilpin Tram workbook 1, 2 and 3, and Central City and Black Hawk workbooks. These books are a great addition to your library, and may still be available. Email me privately if you want more information.
Keith Pashina
Narrow-minded in Arizona |
Re: Along The Gilpin Tramway - A Closer Look-Warming House.
|
|
 This map shows the Buckley Mine trackage, and was prepared by Dan Abbott. Originally published in the Gilpin Railroad Historical Society Newsletter No. 4. 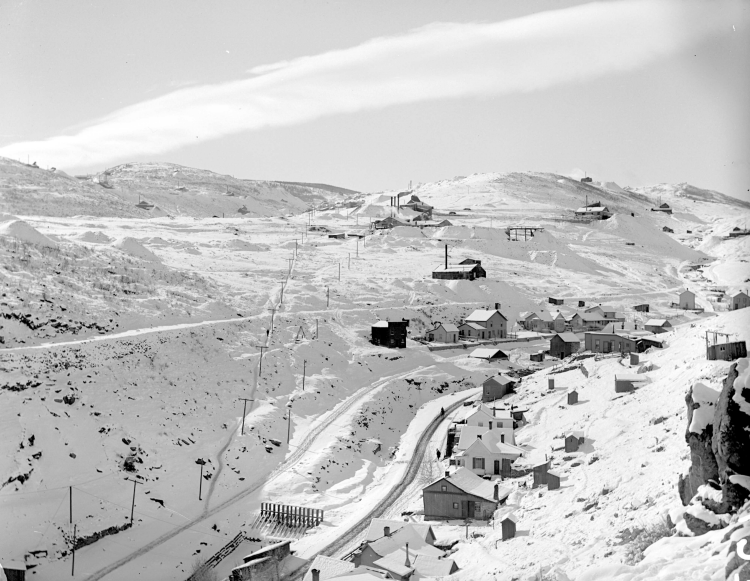 Another companion photo, also from Denver Public Library Western History Collection (DPL), shows the branch grade (it intersects the center of the left margin). In the center is the Buckley Mine. Immediately below is Eureka Street, a residential area. 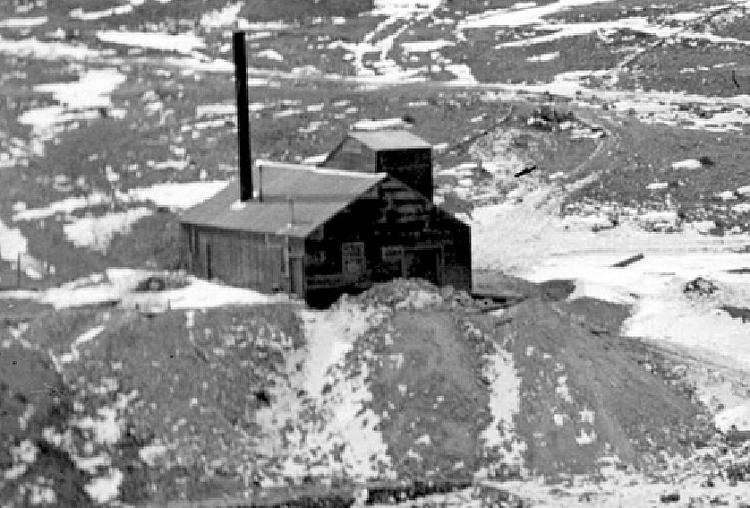 An enlargement of a prior DPL photo shows the Buckley Mine. I have been unable to tell from photos, and from walking the site, where the tram trackage was located. There is waste rock covering part of the branch grade below, indicating the mine was worked to some extent after the tram tracks were torn up or out of operation. 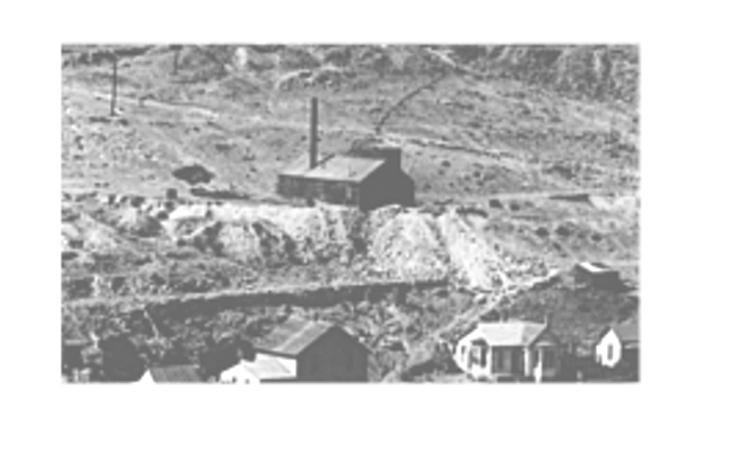 The large stone retaining wall seen in the previous photo is still there. The grade on the wall is unusually wide, and there could have been two tracks here, but there is no photographic evidence of this having been done. 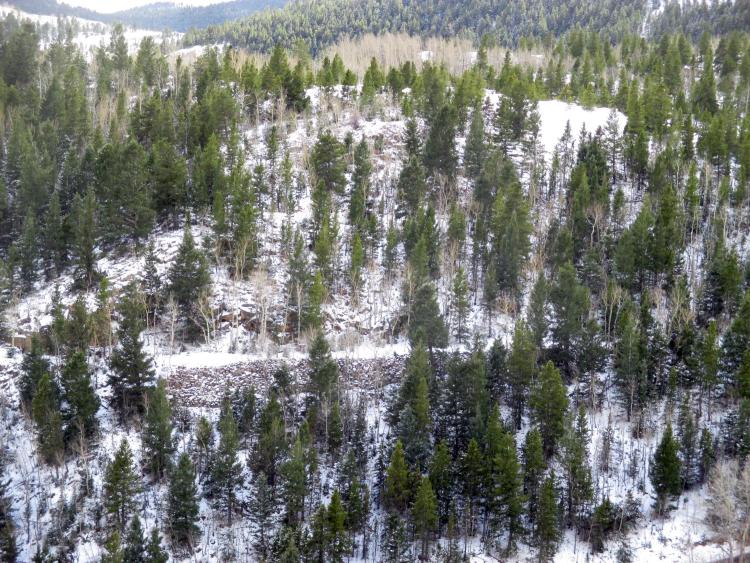 Here’s another view of the branch retaining wall. 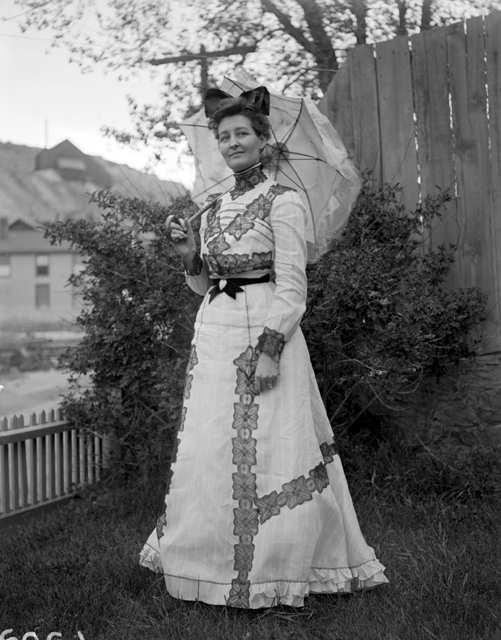 Sometimes you can find information about the tram and its mines where you don’t expect it. This is a DPL image taken by HH Lake, and shows his wife in her new dress in their backyard. In the upper left background is one of the few images of the James Henry Mine. This photo also demonstrates how close the mine operations were to Central City, as was a lot of the Gilpin Tram trackage. 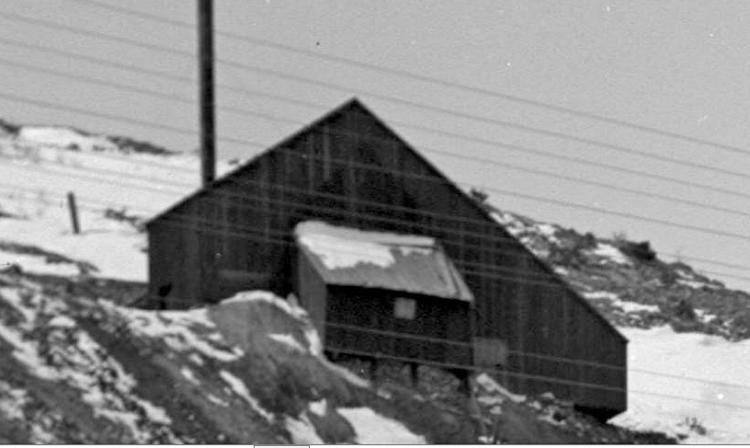 Enlarging the same DPL photo as previous, we get a better view of the James Henry mine’s east side. This photo is dated 1899. 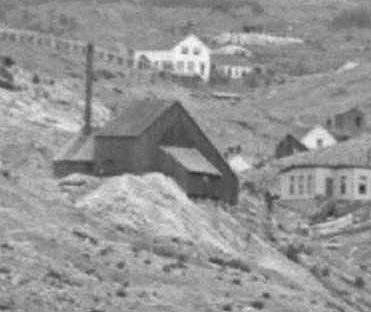 Greatly enlarged, this is another DPL image from about 1900, and shows more of the southeasterly side. The mine is comprised of the main shaft building, a boiler house on the west side, and perhaps a blacksmith shop on the east side. We’re looking northwest in this photo. 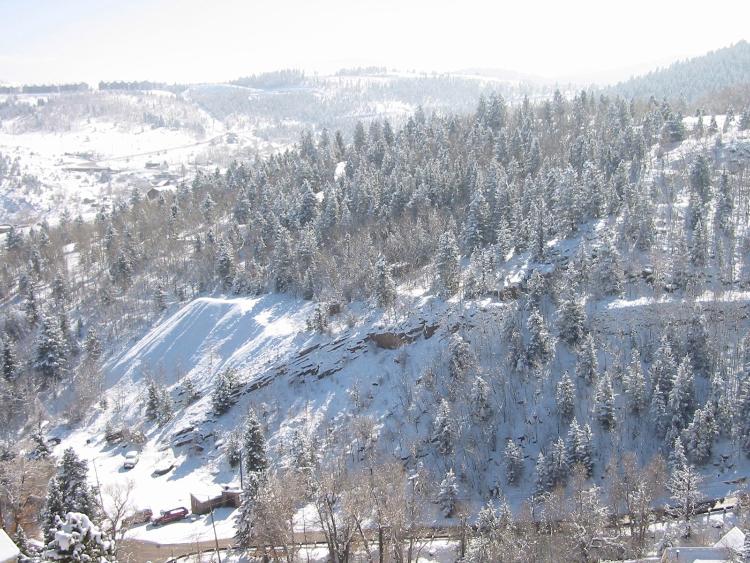 This is the James Henry mine site today. The branch grade is easily seen on the right side of the waste rock dump. 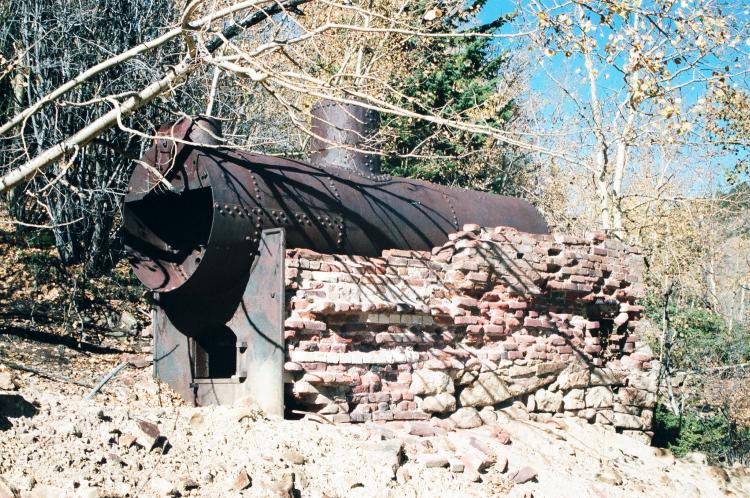 The James Henry mine structure is gone, except for the boiler. This artifact is a good view of how to model a mine boiler. I built an HO scale model from pacing off the distance from the smokestack and shaft, and then guesstimating dimensions off of the photos. No drawings exist, so I’ll claim that this is a precise model!  From the James Henry mine dump, we’re looking east/southeast, towards the St. Louis-Gunnell mine. Also, note how close the mine and branch are to Central City proper. I find it appealing as to how compact the whole Gilpin County mining districts and towns are. 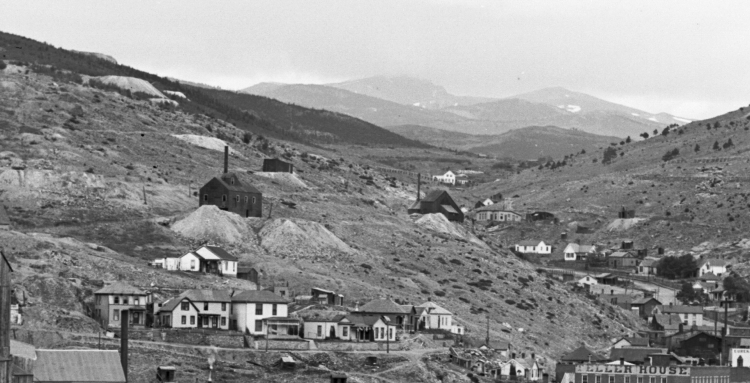 Here is another image enlargement, the parent photo is from DPL. The St. Louis-Gunnell mine is at left center, and just beyond it, the James Henry Mine. This photo illustrates how close the mines were to each other on this short branch. 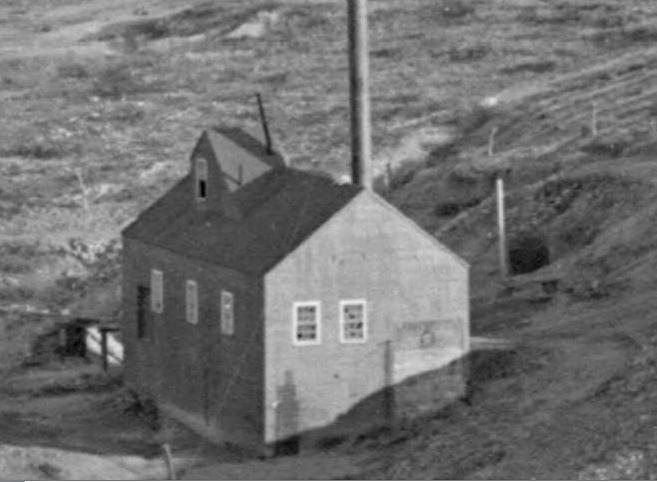 An enlargement of the parent photo shows the west and north sides of the St. Louis-Gunnell Mine. According to the Sanborn Fire Insurance map for this mine, Gilpin Tram trackage extended on both the north and south sides of this building. I see no evidence of trackage in this photo, so perhaps it was taken after 1910. This image is from the Denver Public Library, Western History Collection (DPL) and is image L-27. 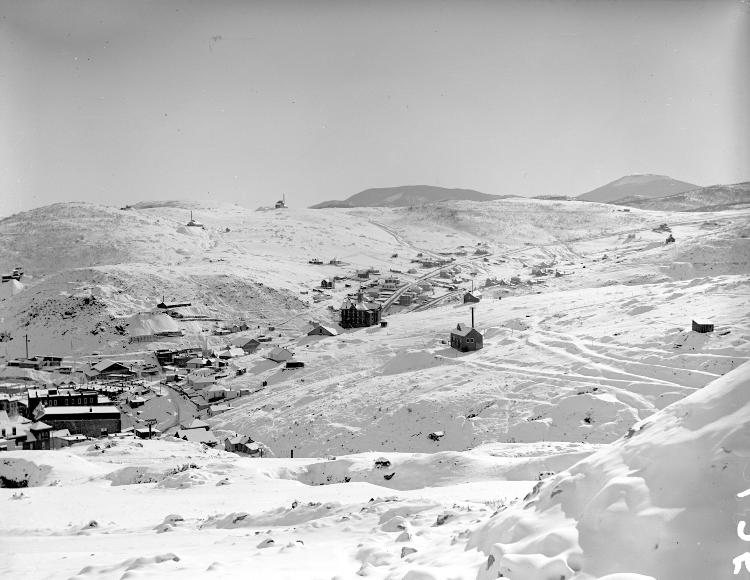 This DPL photo is image L-25, and another enlargement of the parent photo. The St. Louis-Gunnell mine stands all by itself in the center of the photo. The Gilpin Tram grades are easily seen in the snow. The large building just to the left of the mine is the St. Aloysius Academy. This was a Catholic parochial school in Central City, and this photo again illustrates how closely intertwined was the town and mining areas. 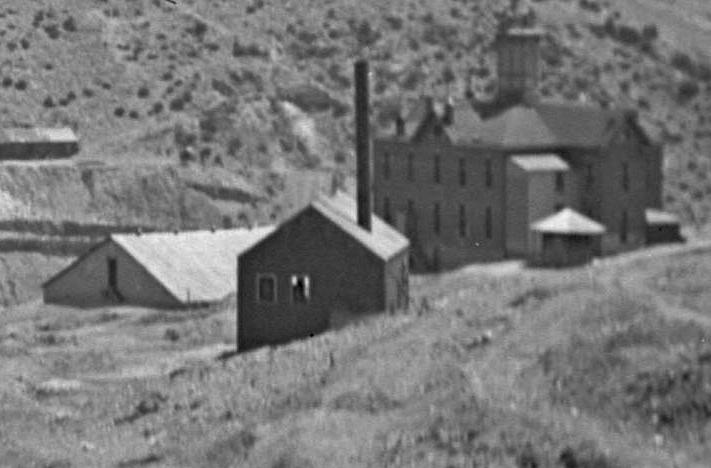 This is another enlargement of a DPL image, showing the St. Louis mine and the St. Aloysius Academy beyond. The mine looks rather forlorn here, and I would guess abandoned at this time. The Gilpin Tram grade can be seem on the right side of the building. Notice the city water reservoir building to the left of the mine – one of 3 that Central City built for their water supply. 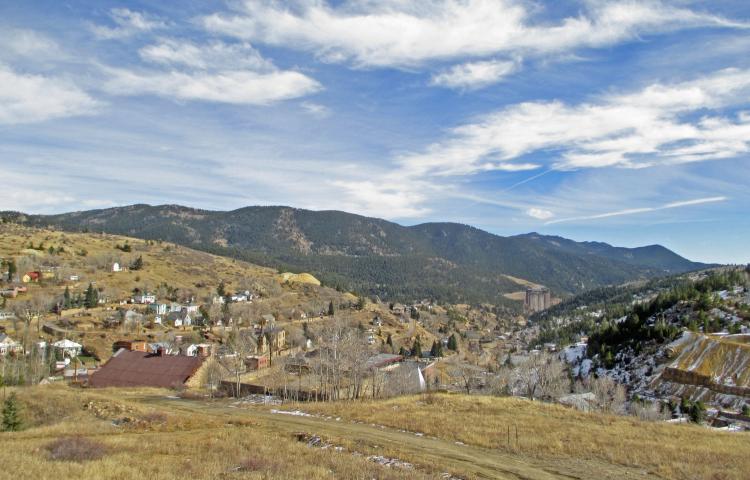 This view was taken 9 years ago, from the St. Louis Gunnell mine site. Looking southeast, we see the Central City reservoir roof and triangular stone end walls at left center, and to its immediate right is the remains of the St. Aloysius Academy. The building was demolished decades ago, and the bottom portion saved. The white cross the marks the Kruse Memorial. The Freedom Mine dump is on the far hillside at center. Note the “progress” – there a 40 story hotel building standing at the far end of the valley, down in Black Hawk. Today, nothing remains of the St. Louis mine, except a few stone retaining wall remnants. The Gilpin County Observer reported on March 7, 1902, “The heavy stone retaining wall, placed several years ago to secure the siding of the tramway back from its main track to the St. Louis mine on the easterly portion of Gunnell Hill, has been torn down and the track removed. So, this mine ended service early. Well, that wraps up our look at the Buckley Mine Branch. Next, we’ll go back to the main line and visit Prosser Gulch, then start exploring the numerous mines and trackage up on Gunnell Hill.
Keith Pashina
Narrow-minded in Arizona |
Re: Along The Gilpin Tramway - The Wood Mine.
|
|
In reply to this post by Keith Pashina
This mine undertaking was on the special side: a little known fact indeed.
UpSideDownC
in New Zealand |
Re: Along The Gilpin Tramway - The Wood Mine.
|
|
PROSSER GULCH, at M.P. 40.31
In this post, we will look at the Prosser Gulch area. Prosser Gulch, sometimes called Pioneer Gulch, is third gulch crossed by the Gilpin Tram as it climbs up to the mines from Black Hawk. 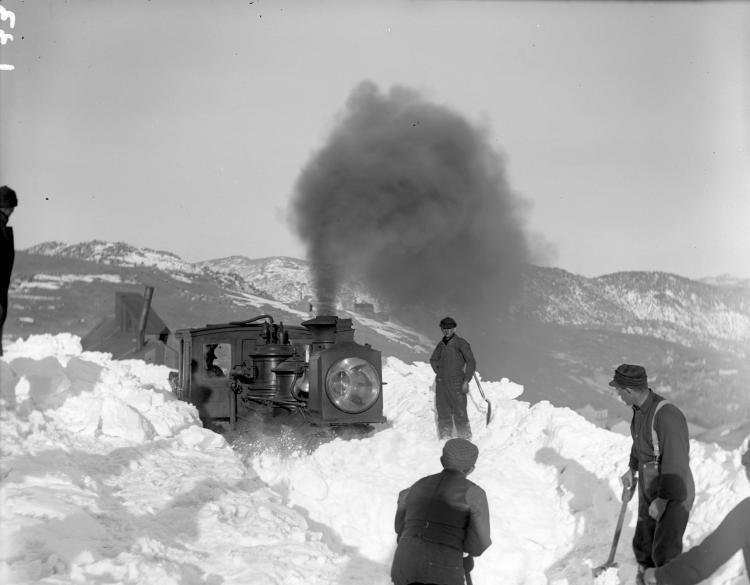 The Gilpin Tram crew is shoveling out after one of the big blizzards, on main line approaching Prosser Gulch. This view is looking northward, and has been published several times before. In the background is the Woods Mine, which we looked at in the previous post. The spur to the Woods Mine would have been a facing point switch for trains. 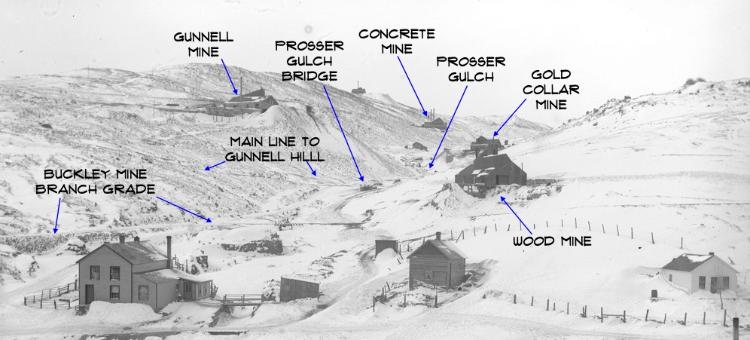 The mining districts around Central City, Nevadaville, and Russell Gulch were crowded with mines, and Gunnell Hill was no exception. This photo shows some of the mines. The Buckley Mine branch can be seen just below the Woods Mine, and below the mainline. Prosser Gulch is in the center, and the subject of this post. 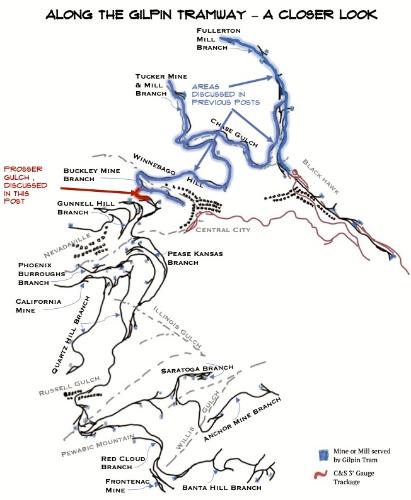 This map shows the location of Prosser Gulch, and what areas have been discussed in previous posts.  The two locomotives are parked at the Gold Collar Mine spur. This spur was built to load out ore and bring in supplies, and was located downgrade from the mine, perhaps 100' lower in elevation. A steep, winding wagon road led up to the mine. 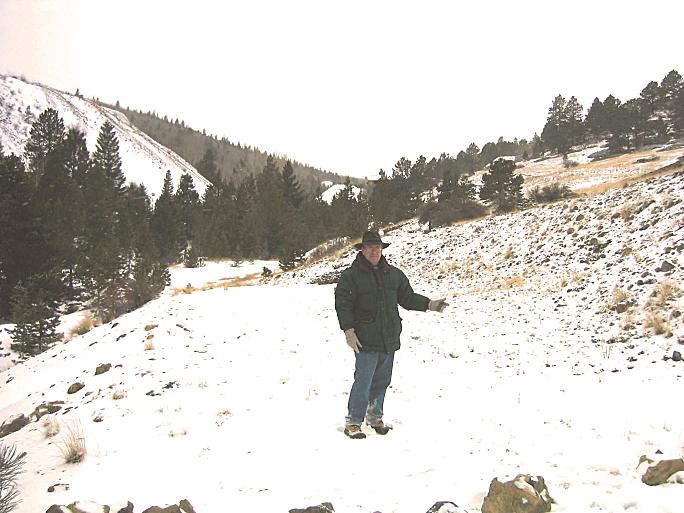 Joe Crea explored the site about 20 years ago, and is standing at about the same spot as in the previous photo=. The old grade remains, but there are a lot more trees that have grown in the area. 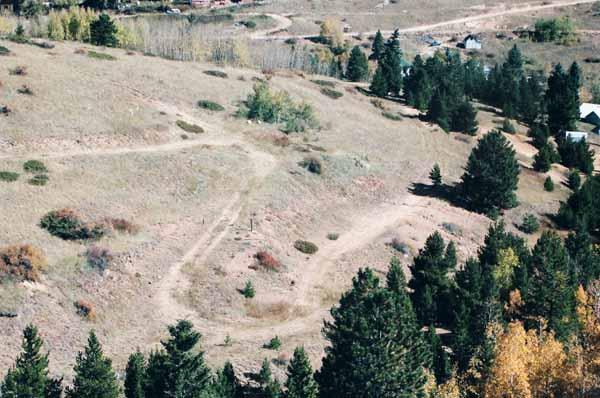 This photo is looking north from the Gunnell Mine site, on Gunnell Hill, and south of Prosser Gulch. The main line was graded across a gentle slope, and the S-curved mine road from the Gold Collar Mine can be seen leading down to where the spur would have been. M.P. 40.27 Gold Collar Mine Spur: The Gold Collar Mine was about 100’ feet uphill of the mainline at this point. Dan Abbott, in the Gilpin Railroad Historical Society Newsletter No. 4, writes “The Gold Collar Mine was on the north side of Prosser Gulch just above its junction with Eureka Gulch. The shaft was 712 feet deep, how- ever, having been idle for many years, by 1910 it could only be descended to the 332-foot level. In September of 1911, lessees had begun to reopen the 332, 257 and 200 foot levels. The total production of the mine was about $250,000. The 180-foot spur for the Gold Collar Mining & Milling Company was completed and ready for use on March 26, 1910. The entire cost of this spur -$289- was borne by the Gilpin Railroad Company and the track was the property of the railroad company. This spur was built to provide a loading point for the Gold Collar Mine and to better facilitate handling ore for the Casto Mill. Construction began March 23 and was completed just three days later." 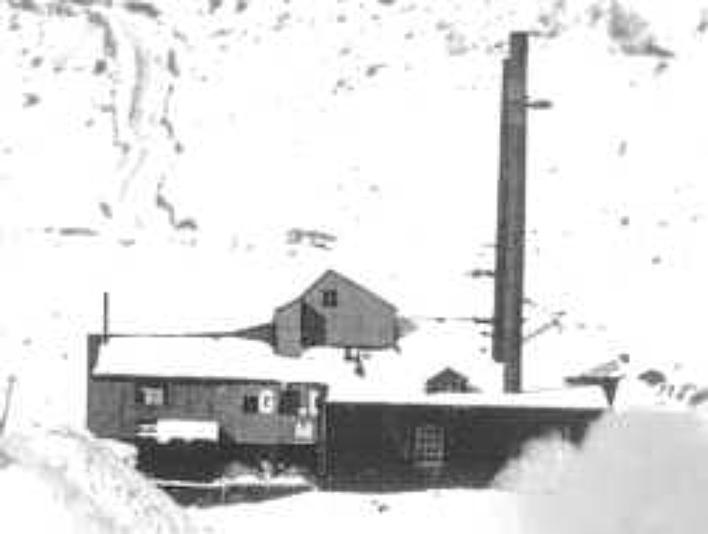 A close-up view of the Gold Collar Mine, enlarged from a Denver Public Library, Western History Collection image. 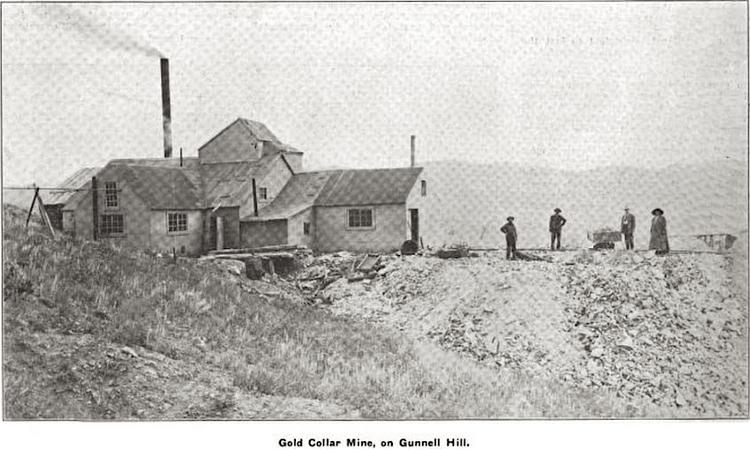 The January 1907 Mining Investor Magazine had this view of the west side of the Gold Collar Mine. 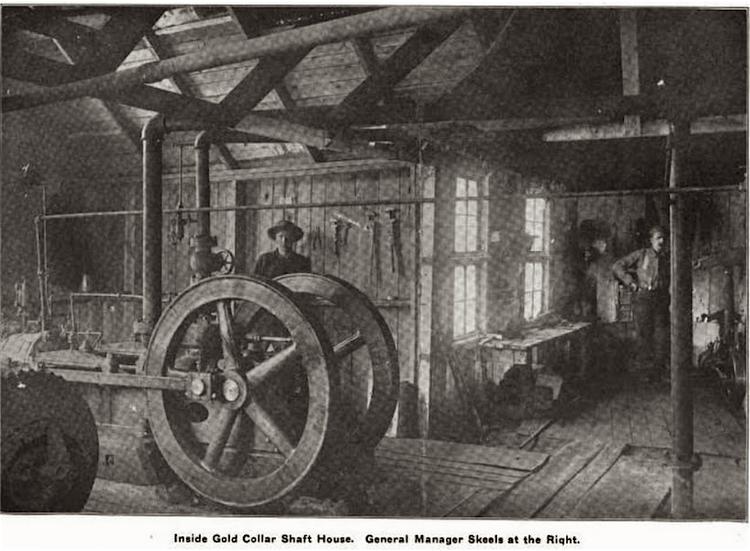 The January 1907 Mining Investor Magazine had this nice view of the shaft house interior of the Gold Collar Mine. 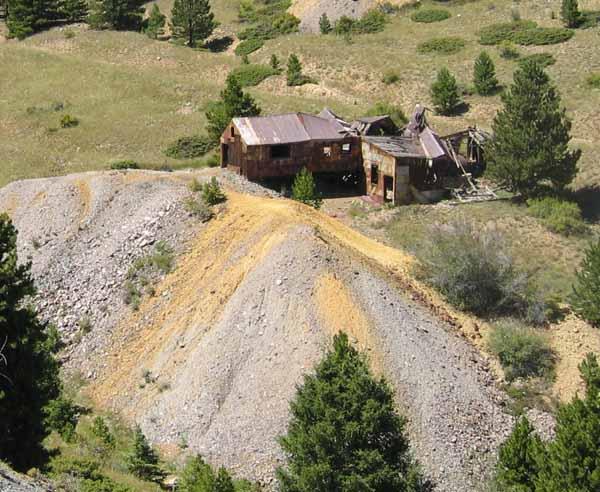 The Gold Collar Mine still exists, but showing the effects of the harsh winters, and is partly collapsed. Quite a bit of the structure was standng in 2005, when I took this photo. Mike Blazek sells plans for this mine. The waste dump is a nice mix of yellow and gray rock. Other researchers have told me the gold ore was gray in color, and shows up white in old photos. The chemistry of much of the rock in Gilpin County is such that it weathers to the yellow color is familiar with today. I would guess the dumps have a lot of sulphur-bearing compounds in them - on warm, sunny days, many of the dumps have a slight sulphur odor to them. 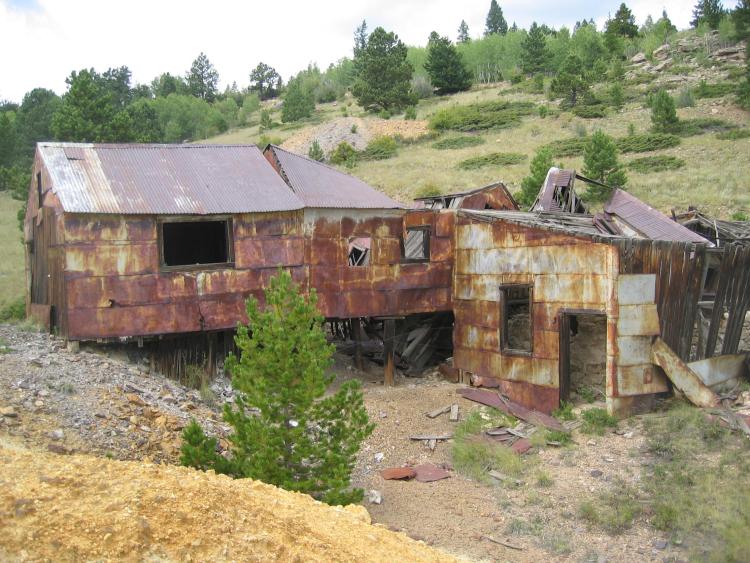 A contemporary view of the south and east sides of the Gold Collar Mine. It was clad with flat metal siding nailed to wood boards. 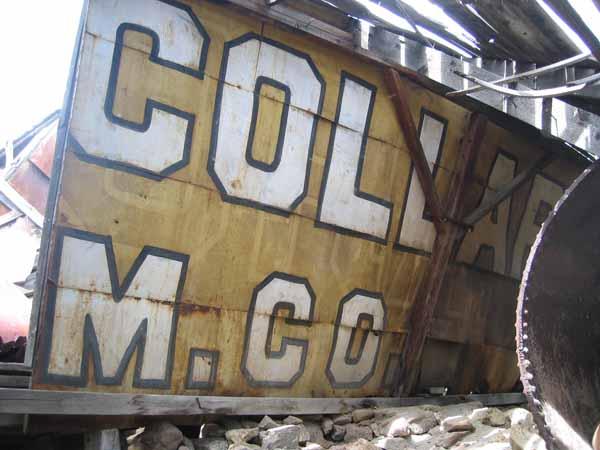 When poking around the mine, this wall was found. The painted wall was covered and protected by a later building addition, and still in relatively good condition. I like the large, block lettering style. The mine appeared to have been painted yellow - somewhat unusual, as most mines in the area appeared to be either unpainted or painted a red or earth brown color.
Keith Pashina
Narrow-minded in Arizona |
Re: Along The Gilpin Tramway - The Wood Mine.
|
|
The Eureka Mine and Mill generally was a self-contained operation, located further west up Prosser Gulch, about 1/3 mile from the Gilpin Tram tracks below. However, they did ship on the Gilpin Tram at least once. The Colorado Railroad Museum has a list of shippers I summarized from April 1913, itemized on “Duplicate Mill Receipts.” These show the Eureka Mine shipped ore, with the notation, “load at Gold Collar Switch."
There is another shipment record, simply noted as “Prosser Gulch”, consisting of 2 ore cars shipped from there and delivered to the Iron City Mill in Black Hawk (source: Colorado Museum Collection, document “Report of Business for September 1914”). I am guessing that the shipper was again the Eureka Mine, because the same group of records shows about 27 tons of coal shipped in April 1914 and 6 cars of coal, totaling 51.9 tons in September 1914, loaded at Black Hawk and delivered to them presumably at the Gold Collar Spur. 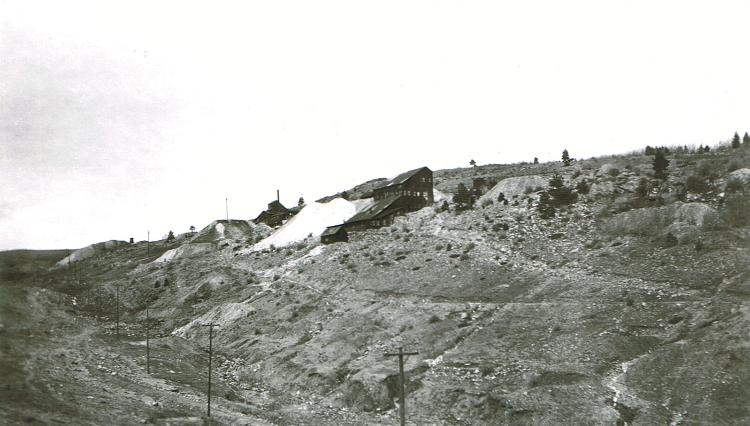 The Eureka Mine and Mill was located in the upper part of the gulch, about 1/3 of a mile west and above the Gilpin Tram track. This view is looking west, and provided courtesy of the Mark Baldwin collection. 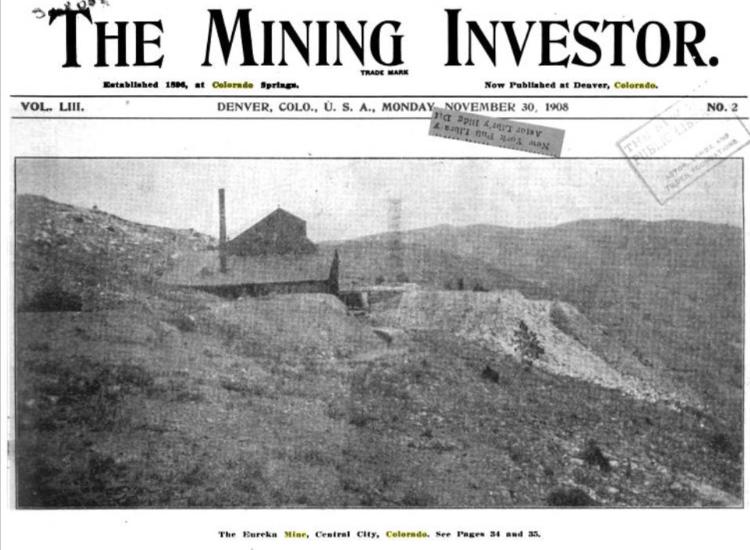 The November 30, 1908 issue of the Mining Investor magazine had this nice view showing the west side of the mine. 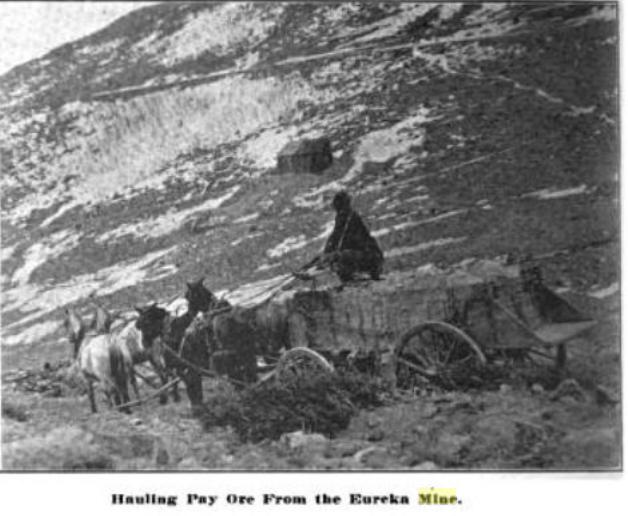 A 1909 issue of the Mining Investor magazine showed ore being hauled down by wagon team, perhaps to the Gold Collar spur, or perhaps a mill down in Black Hawk. 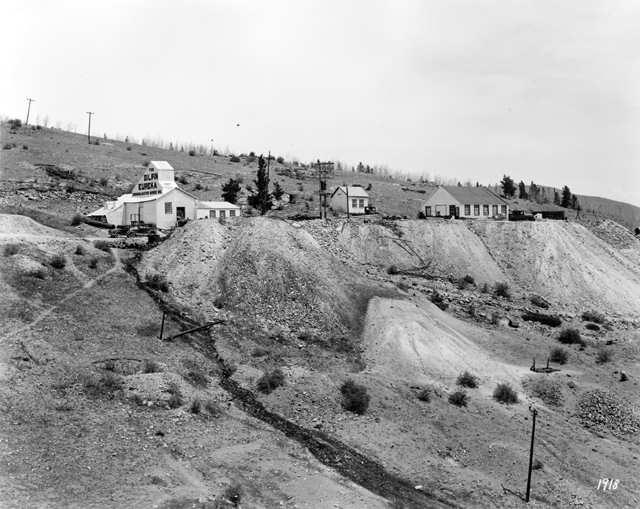 The Eureka Mine seemed to prosper for a while, or at least was painted to appear prosperous to investors. Here is a view of the mine from the January 1907 Mining Investor. After passing the Gold Collar spur site, we approach Prosser Gulch itself. The gulch is a one of the smaller gulches crossed by the Gilpin Tram, and dry for much of the year. The Gilpin Tram crossed the gulch with a short wood bridge with the typical wood cribbing abutments on each side. This gulch was the site of the a well-known accident where Shay #3 derailed and fell into the gulch. On December 29, 1897, shay #3 was pulling a string of empty ore cars upgrade when it jumped the track and fell into the gulch. Engineer Harry W. Pierce was pinned in the wreckage and died several hours later due to being scalded by the escaping steam. The fireman, Will Franklin, was also badly burned but survived. The cause was attributed to “tight universals on the engine.” The gulch bridge site is hardly recognizable today – compared the 1897 wreck photo, the gulch has heavily been silted in with runoff from further up the gulch. About 25 years ago, some railfans discovered the crushed remains of the smokestack from shay #3., left over from this same wreck. These remnants can now be seen at the Colorado Railroad Museum in Golden, Colorado. 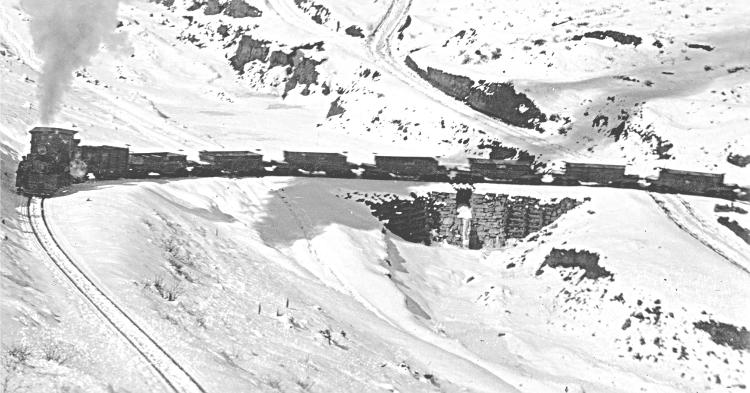 Above, an ore train of empty cars ( and a loaded coal car behind the engine) is crossing the Prosser Gulch bridge and headed westbound southeast at this particular location), and on a steep grade up the north slope of Gunnell Hill. This bridge may have been rebuilt at least once during its lifetime. This image is from the Denver Public Library, Western History Collection. 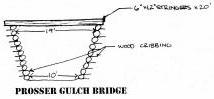 This sketch I prepared by hand copying a hand drawn original sketch in a set of4, leather-bound 1899 journals of Gilpin Tramway records in the Colorado Historical Society archives. 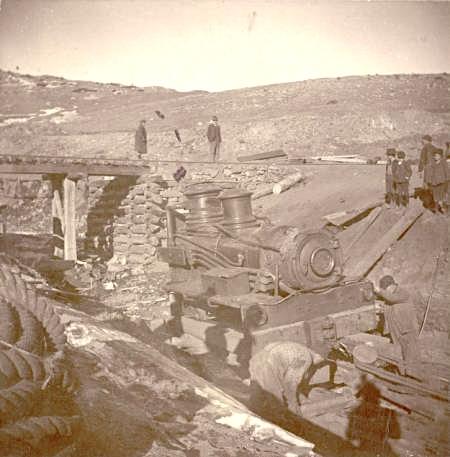 There were several photos taken of the fatal 1897 wreck at Prosser Gulch, and this is one of them, provided courtesy of the Denver Public Library, Western History Collection. Note that the bridge has at least one bent, and differs from the sketch shown previously. Also, the timber cribbing shows the gulch has a depth of maybe 8’-10’ here – the crossing today is mostly silted in. 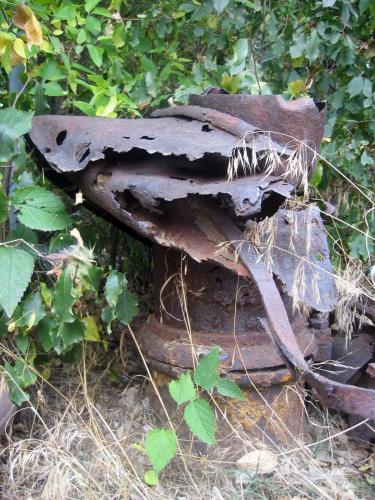 This is all that remains of Gilpin Tram #3 - the crushed remains of the smokestack. But, this means that you can go to the Colorado Railroad Museum and actually touch a real piece of a Gilpin Shay! After crossing Prosser Gulch, the grade curves eastward, and encounters a stiff grade on the north slope of Gunnell Hill. Soon the grade reaches the spurs to the Gunnell Mine and several others on Gunnell Hill. That will be the subject of my next post. 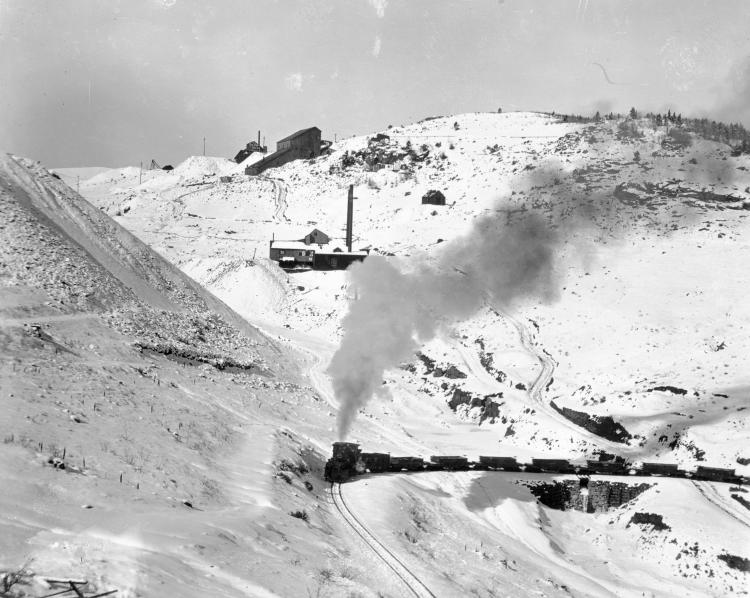 Here is the entire photo of a train in Prosser Gulch, courtesy of the Denver Public Library, Western History Collection. The Gold Collar Mine is immediately above the shay locomotive, and above it, the Eureka Mine and Mill. The train is crossing the Prosser Gulch bridge, and the Gold Collar Mine spur is out of sight, off to the right.
Keith Pashina
Narrow-minded in Arizona |
Re: Along The Gilpin Tramway - The Wood Mine.
|
Administrator
|
In reply to this post by Keith Pashina
Great stuff as usual Keith! I recall when Joe and I had entered the Gold Collar, we found where the employee's had all signed and dated their names. It was really cool to see. That trip predated digital photography. I would be hard pressed to find the photos I took now.
|
Re: Along The Gilpin Tramway - The Wood Mine.
|
|
GUNNELL HILL
Gunnell Hill is a prominent feature on the far west side of Central City. From the town, several mines are seen tiered on all sides of the hill. This was an important mining area, with several active mines shipping on the Gilpin Tram. As the Gilpin Tram main line leaves Prosser Gulch, it climbs a stiff grade up the north slope of Gunnell Hill, which is named for the prominent Gunnell Mine. 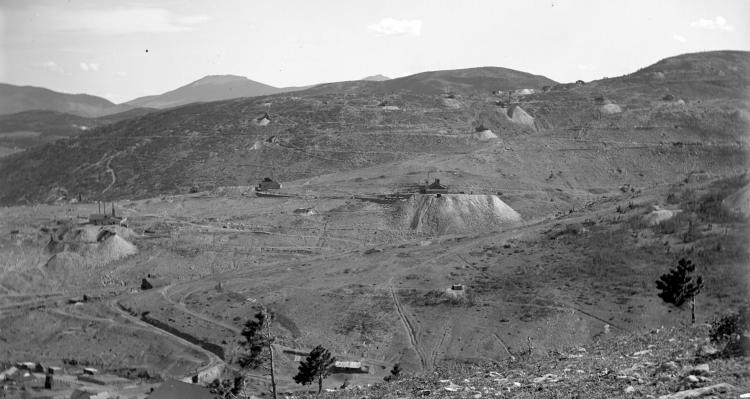 We've seen this photo before, from the Denver Public Library, Western History Collection, Image L-284, titled “View south from Nigger Hill, June, 1899” (renamed Barney Ford Hill in the 1960s), and is looking towards Gunnell Hill. This is where we will be taking a closer look at the Gilpin Tram trackage, mines, and operations. 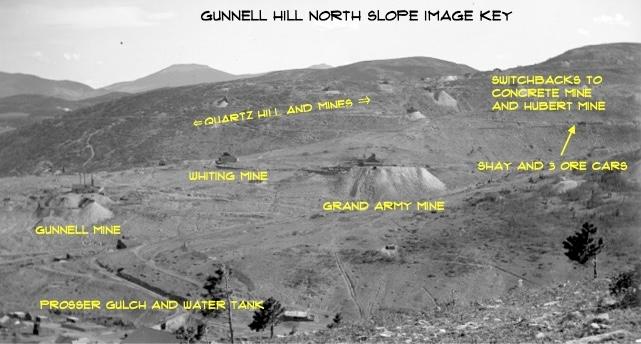 The main features in the previous photo are labeled here. There is a lot of mining activity visible in this photo. H. H. Lake, the photographer, even caught a Gilpin Tram shay and 3 ore cars leaving the Concrete Mine spur. 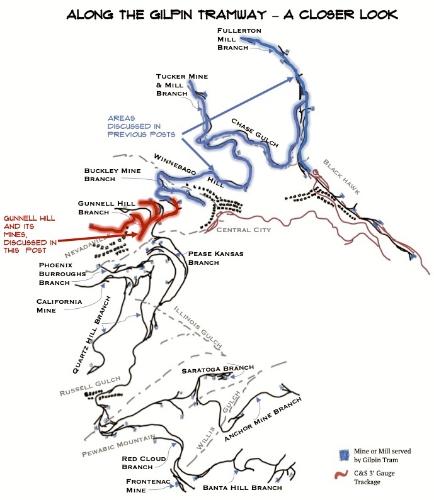 This map shows the areas discussed in previous posts, and the Gunnell Hill area. 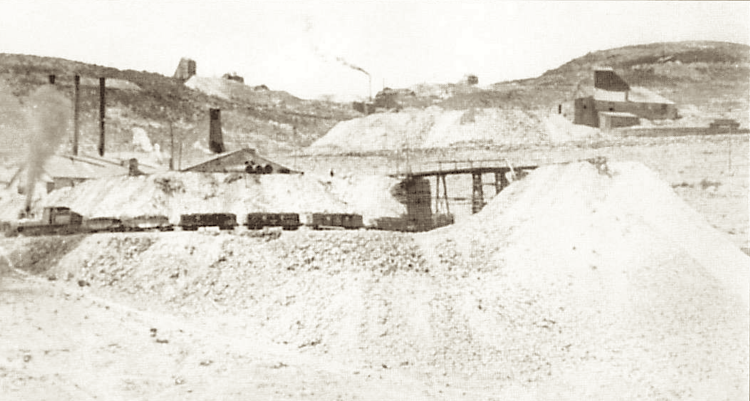 The Gunnell Mine was a big producer in its time. Here a train is heading up the mainline with loads of coal in ore cars and coal cars. The main line curved beneath a trestle on the Gunnell Mine's waste rock dump. Photo courtesy of the Mark Baldwin collection. Milepost 40.44 - Gunnell Mine Spur No. 1 Using the C&S trackage designations, the Gilpin Tram trackage served the Gunnell Mine with multiple spurs. The mainline wound around the mine itself, passing under the tall ore dump trestle located on the north side of the mine. At this location, which was near the mine waste rock dump track, the Gilpin Tram laid a spur that switch-backed to serve loading operations. How the Gunnell Mine loaded the ore cars is somewhat of a mystery. The mine spur did not go under the mine building, nor was it parallel to any of the building walls where ore chutes were located. There was an enclosed wood-framed addition on the west side of the building that may have been used for loading ore cars. However, there is this description in the August 31, 1899, Gilpin Observer newspaper, “On Gunnell hill, Mr. Hallihan, the superintendent of construction, has about completed the switchback from the Gilpin Tramway company’s main line to the West Gunnell mines, and put in a switchback for delivering coal at that property. He has also graded off a side switch in order to put empty ore cars down to the east end of the buiding, at which point the ore mined and hoisted can be dumped into ore cars.” There was a lengthy lawsuit between the owners of the Gunnell Mine and Grand Army Mine. During the suit, there were various shenanigans between the opposing parties, such as stealing ore, throwing sulphur smoke bombs, and other activities. The Gunnell Mine owners finall prevailed in 1894. Soon after, the Weekly Register Call newspaper reported on April 19, 1894, “…A portion of the above sum of money expended was in surface improvements, such as new machinery and the extension of the shaft building over the pump shaft. The tramway company have put in new sidings from their main track which will greatly facilitate the transportation of the ore mined to the sampling works and stamp mills, as well as the transportation of supplies to the mine.” The pump shaft housed a Cornish pump, built locally by the Macfarlane Company. The main shaft was down to 1,088 feet by this time. The lawsuit settlement facilitated much consolidation of properties on Gunnell Hill as the Gilpin Observer newspaper reported on April 27, 1899, “The Gunnell Company on Gunnell hill have been unable to secure tramway cars to handle the output of stamp mill ore from the workings of the Grand Army shaft on that property, hence their output has been pretty light for the past two months.” Shortly thereafter, the Gilpin Observer reported on June 22, 1899, “Gunnell Mine Sold – Yesterday, there was placed a deed conveying to the Gunnell Gold Mining and Milling company, all the buidings of the Kimber, Fullerton & Co., on the Gunnell, Whiting, Grand Army, Slaughter House, Marine, Fagan, and Star of Hope, patented mines, on Gunnell hillm this city. Included in the sale are the Polar Star mill (40 stamps), Fullerton lower mill (40 stamps), Fullerton upper mill (33 stamps) all situate on north Clear creek, in Black Hawk…” Business was good, the Gilpin Observer reported on October 3, 1901, that “The Gunnell Gold Mining and Milling company is now taking out a sufficient amoutn of stamp-mill ore to keep 105 of their 113 stamp capacity employed. All the ore from their holdings is shipped from their mines to their stamp mills on the Gilpin tramway.” There are traffic records showing ore shipments on the tram in years 1896 to 1904, and 1906. There could be more, it just means there are records existing for those particular periods. But, just when things were looking good, disaster struck. Newspapers reported that on March 24, 1904, the shaft house burned for the third time and ruined all the machinery. Records seem to be sparse after that point, although there was still apparently some activity in the ensuing years.  This is a similar view today as in the preceding two photos. Again, the Gunnell dump is at the left margin. The biggest dump seen is the Grand Army dump. Tree growth in the past century conceals many features. 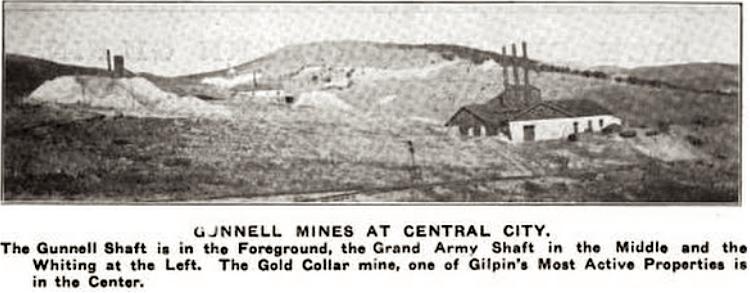 Here is the Gunnell Mine from a January 1917 issue of the Mining Investor magazine. You’ll note that the shape of the mine headframe and enclosure changes over time. The mine itself was modified greatly over the years, mainly because the shaft house burned 3 different times! 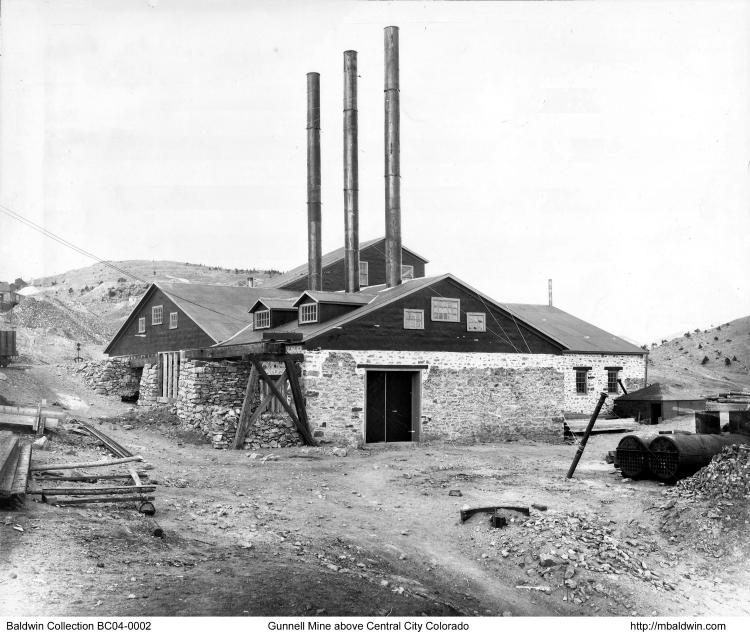 Here is the Gunnell Mine looking prosperous. This image is provided courtesy of the Mark Baldwin collection. There are several items of note in this image. Notice the lower stone wall facing the photographer – this must be the second iteration of the shaft house, after a previous fire. There is new, patched stone masonry visible at the top of the wall. On the left side of the shaft house, the elevated Gilpin Tram trestle, can be seen. This was used for dumping coal at the boilers. At the extreme center left margin, part of a Gilpin Tram coal car can be seen. Notice 2 new boilers sitting in front pf the mine – this photo may have been taken during reconstruction after the previous fire. 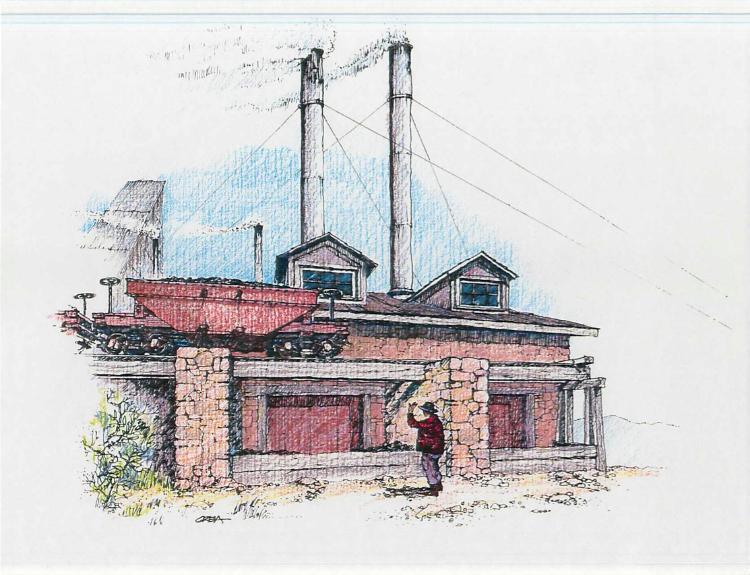 Joe Crea made this sketch showing how the Gilpin Tram’s coal spur to the Gunnell Mine was constructed. The stone piers, stone building wall, and coal pocket doors remain today, as does part of the roof. 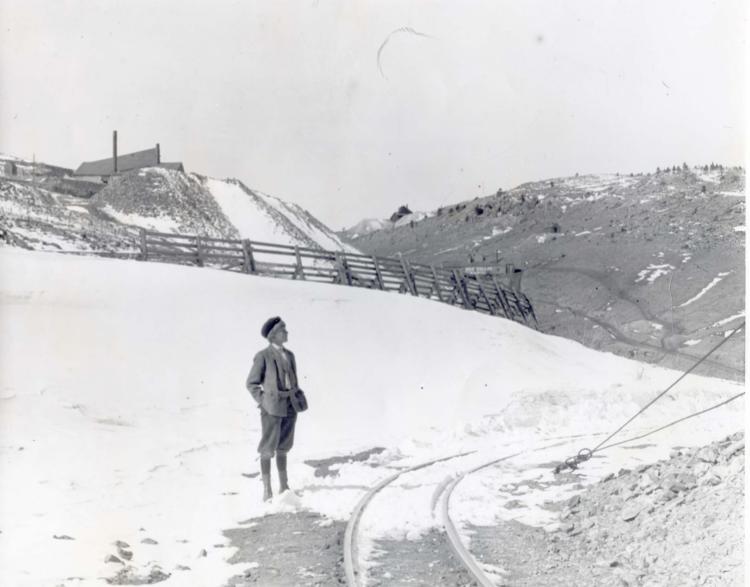 This is an image from the Denver Public Library, Western History collection. The little guy is probably the son of H.H. Lake - he pops up in other photos. He is standing next to the Gilpin Tram spur that curved back around the mine and from where the coal dump spur split off. Two guy wires, likely for the Gunnell Mine smokestacks, can be seen. This is a good image showing how sharp some of the mine trackage spurs were. The Grand Army is the large mine at left background. 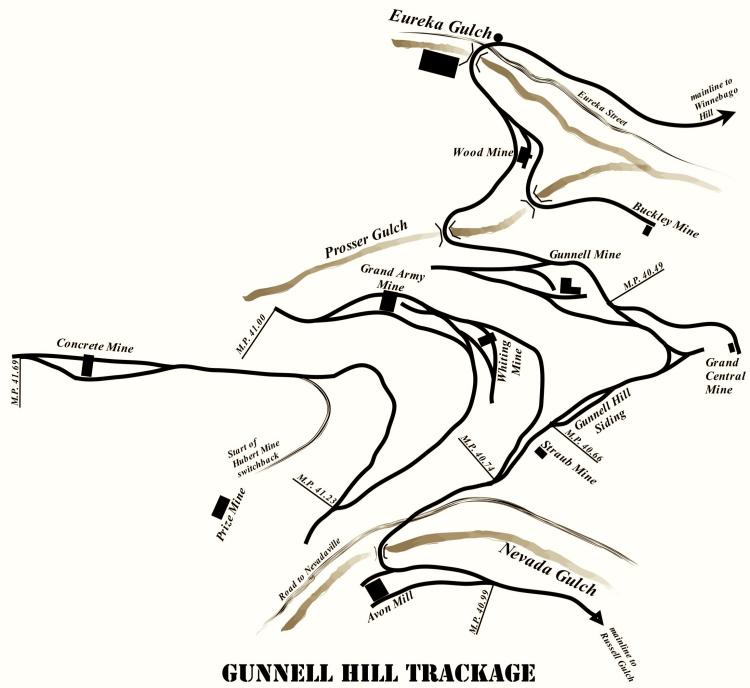 This map shows the trackage on Gunnell Hill, and the major mines. 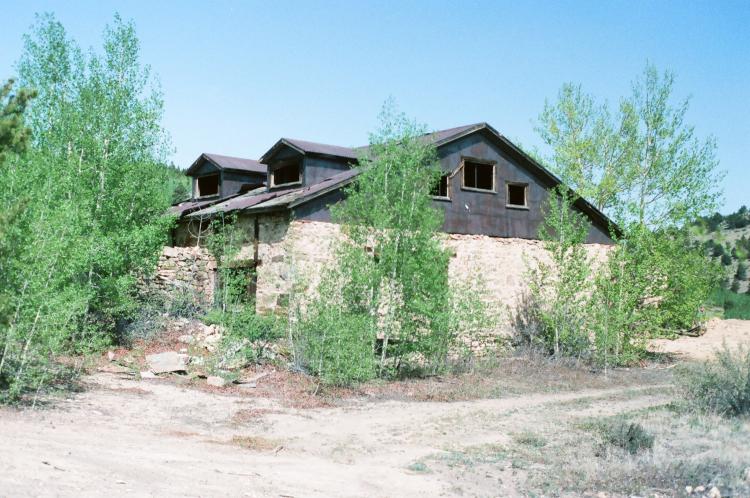 Someone has partially restored the remains of the Gunnell Mine, and the roof and walls of the boiler room end of the building remain. The stone pier for the Gilpin Tram coal spur can be seen on the left side of the building. 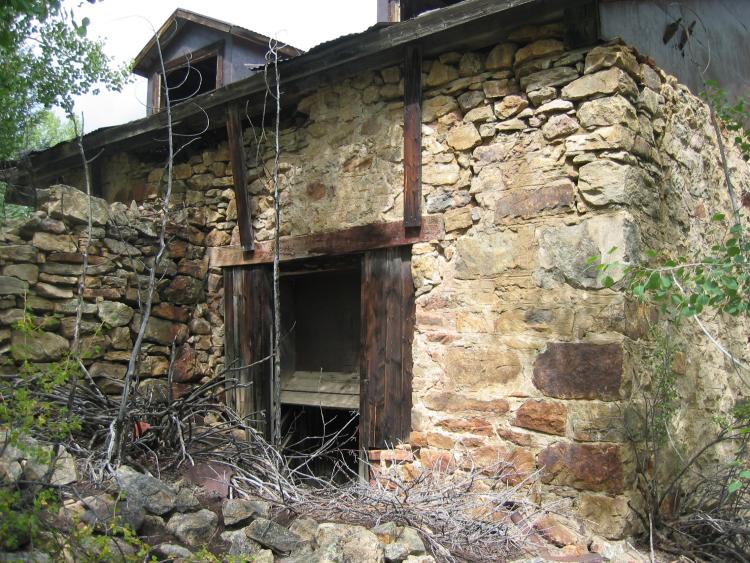 The south wall of the Gunnell Mine shows the two restored wooden coal doors. The stone pier for the Gilpin Tram spur can be seen at left. 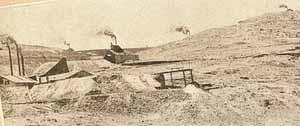 Comparing the above image to one previously posted, we seen the shaft-house of the Gunnell Mine was rebuilt again after a fire. This is an earlier photo from “Glimpses of Golden Gilpin Colorado”, a promotional pamphlet published about 1908 or so. Note that the waste rock at the end of the dump trestle is pretty small at this time. The Whiting Mine is the mine in the background.
Keith Pashina
Narrow-minded in Arizona |
«
Return to C&Sng Discussion Forum
|
1 view|%1 views
| Free forum by Nabble | Edit this page |