Re: The Gilpin Tram in Black Hawk
Posted by Keith Pashina on
URL: http://c-sng-discussion-forum.254.s1.nabble.com/The-Gilpin-Tram-in-Black-Hawk-tp18436p19533.html
Whew! It’s been a while since I posted. Time to get back on track…
But, continuing along on our visit to upper Black Hawk, we come up to the transfer tracks between the Gilpin Tram and C&S.
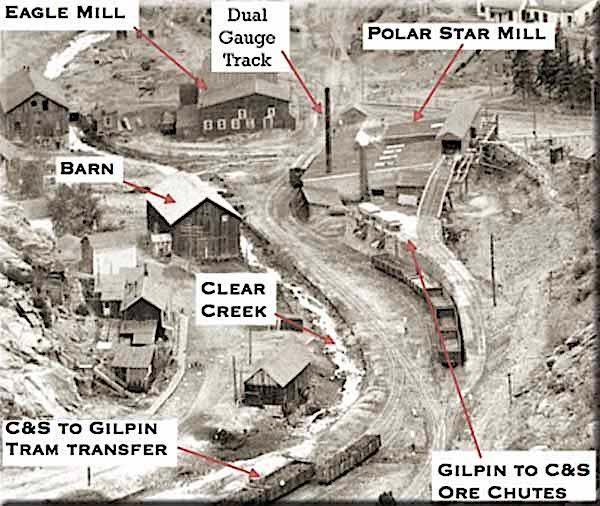
This enlargement of the previously photo zooms in on the Gilpin Tram and C&S freight transfer. There are two C&S coal cars parked on the siding, next to two Gilpin Tram coal cars. The C&S coal cars will be unloaded by hand shoveling into the Gilpin Tram coal cars. Empty C&S coal cars are parked on the siding next to the ore chutes, and will be filled one-by-one from Gilpin ore cars above. The loaded cars will be coasted down on the slight gradient, and the next car then loaded.
The narrow valley of Clear Creek took a slight bend to the west, and just around the corner were the freight transfer tracks from the 3’ gauge C&S to the 2’ gauge Gilpin Tram. The accompanying figures show the simple track arrangement – 2 parallel sidings where freight was hand-transferred from the 3’ gauge to the 2’ gauge. I think most of the freight was coal for the mines – it was delivered in 3’ gauge gondolas (coal cars) and then shoveled into both Gilpin Tram ore cars and specially-built wooden coal cars. This was a moderately busy place - records from October 1907 show 15 C&S cars of coal were transferred to the Gilpin Tram that month. But, some of the Gilpin County mines were early innovators, switching to electrical power when possible, and by the early 1900s, using internal combustion engines for power, thus gradually reducing the need for coal.
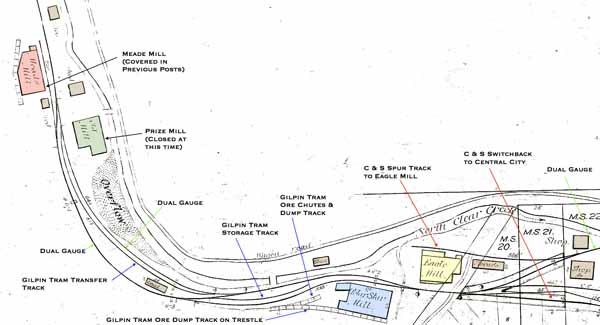
This track map is enlarged from a C&S track map from the Colorado Historical Society collection. The Gilpin Tram transfer track is very close to the Polar Star Mill
Although a very basic arrangement, a surprising variety of non-coal traffic transferred off the C&S to the Gilpin Tram. This traffic was sporadic, and coincided with construction of new mines or rebuilding, with at least one shipment going from a mine to the “depot”. From surviving Gilpin Tram records and local newspaper accounts, here is some of the transfer traffic I could locate:
This is just the traffic documented in August and October 1907:
“Merchandise” (not described any more than that), in shipments varying from 0.14 to 0.66 tons, and hauled in ore cars to the East Pewabic and Pewabic Mines
Steel”, 1.666 tons in ore car 141 to the Pewabic Mine
Drill steel, 4.09 tons to the Pewabic Mine in Car 4 (a coal car)
A casting (not described) of 0.1 tons in ore car 139 from the Pewabic Mine to the depot area
“Oil” in ore car 136 to the East Pewabic Mine (must have been in cans or barrels)
Steel (not described) of 2 tons in coal car 4 from the Pewabic Mine to the depot area
Iron pipe, 0.92 tons from the depot area to the Old Town Mine in coal car 4 “Powder” in ore cars 45 & 48 – 11.45 tons of it! This was from the depot area to the Old Town Mine
This is a photo from the Ronzio collection, and published in the Gilpin Railroad Era. There is a lot of detail in this photo but it is the best photo showing the C&S-Gilpin coal and transfer tracks.
This photo was taken when the Gilpin Tram and shut down and was being scrapped - that is torn-up rail inside the C&S gondola in the foreground. Note the dual gauge track at right - the 2' gauge Gilpin Tram track is to the left of it. The "mainline" is the dual gauge track at far left (in front of the shay). One interesting detail here - the turnouts to 2' gauge track are all thrown with harp switch stands, and any dual gauge turnout is thrown with rotary switch stands. I wonder what color the switch stand targets were painted?
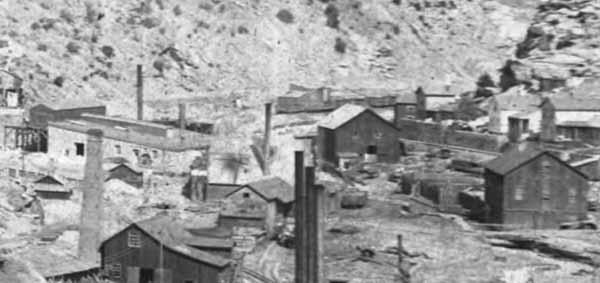
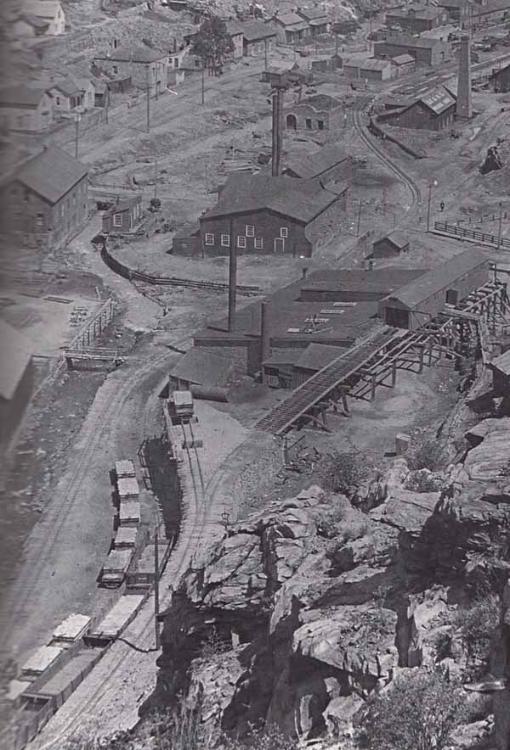
Here is a view from the Denver Public Library, Western History Collection, greatly enlarged from a small corner of a photo. The south side of the Polar Star Mill can be seen at left, along with the Gilpin Tram ore spur for unloading (track is on a trestle). In the center (blurry) distance, some C&S cars can be seen parked on the transfer track. I love this scene showing how crowded together the buildings are - there seems to be smokestacks and buildings everywhere!
This photo is a Ronzio collection photo from the Gilpin Railroad Era. Of interest here is the 2' gauge Gilpin Tram spur to the ore chutes, and the trestle for unloading ore into the Polar Star Mill. At the ore chutes, there are 4, 3' gauge C&S gondolas waiting to be loaded with ore from the ore chutes. One Gilpin Tram ore car sits on the ore chute dump track above. There are 8 loaded Gilpin Tram ore cars to the left of the C&S gondolas. They are sitting on a 2' gauge track that seems to be use for ore car storage while waiting to be unloaded. Immediately above the Polar Star Mill is the Eagle Mill. The Eagle Mill was served only by the C&S, and never by the Gilpin Tram.
There was a lot of interesting switching activity around the ore chutes and transfer track. This information is from C&S records in the Colorado Railroad Museum archives. Some moves that were documented in 1907:
Transfer of C&S cars 4858, 4106, and 4037 from the Hidden Treasure Mill to the C&S Transfer
Switching C&S cars 7625 and 4065 from the Polar Star Mill to the C&S Transfer
Other car switching was of C&S gondolas 4226, 4245, 4895 and 4140 in October 1907, from the Hidden Treasure Mill to the C&S ore chutes.
These switching moves refer to switching of 3’ gauge gondolas by the Gilpin Tram, on the dual gauge track.
URL: http://c-sng-discussion-forum.254.s1.nabble.com/The-Gilpin-Tram-in-Black-Hawk-tp18436p19533.html
Whew! It’s been a while since I posted. Time to get back on track…
But, continuing along on our visit to upper Black Hawk, we come up to the transfer tracks between the Gilpin Tram and C&S.
This enlargement of the previously photo zooms in on the Gilpin Tram and C&S freight transfer. There are two C&S coal cars parked on the siding, next to two Gilpin Tram coal cars. The C&S coal cars will be unloaded by hand shoveling into the Gilpin Tram coal cars. Empty C&S coal cars are parked on the siding next to the ore chutes, and will be filled one-by-one from Gilpin ore cars above. The loaded cars will be coasted down on the slight gradient, and the next car then loaded.
The narrow valley of Clear Creek took a slight bend to the west, and just around the corner were the freight transfer tracks from the 3’ gauge C&S to the 2’ gauge Gilpin Tram. The accompanying figures show the simple track arrangement – 2 parallel sidings where freight was hand-transferred from the 3’ gauge to the 2’ gauge. I think most of the freight was coal for the mines – it was delivered in 3’ gauge gondolas (coal cars) and then shoveled into both Gilpin Tram ore cars and specially-built wooden coal cars. This was a moderately busy place - records from October 1907 show 15 C&S cars of coal were transferred to the Gilpin Tram that month. But, some of the Gilpin County mines were early innovators, switching to electrical power when possible, and by the early 1900s, using internal combustion engines for power, thus gradually reducing the need for coal.
This track map is enlarged from a C&S track map from the Colorado Historical Society collection. The Gilpin Tram transfer track is very close to the Polar Star Mill
Although a very basic arrangement, a surprising variety of non-coal traffic transferred off the C&S to the Gilpin Tram. This traffic was sporadic, and coincided with construction of new mines or rebuilding, with at least one shipment going from a mine to the “depot”. From surviving Gilpin Tram records and local newspaper accounts, here is some of the transfer traffic I could locate:
This is just the traffic documented in August and October 1907:
“Merchandise” (not described any more than that), in shipments varying from 0.14 to 0.66 tons, and hauled in ore cars to the East Pewabic and Pewabic Mines
Steel”, 1.666 tons in ore car 141 to the Pewabic Mine
Drill steel, 4.09 tons to the Pewabic Mine in Car 4 (a coal car)
A casting (not described) of 0.1 tons in ore car 139 from the Pewabic Mine to the depot area
“Oil” in ore car 136 to the East Pewabic Mine (must have been in cans or barrels)
Steel (not described) of 2 tons in coal car 4 from the Pewabic Mine to the depot area
Iron pipe, 0.92 tons from the depot area to the Old Town Mine in coal car 4 “Powder” in ore cars 45 & 48 – 11.45 tons of it! This was from the depot area to the Old Town Mine
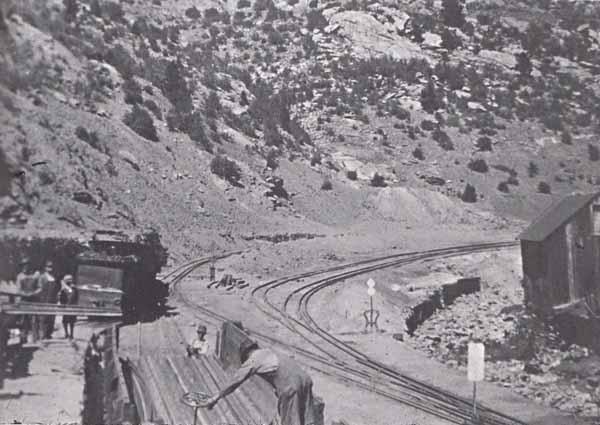
This is a photo from the Ronzio collection, and published in the Gilpin Railroad Era. There is a lot of detail in this photo but it is the best photo showing the C&S-Gilpin coal and transfer tracks.
This photo was taken when the Gilpin Tram and shut down and was being scrapped - that is torn-up rail inside the C&S gondola in the foreground. Note the dual gauge track at right - the 2' gauge Gilpin Tram track is to the left of it. The "mainline" is the dual gauge track at far left (in front of the shay). One interesting detail here - the turnouts to 2' gauge track are all thrown with harp switch stands, and any dual gauge turnout is thrown with rotary switch stands. I wonder what color the switch stand targets were painted?
Here is a view from the Denver Public Library, Western History Collection, greatly enlarged from a small corner of a photo. The south side of the Polar Star Mill can be seen at left, along with the Gilpin Tram ore spur for unloading (track is on a trestle). In the center (blurry) distance, some C&S cars can be seen parked on the transfer track. I love this scene showing how crowded together the buildings are - there seems to be smokestacks and buildings everywhere!
This photo is a Ronzio collection photo from the Gilpin Railroad Era. Of interest here is the 2' gauge Gilpin Tram spur to the ore chutes, and the trestle for unloading ore into the Polar Star Mill. At the ore chutes, there are 4, 3' gauge C&S gondolas waiting to be loaded with ore from the ore chutes. One Gilpin Tram ore car sits on the ore chute dump track above. There are 8 loaded Gilpin Tram ore cars to the left of the C&S gondolas. They are sitting on a 2' gauge track that seems to be use for ore car storage while waiting to be unloaded. Immediately above the Polar Star Mill is the Eagle Mill. The Eagle Mill was served only by the C&S, and never by the Gilpin Tram.
There was a lot of interesting switching activity around the ore chutes and transfer track. This information is from C&S records in the Colorado Railroad Museum archives. Some moves that were documented in 1907:
Transfer of C&S cars 4858, 4106, and 4037 from the Hidden Treasure Mill to the C&S Transfer
Switching C&S cars 7625 and 4065 from the Polar Star Mill to the C&S Transfer
Other car switching was of C&S gondolas 4226, 4245, 4895 and 4140 in October 1907, from the Hidden Treasure Mill to the C&S ore chutes.
These switching moves refer to switching of 3’ gauge gondolas by the Gilpin Tram, on the dual gauge track.
Keith Pashina
Narrow-minded in Arizona
Narrow-minded in Arizona
| Free forum by Nabble | Edit this page |