Re: Leadville Designs Baggage/Express 1 in C&Sn3
Posted by Jim Courtney on Dec 31, 2023; 2:30am
URL: http://c-sng-discussion-forum.254.s1.nabble.com/Leadville-Designs-Baggage-Express-1-in-C-Sn3-tp19129p19317.html
Finishing Up
Paint:
The body of C&S 1 got a primer coat of Tamiya fine grey primer.
I wasn't happy with the finish on RPO/Coach 43 using enamels. So, I finally found an alternative match for Mike Trent's "Dark Green" with the same FS number of 34079--AK Interactive "Forest Green", RC027, one of the "Real Color" paints in their WW2 armor color line.
AK "Real Color" paints are acrylic lacquers, similar to P-B-L's "Star Paint" line, that I've used in the past. The solvent is a combination of alcohol-like chemicals, with little odor. I watched several YouTube videos on airbrushing this line of AK paints. It can be thinned with a variety of thinners, I used Mr. Color thinner. I was surprised that it is recommended that the paint be thinned at least 50:50 for use with an airbrush, others recommending 30:70 ratio of paint to thinner. I used a medium tip at 25 psi. The paint went on very smoothly, no need of a retarder. It is dry to the touch in 2 hours, with a matte finish (unlike the enamels I used before which took 2 weeks to fully dry).
Did I mention that I really like this paint?
The body then received a coat of Testers "Glosscote" for the application of decals. The roof got a coat of "Dullcote". Geoff Hamway, in a recent issue of his Telluride Journal, observed that Testor's has a "New Coke" thing going with "Dullcote" in a rattle can. It isn't dull anymore (is nothing sacred?). Fortunately I have a large stash of the stuff form 15 years ago for use in an airbrush, so I used that.
FWIW, these are the painting handles that I've been using for the past couple of years:
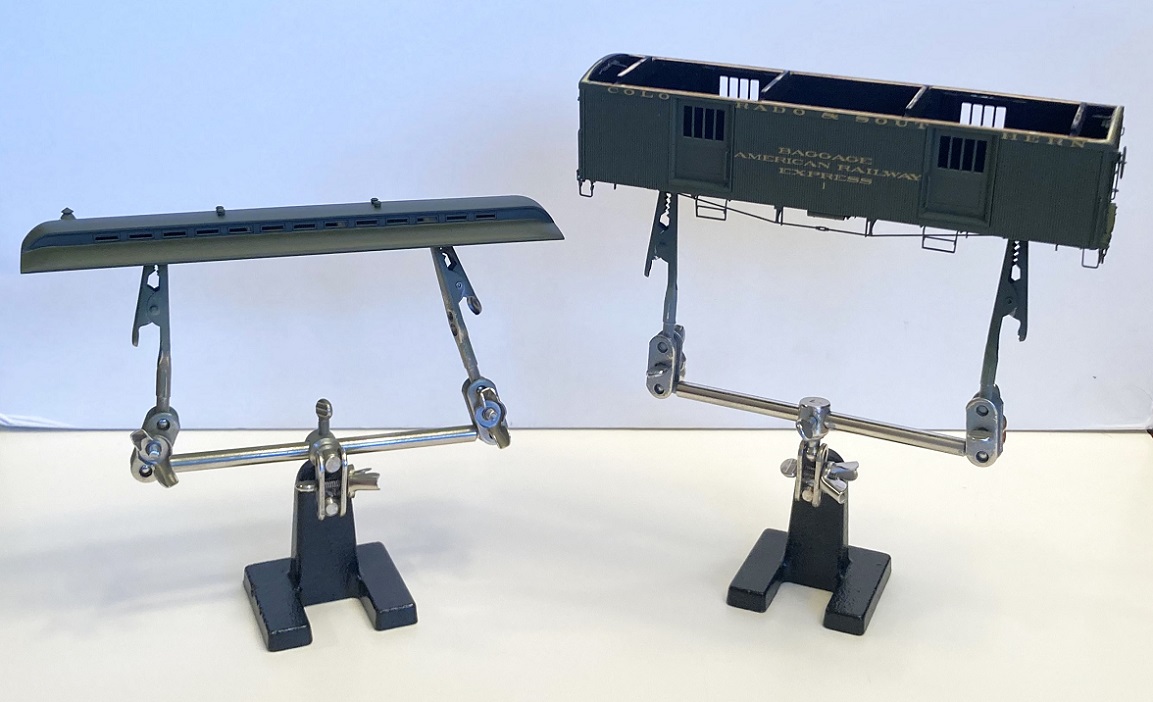
Not my idea, don't remember where I first saw it. They are basically "Third Hand" soldering stands that you can buy at the hardware store or online for $10.00-12.00 (example: https://www.amazon.com/dp/B08Q3NNHNB?ref=ppx_yo2ov_dt_b_product_details&th=1)
I ditch the magnifying glass, and orient the rods with the alligator clips vertically and attach the clips to temporary screws in the bolster. Lately, I've been leaving the car body on the stand from primer to color coat to gloss coat to decaling to cover coat to dull coat. No more accidental finger prints in soft paint from handling.
Lettering:
Included in the kit are decal from Bill's own artwork, printed in buttery "Deluxe Yellow":

The decals are perfect for the late 1920's until abandonment. Unfortunately for my C&S #1 project, part of a 1924 consist, "Deluxe Yellow" hadn't arrived yet, the lettering still gold paint. I've never found a date for when the C&S began substituting Yellow paint for the Gold used on passenger car lettering (Danneman cites January, 1925, as the date the D&RGW adopted yellow paint for lettering its passenger cars).
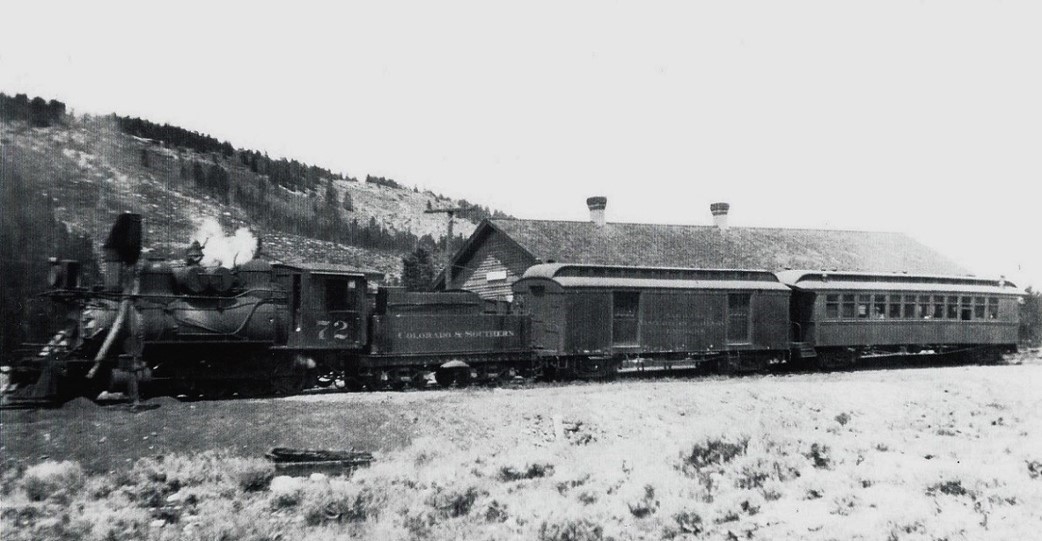
So, I used Thinfilm Sn-28 "C&S Passenger Car Set", the same artwork that came with my Overland coaches. I used the "Colorado & Southern" from the set for the letterboard side fascia. A further issue is that in 1924, the C&S baggage cars still carried the WW1 / USRA era "American Railway Express" lettering, and the word "Baggage". The only photo that I've found of C&S baggage car 1 in the 1920s is this photo of the Leadville passenger train at Dillon:
The words "American Railway" barely fit between the two side doors. To reproduce this lettering I used Thinfilm's set Sn-04 "D&RGW NG (Rich Gold) Set" (https://thinfilmdecals.com/narrow-gauge-decal-list/. This set includes the words "Baggage" and "American Railway Express" in the same 4" extended Roman font and the same gold ink as the C&S passenger set. I had to cut apart the L-W-A-Y of "Railway" and rearrange them to make the lettering fit, but it does, just:
The body got an overspray of Old Dullcote after the decals were dry. The Dullcote minimised the visible wood grain of the siding. And I doubt that the "varnish" was highly varnished by the 1920s.
Finishing touches:
P-B-L rubber air and signal hoses were installed on the car ends, along with the couplers. The baggage door windows were glazed with microscope cover slip glass, attached to the inside with dots of clear epoxy. The clerestory windows were glazed with strips of Evergreen 0.010 thick clear styrene.
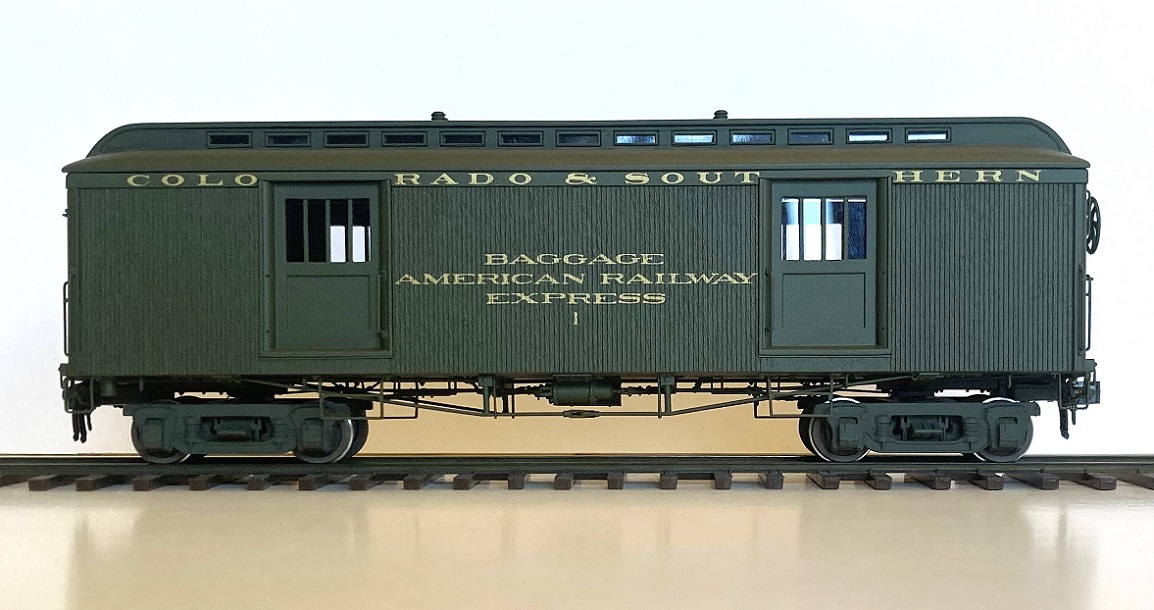
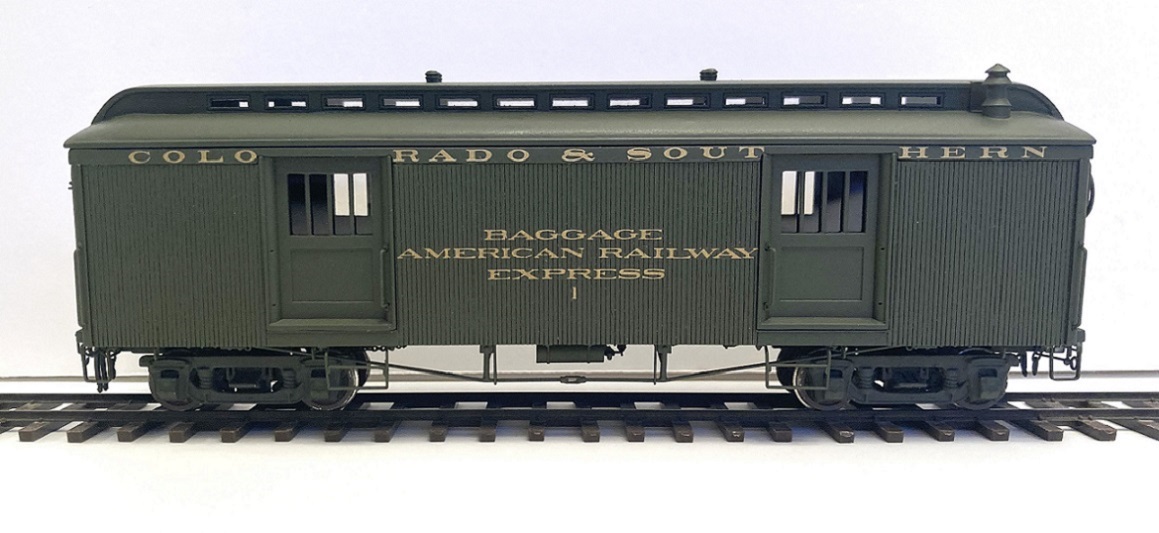
So the car is pretty much finished:

I haven't glued the roof to the body yet, the final step. I'm toying with the idea of installing safety bars behind the glass in the baggage doors. I'm not sure they will even be visible with the black interior and the reflections from the glass.
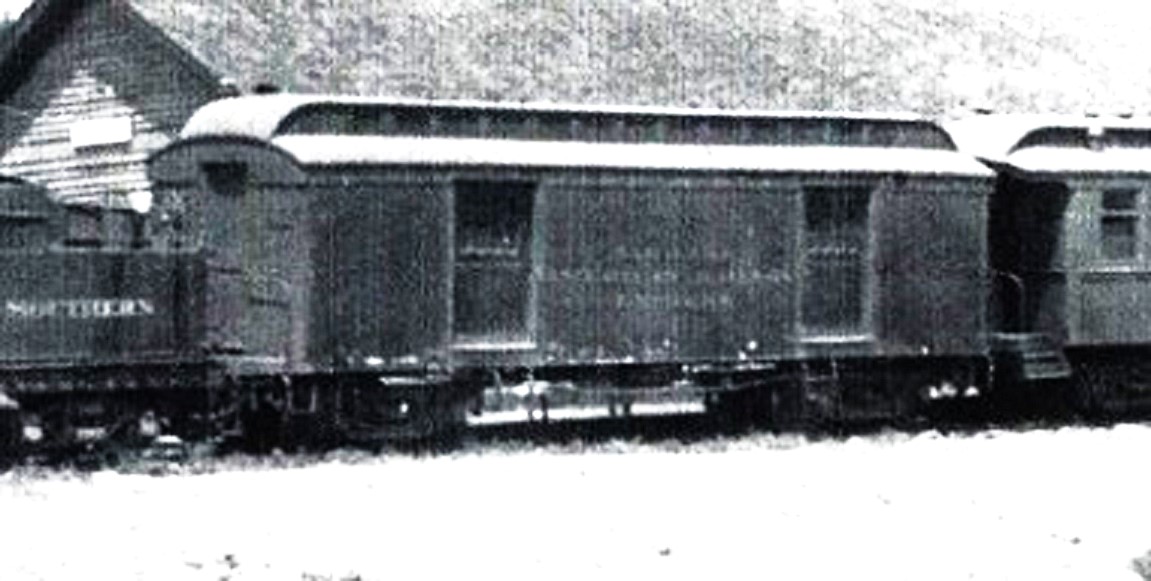
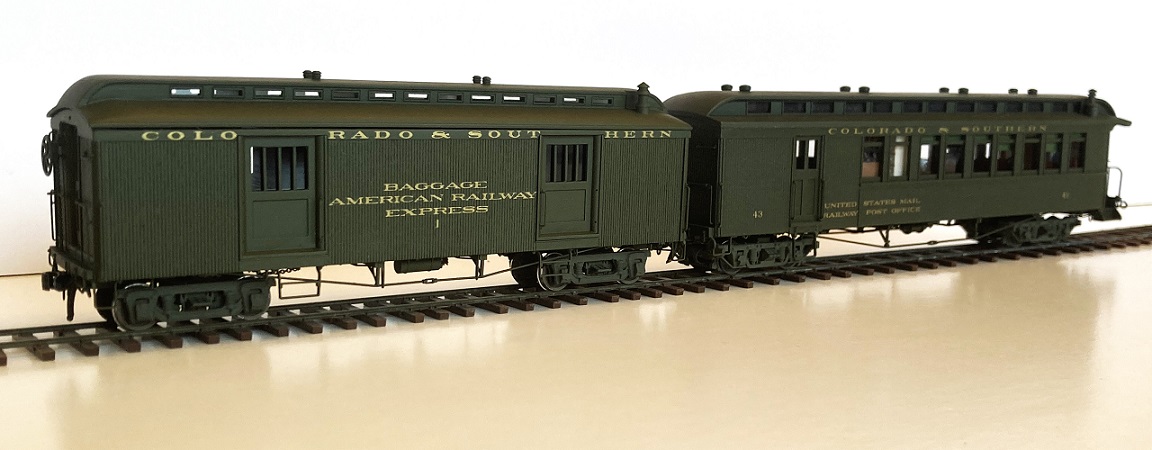
Here is how baggage car 1 looks coupled ahead of RPO / Coach 43. The two head end cars handled the express and mail business on the South Park Division in 1924:
Bill's kit for C&S 1 is a very challenging kit, a true craftsman's kit. But it can be built up into a fine model. I am very pleased with how the baggage car has turned out, a car that I've always wanted to model, another thing to check off the bucket list.
If others build up Bill's kit, especially in HO or O scales, please share photos of your work here!
URL: http://c-sng-discussion-forum.254.s1.nabble.com/Leadville-Designs-Baggage-Express-1-in-C-Sn3-tp19129p19317.html
Finishing Up
Paint:
The body of C&S 1 got a primer coat of Tamiya fine grey primer.
I wasn't happy with the finish on RPO/Coach 43 using enamels. So, I finally found an alternative match for Mike Trent's "Dark Green" with the same FS number of 34079--AK Interactive "Forest Green", RC027, one of the "Real Color" paints in their WW2 armor color line.
AK "Real Color" paints are acrylic lacquers, similar to P-B-L's "Star Paint" line, that I've used in the past. The solvent is a combination of alcohol-like chemicals, with little odor. I watched several YouTube videos on airbrushing this line of AK paints. It can be thinned with a variety of thinners, I used Mr. Color thinner. I was surprised that it is recommended that the paint be thinned at least 50:50 for use with an airbrush, others recommending 30:70 ratio of paint to thinner. I used a medium tip at 25 psi. The paint went on very smoothly, no need of a retarder. It is dry to the touch in 2 hours, with a matte finish (unlike the enamels I used before which took 2 weeks to fully dry).
Did I mention that I really like this paint?
The body then received a coat of Testers "Glosscote" for the application of decals. The roof got a coat of "Dullcote". Geoff Hamway, in a recent issue of his Telluride Journal, observed that Testor's has a "New Coke" thing going with "Dullcote" in a rattle can. It isn't dull anymore (is nothing sacred?). Fortunately I have a large stash of the stuff form 15 years ago for use in an airbrush, so I used that.
FWIW, these are the painting handles that I've been using for the past couple of years:
Not my idea, don't remember where I first saw it. They are basically "Third Hand" soldering stands that you can buy at the hardware store or online for $10.00-12.00 (example: https://www.amazon.com/dp/B08Q3NNHNB?ref=ppx_yo2ov_dt_b_product_details&th=1)
I ditch the magnifying glass, and orient the rods with the alligator clips vertically and attach the clips to temporary screws in the bolster. Lately, I've been leaving the car body on the stand from primer to color coat to gloss coat to decaling to cover coat to dull coat. No more accidental finger prints in soft paint from handling.
Lettering:
Included in the kit are decal from Bill's own artwork, printed in buttery "Deluxe Yellow":
The decals are perfect for the late 1920's until abandonment. Unfortunately for my C&S #1 project, part of a 1924 consist, "Deluxe Yellow" hadn't arrived yet, the lettering still gold paint. I've never found a date for when the C&S began substituting Yellow paint for the Gold used on passenger car lettering (Danneman cites January, 1925, as the date the D&RGW adopted yellow paint for lettering its passenger cars).
So, I used Thinfilm Sn-28 "C&S Passenger Car Set", the same artwork that came with my Overland coaches. I used the "Colorado & Southern" from the set for the letterboard side fascia. A further issue is that in 1924, the C&S baggage cars still carried the WW1 / USRA era "American Railway Express" lettering, and the word "Baggage". The only photo that I've found of C&S baggage car 1 in the 1920s is this photo of the Leadville passenger train at Dillon:
The words "American Railway" barely fit between the two side doors. To reproduce this lettering I used Thinfilm's set Sn-04 "D&RGW NG (Rich Gold) Set" (https://thinfilmdecals.com/narrow-gauge-decal-list/. This set includes the words "Baggage" and "American Railway Express" in the same 4" extended Roman font and the same gold ink as the C&S passenger set. I had to cut apart the L-W-A-Y of "Railway" and rearrange them to make the lettering fit, but it does, just:
The body got an overspray of Old Dullcote after the decals were dry. The Dullcote minimised the visible wood grain of the siding. And I doubt that the "varnish" was highly varnished by the 1920s.
Finishing touches:
P-B-L rubber air and signal hoses were installed on the car ends, along with the couplers. The baggage door windows were glazed with microscope cover slip glass, attached to the inside with dots of clear epoxy. The clerestory windows were glazed with strips of Evergreen 0.010 thick clear styrene.
So the car is pretty much finished:
I haven't glued the roof to the body yet, the final step. I'm toying with the idea of installing safety bars behind the glass in the baggage doors. I'm not sure they will even be visible with the black interior and the reflections from the glass.
Here is how baggage car 1 looks coupled ahead of RPO / Coach 43. The two head end cars handled the express and mail business on the South Park Division in 1924:
Bill's kit for C&S 1 is a very challenging kit, a true craftsman's kit. But it can be built up into a fine model. I am very pleased with how the baggage car has turned out, a car that I've always wanted to model, another thing to check off the bucket list.
If others build up Bill's kit, especially in HO or O scales, please share photos of your work here!
Jim Courtney
Poulsbo, WA
Poulsbo, WA
| Free forum by Nabble | Edit this page |