Re: Leadville Designs Baggage/Express 1 in C&Sn3
Posted by Jim Courtney on Dec 14, 2023; 1:32am
URL: http://c-sng-discussion-forum.254.s1.nabble.com/Leadville-Designs-Baggage-Express-1-in-C-Sn3-tp19129p19261.html
A Detour: 5'-6" Commonwealth Trucks for C&S Baggage 1
To figure how much weight to add to the car body, I needed to weigh the body, the roof and all parts of Bill's cast trucks, including wheelsets. The short version of this post is that a total of about 1.25 oz. of additional weight is needed to bring total weight up to 4.25 oz.
To weigh the castings for the trucks, they had to be cut from the heavy brass sprues, accomplished using a cut off disc in my Dremel and a jeweler's saw. Once weighed, I began examining the individual parts, and one thing lead to another. I found myself picking up a needle file and cleaning up all the castings.
Then, I thought to myself, I should assemble the trucks and see how they mounted to the car body bolsters, as to car height above the rail.
Bill's design doesn't require glue or solder, depends on two screws:

I reread Keith's review of the trucks here: http://c-sng-discussion-forum.254.s1.nabble.com/Leadville-Designs-C-amp-S-5-6-quot-Passenger-Trucks-td19106.html
I noted Keith's dislike of the 00-90 screws provided with the trucks (one broke, all had pan-head, slotted tops). So I used 1.4 mm metric screws with Phillips heads instead. The holes in the top bolster were drilled out on my drill press with a 1.4 mm tap drill (#57) and the bolster bottoms drilled out to clear the same (#54). The top bolster holes were tapped with a NWSL 1.4 mm tap. Since I had drilled the car bolster bearing plates for 2 mm screws, I screwed the two halves of the bolsters together, squared them up with a file and drilled the central hole out to clear a 2 mm screw.
Three of the four side frames had the little mushroom bolster pin bent a bit. Keith had used a hammer to tap and straighten them.
I used a flat screw driver blade to accomplish this. One of the pins was a bit shorter than the others. I filed the underside of the little 'shroom head until it fit.
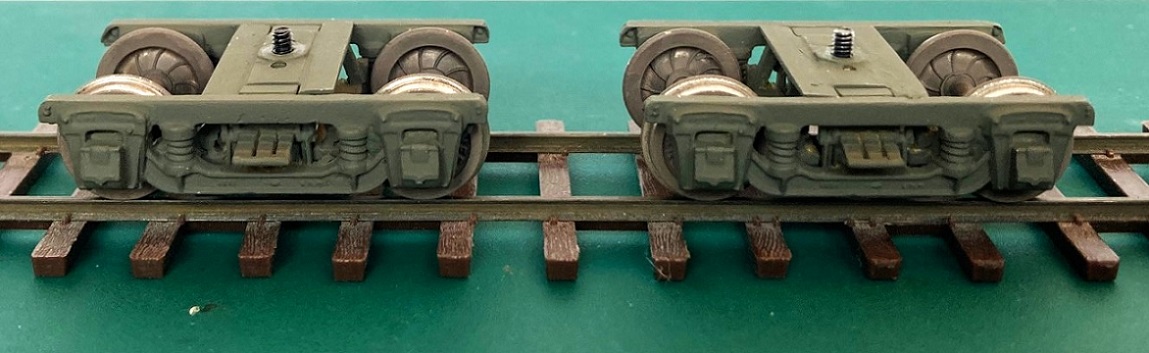
The little studs on the brake beam mounting plates didn't completely cast and the studs were too large to fit the holes in the side of the bolster assembly. So back to the drill press to enlarge the side bolster holes. When assembled with the wheel sets, the trucks are very free rolling:


Sure enough, Bills trucks make the baggage car sit a bit higher than the PBL trucks. I had to carefully file down the bolster bearing pads on the car body by about 0.020" each, to make the baggage car sit correctly, 36 scale inches above the rail top.
Then, I thought to myself, I wonder how the trucks are going to look when painted? So, I removed the wheel sets, painted them in a Banta tread mask with Polyscale "Roof Brown". I cleaned the paint off the axle ends with lacquer thinner and a microbrush. After masking the journal holes, I gave the assembled side frames and bolsters a Mike Trent paint job: Two light coats of Rustolium Camo Line "Deep Forest Green" from a rattle can. I didn't prime them first, maybe should've. Anyhow, the painted, reassembled trucks:
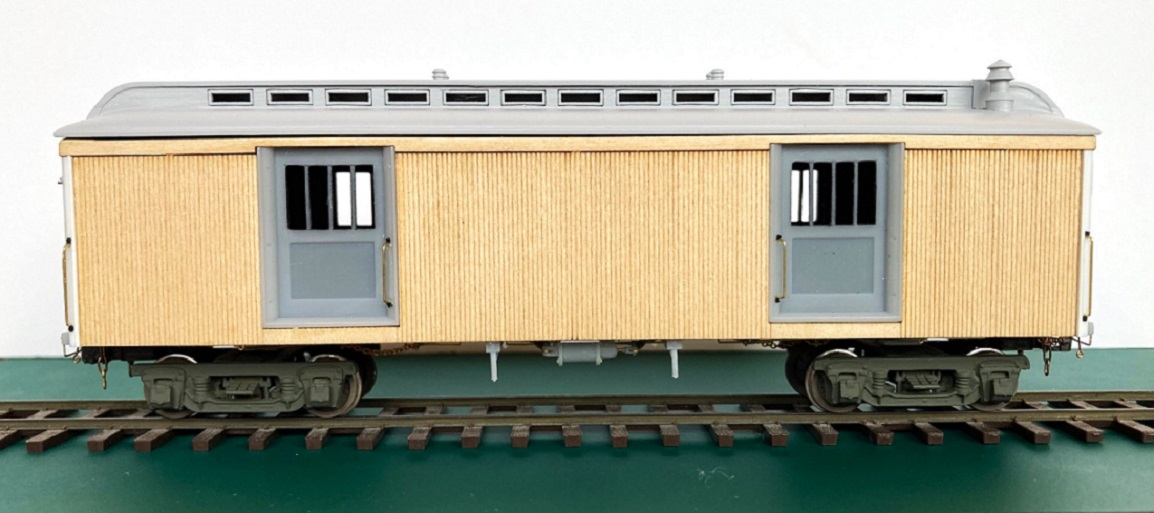
And here is how they look attached to the baggage body with the roof temporarily in place:
I ended up going with the "black hole" approach with the car interior, painted everything black. I added the weight as one of the Accurail car weights in my stash of parts, epoxied to the interior floor.
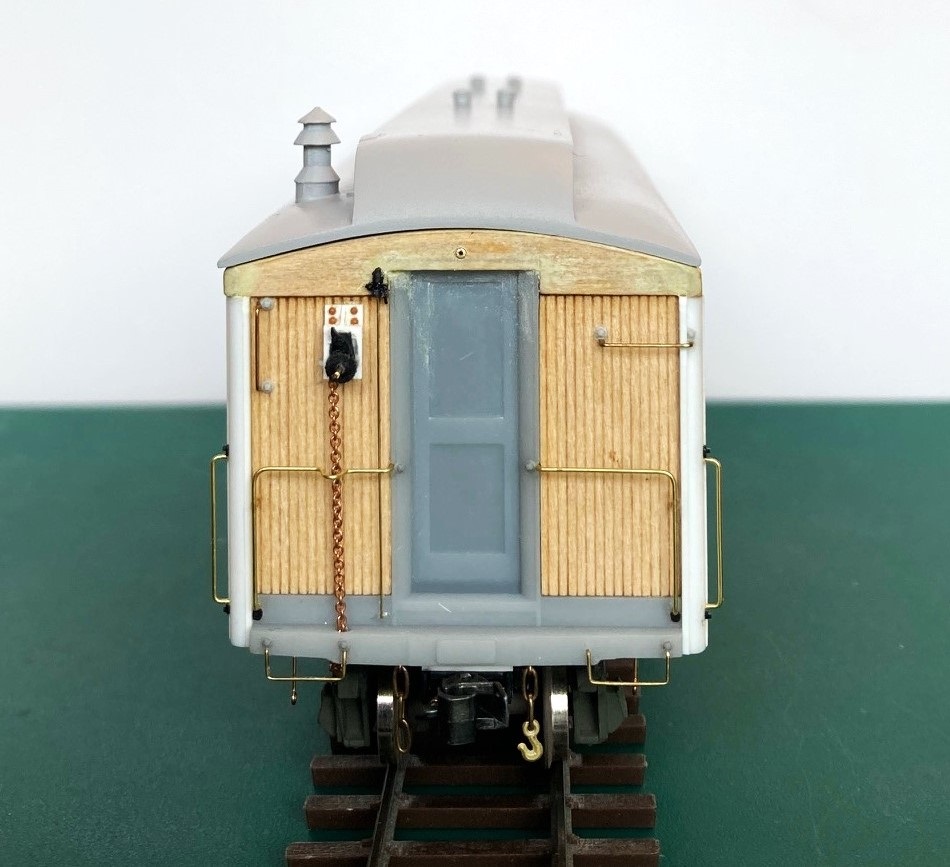
I did get the car end beams completely drilled. Even installed the safety chains and the brackets for the coupler release levers. And the small brass fitting for the signal cord, above the end door:
Hopefully, this week I will finish installing the remainder of the underframe parts . . .
URL: http://c-sng-discussion-forum.254.s1.nabble.com/Leadville-Designs-Baggage-Express-1-in-C-Sn3-tp19129p19261.html
A Detour: 5'-6" Commonwealth Trucks for C&S Baggage 1
To figure how much weight to add to the car body, I needed to weigh the body, the roof and all parts of Bill's cast trucks, including wheelsets. The short version of this post is that a total of about 1.25 oz. of additional weight is needed to bring total weight up to 4.25 oz.
To weigh the castings for the trucks, they had to be cut from the heavy brass sprues, accomplished using a cut off disc in my Dremel and a jeweler's saw. Once weighed, I began examining the individual parts, and one thing lead to another. I found myself picking up a needle file and cleaning up all the castings.
Then, I thought to myself, I should assemble the trucks and see how they mounted to the car body bolsters, as to car height above the rail.
Bill's design doesn't require glue or solder, depends on two screws:
I reread Keith's review of the trucks here: http://c-sng-discussion-forum.254.s1.nabble.com/Leadville-Designs-C-amp-S-5-6-quot-Passenger-Trucks-td19106.html
I noted Keith's dislike of the 00-90 screws provided with the trucks (one broke, all had pan-head, slotted tops). So I used 1.4 mm metric screws with Phillips heads instead. The holes in the top bolster were drilled out on my drill press with a 1.4 mm tap drill (#57) and the bolster bottoms drilled out to clear the same (#54). The top bolster holes were tapped with a NWSL 1.4 mm tap. Since I had drilled the car bolster bearing plates for 2 mm screws, I screwed the two halves of the bolsters together, squared them up with a file and drilled the central hole out to clear a 2 mm screw.
Three of the four side frames had the little mushroom bolster pin bent a bit. Keith had used a hammer to tap and straighten them.
I used a flat screw driver blade to accomplish this. One of the pins was a bit shorter than the others. I filed the underside of the little 'shroom head until it fit.
The little studs on the brake beam mounting plates didn't completely cast and the studs were too large to fit the holes in the side of the bolster assembly. So back to the drill press to enlarge the side bolster holes. When assembled with the wheel sets, the trucks are very free rolling:
Sure enough, Bills trucks make the baggage car sit a bit higher than the PBL trucks. I had to carefully file down the bolster bearing pads on the car body by about 0.020" each, to make the baggage car sit correctly, 36 scale inches above the rail top.
Then, I thought to myself, I wonder how the trucks are going to look when painted? So, I removed the wheel sets, painted them in a Banta tread mask with Polyscale "Roof Brown". I cleaned the paint off the axle ends with lacquer thinner and a microbrush. After masking the journal holes, I gave the assembled side frames and bolsters a Mike Trent paint job: Two light coats of Rustolium Camo Line "Deep Forest Green" from a rattle can. I didn't prime them first, maybe should've. Anyhow, the painted, reassembled trucks:
And here is how they look attached to the baggage body with the roof temporarily in place:
I ended up going with the "black hole" approach with the car interior, painted everything black. I added the weight as one of the Accurail car weights in my stash of parts, epoxied to the interior floor.
I did get the car end beams completely drilled. Even installed the safety chains and the brackets for the coupler release levers. And the small brass fitting for the signal cord, above the end door:
Hopefully, this week I will finish installing the remainder of the underframe parts . . .
Jim Courtney
Poulsbo, WA
Poulsbo, WA
| Free forum by Nabble | Edit this page |