Re: Leadville Designs Baggage/Express 1 in C&Sn3
Posted by Jim Courtney on Dec 05, 2023; 4:45am
URL: http://c-sng-discussion-forum.254.s1.nabble.com/Leadville-Designs-Baggage-Express-1-in-C-Sn3-tp19129p19245.html
Finishing the Roof:
I did a 4th application of thinned Milliput Sunday and finally built up the last pesky corner of the roof, so it looked like the rest. Also filled a few more small divots in the roof surface. When dry more sanding followed by a 4th light coat of Tamiya grey primer. This led to a bit more sanding of the corners, clerestory upper roof where it met the end, and smoothing of the clerestory sides at the pointy ends.
After 4 applications of both Milliput and primer and much sanding, I felt that I had reached the point of diminishing returns. If I kept working on the roof to make it "perfect", I would likely screw up something that I couldn't fix. So, it was time to add the roof details.
Bill has included nice little printed lamp vents for the top of the clerestory. But, in my parts box, I found several packages of Precision HOn3 lamp vents for D&RGW passenger cars. In S scale they match Ken Martin's plan almost exactly, and have a bit more detail in relief. So, I decided to use them for this project, rather than have them end up at my estate sale.
One detail Bill completely overlooked was the smoke jack for the stove, located at the right corner of the "A" end of the car:
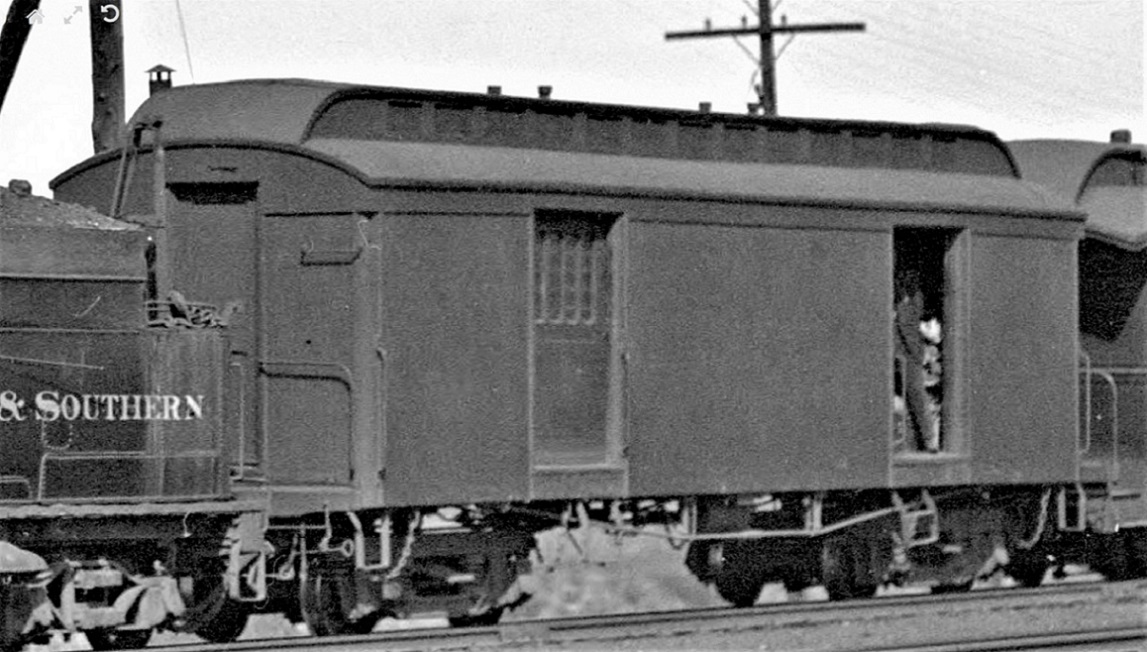
You can see it just peeking up to the right of the telegraph pole at the upper left corner. Again, in my parts box, I found a typical C&S style smoke jack, a white metal part, with the paired conical tops (see, there is a point to hanging onto stuff for 20-30 years). After building up some flashing of 0.005" styrene strips and attaching it to the clerestory, I laid out a mounting hole per Ken Martin's plans and glued it in place.
After thoroughly dusting and blowing off the roof with compressed air, I applied a 5th (and hopefully final) coat of Tamiya primer:
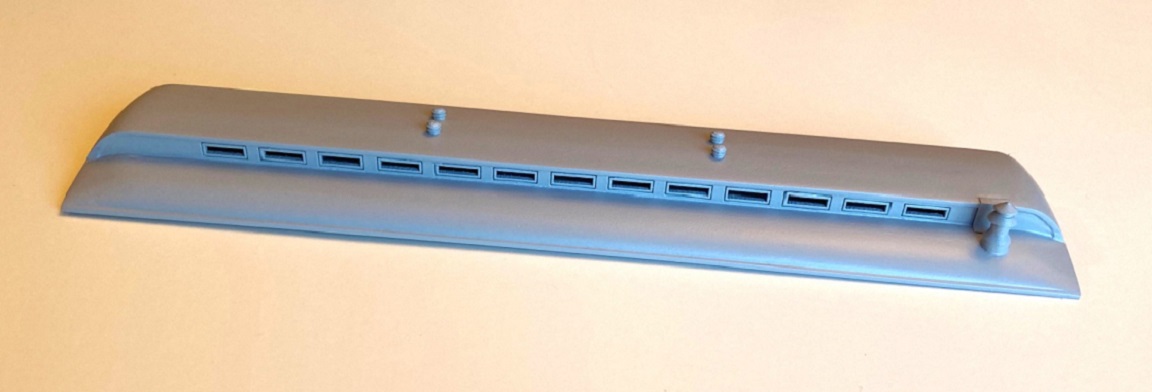
Here's how the roof looks atop the baggage car, awaiting a color coat after the car body catches up:

Although the assembly was a bit tedious, and I freaked out about some of the construction issues, I feel the finished roof turned out great, validating Bill's hybrid design. I've learned some new techniques along the way, don't know how I've been modeling all these years without Milliput.
It occurred to me that the 4 layers of Milliput and primer followed by sanding was not to fill and finish the seams. Rather it was eliminating the irregularities in the grain of the wood portion of the roof. Geoff Hamway, always helpful, suggested a technique for this chore, that he had picked up from Jan Rons: Using "High Fill" auto primer, something like this stuff that I bought on Amazon: https://www.amazon.com/dp/B0088LVJU8?ref=ppx_yo2ov_dt_b_product_details&th=1
Evidently the stuff dries quickly, and can be sanded. Sorta like Bondo in a rattle can. Geoff warned me that the term "high fill" is literal and to not use it on the car body, with all that scribing for the wood sheathing (unless I wanted to convert the model to a steel sheathed car). Since the clerestory window frames are laser engraved, I was leery about using it on this roof. I might use it on Roy's combine 20 roof to completely eliminate any print lines.
Moving on:
I had planned to add the 4th layer of the underframe details next. I have even started forming up the baggage door steps--beautiful little parts! But they are also pretty fragile. I also noted that I have overlooked a couple of steps that are a bit heavy handed:
1. I've forgotten to drill out the underside of the end beams for the safety chain mounts and the coupler release levers.
2. I'd planned to leave the interior empty and unfinished, thinking that once the windows were glazed, it would be a black hole in there. While working under the dining table lights last night, I noticed that all those windows in the baggage doors let in a lot of ambient light, and the raw interior and printed doors are pretty visible. So, I'll probably mask off everything and paint the interior. The folio 24 sheet says the walls were painted a yellow--perhaps "Depot Buff"?? I'll paint the floor black.
3. I need to add weight to the car, which means I'll need to weigh all the brass parts for the trucks and wheel sets and add any additional weight needed to get the car up to about 4 oz.
So, stay tuned . . . will Jim finish this project before the New Year??
URL: http://c-sng-discussion-forum.254.s1.nabble.com/Leadville-Designs-Baggage-Express-1-in-C-Sn3-tp19129p19245.html
Finishing the Roof:
I did a 4th application of thinned Milliput Sunday and finally built up the last pesky corner of the roof, so it looked like the rest. Also filled a few more small divots in the roof surface. When dry more sanding followed by a 4th light coat of Tamiya grey primer. This led to a bit more sanding of the corners, clerestory upper roof where it met the end, and smoothing of the clerestory sides at the pointy ends.
After 4 applications of both Milliput and primer and much sanding, I felt that I had reached the point of diminishing returns. If I kept working on the roof to make it "perfect", I would likely screw up something that I couldn't fix. So, it was time to add the roof details.
Bill has included nice little printed lamp vents for the top of the clerestory. But, in my parts box, I found several packages of Precision HOn3 lamp vents for D&RGW passenger cars. In S scale they match Ken Martin's plan almost exactly, and have a bit more detail in relief. So, I decided to use them for this project, rather than have them end up at my estate sale.
One detail Bill completely overlooked was the smoke jack for the stove, located at the right corner of the "A" end of the car:
You can see it just peeking up to the right of the telegraph pole at the upper left corner. Again, in my parts box, I found a typical C&S style smoke jack, a white metal part, with the paired conical tops (see, there is a point to hanging onto stuff for 20-30 years). After building up some flashing of 0.005" styrene strips and attaching it to the clerestory, I laid out a mounting hole per Ken Martin's plans and glued it in place.
After thoroughly dusting and blowing off the roof with compressed air, I applied a 5th (and hopefully final) coat of Tamiya primer:
Here's how the roof looks atop the baggage car, awaiting a color coat after the car body catches up:
Although the assembly was a bit tedious, and I freaked out about some of the construction issues, I feel the finished roof turned out great, validating Bill's hybrid design. I've learned some new techniques along the way, don't know how I've been modeling all these years without Milliput.
It occurred to me that the 4 layers of Milliput and primer followed by sanding was not to fill and finish the seams. Rather it was eliminating the irregularities in the grain of the wood portion of the roof. Geoff Hamway, always helpful, suggested a technique for this chore, that he had picked up from Jan Rons: Using "High Fill" auto primer, something like this stuff that I bought on Amazon: https://www.amazon.com/dp/B0088LVJU8?ref=ppx_yo2ov_dt_b_product_details&th=1
Evidently the stuff dries quickly, and can be sanded. Sorta like Bondo in a rattle can. Geoff warned me that the term "high fill" is literal and to not use it on the car body, with all that scribing for the wood sheathing (unless I wanted to convert the model to a steel sheathed car). Since the clerestory window frames are laser engraved, I was leery about using it on this roof. I might use it on Roy's combine 20 roof to completely eliminate any print lines.
Moving on:
I had planned to add the 4th layer of the underframe details next. I have even started forming up the baggage door steps--beautiful little parts! But they are also pretty fragile. I also noted that I have overlooked a couple of steps that are a bit heavy handed:
1. I've forgotten to drill out the underside of the end beams for the safety chain mounts and the coupler release levers.
2. I'd planned to leave the interior empty and unfinished, thinking that once the windows were glazed, it would be a black hole in there. While working under the dining table lights last night, I noticed that all those windows in the baggage doors let in a lot of ambient light, and the raw interior and printed doors are pretty visible. So, I'll probably mask off everything and paint the interior. The folio 24 sheet says the walls were painted a yellow--perhaps "Depot Buff"?? I'll paint the floor black.
3. I need to add weight to the car, which means I'll need to weigh all the brass parts for the trucks and wheel sets and add any additional weight needed to get the car up to about 4 oz.
So, stay tuned . . . will Jim finish this project before the New Year??
Jim Courtney
Poulsbo, WA
Poulsbo, WA
| Free forum by Nabble | Edit this page |