Re: Leadville Designs Baggage/Express 1 in C&Sn3
Posted by Jim Courtney on Oct 11, 2023; 11:25pm
URL: http://c-sng-discussion-forum.254.s1.nabble.com/Leadville-Designs-Baggage-Express-1-in-C-Sn3-tp19129p19155.html
Houston . . . we have a problem.
Turns out, my fear of building clerestory roofs is not irrational, prescient perhaps.
I finished sanding the roof assembly for baggage 1 yesterday and then did a test fit to the body. To my dismay, the roof is narrower than the car body. Not by much, but noticeable. My first thought was to narrow the car body over the letterboard fascia. I used small rectangles of 0.005" styrene to protect the sheathing from being marred by sanding, then sanded the upper letterboard flush. The letterboard now protrudes from the sheathing by only 0.005" or 1/3 a scale inch. The roof is still too narrow:


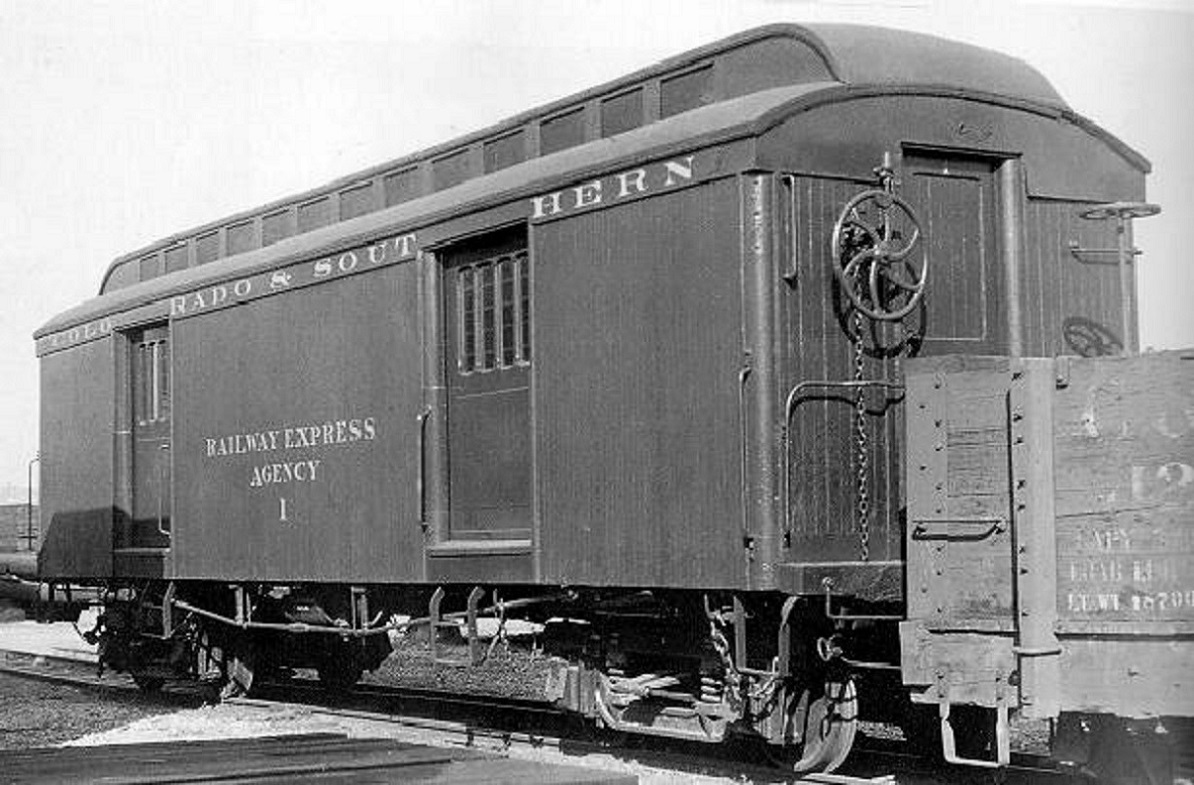
The roof should overhang the letterboard by at least a scale inch (0.015"). Mr. Micrometer tells me that the roof is 0.030" narrower than the body over the letterboards. If I want overhang as in the prototype photo, the roof needs an additional 0.030" of width. So, to be blunt, the roof as designed is 0.060" too narrow.
So, folks, I'm stuck. I guess that I could press on as is, learn to live with the roof width problem and hope the final paint coat of dark green makes it less obvious. But being an O.C. kind' guy, I don't want a baggage car model that's just "pretty Okay".
I would welcome any suggestions how to fix this . . . anyone?
Having thought about it overnight, I did purchase two kits, so I could:
1. Abandon the car body as built to date, use the parts in the second kit and build a new body up, but symmetrically narrow the floor and ends by 0.060" (i.e. sand 0.030" off each side of the floor and ends. For those of you that have not started building this kit, this may be your best bet to avoid this problem. But at this point in construction, this option isn't palatable to me.
2. I will probably try the opposite: Put this incompletely built roof aside for future use (with a narrowed body). Use the roof parts from the second kit to build up a new roof framing piece, but before adding the lower roof panels, build up the width of the frame at the side rails by 0.030"--glue a strip of S scale 2x3 to the side of the side rails and then try to sand the upper edge so it matches the contour of the roof ribs. The lower roof panels seem to be wide enough to cover this buildup when rolled over, clamped and glued, as in the last two steps in the above post.
____________________
Please note that I discovered this design problem in the S scale kit. I have no idea whether the same glitch is present in the HO and O scale kits. But you folks should check before you start gluing pieces in place!
And what about Bill's other passenger car kits, the Pullman sleepers, Pullman coaches and C&S coach 62? Does the same issue exist there. I don't know yet, haven't got that far. Out of curiosity, I measured the floor pieces for the Baggage 1 and Coach 62 kits in S scale. The Pullman floor is about 0.085" (about 6 scale inches) narrower than the baggage car floor. So there may be no problem there. But I don't know how thick the final build up of the coach walls will be . . .
I'm going to put this project on hold for a week or two, so as to clear my head and rethink things, before cutting and gluing new parts together for a new roof. And in the meantime, hope one of you comes up with a genius solution for an easier fix for this dilemma.
URL: http://c-sng-discussion-forum.254.s1.nabble.com/Leadville-Designs-Baggage-Express-1-in-C-Sn3-tp19129p19155.html
Houston . . . we have a problem.
Turns out, my fear of building clerestory roofs is not irrational, prescient perhaps.
I finished sanding the roof assembly for baggage 1 yesterday and then did a test fit to the body. To my dismay, the roof is narrower than the car body. Not by much, but noticeable. My first thought was to narrow the car body over the letterboard fascia. I used small rectangles of 0.005" styrene to protect the sheathing from being marred by sanding, then sanded the upper letterboard flush. The letterboard now protrudes from the sheathing by only 0.005" or 1/3 a scale inch. The roof is still too narrow:
The roof should overhang the letterboard by at least a scale inch (0.015"). Mr. Micrometer tells me that the roof is 0.030" narrower than the body over the letterboards. If I want overhang as in the prototype photo, the roof needs an additional 0.030" of width. So, to be blunt, the roof as designed is 0.060" too narrow.
So, folks, I'm stuck. I guess that I could press on as is, learn to live with the roof width problem and hope the final paint coat of dark green makes it less obvious. But being an O.C. kind' guy, I don't want a baggage car model that's just "pretty Okay".
I would welcome any suggestions how to fix this . . . anyone?
Having thought about it overnight, I did purchase two kits, so I could:
1. Abandon the car body as built to date, use the parts in the second kit and build a new body up, but symmetrically narrow the floor and ends by 0.060" (i.e. sand 0.030" off each side of the floor and ends. For those of you that have not started building this kit, this may be your best bet to avoid this problem. But at this point in construction, this option isn't palatable to me.
2. I will probably try the opposite: Put this incompletely built roof aside for future use (with a narrowed body). Use the roof parts from the second kit to build up a new roof framing piece, but before adding the lower roof panels, build up the width of the frame at the side rails by 0.030"--glue a strip of S scale 2x3 to the side of the side rails and then try to sand the upper edge so it matches the contour of the roof ribs. The lower roof panels seem to be wide enough to cover this buildup when rolled over, clamped and glued, as in the last two steps in the above post.
____________________
Please note that I discovered this design problem in the S scale kit. I have no idea whether the same glitch is present in the HO and O scale kits. But you folks should check before you start gluing pieces in place!
And what about Bill's other passenger car kits, the Pullman sleepers, Pullman coaches and C&S coach 62? Does the same issue exist there. I don't know yet, haven't got that far. Out of curiosity, I measured the floor pieces for the Baggage 1 and Coach 62 kits in S scale. The Pullman floor is about 0.085" (about 6 scale inches) narrower than the baggage car floor. So there may be no problem there. But I don't know how thick the final build up of the coach walls will be . . .
I'm going to put this project on hold for a week or two, so as to clear my head and rethink things, before cutting and gluing new parts together for a new roof. And in the meantime, hope one of you comes up with a genius solution for an easier fix for this dilemma.
Jim Courtney
Poulsbo, WA
Poulsbo, WA
| Free forum by Nabble | Edit this page |