Re: Type C/UP trucks -- S scale experiments
Posted by Jim Courtney on Jul 06, 2021; 6:24pm
URL: http://c-sng-discussion-forum.254.s1.nabble.com/Type-C-UP-trucks-tp15497p16818.html
While waiting for Michael to post the new version 2.0 of the S scale, type C truck to Shapeways, I ordered a couple of prints of the original iteration to experiment.
I intended to try attaching the brake beams using the eyelet and wire design that I've used for my type B trucks. But the original print doesn't have full width transoms on the bottom. Michael designed a carve out (likely to save plastic and lower cost). I tried various thicknesses of Evergreen styrene strip and found that 0.030 thick stock fit snuggly in the space. With 0.030 x 0.188 strip a flange would protrude from the bottom of the transom, as Michael has designed in version 2.0. So, I used my micro-razor saw to cut a bunch of rectangles of styrene 0.030 x 0.188 x 0.41 inches. I laid out and drilled two holes in the rectangles for wire, some 0.20 inches apart on center and the others 0.25 inches, for the brake beam wires. I placed the rectangles partially into the space, threaded 0.019' wire through the two styrene rectangles, then seated the rectangles, so the wire was flush with the bottom of the transom. After brake beams were drilled and installed this is what I can up with:
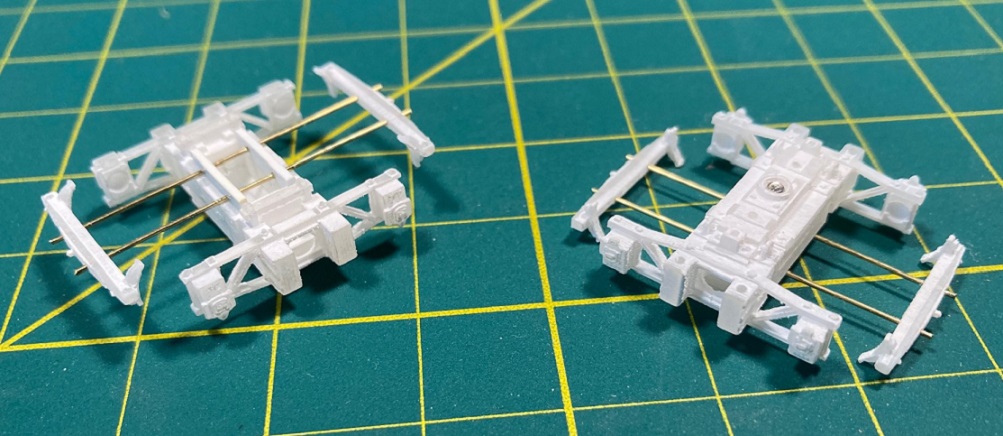
The styrene flange replaces the eyelets in my original method. A note about drilling the brake beams, as I've broken a couple in the process. I gently clamped the triangular part of the beam in my Panavise, then marked the location of the holes ether 0.20" or 0.25" apart. I found that if I started the hole with a #80 drill, then drilled through the brake beam with a #78 drill and finally enlarging the hole with a #76 drill, no breakage occurred. Seems tedious to drill the same hole 3 times, but I didn't break any of the 16 brake beams.
I had hoped to glue the brake beams into position on the wires, paint the entire truck assembly, then insert the separately painted PBL wheel sets as a last step, once and once only, to minimize the chance of breaking the side frame. But this doesn't work.
If the brake beams are glued into position, it is impossible to insert or remove a wheel set without breaking the side frame: The free axle end of the wheel set must be inserted into the spread side frame from the end, not the top. The fixed brake beam prevents this. BTW, there was no advantage in having the support wires only 0.20 inches apart. A distance of .025" is sufficient to manipulate the wheel set into position
So, I merely mounted the brake beams on the support wires (0.45" from brake beam edge to transom side), but didn't glue them. The axle holes were masked off and the entire assembly was air brushed with Polyscale "tarnished black"; the PBL wheel sets were airbrushed with Polyscale "roof brown" in a Banta tread masker.
When the paint was dry to touch but still soft, I gently removed the brake beams from the support wires. Then, slowly, carefully installed the painted wheel sets--didn't break a single side frame on the four pair of trucks!! The brake beams were then remounted on the wires, position checked so the brake shoes didn't rub wheel treads or flanges and the brake beams glued with ACC. After the protruding wires were cut off flush and paint touched up, this is how they looked:
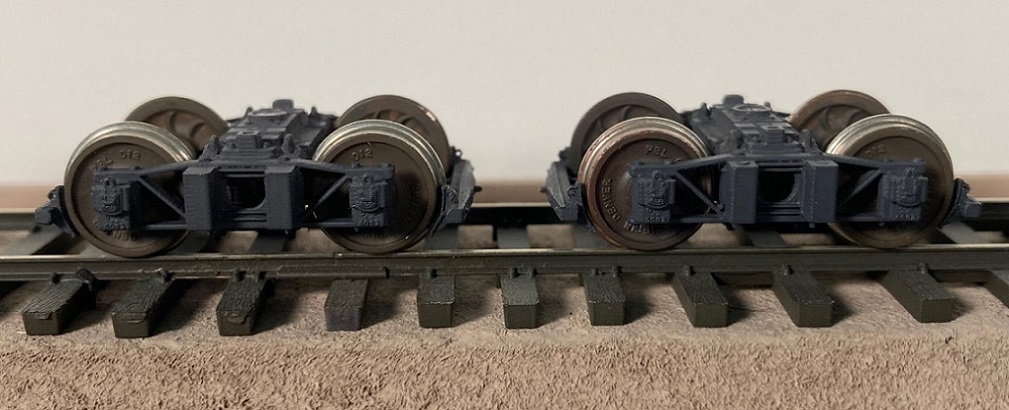
Michael's S scale trucks are gorgeous! I particularly like the way the transom tie rods are delicately rendered in front of the circular cut out. And the journal boxes are each little pieces of jewelry. Note the lift rings on the journal lids. The raised UP lettering and numbers are legible under magnification. Alas, the spring set gets visually lost in the black hole beyond the circular cut out.
The assembled trucks are also very free rolling. If PBL R-T-O trucks are a 10 in terms of rolling, these are an 8.
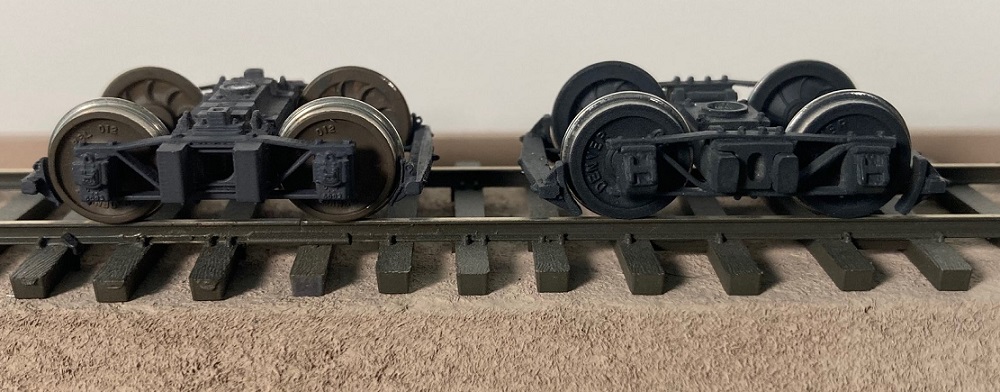
Here is how the S scale type C, 14 ton truck compares to the RGM type B, 20 ton truck:
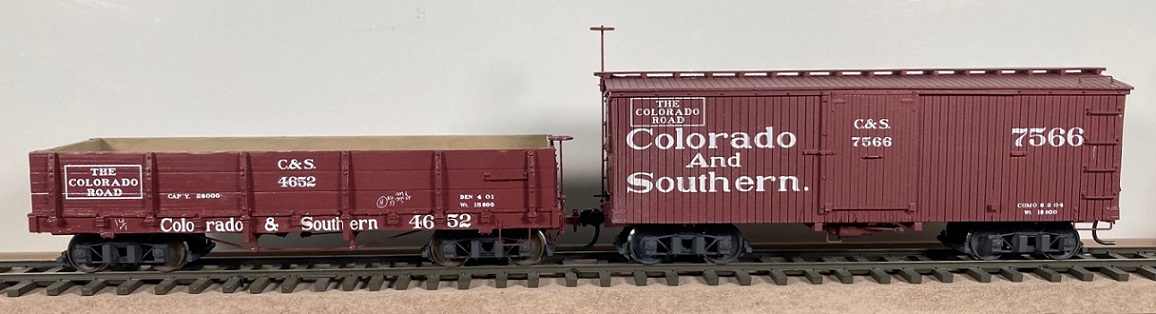
And here is how Michael's trucks look under two of the 27 foot cars that the prototype carried:
I did find an adhesive that will repair the acrylic if it breaks, the "Cool Chem" cyano-epoxy system: https://coolchem.com/products. This stuff was supposedly created to attach the outer skin of the stealth fighters, thus avoiding rivets that might produce a radar signature.
On the one surviving trucks of my first print, I noted that the diagonal and bottom bars had broken where they join and meet the transom. The side frame was being held in place only by the top bar. The Cool Chem system requires the two parts to be joined be brushed with a primer liquid, then a small amount of the cyano-epoxy resin was applied with a piece of wire. With the two parts held in alignment together with my fine forceps, one puff of the activator was sprayed on. The resulting joint seems as strong as the original acrylic. This stuff will supposedly glue Delrin to Delrin, too -- folks evidently use this stuff to repair broken Delrin handrails on HO scale diesels.
I want to thank Michel for all the work he's put into the type C trucks. They've inspired me to move on to other projects that used this 14 ton truck, namely the Tiffany Reefers c.1901. Both the 26' and 27' Tiffany's used these trucks. I'm looking forward to getting prints for Michael's second version of this trucks, as assembly will be much quicker. If the HOn3 and On3 prints of this truck turn out as well, folks are going to be pleased. And all you 1930's model builders need to remember that these trucks were in common use under the 27 foot outfit cars, for your MOW train.
And (ahem) it sure would be nice to have those 12 ton Litchfield trucks printed in S scale . . .
URL: http://c-sng-discussion-forum.254.s1.nabble.com/Type-C-UP-trucks-tp15497p16818.html
While waiting for Michael to post the new version 2.0 of the S scale, type C truck to Shapeways, I ordered a couple of prints of the original iteration to experiment.
I intended to try attaching the brake beams using the eyelet and wire design that I've used for my type B trucks. But the original print doesn't have full width transoms on the bottom. Michael designed a carve out (likely to save plastic and lower cost). I tried various thicknesses of Evergreen styrene strip and found that 0.030 thick stock fit snuggly in the space. With 0.030 x 0.188 strip a flange would protrude from the bottom of the transom, as Michael has designed in version 2.0. So, I used my micro-razor saw to cut a bunch of rectangles of styrene 0.030 x 0.188 x 0.41 inches. I laid out and drilled two holes in the rectangles for wire, some 0.20 inches apart on center and the others 0.25 inches, for the brake beam wires. I placed the rectangles partially into the space, threaded 0.019' wire through the two styrene rectangles, then seated the rectangles, so the wire was flush with the bottom of the transom. After brake beams were drilled and installed this is what I can up with:
The styrene flange replaces the eyelets in my original method. A note about drilling the brake beams, as I've broken a couple in the process. I gently clamped the triangular part of the beam in my Panavise, then marked the location of the holes ether 0.20" or 0.25" apart. I found that if I started the hole with a #80 drill, then drilled through the brake beam with a #78 drill and finally enlarging the hole with a #76 drill, no breakage occurred. Seems tedious to drill the same hole 3 times, but I didn't break any of the 16 brake beams.
I had hoped to glue the brake beams into position on the wires, paint the entire truck assembly, then insert the separately painted PBL wheel sets as a last step, once and once only, to minimize the chance of breaking the side frame. But this doesn't work.
If the brake beams are glued into position, it is impossible to insert or remove a wheel set without breaking the side frame: The free axle end of the wheel set must be inserted into the spread side frame from the end, not the top. The fixed brake beam prevents this. BTW, there was no advantage in having the support wires only 0.20 inches apart. A distance of .025" is sufficient to manipulate the wheel set into position
So, I merely mounted the brake beams on the support wires (0.45" from brake beam edge to transom side), but didn't glue them. The axle holes were masked off and the entire assembly was air brushed with Polyscale "tarnished black"; the PBL wheel sets were airbrushed with Polyscale "roof brown" in a Banta tread masker.
When the paint was dry to touch but still soft, I gently removed the brake beams from the support wires. Then, slowly, carefully installed the painted wheel sets--didn't break a single side frame on the four pair of trucks!! The brake beams were then remounted on the wires, position checked so the brake shoes didn't rub wheel treads or flanges and the brake beams glued with ACC. After the protruding wires were cut off flush and paint touched up, this is how they looked:
Michael's S scale trucks are gorgeous! I particularly like the way the transom tie rods are delicately rendered in front of the circular cut out. And the journal boxes are each little pieces of jewelry. Note the lift rings on the journal lids. The raised UP lettering and numbers are legible under magnification. Alas, the spring set gets visually lost in the black hole beyond the circular cut out.
The assembled trucks are also very free rolling. If PBL R-T-O trucks are a 10 in terms of rolling, these are an 8.
Here is how the S scale type C, 14 ton truck compares to the RGM type B, 20 ton truck:
And here is how Michael's trucks look under two of the 27 foot cars that the prototype carried:
I did find an adhesive that will repair the acrylic if it breaks, the "Cool Chem" cyano-epoxy system: https://coolchem.com/products. This stuff was supposedly created to attach the outer skin of the stealth fighters, thus avoiding rivets that might produce a radar signature.
On the one surviving trucks of my first print, I noted that the diagonal and bottom bars had broken where they join and meet the transom. The side frame was being held in place only by the top bar. The Cool Chem system requires the two parts to be joined be brushed with a primer liquid, then a small amount of the cyano-epoxy resin was applied with a piece of wire. With the two parts held in alignment together with my fine forceps, one puff of the activator was sprayed on. The resulting joint seems as strong as the original acrylic. This stuff will supposedly glue Delrin to Delrin, too -- folks evidently use this stuff to repair broken Delrin handrails on HO scale diesels.
I want to thank Michel for all the work he's put into the type C trucks. They've inspired me to move on to other projects that used this 14 ton truck, namely the Tiffany Reefers c.1901. Both the 26' and 27' Tiffany's used these trucks. I'm looking forward to getting prints for Michael's second version of this trucks, as assembly will be much quicker. If the HOn3 and On3 prints of this truck turn out as well, folks are going to be pleased. And all you 1930's model builders need to remember that these trucks were in common use under the 27 foot outfit cars, for your MOW train.
And (ahem) it sure would be nice to have those 12 ton Litchfield trucks printed in S scale . . .
Jim Courtney
Poulsbo, WA
Poulsbo, WA
| Free forum by Nabble | Edit this page |