Re: Type C/UP trucks
Posted by Jim Courtney on Jun 17, 2021; 4:10pm
URL: http://c-sng-discussion-forum.254.s1.nabble.com/Type-C-UP-trucks-tp15497p16743.html
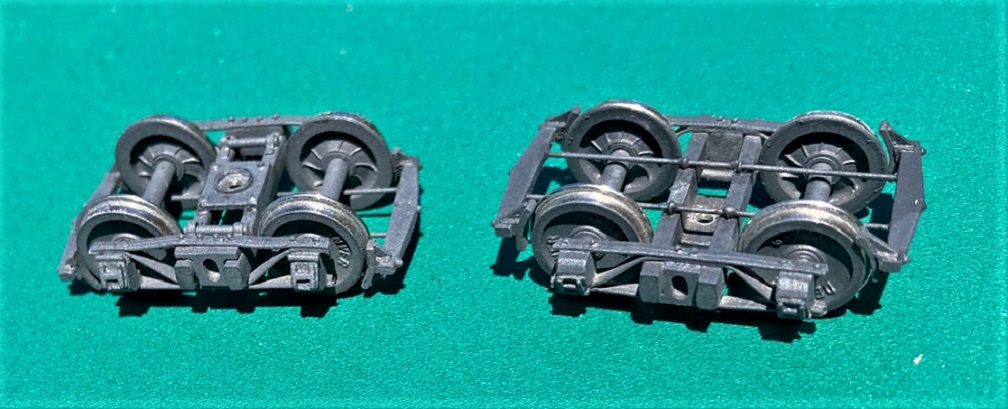
The Sn3 test print of the Type C trucks arrived. They look fabulous and roll very well:
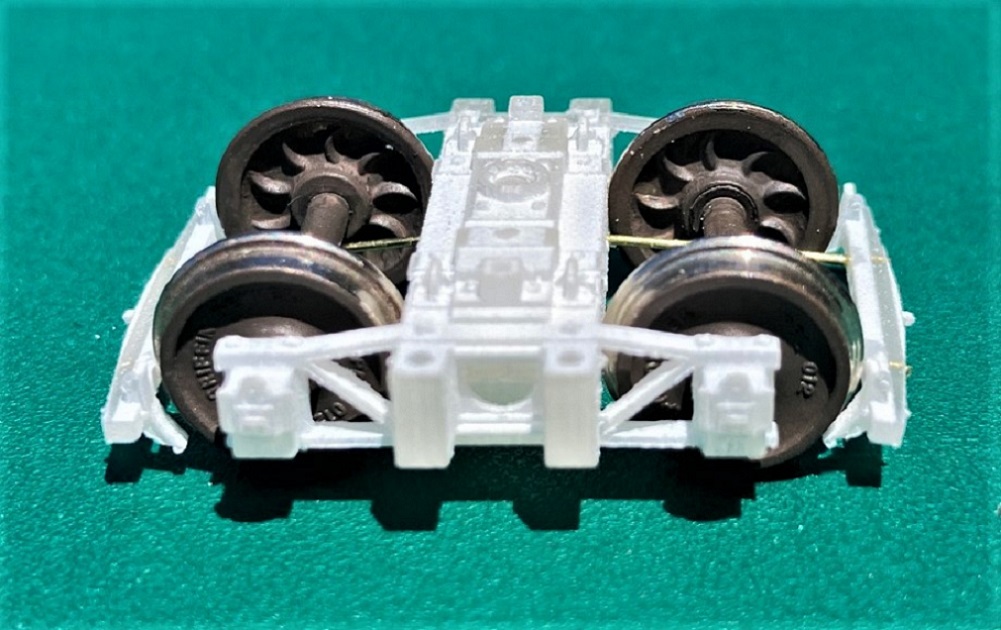
My photographs don't do them justice. Hopefully I can prime and paint a pair this weekend, so the detail is more apparent.
On arrival, I was astounded by the rendering of detail on the side frame, bolsters and recessed springs. I wanted to immediately separate them into the component parts and assemble them, but followed my usual Shapeways ceremony: Placed in direct sunlight for 2 hours to ensure the acrylic had completely UV cured. Soaked in Bestine for 30 minutes to remove residual wax. Wash in my ultrasonic cleaner with warm water and Dawn. finally a rinse in distilled water and air dried. I clipped the larger supporting sprues apart with my PBL sprue nipper, used the small/fine nipper to separate the brake beams from the side frames. All sprues then trimmed flush with sprue nippers filed smooth as needed. The print is translucent on arrival, becomes chalky white after cleaning.
On to inserting wheel sets--I'm using my stash of PBL's last iteration of 26" wheelsets, with code 88 treads and flanges, cooling ribs on wheel backs. Older wheel sets with standard treads may not fit.
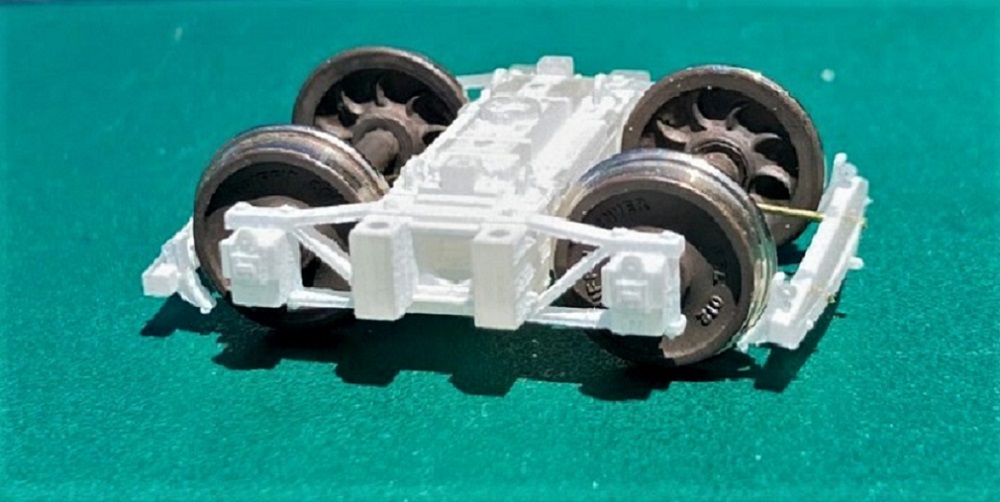
CAUTION: When spreading the side frames to insert the wheelset axles, go slowly and gently. This isn't Delrin. The acrylic print is brittle and if you rush it you can snap the side frame off the bolster, impossible to repair. Ask me how I know . . .
The first wheel sets installed produced an extremely free rolling truck, almost as good as PBL's "RTO" trucks from China. The second set of wheel sets in the second frame were much more sluggish, a puzzle. It took about 15 minutes to figure out that the problem wasn't Michaels print, but the PBL wheelsets.
All is not groovy . . .
Michael, clever man that he is, has tried to maintain the truck dimensions as close to scale as possible and still accommodate our slightly over sized wheels and flanges. The transoms have a vertical groove printed in them to clear the flanges on a strict 4' wheelbase (orange arrows):
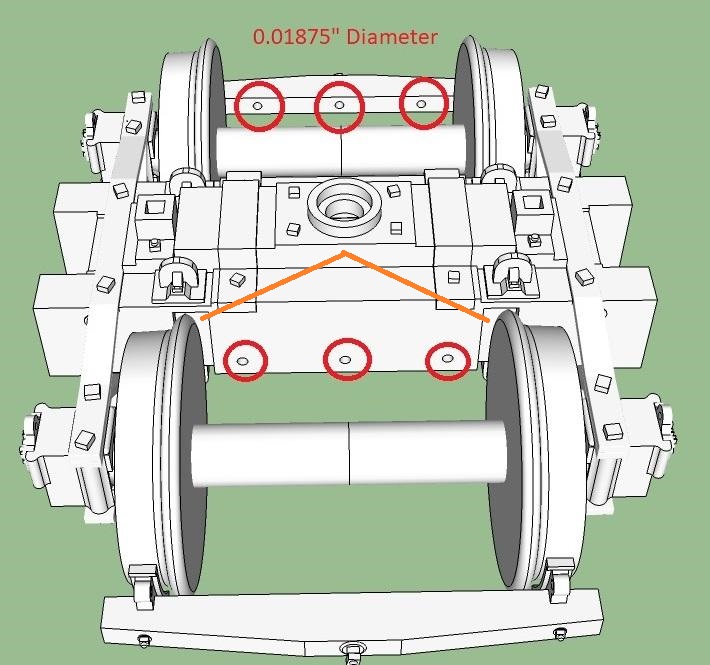
With my micrometer, I found that not all PBL wheelsets are created equal. On 4 of 10 wheelsets checked, the wheels, while in perfect gauge, were mounted on the axles asymmetrically, with one wheel up to 0.010" closer to the axle tip than normal, the other up to 0.010" further away from the axle tip than normal. This causes either the front of the flange or the rear of the flange to rub against the edges of the printed grooves. So much for Chinese manufacturing quality control. We're goin' to need wider grooves in Sn3, Michael.
Michael's design for mounting the brake beams is doable but tedious. The photo illustrate my process better than words:
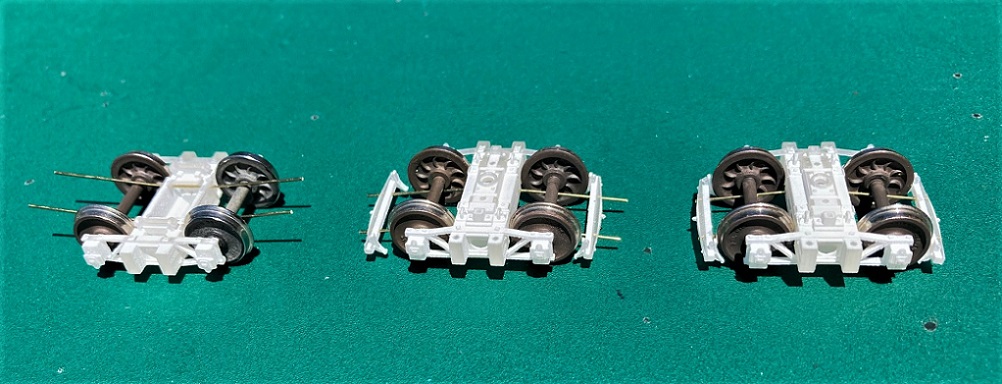
I cut Detail Associates 0.019" wire into lengths 1.75 inches long and dressed the ends. I drilled out the outside holes in the transoms and brake beams with No. 76 drill (0.020"). I drilled all the way through the brake beams. I threaded the wire thru both transoms and centered it, secured the wire with ACC so it wouldn't turn in the holes. I then used my long nose pliers to bend the four pieces of wire downwards, gestimating when the wire would clear the axles from below. The wheel sets have to be re-installed to check axle clearance and this is problematic, as the wire is now very close to the back of the wheel, requiring the side frame to be spread further. This is how I broke one of mine.
When the four wires had been further tweaked by bending and clear of the axles, I slipped the brake beams on the two wires, positioned them so the inside edge of the brake shoes were about one flange distance from the tread and secured the brake beam to the wires with ACC. I then clipped off the wire protruding from the brake beams with my small flush cutters and filed them smooth. To make the brake beam lie horizontal required further tweaking/bending.
If we are going to use wire to mount the brake beams, I would prefer this method:
This is my standard Type-B 20-ton Peninsular truck in Sn3. Eric Bracher's Rio Grande Models produced them as kits years ago. As I prefer the PBL wheelsets, Eric produced enough side frames and transom/bolsters for me for abut 15 pair.
I used The Leadville Shops brass brake beams. The casting has indents, like Michael's little holes, and I drilled them out, all the way thru, like on the printed brake beams above. Same 0.019" wire was used, one brake beam casting soldered to the two wires, making sure everything was square. I threaded four Detail Associates wire eyelets on the wires. The bottom of the white metal truck transoms were marked and drilled about 1/4" deep with a number 80 drill. The eyelets were inserted into the transoms bottom and press fit. The wires were then slid thru the eyelets until the attached brake beam was positioned near the wheels, then everything clamped in place. The other brake beam was then slid onto the wires, positioned near the wheels on the other wheelset and soldered (or ACC'd) into place. With everything centered the four eyelets were ACC'd into the transoms and to the wires.
Once one set of brake beams is assembled, the back-to-back distance of the brake beams can be measured, and all future brake beam assemblies can be assembled separate from the trucks, then pined to the bottom of the transoms, centered, then glued into place.
I like this method because all the wire stays straight, is mounted flush with the bottom of the transom, is well below the axles without bending, and the brake beams end up level in both dimensions, in the same plane as the support wires.
Whew, I didn't intend to be this wordy. I'll take a break, do some measuring, then come back and add a list of adjustments to Michal's print in Sn3, that I would suggest . . .
URL: http://c-sng-discussion-forum.254.s1.nabble.com/Type-C-UP-trucks-tp15497p16743.html
The Sn3 test print of the Type C trucks arrived. They look fabulous and roll very well:
My photographs don't do them justice. Hopefully I can prime and paint a pair this weekend, so the detail is more apparent.
On arrival, I was astounded by the rendering of detail on the side frame, bolsters and recessed springs. I wanted to immediately separate them into the component parts and assemble them, but followed my usual Shapeways ceremony: Placed in direct sunlight for 2 hours to ensure the acrylic had completely UV cured. Soaked in Bestine for 30 minutes to remove residual wax. Wash in my ultrasonic cleaner with warm water and Dawn. finally a rinse in distilled water and air dried. I clipped the larger supporting sprues apart with my PBL sprue nipper, used the small/fine nipper to separate the brake beams from the side frames. All sprues then trimmed flush with sprue nippers filed smooth as needed. The print is translucent on arrival, becomes chalky white after cleaning.
On to inserting wheel sets--I'm using my stash of PBL's last iteration of 26" wheelsets, with code 88 treads and flanges, cooling ribs on wheel backs. Older wheel sets with standard treads may not fit.
CAUTION: When spreading the side frames to insert the wheelset axles, go slowly and gently. This isn't Delrin. The acrylic print is brittle and if you rush it you can snap the side frame off the bolster, impossible to repair. Ask me how I know . . .
The first wheel sets installed produced an extremely free rolling truck, almost as good as PBL's "RTO" trucks from China. The second set of wheel sets in the second frame were much more sluggish, a puzzle. It took about 15 minutes to figure out that the problem wasn't Michaels print, but the PBL wheelsets.
All is not groovy . . .
Michael, clever man that he is, has tried to maintain the truck dimensions as close to scale as possible and still accommodate our slightly over sized wheels and flanges. The transoms have a vertical groove printed in them to clear the flanges on a strict 4' wheelbase (orange arrows):
With my micrometer, I found that not all PBL wheelsets are created equal. On 4 of 10 wheelsets checked, the wheels, while in perfect gauge, were mounted on the axles asymmetrically, with one wheel up to 0.010" closer to the axle tip than normal, the other up to 0.010" further away from the axle tip than normal. This causes either the front of the flange or the rear of the flange to rub against the edges of the printed grooves. So much for Chinese manufacturing quality control. We're goin' to need wider grooves in Sn3, Michael.
Michael's design for mounting the brake beams is doable but tedious. The photo illustrate my process better than words:
I cut Detail Associates 0.019" wire into lengths 1.75 inches long and dressed the ends. I drilled out the outside holes in the transoms and brake beams with No. 76 drill (0.020"). I drilled all the way through the brake beams. I threaded the wire thru both transoms and centered it, secured the wire with ACC so it wouldn't turn in the holes. I then used my long nose pliers to bend the four pieces of wire downwards, gestimating when the wire would clear the axles from below. The wheel sets have to be re-installed to check axle clearance and this is problematic, as the wire is now very close to the back of the wheel, requiring the side frame to be spread further. This is how I broke one of mine.
When the four wires had been further tweaked by bending and clear of the axles, I slipped the brake beams on the two wires, positioned them so the inside edge of the brake shoes were about one flange distance from the tread and secured the brake beam to the wires with ACC. I then clipped off the wire protruding from the brake beams with my small flush cutters and filed them smooth. To make the brake beam lie horizontal required further tweaking/bending.
If we are going to use wire to mount the brake beams, I would prefer this method:
This is my standard Type-B 20-ton Peninsular truck in Sn3. Eric Bracher's Rio Grande Models produced them as kits years ago. As I prefer the PBL wheelsets, Eric produced enough side frames and transom/bolsters for me for abut 15 pair.
I used The Leadville Shops brass brake beams. The casting has indents, like Michael's little holes, and I drilled them out, all the way thru, like on the printed brake beams above. Same 0.019" wire was used, one brake beam casting soldered to the two wires, making sure everything was square. I threaded four Detail Associates wire eyelets on the wires. The bottom of the white metal truck transoms were marked and drilled about 1/4" deep with a number 80 drill. The eyelets were inserted into the transoms bottom and press fit. The wires were then slid thru the eyelets until the attached brake beam was positioned near the wheels, then everything clamped in place. The other brake beam was then slid onto the wires, positioned near the wheels on the other wheelset and soldered (or ACC'd) into place. With everything centered the four eyelets were ACC'd into the transoms and to the wires.
Once one set of brake beams is assembled, the back-to-back distance of the brake beams can be measured, and all future brake beam assemblies can be assembled separate from the trucks, then pined to the bottom of the transoms, centered, then glued into place.
I like this method because all the wire stays straight, is mounted flush with the bottom of the transom, is well below the axles without bending, and the brake beams end up level in both dimensions, in the same plane as the support wires.
Whew, I didn't intend to be this wordy. I'll take a break, do some measuring, then come back and add a list of adjustments to Michal's print in Sn3, that I would suggest . . .
Jim Courtney
Poulsbo, WA
Poulsbo, WA
| Free forum by Nabble | Edit this page |