Digital Backdrops For Dummies


Administrator
|
Greetings,
I've finally been able to break through with a pretty good digital backdrop, after mostly trying in vain for a pretty long time to find an easy, step by step process that, to borrow a phrase from Joe Walsh, even an analog man in a digital world like me can understand. Hence the reference to "Dummies". In the extreme likelihood that I am not the only such dummy on this list, check this out.... As most of you know, here in Alabama I have very little space to contain my "big scenery ~ little trains" aspirations, but I remain unwilling to give up On3 as my scale of choice. So I live in a world of dioramas, chasing shadowbox dreams. Last July, our pal Jeff Young was hanging out in Breckenridge for a couple of weeks and I asked him if he would be so kind as to take the short 7 mile drive down the Blue to Dickey to see if he could find a place where he could take a few pictures that I might be able to use to cobble up a panorama backdrop for my Dickey. He was indeed willing, and took his I Phone and snapped off four pictures looking mostly East, and one looking North. He also took a great separate image looking toward the South, toward Breckenridge. My C&S "layout" runs about 10' along a blank wall in my designated safe zone at home, 36" deep, with a 4' 24" L at the left end. So the depot sits in line with the six stall engine house at the end of the 12 pocket coaling dock along the 10' run, and the mainline curves toward Frisco at the "wye". I have a diorama of the Durango Depot area above the C&S, so vertical space was limited as well. For starters, I stitched all four of the panorama shots together on my home computer to determine if this was feasible, and was pleased with the possibilities. I was in Boulder on Family business in August, and went in to one of my old haunts there, Mike's Camera, and found that they have a Custom Imaging shop there. One of the techs there told me that they could do it, but that in order to be able to print it, it would have to be set at 750dpi and that the file would be much too big to email. I told him I was sure my computer and software wouldn't let me manipulate a file anywhere near that large and he told me they could do it there. I returned to Boulder on other business in September, and took my digital pictures from Jeff with me, along with my small version of the four images which I had stitched together as a sample into the shop, where I spent about 20 minutes with another tech trying to explain what I needed. She seemed to understand exactly what I wanted, and two days later emailed me with a small file version of her work. It was even better than mine. She added some green tinting to restore the beetle kill areas to life, and not only matched every detail in the mountains to perfection, she also matched the clouds. Wow! Clouds! To make a complicated discussion short, after looking at everything on my home computer in better detail, I asked her to see if she could match the sky tone in Jeff's South view to the right side in hopes I might be able to make a corner that would work. All of her time spent to do this, including the last work on the sky tones was done in just under one hour, which I appreciated, since the rate for such work is $80 per hour. When she calculated the dimensions to print at 100% at 750dpi, the size was only about 10" high, and about 10.5' long. I asked her if it could be printed at 200%, which was 20" high and about 22' long total. She said she though for my purposes that should be fine, as it wouldn't degrade the resolution too much. She sent a couple of screen shots for me to review, and it looked fine to me. I knew it would, because I was sure all of the spectacular results I'd seen in other layout shots would have had to have been printed above 100%. So I told her to go ahead. I selected the lowest price paper, which is a matte finish, and the total cost, including shipping and the $80 Photoshop work came to about $480. It arrived here on 10/12, and last week I made up the backing supports using 3/8 Hardboard (we used to call this "Masonite") and milled 1X2's. Thursday I started applying the image in 24" panels one at a time, starting in the left corner, where the scenery to the North of the depot transitions from near mountains to far. When I got down to the right corner, I knew there would be no way I could force a transition to the South view, but I sure got away with a perfect result anyway. Still lots of little stuff to do. I need to touch up some seams where I cut them to install, and also where I altered a section to take out part of the Swan Lake Road, which we don't think was there in 1937. I have to say, however, I like the contrast, and may end up actually replacing the section I mutilated trying to cover it up. Also, I need to make up a profile piece to transition from layout to backdrop. But that stuff can all be done where it sits, and how 'bout them clouds? So, to review: 1) Get usable pictures. Your phone may be OK, but if you need to print bigger images than I have, use a high quality Digital SLR. 2) Take everything to a good Custom Imaging shop like Mike's Camera in Boulder. 3) Don't complain about the cost, it's not that bad, and well worth it! 4) Find where you want to start, use a large framing square with a box knife with a new blade, and use Scotch Hi-Strength 90 Contact Adhesive to spray on the back of each panel. It has an adjustable nozzle and is easy to use. 5) Stand back or up close and get some really cool pictures! Thanks Jeff! If anyone wants more information, I'll be glad to share anything I know, which isn't really all that much but as always, if I can do it, anybody can.  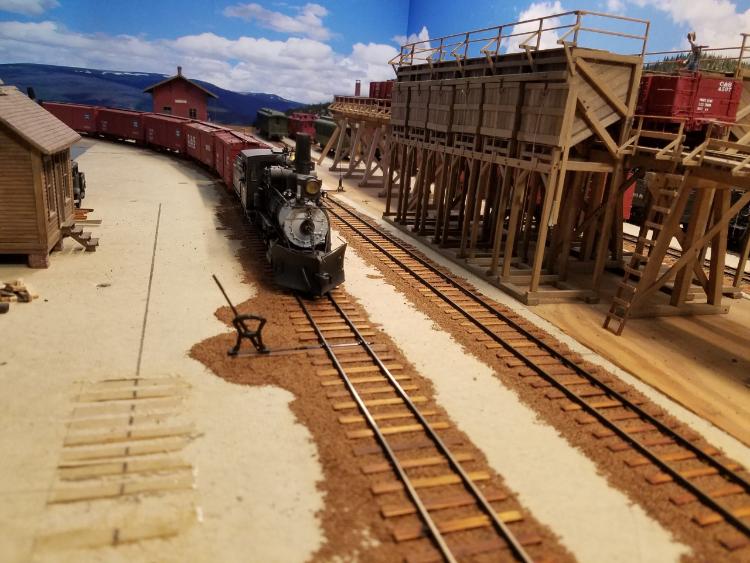 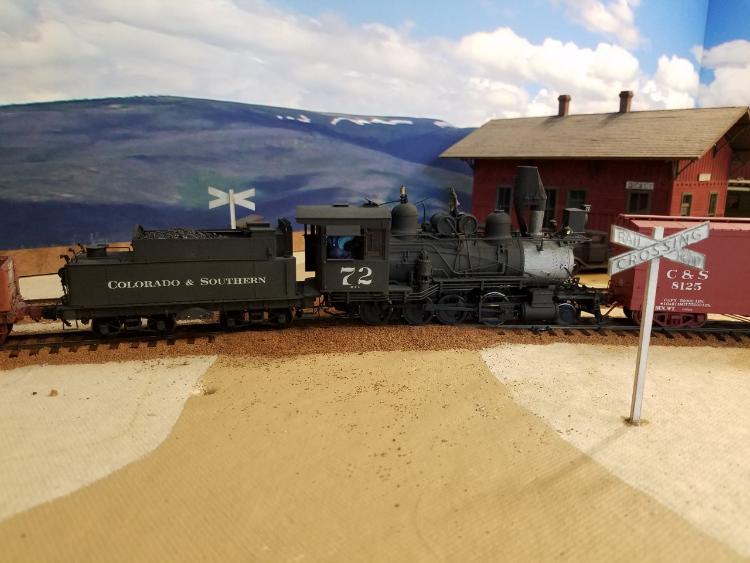
|
Re: Digital Backdrops For Dummies
|
|
Very nice -- thanks for sharing the process and finished product! Bill Uffelman Ocean View DE On Monday, October 24, 2016 10:19 AM, Mike Trent [via C&Sng Discussion Forum] <[hidden email]> wrote:
Greetings,
I've finally been able to break through with a pretty good digital backdrop, after mostly trying in vain for a pretty long time to find an easy, step by step process that, to borrow a phrase from Joe Walsh, even an analog man in a digital world like me can understand. Hence the reference to "Dummies". In the extreme likelihood that I am not the only such dummy on this list, check this out.... As most of you know, here in Alabama I have very little space to contain my "big scenery ~ little trains" aspirations, but I remain unwilling to give up On3 as my scale of choice. So I live in a world of dioramas, chasing shadowbox dreams. Last July, our pal Jeff Young was hanging out in Breckenridge for a couple of weeks and I asked him if he would be so kind as to take the short 7 mile drive down the Blue to Dickey to see if he could find a place where he could take a few pictures that I might be able to use to cobble up a panorama backdrop for my Dickey. He was indeed willing, and took his I Phone and snapped off four pictures looking mostly East, and one looking North. He also took a great separate image looking toward the South, toward Breckenridge. My C&S "layout" runs about 10' along a blank wall in my designated safe zone at home, 36" deep, with a 4' 24" L at the left end. So the depot sits in line with the six stall engine house at the end of the 12 pocket coaling dock along the 10' run, and the mainline curves toward Frisco at the "wye". I have a diorama of the Durango Depot area above the C&S, so vertical space was limited as well. For starters, I stitched all four of the panorama shots together on my home computer to determine if this was feasible, and was pleased with the possibilities. I was in Boulder on Family business in August, and went in to one of my old haunts there, Mike's Camera, and found that they have a Custom Imaging shop there. One of the techs there told me that they could do it, but that in order to be able to print it, it would have to be set at 750dpi and that the file would be much too big to email. I told him I was sure my computer and software wouldn't let me manipulate a file anywhere near that large and he told me they could do it there. I returned to Boulder on other business in September, and took my digital pictures from Jeff with me, along with my small version of the four images which I had stitched together as a sample into the shop, where I spent about 20 minutes with another tech trying to explain what I needed. She seemed to understand exactly what I wanted, and two days later emailed me with a small file version of her work. It was even better than mine. She added some green tinting to restore the beetle kill areas to life, and not only matched every detail in the mountains to perfection, she also matched the clouds. Wow! Clouds! To make a complicated discussion short, after looking at everything on my home computer in better detail, I asked her to see if she could match the sky tone in Jeff's South view to the right side in hopes I might be able to make a corner that would work. All of her time spent to do this, including the last work on the sky tones was done in just under one hour, which I appreciated, since the rate for such work is $80 per hour. When she calculated the dimensions to print at 100% at 750dpi, the size was only about 10" high, and about 10.5' long. I asked her if it could be printed at 200%, which was 20" high and about 22' long total. She said she though for my purposes that should be fine, as it wouldn't degrade the resolution too much. She sent a couple of screen shots for me to review, and it looked fine to me. I knew it would, because I was sure all of the spectacular results I'd seen in other layout shots would have had to have been printed above 100%. So I told her to go ahead. I selected the lowest price paper, which is a matte finish, and the total cost, including shipping and the $80 Photoshop work came to about $480. It arrived here on 10/12, and last week I made up the backing supports using 3/8 Hardboard (we used to call this "Masonite") and milled 1X2's. Thursday I started applying the image in 24" panels one at a time, starting in the left corner, where the scenery to the North of the depot transitions from near mountains to far. When I got down to the right corner, I knew there would be no way I could force a transition to the South view, but I sure got away with a perfect result anyway. Still lots of little stuff to do. I need to touch up some seams where I cut them to install, and also where I altered a section to take out part of the Swan Lake Road, which we don't think was there in 1937. I have to say, however, I like the contrast, and may end up actually replacing the section I mutilated trying to cover it up. Also, I need to make up a profile piece to transition from layout to backdrop. But that stuff can all be done where it sits, and how 'bout them clouds? So, to review: 1) Get usable pictures. Your phone may be OK, but if you need to print bigger images than I have, use a high quality Digital SLR. 2) Take everything to a good Custom Imaging shop like Mike's Camera in Boulder. 3) Don't complain about the cost, it's not that bad, and well worth it! 4) Find where you want to start, use a large framing square with a box knife with a new blade, and use Scotch Hi-Strength 90 Contact Adhesive to spray on the back of each panel. It has an adjustable nozzle and is easy to use. 5) Stand back or up close and get some really cool pictures! Thanks Jeff! If anyone wants more information, I'll be glad to share anything I know, which isn't really all that much but as always, if I can do it, anybody can.   
If you reply to this email, your message will be added to the discussion below:
http://c-sng-discussion-forum.41377.n7.nabble.com/Digital-Backdrops-For-Dummies-tp6611.html
To start a new topic under C&Sng Discussion Forum, email [hidden email] To unsubscribe from C&Sng Discussion Forum, click here. NAML |
|
|
In reply to this post by Mike Trent
Hi Mike,
They turned out great! Just one correction: while the first test shots I took were with my iPhone, the later shots that you used were taken with my wife's DSLR (a Rebel T3i) on a tripod. Cheers, Jeff. |
Re: Digital Backdrops For Dummies
|
|
In reply to this post by Mike Trent
Turned out great Mike! I have been contemplating trying this out some day.
|
Re: Digital Backdrops For Dummies
|
|
In reply to this post by Mike Trent
Well done, Mike and Jeff.
Very realistic. In my minds eye I can see myself standing at Dickey, taking in the panorama!
Jim Courtney
Poulsbo, WA |
Re: Digital Backdrops For Dummies
|
|
Looking at the Bath portion of Derrell Poole's old C&S layout in the file photos it appears he did the same thing.In the background you can see South Park in the area coming down off of Trout Creek Pass.
|
Re: Digital Backdrops For Dummies
|
|
Mike,
Your back drop looks great. It's an excellent compliment to your fine models. Thank you for sharing the steps involved and the final result. I look forward to more of your work. Again, thanks. Lee Gustafson |
Re: Digital Backdrops For Dummies
|
|
In reply to this post by Mike Trent
Probably the best I've seen! Way better looking, and more accurate than painted.
|
Re: Digital Backdrops For Dummies
|
|
I've worked with Mike's Camera for over 20 years. You couldn't have made a better choice.
|
Re: Digital Backdrops For Dummies
|
|
Not sure if you all know that the photo labs at big box stores like Walmart and Meijer offer 24 inch tall by 6 or 8 foot long enlargements they call "banners" for $around $25-35 each, depending on how many you order.
Here is the 16 foot backdrop I am using behind my Idaho Springs. One 6 and one 8 ft. "banners" making 14 feet for $50 at Walmart. I shot this series of half a dozen individual photos from above Hwy 70 look north over the hwy at Idaho Springs. The images were then merged using photoshop. Doug Tagsold Blissfield, MI  |
Re: Digital Backdrops For Dummies
|
|
Here is the same Idaho Springs backdrop printed and mounted on the wall behind my Idaho Springs. The pre built Argo Mill module that you see was just set in place with no attempt yet at coloring the scenery to better to match the backdrop. And, yes, I know the my Argo Mill is at the wrong end of town.
Doug Tagsold Blissfield, MI 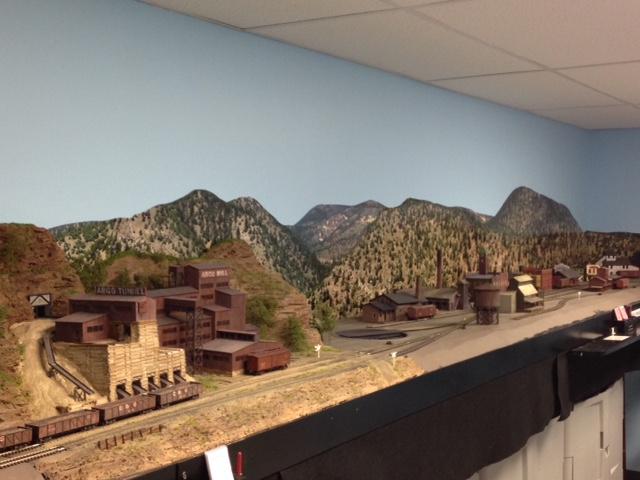
|
Re: Digital Backdrops For Dummies
|
|
Doug,
Looks Great! |
Re: Digital Backdrops For Dummies
|
|
In reply to this post by Doug Tagsold
Very nice. Bill Uffelman On Thursday, December 15, 2016 11:03 AM, Doug Tagsold [via C&Sng Discussion Forum] <[hidden email]> wrote:
Here is the same Idaho Springs backdrop printed and mounted on the wall behind my Idaho Springs. The pre built Argo Mill module that you see was just set in place with no attempt yet at coloring the scenery to better to match the backdrop. And, yes, I know the my Argo Mill is at the wrong end of town.
Doug Tagsold Blissfield, MI 
If you reply to this email, your message will be added to the discussion below:
http://c-sng-discussion-forum.41377.n7.nabble.com/Digital-Backdrops-For-Dummies-tp6611p7257.html
To start a new topic under C&Sng Discussion Forum, email [hidden email] To unsubscribe from C&Sng Discussion Forum, click here. NAML |
|
Administrator
|
In reply to this post by Doug Tagsold
Nice job, Doug! When you set your mind to something, anything is possible.
I certainly wasn't aware Walmart could do anything like this. The problem for me would have been that I couldn't manipulate the images on my computer at full size. I was able to make up, as I think I mentioned above, a test sample so they could use it as a guide for what I was looking for, but the final image was so small that when blown up to this size it wouldn't have anywhere close to the resolution I needed. One thing I learned the hard way is that in a panorama scene like this, everything from one panel to the next changes in scale. The trees in any given 12" width vary noticeably to those 12" away in either direction. In my scene, the nearest mountain is the one at the right corner, which continues as the right end as seen in the first photo with the passenger train and in one of the scenes below. Everything looks completely different as the scene continues away and to the north. My original idea was that I could literally cut and paste out the Swan Mountain Road, but that ended with disastrous results and I had to reprint 42" in the middle. So I've ended up with the road through the scene, but I actually prefer it in the end, as it adds more perspective and lighter contrast through the middle. Before, it was too dark and didn't convey distance like it does now. This wouldn't have been my ideal choice, but I'm very happy with the result and will keep it this way. As modelers, we have to compromise all the time, and this is no different. Still remaining to be done is a profile board to sit below the backdrop to the ground. I'll experiment with different ways to do that. One other thing, I found that using a brown and or green marking pen on the edges hides the cuts which show if they are left uncolored. The first picture shows one such seam, now has been colored out. Here are a couple of pictures I took this morning that show Eastbound engines at the coaling dock. I'll do some photo shopping to make them black and white, they'd probably look pretty good. But since we're discussing backdrops, here they are in color. 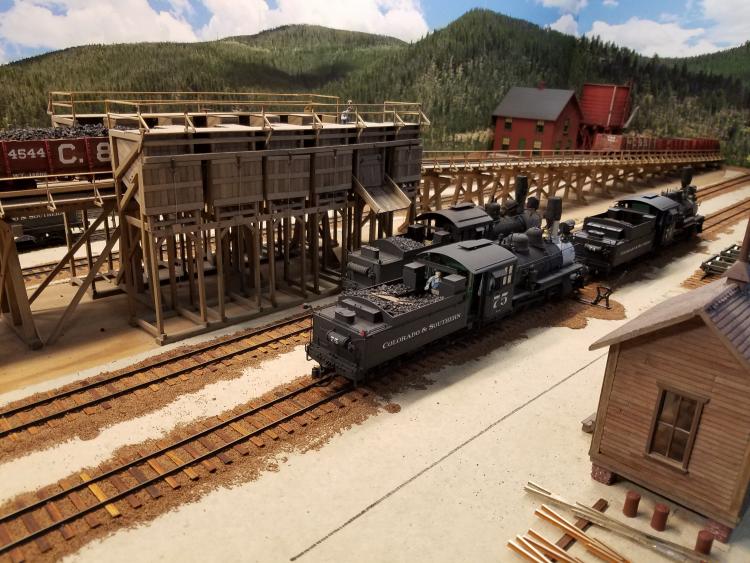  |
Re: Digital Backdrops For Dummies
|
|
Well done and beautiful!!! What are you going to do about the corner in the sky-or seams between photo panels?
|
|
Administrator
|
Better lighting!
At least I'll try that first. Thanks, Robert. |
|
|
This raises an interesting question:
Philosophically speaking .... if a pilot is bad, does his mother tell him to go fly in the corner ? 
"Duty above all else except Honor"
|
«
Return to C&Sng Discussion Forum
|
1 view|%1 views
| Free forum by Nabble | Edit this page |